Friday, May 30, 2014

The Equipment Register, Part 4

In the previous segment of this reproduced essay about the Official Railway Equipment Register or ORER, which was Part 3 (you’ll find it at this link: http://modelingthesp.blogspot.com/2014/05/the-equipment-register-part-3.html ), the data stenciling and reweigh rules were presented. In the present post, I add the rest of the photos which were part of the original essay.
     Since the photo captions refer repeatedly to the table which was included in Part 3, I repeat it here so the data are conveniently to hand.

Table 1
Axle Size and Car Capacity

Axle                   Journal Size,       Nominal Capacity,       Maximum Weight
Code                       inches                      tons                      on Rail*, pounds
   B                      4-1⁄4 X 8                       30                             103,000
   C                           5 X 9                       40                              136,000
   D                     5-1⁄2 X 10                      50                              169,000
   E                           6 X 11                      70                              210,000
   F                       6-1⁄2X12                     100                              251,000

*Equals sum of “light weight” and “load limit” of car
(The maximum weight values were increased about 10 percent for each Axle Code in 1961)

 [The following lettering photos can all be clicked to enlarge the image.
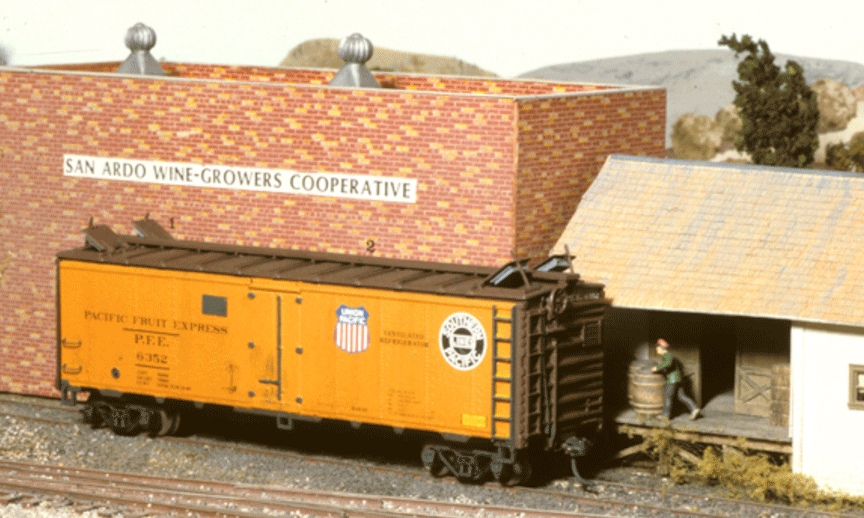
     The next two photos are of Pacific Fruit Express refrigerator cars; both are details of company photos in the author’s collection. Both illustrate that ice refrigerator cars usually had light weights which were high relative to their nominal capacities. The first photo shows steel car PFE 45025, with Code C axles, and a load limit scarcely higher than the nominal capacity. This photograph of the new car was taken at Pacific Car & Foundry’s plant.]


[The second PFE photo is an example of a car with a load limit determined by the structural capacity of the underframe, instead of the maximum load on the truck axles, a possibility mentioned in Part 3. The load limit has a star next to it to indicate this situation, which means that the sum of the load limit and the light weight will be less than the maximum load on rail shown in Table 1. Wood-sheathed PFE 28063 was repainted and reweighed at PFE’s Los Angeles shop in March 1936.]


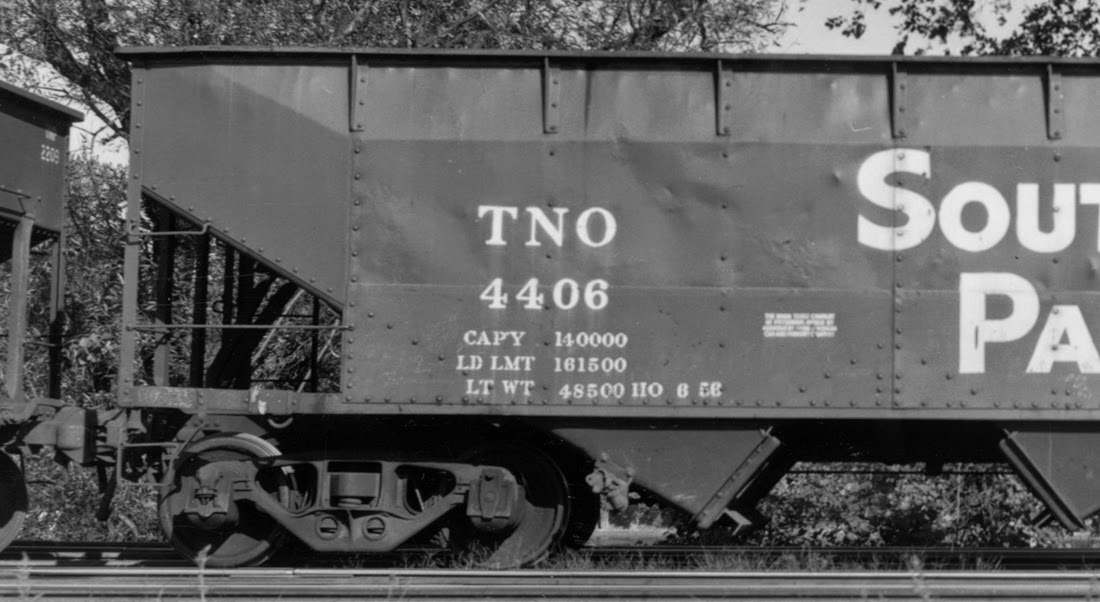
[The next example is a 70-ton triple hopper, with Code E axles, readily identified by the total weight on rail of 210,000 pounds; see Table 1. The car, built in 1946, was reweighed at Houston (station symbol HO) in June 1958. It belonged to the Texas & New Orleans, an SP subsidiary. Its dented sides testify to hard use. This is a detail of a Bob Lorenz photo.]


[Flat cars often carried considerable steel in their deep center sills, and consequently could have light weights nearly as large as some box cars. This Western Pacific flat car, WP 2419, is an illustration, with a light weight of 44,400 pounds. It has Code D axles. AC&F photo, from the National Archives of Canada, negative PA 186379.]


[In contrast to the flat car above, here is an example of a car with a rather low light weight, a stock car with Code C axles and typical light framing. Because the light weight is only 36,600 pounds, the load limit is nearly 25 percent larger than the nominal capacity. The reweigh station symbol identifies Roseville, a major SP yard. Detail of a Virl W. Davis photo, taken at Gering, Nebraska in 1957.]


[In the 1950s, practically all cars with Code F axles were either heavy-duty flat cars or ore cars. These SP iron ore cars at Eagle Mountain, California,= illustrate the point; their light weight, 53,700 pounds, was far below the load limit of 197,300 pounds. The total weight on rail, 251,000 pounds, is shown in Table 1. Detail of SP photo.]


[Finally, tank cars are exceptions to many of the rules that applied to other freight cars, as mentioned in Part 3. The fact that their cargoes were billed by gallonage insted of weight had two consequences for lettering: first, most tank cars were rarely reweighed (the car below was built in August 1920 and that was the last time it hd been weighed, though this photo was taken in the 1950s). Second, the exact gallonage of the individual car was important for freight billing, and it was stenciled on the end of the car, as you see here, 10,188 gallons. Detail of a photo from the Bob’s Photo collection.]


 “These examples should suffice to illustrate the broad usefulness of the Register as a source of freight car information, granting that there is usually some additional information which one may need to know. But the broadest of photo collections or company freight car rosters does not contain the complete dimensional, statistical and AAR class data found in the ORER. For the prototypically oriented modeler, there is no substitute for the ORER.”

     This concludes what was contained in my original essay in the NMRA reprint of the January 1953 ORER, with a few changes and rewording. The complete text has been placed on Google Drive as a PDF, for anyone who wants a one-piece copy. Here is the link:

https://drive.google.com/file/d/0Bz_ctrHrDz4wYUxvci0ybTlLT1U/edit?usp=sharing

Tony Thompson

Tuesday, May 27, 2014

Modeling pre-war SP 50-foot automobile cars

At various times, Southern Pacific purchased groups of automobile cars (defined by the AAR prior to 1954 as box cars with double doors). The cars built before 1936 were single-sheathed and are quite varied and interesting, but I won’t touch on them in this post. The cars purchased after World War II pose some intriguing modeling challenges, and I have a project underway to model one such car, which I will report on presently. That brings me to today’s post, which is about the cars built after 1936 and before World War II.
     There were two classes of 50-foot cars purchased in this period, classes A-50-12 and A-50-14. The latter class has been offered by Proto2000 in an almost exact model, so I won’t say much more about modeling it. Instead, I will discuss the modeling of Class A-50-12, and highlight some of the differences between that class and the -14s.
     First, let me show the goal. This is a General American builder photo of Class A-50-12, from the SP collection at Stanford University.


Now let’s explore the characteristics of this car, compared to its sister class, Class A-50-14.
     Class A-50-14 had a straight-panel roof with 13 raised panels, along with a smooth panel at each end to accommodate the lateral running boards. They also had what I call 4 + 6-panel sides, meaning four panels to the left of the double doors, and six to the right, and full-length straight side sills. In all these respects. the -14 cars were the same as the A-50-12. But the -14 ends were the standard late-1930s Dreadnaught ends with W-corner posts, making the edge rounded, while the -12s had sharp-cornered Dreadnaught ends. The ends, then, are the most visible difference between -12 and -14.
     From a modeling perspective, both of these SP classes differ from the old Athearn 50-foot automobile car, which accordingly was never close to accurate for either an SP Class A-50-12  or -14 auto car. Athearn models of that era had several other shortcomings, which I will come back to in a moment.
     But as I said, the Proto2000 model makes any thought of serious surgery to model the A-50-14 on an Athearn 50-foot body evaporate and fly quickly away. That leaves the problem of the A-50-12 cars. Their most visible difference from the -14 cars was the sharp-cornered Dreadnaught end. The Athearn model does have a sharp-corner end (though in 5/5 instead of 4/5 configuration), but its incorrect roof (12 instead of 13 raised panels), wrong number of side panels (5 + 7), and numerous clunky details such as cast-on ladders, oversize sill steps, and too-short doors, mean that it really is not reasonable to think about surgery to make an A-50-12, either.
     My furthest effort on one of the Athearn bodies involved adding a styrene strip to simulate a straight side sill, cutting off the “door claws,” as they are called, extending the brake step and adding brake step supports, installing wire grab irons, and a new running board with grab irons on the lateral running boards. This is still not very correct; for example, the doors remain too short. Here is one car I did that way, certainly a stand-in at best.


     There is a good model out there, the Sunshine kit for the A-50-12, kit no. 83.1. It is correct in all the ways mentioned above (roof, ends, doors, side panels) and has free-standing details such as ladders, grab irons, and sill steps, along with correct doors. Luckily I obtained one while Sunshine kits were still available, and Dennis Williams built the basic car for me.
     I wanted to model a car in auto parts service, and chose to replace the kit brake wheel with a better Ajax brake wheel part, so then I needed to find which A-50-12 cars that had Ajax brake gear were also in auto parts service (AAR type XAP). These should probably fall within the number series 64525–64924, which contained the largest number of auto parts cars and which also had Ajax brakes. There were about 65 cars in that group assigned to such service in 1953, the year I model, so I chose my car number accordingly for decaling. The number 64826 was indeed an XAP car in 1953, and that number can be decaled in just two parts from the Sunshine decal sheet.
     How do I know these facts? The specialty equipment applied to these car classes, and many others, are listed in Volume 3 of my series, Southern Pacific Freight Cars, covering automobile and flat cars (Signature Press, 2004, currently out of stock though readily available used). And the information on car assignments is in the Official Railway Equipment Register or ORER, or 1953, For more information on using the latter, see my post at: http://modelingthesp.blogspot.com/2014/05/the-equipment-register-part-1.html .
     I also added a styrene route card board on the right-hand door on each side. These boards are essential. The dimensions of the boards were standard, and I have shown the AAR drawing in a previous post (you can see it at this link: http://modelingthesp.blogspot.com/2012/01/route-cards-7.html ). A piece of Evergreen scale 1 x 6-inch strip, 10 scale inches long, does the job.
     The kit decals are largely very nice and are accurate, including the trust stencil that SP applied to the side sill just beyond the end of the lower door track (you can see it in the protoytpe photo above). The decals also include your choice of door symbols for either auto racks or auto parts (I chose the latter for my XAP car.) But it does not include the lettering SP applied on the bottom rib of each end, “BOLSTER SNUBBER SPRINGS.” That legend is included in my SP Tank Car decal set, available from Jerry Glow, and I added it to my model.
     I also chose a pretty recent reweigh date (for my layout year of 1953). Cars in auto parts service had new parts racks installed every year in this era, and accordingly would almost always display a reweigh date less than a year old. Here the car is in an eastward train at Shumala.


This car is a welcome addition to any cut of auto parts cars in the manifest trains for my SP main line, and joins a couple of the fine Proto2000 models of Class A-50-14 as well as several models of foreign automobile cars.
Tony Thompson

Saturday, May 24, 2014

Open-car loads: more pipe loads

About two years ago I presented a series of blog posts about loads for open-top cars, one of which was about pipe loads in gondolas. You can read it at: http://modelingthesp.blogspot.com/2012/01/open-car-loads-pipe-in-gondolas.html . In the present post I expand on one particular pipe load.
     One type of pipe load I showed in that previous post used the kind of tubular coffee stirrers one finds in some coffee shops. They are about five inches long, perfectly sized for a 40-foot gondola in HO scale, and about an eighth of an inch in diameter, which is about 11 inches in HO scale. They are often white with blue stripes, but sometimes are white with red stripes; stripes can be wide or narrow. They look like this:


     My loads constructed with these coffee stirrers as shown in that previous post were built up to rise above the sides of gondolas, and thus to require side stakes and cross ties; in that post, I showed the AAR loading diagram to specify these features. But if a load of this kind did not extend above the car sides, it did not require side stakes. I decided to make a couple of loads like that, to add some variety to my gondola loads.
     My method of making them is really pretty simple. I cut a piece of waxed paper to fit into a gondola, with folds so it reaches into the corners of the interior, then lay in a layer of the stirrers. I drip a few lines of canopy glue transversely across that bottom layer, then lay another layer on top, and drip another couple of glue lines across that layer. (For some information about canopy glue, see: http://modelingthesp.blogspot.com/2013/05/a-few-words-in-praise-of-canopy-glue.html .) Tube ends in the stack should not be lined up, as they would vibrate and move independently in transit, even if originally loaded in alignment. (And the stirrers are not all exactly the same length anyway.) Continue until there are four layers (bringing them to just below the top of the sides), then let dry. Here’s a photo of a glued load in the waxed paper:


     The easiest way to paint such a load is with a spray can (after removing from the gondola, of course). I like the Tamiya TS-48 color, called Gunship Grey, for this job, as it looks fairly much like steel. The spray will penetrate a ways into the tube ends as well as getting into the valleys between them, and creates a pretty good coverage. This paint goes on slightly glossy if you spray from too close, and then I overcoat it with a little Dullcoat to keep it flat. If you spray at the proper distance, it does go on flat. One of my loads looks like this in an Ulrich GS gondola upgraded with wire grabs, brake rigging, etc.:


     This design of load is easy to make and helps your gondolas look like they are doing some work. I recommend it as another route to more open-top car loads.
Tony Thompson

Wednesday, May 21, 2014

The Equipment Register, Part 3

The third section of my essay on the ORER is contained in this post. Unlike the prior ones, it has some car photos. You can read the preceding section at: http://modelingthesp.blogspot.com/2014/05/the-equipment-register-part-2.html . In this post, I take up, among other things, reweigh lettering, which has been the subject also of an article I wrote for Railroad Model Craftsman, which was published back in April of 2011. The article, as I originally submitted it to RMC, got a little garbled in the process of going into print, so a corrected version is available through this blog, at the following link: http://modelingthesp.blogspot.com/2011/03/reweigh-article-from-rmc.html . 


“Freight Car Lettering and the ORER
Freight car lettering can be greatly assisted with a selective use of Register information. An explanation of why this is true is presented briefly here and accompanied by examples of required lettering, corresponding to ORER entries, in the photographs. If in doubt about any of the car dimensions shown in the ORER entry, there are Key Pages giving all the definitions of the dimensions, included at the back of the ORER.
     “Freight shipments are billed to the shipper on the basis of weight, for most categories of freight. The applicable tariff specifies a cost per pound in most instances. The basis for these charges is the weight of the cargo as shipped, which is determined by the railroad by placing the entire car on a scale after pickup from the shipper. Of course, the empty or tare weight of the car must be subtracted from the gross weight of the loaded car. Accordingly, the tare or ‘light weight’ of a freight car, which is lettered on the car side, is not just another boring detail of car lettering, but plays a vital role in shipping charges.
     “When built, a batch or lot of freight cars ordinarily all has the same light weight for each car, unless there are variations within the lot in such items as trucks, internal equipment such as loading racks, or some other major hardware item. The builder would stencil the light weight on the car during its first paint job, along with the notation ‘new’ and the date of weighing. During the life of the car, however, repairs may be made, or other equipment replaced or exchanged, resulting in a change in the light weight. An example would be replacement of a wheelset or truck sideframe, which can easily differ in weight by more than a hundred pounds. Even normal wheel wear (a maximum of about half an inch tread depth on a single-wear wheel) removes weight approaching 100 pounds per car.
     “For these reasons, AAR Car Service Rules (summarized in the back of the ORER under Rule 11) required re-measuring light weights of any car which was repaired, and (in 1953) to reweigh most kinds of cars every 48 months even if no repairs had been done. More recent rules permit longer times between reweighing.  The new light weight was then stenciled on the car, along with identification of the place of reweighing, and the date. The car’s load limit would also be changed, as explained below. The new light weight was reported to the car’s owner, who maintained records of individual car weights. 
     “One consequence of this reweigh requirement is that the notation near the capacity data on a new car, such as new 8-46, would only remain on the car until a reweigh occurred, a maximum of 48 months. Thus such a car, if you were modeling 1953, would have to have a reweigh symbol in place of its original new lettering. Moreover, the dates accompanying all the reweigh symbols should be within 48 months of the time you are modeling. Tank cars were the primary exception because their cargoes were not ordinarily billed by weight, and they often retained new notations for years.
     “After a number of years in service, then, cars of a particular class could well have a range of light weights, and would of course have a wide variety of reweigh dates and symbols. A word is in order about station symbols. A standardized, national list of these abbreviations of place names, called “station symbols,” was maintained. Today, this has been simplified to require only the initials of the railroad doing the reweighing, but in the steam era, thousands of these weigh station symbols were listed. [An extensive version of this list in the steam era is available on-line; go to  http://www.steamerafreightcars.com/prototype/protoinfomain.html , and click on “reweigh station symbols.”]
     “The presence of a particular place in this list meant only that a scale was located there, together with the tools to restencil cars. Examples of symbols across the United States include oak (Oakland, Calif.), bi (Blue Island, a large yard near Chicago), om (Omaha), des (DeSoto, Missouri — MoPac shops), hi (Hillyard, the NP shop at Spokane, Wash.), wc (Wichita, ATSF car shop), jax (Jacksonville, Fla.) and hag (Hagerstown, Md., on Western Maryland). The Pennsylvania Railroad had its own scheme for reweigh symbols, using numbers for locations. A commonly seen example is P-57 (Altoona, Pa. — PRR shops), and to decipher these, you just have to know some Pennsy lore [PRR station symbols are listed in the on-line resource cited above]. Reweighing was most commonly done on the owning railroad, but if the reweigh period had expired with the car on a foreign road, the car could be reweighed and stenciled there.
     “An additional detail of importance is that the light weight of a car, and its load limit, are connected numbers. This is because the technical basis for axle capacity, which in turn is the basis for load capacity of trucks, is the total weight on the rails. That total weight is equal to the sum of the tare or light weight of the car, and its load limit or maximum permitted load. These total weights are given in Table 1 for several axles and journal sizes from the 1950s. For a 50-ton car, for example, the load limit and light weight always add up to 169,000 pounds. It is these fixed total weights which meant that a change in the light weight also meant a change in the load limit, and both would have to be restenciled together.

Table 1
Axle Size and Car Capacity

Axle                   Journal Size,       Nominal Capacity,       Maximum Weight
Code                       inches                      tons                      on Rail*, pounds
   B                      4-1⁄4 X 8                       30                             103,000
   C                           5 X 9                       40                              136,000
   D                     5-1⁄2 X 10                      50                              169,000
   E                           6 X 11                      70                              210,000
   F                       6-1⁄2X12                     100                              251,000

*Equals sum of “light weight” and “load limit” of car
(The maximum weight values were increased about 10 percent for each Axle Code in 1961)

     “The third item in the weight data on a freight car, the nominal capacity, is intended to be a round number. Usually rounded to the nearest 10,000 pounds, though permitted to have 1000-pound increments, it usually corresponds to the nominal truck capacity (occasionally it corresponds to underframe capacity). Although it cannot exceed the load limit, there is no simple relation between the nominal capacity and the load limit. A 50-ton flat car may have a light weight as little as half that of a 50-ton box car, but both have the same nominal capacity, 100,000 pounds. The photos below contains examples of the various capacity details mentioned above.”
     [Two example photos are below. You can click on them to enlarge.]


[Above, NP 15788. As usual, the dimensional capacity data are at the right, and the weight capacity data are at the left of the car side. As is typical with 50-ton cars, this one, built in 1940, has Code D axles (see Table 1, above). The station symbol to the right of the weight data reads ‘LR 12-49.’ This refers to Laurel, Montana, an NP shop, and of course December 1949, when the reweighing was done. This is a detail of a George Sisk photo of 1950, from the Charles Winters collection.]


[This second photo, of WM 13984, shows a “55-ton” hopper, so called because its nominal weight capacity is 110,000 pounds. The Bethlehem builder emblem is on the car, just right of the center rib. The car has Code D axles, as shown by the sum of the light weight and the load limit (again, see Table 1, above). This Wilbur C. Whittaker photo was taken at Elkins, West Virginia on May 28, 1953, when the car was just three months old; it still has its NEW weigh date.]

     This concludes Part 3. I will complete the presentation of the original accompanying photos and captions in the succeeding Part 4.
Tony Thompson

Sunday, May 18, 2014

The Equipment Register, Part 2

In my previous post (see: http://modelingthesp.blogspot.com/2014/05/the-equipment-register-part-1.html ), I introduced the first part of my essay on the Official Railway Equipment Register, or ORER. Here is the second part.


Other Railroad Research Uses
And there are other uses for the ORER, too, some which go beyond modeling concerns as such. Because the Register listings of cars are so detailed and accurate, it is often possible to trace renumberings, rebuilding, and ownership transfers of cars, since in a particular quarter (or month, in the early era) changes to a listing are identified by a “dingbat.” (A symbol or emblem is called a “dingbat” by printers.) Normal changes such as destruction of cars by wrecks, or even by systematic scrapping, did not receive dingbats, but addition of a new group of cars, for example, a delivery of new cars in progress at the time of submission of an ORER entry, would be signified by a star symbol [dingbats are illustrated below]. An increase in an existing group of cars was indicated by a diamond, while wholesale reduction (usually by sale or renumbering) in a group of cars was signified by a small circle and bar emblem (click to enlarge).
     “If one is trying to determine the origin or destination of a group of cars which was sold or transferred, the strategy is to look first for the end of the sale you know about, such as the arrival of a batch of cars on the XYZ Railroad. When it is found in a particular ORER, you then know the time of the transfer (plus or minus one issue of the ORER) to the XYZ. You then search for the sale end in likely sellers, and should be able to locate the disappearance of the cars, with the identity of the car group verified by matching their detailed dimensions between the entries for the XYZ and the seller. This technique, of course, requires access to a set of ORER copies, which is certainly not part of every library’s collection. An accessible exception is the California State Railroad Museum Library in Sacramento. Copies of particular listings (e.g. a railroad in a specific year) can be ordered by telephone, (916) 323-8073. 
     [Shown below are two cover images of issues of the ORER, one for April 1912, when it was a monthly publication, and the other for October 1958, when it was quarterly.


Though issued almost 40 years apart, they are certainly similar in appearance and only slightly different in size. By 1970, however, a simpler cover, with sans-serif type, had taken over.]
     “Still another aspect of freight car usage which relates to the Register is the Car Service Rules, high points of which are printed in the back of each issue, together with the Per Diem Agreement. These are of interest if a modeler would like guidance in operating more prototypically. Perhaps the major point to be made here is that it’s sometimes overlooked that the AAR Car Service Rules in the 1950s required that ‘foreign’ cars were to be loaded in prefererence to home-road cars. 
     “The AAR Car Service Rules in fact specify that foreign (off-line) cars must be used, if available, in preference to home-road cars for loading to off-line destinations. The reason is simple. Use of the foreign car avoids sending cars home empty. Consider a railroad in Pittsburgh which is sending a load to Los Angeles, and the L.A. customer will then ship a load back to Pittsburgh. If these two railroads both load home-road cars and send the foreigns home empty, every load shipment is matched by an empty move across the country. That wastes available cars as well as the cost of moving the cars. On the other hand, if the AAR rule is followed, these pairs of shipments could all be done in one car. 
     “The newcomer to these rules tends to attach too much importance to the per diem charge. In fact, railroads derive most of their revenue on a load by originating it. The only benefit in using a home car is possibly to save the per diem charge, which is relatively small. (There may be no saving at all; the foreign car has to be moved homeward, loaded or empty.) The per diem fee is intended to spread the cost of owning and maintaining cars over all users of the fleet, but, like library overdue fees, is also intended to keep cars in circulation. In adopting the per diem, the railroads also agreed to abide by car-service and interchange rules, one of which is the one discussed here. To summarize, this rule says, ‘Keep ’em home and send ’em home.’ 
     “If this topic of interchange procedures is of interest, there are two books which give a broad yet simple and readable summary of more than I have space to cover. These are Freight Cars Rolling, by Lawrence Sagle (one of the most under-appreciated railroad books in existence) and The Railroad - What It Is, What It Does, by John Armstrong (now you understand my apology at the beginning [of the first section]). 
     “Yet another valuable section in the back of the Register is the summary and definitions of AAR Car Classifications for both passenger and freight cars and, for freight cars, small diagrams to illustrate many of the definitions. These same AAR classes are also used for entries in the railroad sections, so if you don’t know what kind of car an AAR class GA or a class SC is, you can look it up. Only for tank cars is the information incomplete, since for those cars one also needs to understand the ICC (now DOT) specification. In 1953, a tank car would be fully described by both: an AAR Class TP tank was a pressurized car, and the ICC specification (e.g. 105A400) would additionally inform you that it was a welded and jacketed car, designed for a pressure of 400 pounds per square inch with safety valves set for 300 pounds. The ICC specifications can be found in Car Builders Cyclopedia volumes, among other places.” 

     This second section of the essay describes a few of the items of information that a modeler might wish to use in the ORER. The following sections connect the ORER listings with the lettering seen on freight cars, and will be along shortly.
Tony Thompson

Friday, May 16, 2014

The Equipment Register, Part 1

Now almost twenty years ago, the National Model Railroad Association published a reproduction of the Official Railway Equipment Register issue for January 1953. I was asked to write, and did write, an introductory essay in 1995, intended to explain what this book is, and how modelers might use it. I covered several sub-topics in this essay. I should add that the softbound version of this reprint is still available from the NMRA; go to this page:
https://www.nmrastores.com/Public_Store/product_info.php?products_id=33&osCsid=utotuo6395iuu11mmhbrmc3586 . They also sell a reprint of a 1943 issue.
     However, I continue to hear modelers asking what the Register is. Accordingly, I am going to repeat my essay in the form of a couple of blog posts, to make it more available, and when the sections have all been posted, I will also put a complete version on Google Drive so that it can be downloaded if desired. In a few places, I will insert current comments or illustrations, which will be set off in square brackets, [thus]. The first section follows.

“The Register — What It Is, What It Does
by Anthony W. Thompson

Introduction
“The Official Railway Equipment Register, often called the Register for short, or sometimes just the ORER, has the purpose of listing and describing all active North American freight cars. First published in 1885, its interval of publication has varied over the years, monthly early in this century and quarterly since 1937. Interestingly, the Register has gotten thicker over the years, even as the size of the freight car fleet has steadily shrunk. This reflects the increasingly specialized design of freight cars, and the increasing use of specialized equipment in cars, requiring many more separate listings. Where once a large group of freight cars owned by a particular railroad might well be essentially identical and could be described by a single entry in the Register, today many smaller groups of specially equipped cars rate separate entries. 
     “What the Register is and what it does (with apologies to John Armstrong) is this: it is used by freight agents and car clerks, to identify the characteristics of freight cars, such as size (especially internal dimensions, door opening, and other aspects which affect car loading), special internal equipment, such as loading racks, and other details, such as assignment to particular service. The only identification needed for an individual car is the car reporting marks and number. Thus an empty car at a particular station or terminal could be evaluated in comparison to the needs of a shipper, and cars matched up with demand.
     “This kind of search and matching process is an obvious candidate for computerization, and indeed the ORER of today is available in both the printed version and on tape in a computer-readable format. It has been speculated that the day may not be too far off when the printed version disappears.
     [As it happens, you can still buy the print version; visit: https://ubm-sub.halldata.com/site/UBM000452LOnew/init.do ]
     “Each issue of the Register thus contains a very complete and detailed description of the freight car fleet of each railroad for the period of the issue’s cover date. The description covers all car numbers, revenue car types, and every important dimension and major characteristic. The listings of cars in each Register reflect considerable effort by the individual railroads to be accurate. There were legal and regulatory consequences of errors in these listings, so although errors did occur, they were fairly rare. This accuracy extends to all the dimensions, down to fractions of inches, for each and every car.
     “Yet modelers quickly find that there are pieces of information about cars which are not included. These include the built date, any indication of whether and when the car was rebuilt, and some capacity information such as the empty or light weight. These items are not included, of course, because they do not affect usage of the car by shippers, even though they are quite relevant to freight car history and lettering. When such information is needed, other sources such as car rosters or photographs must be consulted. Also, in earlier days, passenger equipment was included in the ORER, but starting in 1943, a separate Register of Passenger Train Equipment was issued. Some smaller railroads have listed non-revenue or maintenance equipment, but such listing was not required and was not widespread. The roster is thus not a source of all information one might want, but it is an essential source of the kinds of freight car data which are included. A brief summary of modeling uses for the Register is given in the following section.

Modeling Use of the Register
     “There are two primary uses of the information in the Register by a modeler. The first would be to determine the characteristics of a car for which the car number is known. The known car may be a pre-lettered scale model or it may appear in a prototype photograph. The Register immediately provides the car type, car length, and other dimensions such as size of the door opening for a box car. With a little additional knowledge of freight car history, this can lead to still more insight. For example, imagine that youhave a photo in which you can see just the end of a house car, enough to read the car number and see that it is a steel Dreadnaught end. There’s no way to determine the car length, or whether it’s a box car, auto car, stock car, or whatever. Let’s see what the Register can provide.
     “The car end lettering reads OWR&N 188371. Not being familiar with these reporting marks, you turn to the Index of Railroads in the front of your Register and discover that it stands for Oregon Washington Railroad and Navigation Co., a subsidiary of the Union Pacific. In the UP listing, you find the group of cars you want, numbers 188300-188999. These were all-steel 40-ft. box cars with 6-ft. doors, already much more information than you could tell from the photo. You also note the 10-ft. inside height of this car and the cubic capacity, 3705 cubic feet, which in combination strongly suggest that this is the 1937 AAR box car design. That’s quite a bit of information from a reporting mark alone.
     “However, there are additonal things you might like to know that are not evident here. For example, you can’t be certain from the listing alone that this is a 1937 AAR car, nor can you tell what kind of doors, or lettering style, or actual built date, are correct for the car. For those things, you would need more photos of one of these cars, or you would consult an authoritative reference on UP freight cars, such as the book Union Pacific Freight Cars 1936-1951, by Terry Metcalfe. 
     [Here is the cover of Terry’s excellent book. Though long out of print, it can be purchased used from on-line booksellers.]


There you would also learn that this car was a member of UP’s Class B-50-24, part of a group of 1900 cars built in 1939 in three different UP company shops, and you would find excellent builder’s photos and other information about the cars. But you have a very good start from the Register information. 
     [Here is a builder shot representing the OWR&N cars, built at UP’s Albina Shop in Portland, Oregon. It is a UP photo, from the Terry Metcalfe collection, and appears in the book just cited.]


     “The second common use is to determine car fleet characteristics for a particular railroad. For example, perhaps you are curious about the Montour Railroad. The ORER listings aren’t alphabetical, but are roughly grouped geographically; it is usually fastest to start with the Index of Railroads at the front of the ORER. Turning to the listing for the Montour, you can learn its operating location (Coraopolis, PA) and all its interchange points, as well as the fact that it rostered only hopper cars. Thus that mill gondola that you were tempted to letter for the Montour won’t be prototypical. That may not affect your lettering decision about the model, but at least you know what you’re choosing to do. And if prototype accuracy is one of your goals, you need to look for another protoype for that mill gon. 
     “Another aspect of this same usage would be to determine the proportions of a particular railroad’s car fleet. Each car type (box, flat, stock, etc.) is separately listed and totaled, as well as the overall fleet total for the railroad, permitting a simple calculation of such facts as that the Southern Pacific fleet was 57 percent box cars. If your question about that mill gondola involves finding a railroad which owned a high proportion of such cars, the ORER is a good place to look it up.”

     This is the first section of my essay, and clearly sets out how the ORER may be used. I will continue with following sections presently.
Tony Thompson

Wednesday, May 14, 2014

Modeling Tidewater Associated tank cars

Awhile back, I posted a brief history of the Tidewater Associated Oil Company (see: http://modelingthesp.blogspot.com/2013/12/associated-oil-company-background.html ), and a description of the tank car fleet of the company (see: http://modelingthesp.blogspot.com/2014/02/associated-oil-company-tank-car-fleet.html ), and I also offered some modeling comments about an AOX car (see: http://modelingthesp.blogspot.com/2014/04/associated-oil-tank-cars-modeling.html ).
     In the second of the posts cited above, the one about the tank car fleet, I included photos of both a TIDX car, and a TWOX car, the latter in its mid-1950s paint scheme with the Flying A emblem and the word “Tidewater” spelled out. In this post, I show models of both. But first, let me repeat the TIDX car photo (George Sisk photo, Kansas City, circa 1954, Charles Winters collection).


     My model of this car is a brass model from Overland (no. 3130), an AC&F 8000-gallon car. Since the car above is obviously a General American car, my model has to be called a stand-in, but certainly captures the look. The placard boards above contain an unreadable placard. I gave the model an “empty” placard on one side, along with a route card (many tank cars had these cards tacked on the edge of the wood running board, but this car has a side-sill route car board). For an introduction to route cards, you can see this post: http://modelingthesp.blogspot.com/2011/11/chalk-marks-and-route-cards.html . Several succeeding posts provide more information on these cards. You can search for them by putting “route cards” in the search box at the upper right of the blog page.


The model is shown in a train crossing Chamisal Road in my layout town of Shumala.
     In the tank car fleet post, cited above, I showed a photo of a TWOX car. Here is another, from the Bob’s Photo collection, location and date unknown.


Note that this car has not received the later additions of the Flying A logo, and the word “Tidewater” over the reporting marks, all of which wee shown in that prior post.
     The photo above shows a four-course tank built in 1920 by AC&F, of 10,000-gallon capacity. It thus matches nicely with the Proto2000 model of the same prototype, one kit of which was decorated for TWOX. I simply built the kit as directed, though I omitted the dome walk and ladder on the right side, consistent with the prototype photo.


     Since it’s known that the Tidewater Associated fleet of tank cars was freely shared among the western (AOX), midwestern (TIDX) and eastern (TWOX) divisions, cars  with all three reporting marks, including these two models, will show up at my Associated Oil bulk dealer in Shumala.
Tony Thompson

Sunday, May 11, 2014

Moving from collecting to operating

Some two and a half years ago, I ruminated in this blog about the differences in model railroading between collecting and operating (the post can be found here: http://modelingthesp.blogspot.com/2011/08/collecting-vs-operating.html ). I mention that post because a similar topic came up during one of the operating sessions a few weeks ago, at the Layout Design and Operations Weekend in Tulsa, Oklahoma. I had been invited to attend and give a couple of talks, and as I expected, I greatly enjoyed the operating sessions on some outstanding layouts.
     The discussion I’m referring to arose among some of us at one of the operating sessions. The topic was the changes a modeler may make in the process of moving from not having a layout (or not having even planned one), to putting a layout into use, and eventually to refining and focusing the operation scheme for the layout. Specifically, the changes we discussed were in how rolling stock, both locomotives and cars, is chosen or, if already obtained, selected for retention.
     A beginning modeler often simply chooses whatever is appealing. Era is often not a consideration, so a UP Challenger and an SD70ACe might both be acquired. And there are collectors and armchair enthusiasts who may not change from that approach, and have a lot of fun with the variety they accumulate.
     If the collection gets kind of large, or if the collector finds a certain gravitation toward some eras or railroads more than others, or even starts to think about a layout, this can get more focused. Things wildly discrepant may be sold off, or placed in a display case, and a definite theme can emerge in what is newly acquired. But the collection may still be rather generally oriented.
     A layout planning episode can really change all this. Having to choose one part of the country, or one railroad, or one era, can all act to narrow the focus, and once again, some aspects of what has been and is collected begin to look like not fitting with the plan. And of course, new acquisitions now take place in the light of the direction of planning.
     I should hasten to say that I don’t imagine all this as a fixed sequence, nor that any one “stage” is superior to another, only that a sequence of stages somewhat like this is reported by a number of people I know.
     A final stage can emerge, in which even the broad layout plan has begun to result in too many of something, or planned refinements begin to seem unattractive. I have a friend who shall remain nameless, whose layout was developing nicely, well focused on a particular railroad, except that it is set in an area fairly far from a second railroad which my friend also wanted to model. His plan had been to “imagineer” a kind of run-through arrangement, in which trains of that second railroad would in fact traverse the rails of the first railroad, thus permitting locomotives, cabooses, and specialized rolling stock of that second road to be built and operated. He has now reluctantly faced up to the unrealism of this idea, and has decided to stick to a narrower layout perspective.
     Is this a mistake? Obviously a layout builder can imagineer anything he or she wants. As the old saying has it, “it’s my layout and I can run it any way I want.” But I happen to hold with Tony Koester’s response to that saying, which essentially is that you certainly can have fun with models of trains any way you want, but if it’s not actually realistic, don’t confuse it with modeling a railroad.
     This is why operating a layout, or planning carefully to do so, will bring to light inconsistencies or anachronisms in one’s collection of cars or locomotives or structures or even scenic locations. Then what? I have a display case, which is one solution for those rolling stock items which just cannot be on the layout.
     I find myself occasionally deciding that something I have built, or intended to build, really doesn’t fit after all. Sometimes it’s a wrench. Years ago I bought the Durango Press kit (their DP-19) for an 1887-built depot called The Palms, that served Pacific Electric  for many years, because it’s really a delightful small structure.


But you know, it just doesn’t make any sense in the Central California setting of my layout. I guess it will have to find a new home, likely on eBay.
Tony Thompson

Thursday, May 8, 2014

The PCR-NMRA meeting in San Luis Obispo

Over the span of April 30 to May 4, 2014, the Pacific Coast Region (PCR) of the National Model Railroad Association (NMRA) held its annual convention in San Luis Obispo, California. San Luis is one of my favorite parts of California, and though I would normally go anyway to a PCR convention, this one was a must.
     At one time, San Luis Obispo was a division point on the Southern Pacific’s Coast Line, and the area I model on my layout is only 20 miles away to the south. I have posted previously about visiting this area to get landscape information (see it at: http://modelingthesp.blogspot.com/2012/11/visiting-area-you-model-part-2.html ) The handsome Spanish Colonial depot, completed in 1943, still stands and in fact is in daily use by both the Coast Starlight and Surfliner Amtrak trains.


Yes, that’s my Miata parked at the curb. Back in 1991, I took a similar photo of my previous Miata in the same location; it’s on page 137 of Thompson and Signor, Coast Line Pictorial, Signature Press, 2000.
     The old SP freight house has survived, and now has been turned into a railroad museum, still getting its feet on the ground and currently only open one Saturday a month, but plans are to have it open much more frequently in the future. That’s a narrow-gauge Pacific Coast Railway box car alongside.


     San Luis Obispo grew up around, and is named for, its mission, founded in 1772 (which of course was before the American Revolution) and still one of the best-preserved and handsomest missions in California.


     Because San Luis is a college town (Cal Poly), the opportunities for fine dining as well as delights such as craft beers are well in excess of what one might expect for a town of its size. Shown below is a microbrewery I particularly like; it has an open dining balcony overlooking the creek.


    The model contest at the convention was not terribly large in number of entries, but as always in PCR, had very high quality. I really admired a string of SP water cars for fire service, each displayed over a mirror so underbody plumbing as well as brake gear could be viewed. They were built by PCR contest chair Joseph Aymar.


     Here’s another contest entry I rather liked, an O scale diorama by Jack Burgess, showing a Yosemite Valley maintenance crew taking a break (that’s a Fairmont weed burner and associated equipment), complete with line poles and wires overhead, and April’s lupine and California poppies. Jack assured me that the YV really did burn weeds in April.


     All in all, a fine convention in a fine town. My only gripe is that the clinic rooms were way too small and overcrowded. But I had fun, gave a clinic on tank car modeling twice, attended a layout operating session, and as you can see, found time to get around town and see and enjoy the sights.
Tony Thompson

Monday, May 5, 2014

Upgrading tank car dome platforms

Awhile back I posted a brief comment on replacing the grossly oversized valve casing or bonnet on the Athearn “chemical” tank car. That post can be viewed at this link: http://modelingthesp.blogspot.com/2010/12/upgrading-old-models-2.html . Tank cars of this type usually have a platform around the valve casing, sometimes called a “dome platform,” though in reality the casing is not an expansion dome. In the present post, I want to describe further efforts I’ve made to improve the platform area of the Athearn model.
     As I mentioned in that previous post, the Athearn valve casing is at least as large as S scale in size, but can be replaced with the correct-size Precision Scale brass casting No. 31005. But the platform around the bonnet is also way oversize, not less than S scale, probably more. (If you doubt that, try posing an HO scale workman on that platform.) The overall car model doesn’t look oversize, because it was probably proportioned from a much smaller car (many prototype ICC 105A cars are only 6000 gallons, whereas Athearn has created an insulated tank of fully 12,000 gallons capacity). But whatever the reason for the appearance, how can we fix it? Can we use anything of what Athearn provides?
     I doubted that from the outset. For one thing, Athearn’s platform attempts to represent metal-grid platform material, though until 1948 platforms like this were almost always wood planks. But I decided to have a try. First step, remove the platform (they are not glued) and cut the platform crosswise to remove some length. Here are the cut pieces, viewed from above (the long axis of the tank would be horizontal in this view); you can see some Scotch tape holding the pieces for photography.


In this view, I have not yet cut down the corner posts.
     Next I reassembled the three parts shown above, and added a piece of square styrene strip underneath each side of the platform, to tie it together. Warning: this is one of those tasks that require between three and four hands to manage. Not sure I would do it again, unless I can figure out a better procedure. Once so assembled, it looked like this from below, showing the white reinforcing strips.


     Now I added planking on top of the platform, with scale 1 x 6-inch styrene strips. Then I cut down the corner posts by about one-third in height, and re-attached the post tops so a handrail could sit underneath the top corners, as on the original model. I simply bent brass wire to fit, to make new handrails. The corner post shortening helped the looks, but the posts are simply too thick, and here again, the result is less than what I wanted to accomplish. Still, I did get a lot smaller platform. Here is the completed part, next to a stock Athearn platform; you can see the planks. My modified platform is considerably shorter in length (parallel to the long axis of the car) but no narrower in width; the width really ought to be reduced also.


     But at least this is closer to what ought to be on one of these tank cars. Here is the completed platform on a Dow Chemical tank car, which also has the replacement Precision Scale bonnet, next to a stock Athearn model. Even though the modified platform is not all I wanted it to be, it is certainly an improvement.


     Incidentally, there has been at least one non-brass tank car model in HO scale that actually had a correct platform, the Thomas Trains version of the ICC 105A. I showed a photo of one of those models in a post about Thomas, at: http://modelingthesp.blogspot.com/2012/07/thomas-industries-tank-cars-update.html .
     This was an interesting project, if kind of fiddly in spots. I have some additional ideas to try, heading for an even better platform for these ICC 105A tank cars. My hope is that by trying some scratchbuilding, Murphy’s Law will kick in, and someone will immediately bring out a commercial after-market product to do the same job. I’d love that, because I have a bunch of these cars to correct!
Tony Thompson

Friday, May 2, 2014

Another wine shipper for Ballard

I have presented comments in previous posts about wine as an industrial commodity, because wine is shipped from the area I model. The first post may be found here: http://modelingthesp.blogspot.com/2012/02/wine-as-industrial-commodity.html , and then I updated the comments with this post: http://modelingthesp.blogspot.com/2012/02/wine-as-industrial-commodity-update.html .
     In the first post cited above, I showed a small wine-shipping building, which I had built when I lived in Pittsburgh, for a module I assembled as part of a modular group there. My module was named San Ardo, for the small town on SP’s Coast Line, though none of the structures or trackage actually modeled the prototype San Ardo. This structure was intended to show an older shipping building, with an attached modern addition of brick. A photo of it was shown in that post, and here is a repeat of that photo:


The reefer in the photo has ice hatches open in ventilator service, which would often be satisfactory for wine shipping, with the car functioning more as an insulated box car than as a refrigerator.
     This business is envisioned as a relatively small operation, which ships out wine in barrels, for the purpose of blending with other wines. (This was very common in the 1950s, with California wine being shipped elsewhere for blending, or simply to be bottled under the house name of a local business.) The workman moving a barrel along the loading dock is intended to portray this feature.
     I always liked the way this structure looked, so having salvaged it from that module in Pittsburgh, I decided to replace the signage so I could use it on my present layout. I want it to furnish a contrast to the large winery at the other end of Ballard (which has been partially shown in several posts, for example: http://modelingthesp.blogspot.com/2013/06/signs-for-structures-part-2.html , but I will defer discussion of that structure to a future post.)
     The two structures which make up this industry are quite simple, both being built of Bristol board (a standard art material), with square balsa strip inside for stiffening. On the older part of the structure, I used Campbell windows and shingles, and modeled an open door into the warehouse (visible in the photo above). Then the interior was painted black so it wouldn’t have to be detailed. Here it is with the roof off.


     The larger section, representing the newer part of the business, is little more than a box, covered with Walthers brick paper (their number V167). That paper is just one of many useful modelbuilding materials once sold by Walthers. The original paper is a pretty bright color, so it has been substantially dulled with powdered chalk. Here’s the interior.


     Putting the two parts together, here is how the entire structure was intended to look, still with the old signage. Compare the first photo in this post. On the brick section, I inset the flat roof and used stripwood to suggest a concrete coping on the parapet. Roll-up doors are suggested by scribed wood.


     A new sign identifying Ballard was called for. After some rumination, I chose Stone Serif for the type face. It’s named for Sumner Stone, its creator, who was director of typography at Adobe from 1984 to 1990. (I’ve posted commentary on “typography and the layout” in the past; for one example, see this link: http://modelingthesp.blogspot.com/2011/11/type-and-typography-on-layout.html .) If you’re interested in the typeface family (it includes a serif face, a sans serif face, and an in-between design called “informal”), there is a whole book about it, called On Stone, by Sumner Stone (Bedford Arts, San Francisco, 1991). My sign is in ITC Stone Serif Semibold. While not a 1950s typeface, it follows the designs of a much earlier period and looks all right.
     With these modest changes accomplished, the two structural parts now serve in my layout town of Ballard, right across Bromela Road (foreground) from the Ballard depot. My Union Oil bulk depot is at right. The box car spotted at Door 1 is an inbound load. (You can click to enlarge.)


     This co-operative does not make wine in this building, but uses it only for shipping. And also unlike the Zaca Mesa winery at the other end of Ballard, this little business does not ship out wine in bulk (tank cars), but instead exclusively ships in the form of wine barrels in reefers.
Tony Thompson