Tuesday, December 30, 2014

Tweezers

Among the tools I use most often are tweezers. There are innumerable variations available in tweezer size and conformation, but I rely most heavily on what are “officially” tweezers for electron microscopy, dating from the days I was a research scientist and performed electron microscopy myself. More on that in a moment.
     The common, everyday tweezer is a useful though not a precision instrument. I have a selection of such tweezers from many manufacturers. I do use these for handling larger parts and occasionally for holding things being glued together. The ones shown here are both from Millers Forge  and are about 5 inches long. The upper one has rounded points and is used more often than the lower one.


     Most people are aware that another style of tweezer, normally closed and thus only opened by squeezing it, can be very useful as clamps and parts holders. These are sold by some makers as “reverse action” tweezers. I have several different types and sizes of these, and use them occasionally, though I have found that they are not always as useful as I imagine them to be. Here are two.


The larger, upper one here is about six inches long, and is from Grobet USA; the lower one is from X-acto.
     For many clamping jobs, though, I nowadays like to rely on clothes pins, many of them in “reversed” configuration, easily done by removing the metal spring and reassembling the wood parts “upside down” or reversed. These of course are not tweezers; I am only mentioning them to indicate my preferred small clamps when normally-closed tweezers don’t do the job.


     My most heavily used tweezers, though, the ones I use far more than any others, are the electron microscope ones I mentioned above. Most of mine are from Dumont (Switzerland), and you can read about them and their various models at their website, https://www.dumonttweezers.com/Home/About . These are not cheap, but they are simply the royalty of tweezers. The site will show you a very wide range of styles. Most are available in a number of different alloys (some exotic), and some are available Teflon-coated. Most of the simpler ones are around $25 to $30 each; carbon steel is usually fine for hobby use, though in some cases the carbon steel version is only available in a six-pack. Most of mine are stainless.
     Shown in the following photo are the three styles I favor, which Dumont calls styles 3, 5 and 7 (top to bottom). These are all about five inches long.


The Style 3 tweezers have somewhat more durable points and are used the most. I only bring the Style 5 into action when I really need to get into a small space, as the points get bent fairly easily (though you can gently bend them back). The Style 7 naturally are most useful when you have to reach at an angle. I would definitely say that if you are only going to buy one Dumont tweezer, get the Style 3. Actually there are several versions of Style 3; mine is a Style 3C, which is shorter arms with thin tips, compared to the arms of regular Style 3.
     The Dumont tweezers with thinner tips are supplied with a plastic tip protector, which I have kept and still use. It keeps both the tweezer tips and my fingers safe. Here you see an inch-scale ruler for size, next to Style 5 tweezers.


     Like any category of tools, having a really good tweezer is worth the investment. I have had all these tweezers for more than 25 years and they hold up fine. More important, I continue to use them all the time.
Tony Thompson

Saturday, December 27, 2014

Building a resin box car, Part 2

In my first post (see: http://modelingthesp.blogspot.com/2014/12/building-resin-box-car.html ), I described the kit being built, a Speedwitch Media one-piece body kit for a CB&Q Class XM-25 box car. I also showed my completion of what I call the “mechanicals” phase for kits, meaning truck and coupler attachment method and also car weight.
     My second phase is adding all the details to the model. The Speedwitch kit directions suggest detailing the underframe first, and I did so, using a Tichy AB brake set instead of the kit parts, as I personally like the Tichy rendition better. I used styrene pieces (scale 4 x 4-inch and 1 x 8-inch) for supports of these brake parts, as the kit directions suggest, and made my own brake levers from scale 1 x 6-inch styrene strip. Here is the underbody with these additions, prior to adding brake rods and piping. In this first view, you can just see the steel nuts underneath, used for car weight (see Part 1).


A view from the other side of the car may show some details better. Note that the bolster cover plates are not yet applied.


     These steps are easy to do, but there is some waiting for glue to fully set between steps. My practice in such cases is to work on another part of the model. The kit directions in most cases need not necessarily be followed as to sequence. I knew that drilling the holes for all the wire grab irons would be time-consuming, so I did batches of holes between various steps in building the underframe.
     I know drilling small holes like this can be intimidating. The next photo shows my favorite pin vise for this kind of work, because the wood knob is comfortable in the palm, and it rotates freely as you drill. I’ve had it for years, though I don’t know the brand. That’s a No. 77 drill in the chuck (you can click to enlarge).


In use, one just locates the place to be drilled very carefully, or perhaps makes a starting mark with a pin or scriber, then drill the hole.


     I mostly use a pin vise for this kind of drilling, but when the sheer number of holes gets daunting, I sometimes use a motor tool, a Dremel or an ancient Revere (which has a three-jaw chuck, not a collet system), for this job. And I usually drill the holes a size or two larger than the size that would be needed to just fit the grab iron diameter. Saves a certain amount of cursing later.
     With many though not all grabs installed with CA, here is a view of the car body, so far without roof details or doors.


Note that there is no placard board on the car end, nor is there any mention of such a part in the kit directions, nor is there even any such part supplied (though prototype photos clearly show such boards on the ends). Luckily I had some leftover resin placard boards which were not needed in an earlier project, so used those, but in any case they would not be hard to scratchbuild from styrene.
     At this point, I decided to attach the underframe to the car body. The kit directions describe considerable work being done after the running board details are installed, but I postponed roof details until after the work on sides and ends is done. With the underframe installed with CA, the following photo shows the point I had now reached. Brake rodding is modeled with 0.020-inch styrene rod. Coupler boxes are installed empty, so they can be painted along with the rest of the model.


      Next I installed what I call my “interim truck support blocks,” to have something on which to rest the car body during further work (you can read my post about these blocks at this link: http://modelingthesp.blogspot.com/2014/11/interim-truck-support-blocks.html ). Meanwhile, I continued with work on the car sides and ends.
    One small hint: the separate resin doors need to be exactly positioned to match the car side details. For this kind of job, I normally tack the part in place with canopy glue, which permits some small adjustments before it is fully set, then go back and carefully apply CA with a pin at the edge gaps around the door. An earlier post about canopy glue may be of interest, at: http://modelingthesp.blogspot.com/2013/05/a-few-words-in-praise-of-canopy-glue.html .
     With the underbody installed and most of the detailing done, the car body looked like this.


Brake staff and wheel remain to be added, along with running boards.
     With the second major phase, detailing the model, about done, I will stop here. Painting, weathering, and lettering will be shown in the concluding post.
Tony Thompson

Wednesday, December 24, 2014

Helium cars — more information

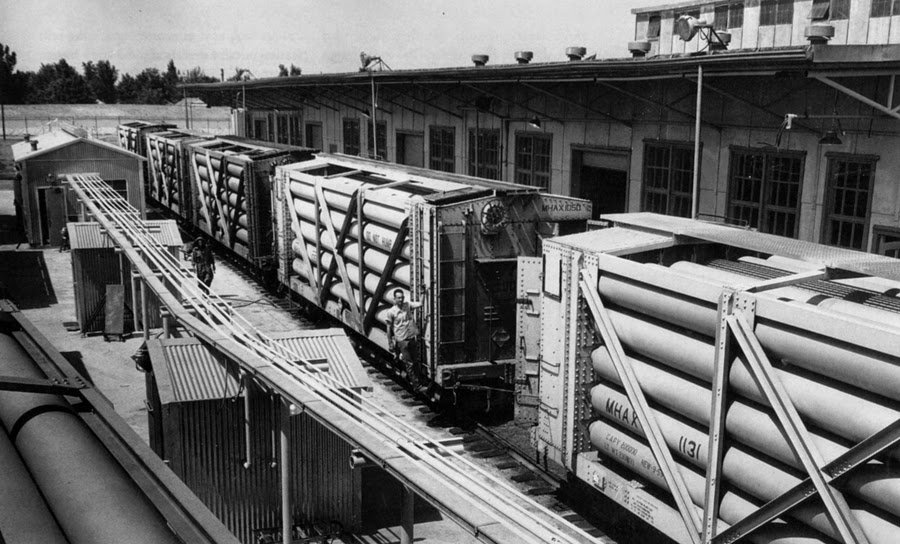
Awhile back I presented three posts about modeling a helium car in HO scale, starting from the AHM model. The final post in that thread was Part 3, describing paint and lettering; you can go back and access that post from this link: http://modelingthesp.blogspot.com/2012/11/helium-cars-part-3.html . The latest issue of The Warbonnet, magazine of the Santa Fe Railway Historical & Modeling Society (SFRH&MS), which is for the Fourth Quarter, 2014, has just arrived, and has excellent coverage about helium cars.
     There are two parts to the coverage. Leading off is a reconstruction by Warbonnet editor John Signor of Jay Miller’s excellent clinic on helium car traffic from five or so years ago, and with much more material than has been on the SFRH&MS web pages I cited previously. It contains extensive photography from the U.S. Bureau of Mines, which built and operated the gas extraction plants, and also took over the operation of the helium tank cars from the U.S. Navy in 1955. There is a helpful helium-plant plan drawing and plant photos, for those intrigued by the source.
     Here is an example of the interesting photos, this one taken at the Exell, Texas helium plant in 1961 (U.S. Bureau of Mines photo).


     Accompanying the Miller material is a fine modeling article by Pat Bray. Pat decided to model one of the helium cars, starting from the AHM model, but unlike the work I described, he chose to mill off the cast-on side and top bracing of that model, and then replace it with separate styrene channel. It certainly improves the look of the car. The look I achieved by leaving the cast-on bracing in place, can be seen in my Part 3 article (link at top of page).
     Copies of this issue of The Warbonnet magazine are available for non-member purchase. Go to the SFRH&MS web site, then to the Company Store, at: http://atsfrr.org/store/war-Vol20-14.htm . Non-member price of the issue is $10.95. The magazine, incidentally, contains a heart-warming piece by Richard Hendrickson about his teenage experiences with the Santa Fe at Oceanside, California. Anyone who knew Richard can just hear him telling these stories.
     Two important points to anyone wishing to do a helium car. First, the trucks. I showed a method to modify a Model Die Casting / Roundhouse truck for my model; see http://modelingthesp.blogspot.com/2012/04/helium-cars-part-1.html .  The Roundhouse 100-ton trucks, used on the SP 100-ton ore car they produced, are only intermittently in stock at Athearn. When the ore cars are re-run, extra trucks are made, but are only kept in stock while supplies last. At least this is how it was explained to me by the person I spoke with at Athearn. So to do this project, you may have to shop at swap meets to find one of the MDC ore cars, or be patient until the trucks are next in stock at Athearn.
     Second, the decals can be a problem. With Jay Miller’s support, I persuaded Jerry Glow to offer the Navy car decals, but Jerry is now out of the decal business, and whether his line of decals will reappear is unknown. Artwork for decals is available as a PDF from the artwork creator, Alain Kap, at: http://www.atsfrr.com/Reviews/HO/Freight/Helium/HeliumDecals.pdf . This artwork is for the post-1955 MHAX and ATMX reporting marks, as well as for the pre-1955 USNX reporting marks. At present I am not aware that decals are available, although I understand a couple of parties are working on this.
Tony Thompson

Sunday, December 21, 2014

Building a resin box car

On a couple of occasions, readers have asked me if I would go through the steps of building a resin freight car. Resin car kits vary quite a bit in degree of difficulty, from one-piece body moldings of simple cars like flat cars, all the way to genuinely challenging and difficult cars like vinegar cars or insulated tank cars. I will go through the process first with a relatively simple car, a one-piece-body kit from Speedwitch Media.
     Here is the kit box, and it describes the contents, a CB&Q XM-25 or XM-26 box car (the two classes were virtual twins). It is Speedwitch kit K106.1. Atop the kit box you see the one-piece body. This saves the step many modelers find challenging, which is to assemble a body box from separate parts for sides, ends, and roof. On the other hand, much detailing needs to be added to the body, including grab iron rows acting as ladders. That’s relevant because the walls of this one-piece body are thick, meaning more work to drill all those holes for grab irons.


     My first step in any kit is to deal with what I call the “mechanicals,” the mechanical aspects which are good to confront as soon as possible. These are the attachment method for couplers and trucks, and any attachment of car weight. I greatly prefer attaching trucks and couplers with screws, usually the 2-56 size, as that method permits easy removal and re-attachment if needed, and in particular facilitates maintenance on couplers. A kit that is set up to do these attachments any other way (such as friction pins for truck attachment, an appalling method) will have to be changed.
     This Speedwitch kit has a one-piece molded underframe, so it only needs to have holes drilled and tapped for trucks and couplers. I like to use a drill press for these jobs, as it helps ensure making a hole which is perpendicular to the plane of the underbody.


     I use a hand tap, as many modelers do, and here again, it is important to keep the tap entering the hole in a perpendicular orientation (whenever the hole does not penetrate very thick material, as with the coupler box pads on this kit).


     With those tasks done, I glue on some weights (not provided in the kit). As I often do in such cases, I chose to attach a pair of 5/8-inch steel nuts with canopy glue (if you”re not familiar with that glue, you may wish to read this: http://modelingthesp.blogspot.com/2013/05/a-few-words-in-praise-of-canopy-glue.html ). The surface of the resin floor is roughed up a little with sandpaper before gluing.


Here are the two nuts in place. You can see the holes drilled for trucks and couplers, with the nuts well out of the way of those holes.
     This completes the “mechanicals” phase for this kit. Next I start the detailing.
Tony Thompson

Thursday, December 18, 2014

Using an airbrush

I know from the questions I get from time to time, that there are plenty of modelers out there, by no means beginners, who don’t understand or don’t want to try using an airbrush. It is natural to be a little hesitant about any new experience, but the airbrush should not be something to be feared.
     There are situations where you can spray paint adequately with a rattle can, and I do that myself for some kinds of jobs. But the first problem is that you have to use the color that’s in the can. That can work all right if it’s something simple, like black, that you need, but for any specific railroad color, obviously not so good. And paint delivery is not really under your control — paint flow is either on or off. I know from having it happen, that a particular rattle-can nozzle can deliver a lot more paint than you had in mind just then. It can also sometimes “blort out” gobs of paint just where you don’t want them.
     So an airbrush isn’t just someone’s idea of a complex way to do a simple job; it’s a solution to all the problems just described with rattle cans. You can mix the color and consistency of the paint you want to apply; and you control the rate of paint application.
     You can start with something truly simple. I have used a Badger 250 brush for many years (it’s now in their catalog as a “spray gun,” that’s how primitive it is). It looks like this, though the one I have is kind of a minty green:


It’s what is called an “external mix” brush, because the compressed air passing horizontally over the paint nozzle (sticking up) draws paint out into the air stream, outside of the instrument itself. The main virtue is its simplicity; it’s a good tool to learn on, and very inexpensive to buy. This and a range of other Badger products can be found at their website (here’s a link to it: http://www.badgerairbrush.com ).
     I also have, and have used very successfully, a Thayer and Chandler double-action air brush. This fine tool, available nowadays from Badger, mixes paint internally instead of externally, and has a double-acting pushbutton that you use to control both the flow of paint, and the flow of air. It can place very small amounts of paint, down to the level of shading. But for most models receiving an overall coat of paint, or overall weathering, I still use the Badger 250.
     The second necessity is a source of compressed air (or other gas) to do the work. Commercial cylinders of either nitrogen or carbon dioxide are possibilities; so are commercial products in aerosol cans, such as Propel (sold by Badger). I got started airbrushing with Propel, and it worked fine. But for more than 25 years, I have used a small Badger air compressor, the Model 80-1, which is fairly noisy. If I did more painting, I would probably replace it with a “silent” compressor.
     And finally, you need a spray booth or other means to pull solvent and paint fumes away from you. I began by painting out in the driveway of our home, but eventually purchased a small commercial booth (from a company no longer in existence), which was not very expensive.
     With any of these tools, you need to practice to get the hang of what you are doing. Use a failed model project to work on, or maybe something like an Athearn blue box kit that you no longer plan to build. Have at it, and learn as you go.
     I won’t presume to offer more instruction than that here, because there are some fine books out there, which take you through it, step by step. The best recent one, in my opinion, is this one from Kalmbach Books.


Note that it is not a model railroad book. The folks in other model-building hobbies have a lot to offer in techniques, and this is just one example. If your Local Hobby Shop only carries trains, see if you can find one that carries plastic models (airplanes, armor, autos) and they may well carry FineScale Modeler magazine and books like this one.
     Here are two more books, both from Kalmbach, though only one is a model railroad book. Both provide considerable detail in a clear, understandable way.


In addition, the book I reviewed awhile back, by Tim Shackleton, also contains a nice section about airbrushing, including his comments about several commercial airbrushes which are available. You can read my post at: http://modelingthesp.blogspot.com/2014/11/an-excellent-book-on-weathering.html .
     Lastly, I should mention safety. Paint solvents are not good for you, if absorbed through the skin or breathed into the lungs. Particles of paint pigment are not good for your lungs either. I always wear disposable gloves and an inexpensive dust mask, even though my spray booth pulls a pretty good flow of air through the booth and away from me. This is discussed at more length in each of the above books.
     Bottom line, for me: airbrushes are a superior method of painting models, whether rolling stock or structures. And learning to use a finer-spray model will permit much better weathering and other applications. If you haven’t tried it, take the plunge, buy an inexpensive starter set (Badger has a couple of them), and have at it. I think you will find it easy and rewarding.
Tony Thompson

Monday, December 15, 2014

A “right-size” freight car fleet

I have discussed in several previous posts the problem of not only getting the right cars into my car fleet, but getting the “wrong” ones out. One discussion of this was mostly about selling off kits or assembled cars that no longer fit my standards or m layout needs (that discussion can be found at the following link: http://modelingthesp.blogspot.com/2012/02/thinning-collection.html ). Another discussion of this subject was mostly about upgrading, and you can see it at: http://modelingthesp.blogspot.com/2012/08/choosing-model-car-fleet-update.html . Then a third post, which I wrote about a year ago, provided some numbers of cars sold, upgraded or replaced (that one is at this link: http://modelingthesp.blogspot.com/2013/10/evaluating-freight-car-fleet.html ). I guess this continues to be a subject that interests me, because I have been thinking about it again lately, and will summarize a few of the more recent thoughts here, primarily thoughts about the size of the fleet.
     One part of the fleet size problem is the proper selection of foreign-road cars, that is, non-SP cars. I think it is possible to be systematic about such choices, as I have written in several blog posts and also in my “Getting Real” column in the on-line magazine Model Railroad Hobbyist. The first such column, explaining the basis for choices among nine major railroads, was published in April 2013 (like all issues of MRH, it’s available free for download at: mrhmag.com/magazine/mrh-2013-04-apr/ ). I am preparing a second column like that, to cover ten more railroads, for an upcoming issue of MRH. Accordingly, I won’t touch further on that topic.
     A second problem, especially for those of us who have been in the hobby for some time, is that those “compromises” we had to make, years ago, no longer look very acceptable. At one time, I upgraded details and relettered a whole bunch of Athearn Blue-Box reefers and box cars for desired prototypes. Most of those models are now gone, sold cheap or given away. The same goes for my stash of unbuilt Blue-Box kits (the intended raw material for even more of those projects). 
     An example of an Athearn box car, somewhat upgraded, is this effort at an SP Class B-50-18 box car. It does have weathering, a wood running board, wire grab irons, Detail Associates sill steps, and a scale-size Ajax brake wheel, but the door height (and door claws) were not fixed, and the molded-on ladders were left alone too. It’s been sold.

     Also on the way out are a number of perfectly good models, some built but most in kit form, which no longer fit the kind of layout I now have. Many of these have gone already, and more will go.
     In fact, because I have long kept a list of the kits on my shelves (originally created so I would not buy needed ones a second time), along with a log of how any car with complications was built (to help with repairs or further changes), and an overall car roster, I do have records of my fleet. And I update all of these, when kits or cars depart, by moving their entries to a “Departed” list. Looking at these lists now, I can add up the changes. 
     Since about 2005, I have sold, traded or given away about 310 kits or complete models. In the same time span, about 275 new cars have been added to the fleet, by building kits, and finishing kitbashes and ready-to-run cars (what Richard Hendrickson liked to refer to as “ready to finish” cars). This is not too bad a number, because though high for my layout, it allows flexibility. 
     The bad news is that I also have around 75 older cars, not really up to current standards, at least some of which ought to go, and have around 100 unbuilt kits of various kinds, some of which probably won’t get built, and at least 25 already set aside for sale. So my job of “right sizing” my freight car fleet for my layout still has a ways to go.
Tony Thompson
     

Friday, December 12, 2014

Modeling Southern Pacific Class A-50-17: background

I have long wanted to figure out how to model the post-World War II automobile cars that SP built, 50-foot double-door cars of classes A-50-15, -17, and -18. There is no commercial model particularly close to any of the three. Ironically, the third one, A-50-18, is not as hard a modeling challenge, but because it was built during 1954–1955, which is after the time I model, my interest is focused only on the first two.
     The cars of Class A-50-15 were built by General American in late 1946, while the other two classes were assembled at Sacramento Shops using commercial components such as sides, ends, roofs, and doors. Southern Pacific, through its SP Equipment Company, built quite a few cars for the railroad in the decade or so after World War II, and liked to publicize the fact with photos like this one, showing automobile cars on the assembly line at Car Shop No. 9 (it’s an SP photo).


     To choose between classes A-50-15 and -17, the -15 class comprised 750 cars built in late 1946, and is a tough modeling challenge, because it had Improved Dreadnaught ends. straight-panel roofs, and the early postwar welded doors, 8 feet wide, with wide seams. This would require some kitbashing to combine all these elements.
     Kit modification is also necessary for Class A-50-17, as I will show, though to a definitely lesser degree, and since this class comprised 1500 cars, it would be more commonly seen. It too had Improved Dreadnaught ends, but a diagonal-panel roof, and conventional-seam postwar doors. There is a Branchline (now Atlas) kit which has these ends, roof and doors, but the sides for this class (and for the A-50-15 cars also) pose a problem, about which, more in a moment.
     Here is what car 190000 looked like, the first of the class. SP eventually built 500 cars numbered 190000–190499, all with Evans Type F auto loaders, and 1000 additional cars, numbered 192000–192999, of which only 100 had the Evans loaders. So overall, there were 900 plain cars and 600 cars with loaders. The photo below, taken from the A end, shows the door stripe indicating loaders.


The photo was taken by Southern Pacific at Sacramento Shops in August 1950, and is provided here courtesy of the SP Mechanical Department collection at Stanford University Libraries.
     The problem I alluded to with car sides is that SP had introduced a new kind of side post in the prewar automobile cars of Class A-50-14, a hat-section post with the “legs” flanged so they could both be riveted to side sheets. This gave rise to double rivet rows at each seam, with the “outer leg” of the post (relative to the seam) riveted with double-spaced rivets. This segment of a drawing of the sides shows what I mean. Note that all panels are the same width, 3 feet, 6-13/32 inches, and that the wider rivet row is exactly double the spacing of the inner row. You can click to enlarge the image.


Here is a detail of a photo from the builder, General American, showing this rivet arrangement (on a car of Class A-50-15). Perspective may make the rivet rows not look aligned at double spacing, but the drawing proves that they are.


     Only some commercial models of automobile cars have included this kind of rivet pattern. The fine Proto2000 model (now Walthers) of the SP’s Class A-50-14 prewar car does have these rivets, but has the wrong roof, ends and doors, not easy to replace, compared to rivets. The Branchline car has single-row rivets at the side sheet seams, and also has the wrong panel arrangement, with five panels to the left of the door opening and eight to the right, whereas the SP cars had four to the left, six to the right. So the project is to remove the Branchline rivets, and replace with the right number of panels, and double rivet rows.
     In past years, applying large numbers of rivets would have been an almost impossibly tedious task, but today, with the excellent products of Archer Fine Transfers, it need not be a hard job at all. Because I wanted to model the SP Class A-50-17 cars, I provided the prototype data (taken from the drawing above) to Archer, and they produced their set AR88108, which is exactly this kind of double rivet row. This particular set is shown below; for more, you can visit their web page at: http://www.archertransfers.com/AR88108.html .


     This rivet set is the last barrier to a practical project to model SP Class A-50-17, starting with the Branchline (Atlas) car and simply replacing the rivets.
     So I have in fact gone ahead with a model of one of these cars, and have submitted the modeling part of the story to the Southern Pacific Historical & Technical Society magazine Trainline. I expect it to appear soon. I will probably also post a summary here.
Tony Thompson

Tuesday, December 9, 2014

Fourth anniversary of this blog

I began this blog about Southern Pacific modeling on December 8, 2010, a date chosen not for any reason other than I was ready to begin. And once again this year, as has been the case on each of the three prior anniversaries, I am surprised and impressed with the viewership this blog has enjoyed.
     I have remained fairly consistent in presenting about ten posts per month, and about 120 or 125 per year. These have varied widely in how many comments they receive, but as was true last year also, increasingly those with questions, corrections or comments tend to email me directly. That’s not a complaint, just a description.
     Page views have continued at a high level. The first year there were about 50,000, a number which seemed impossibly huge to me when I saw it, and far beyond anything I had ever imagined would happen with this blog. The following year there were almost 100,000 more, bring the total to 150,000 after two years. Even more impressive to me.
     The third anniversary in 2013 brought to light even bigger annual viewing numbers, reaching almost to 300,000 views total, thus almost 150,000 additional views in that one year alone. Since then, the viewing has continue to increase, though the rate of increase has flattened out; totals continue quite substantial. The total has now passed 468,000 views over the four years, meaning that there were almost  170,000 new views this past year. I can’t say it enough times: I am just amazed—and also very gratified.
     The original goal was to present a perspective on modeling the SP, and to add historical as well as modeling information where possible. I believe I have been doing that, and have been able to cover a number of modeling projects on my SP layout as well. That makes it fun, as I would now plan any project, whether rolling stock or layout, with photography in mind, to document in a future post. This has probably increased my percentage of completed projects, if nothing else!
     There have been new features too. These include increases in the number of documents posted on Google Docs and available to anyone on the Internet, and also now reference pages, accessible by the list at the upper right of the blog page. I combined eleven posts about my method of freight car weathering using acrylic washes, into two reference pages, one on the basic method, the other on specifics for individual car types and additional details.
     What lies ahead? Obviously to some extent, more of the same, but hopefully more than that. Here is a teaser. It’s from the Richard Hendrickson photo collection, in the process of transferral to the California State Railroad Museum, and the print was entirely unmarked on the back, so I don’t know source, location or date. But it clearly shows ICC 104-type tank cars being loaded.


What is this a teaser for? You’ll have to wait and see.
Tony Thompson

Saturday, December 6, 2014

Modeling an SP Class O-50-9 tank car

One of the distinctive SP tank car classes was O-50-9. It was the first with a truly “SP standard” tank, in terms of proportions. Southern Pacific had been buying tank cars of 12,500-gallon capacity for some years, but designs varied, up through Class O-50-8. But classes O-50-9 through -13 all had the same tank proportions, which in HO scale is exactly provided by the Athearn tank car.
     One key in modeling Class O-50-9 is the availability of a good detail part for the elbow safety valve, actually a double safety valve in one elbow, characteristic of this class. Later classes all used dome-top instead of elbow mounting for safety valves. The recent elbow valve from Owl Mountain Models solves this problem. This is Part No. 1002. You can purchase it on their web site, at: http://owlmtmodels.com/ , but unfortunately the website does not yet include photos of parts.
     The goal, then, is to model a car like the pair of prototype photos below, showing the same car of Class O-50-9 from each side. Note that there is a dome walk only on one side (the left side, as seen from the B end), and the elbow safety valve arrangement (toward the B end) is evident too, as are the prominent circumferential rivet rows. (SP photo, courtesy Stanford University Libraries)


     So to set about building a tank of this class, I began, as usual with an Athearn tank car kit. I will not go into great detail about most of the changes to be made, because there is already a detailed description of what is needed, in my prior post at: http://modelingthesp.blogspot.com/2011/05/modeling-sp-tank-cars.html . That post was followed up with a few additional details. These included construction of new handrails, since one dome walk is removed (see it at: http://modelingthesp.blogspot.com/2011/06/modeling-sp-tank-cars-2-handrails.html ); how to model the circumferential rivet joints for some classes (that would be for classes O-50-9 and -10), which is at: http://modelingthesp.blogspot.com/2011/06/modeling-sp-tank-cars-3-tank-sheets.html ; part numbers if you want to order Athearn parts to add to a kit (since one kit does not have all you need), which was described in this post: http://modelingthesp.blogspot.com/2011/08/modeling-sp-tank-cars-update.html ; specifics about use of Archer rivets and underframe detailing, in the post at: http://modelingthesp.blogspot.com/2012/10/modeling-sp-tank-cars-4-circumferential.html ; and the Jerry Glow decals, for which I did artwork: http://modelingthesp.blogspot.com/2011/05/sp-tank-car-decals.html .
     I began with a plain vanilla tank car, and removed the extraneous double rivet rows on either side of the dome, on the upper tank as well as on the bottom sheet (these should not be on a single-compartment car), and removed the dome-top safety valves, manway cover, dome grab irons, and the rivet row around the top of the dome. Here is an in-progress photo at this point.


Small recommendation: choose a light-colored car as a starting point if you can, because it is much easier to see what you are doing. This will be especially helpful when the addition of Archer rivets comes along. Of course you can always spray on a “witness coat” of light gray primer, or any other light color.
     Next came removal of one dome walkway, of tank-end molded grab irons which will be replaced with wire, and adding the dome-height correction (see my first post, cited above, for specifics on the overall method). And finally, the top rivet seam must be removed, while preserving the hold-down bands, because I am modeling a car with circumferential seams on the upper tank. For tasks like removal of that rivet seam, or the grab iron removal, I always use a brand-new X-acto chisel blade.
     Here is the same car body, a little farther along, shown from the side with the removed dome walk. The dome top never fits perfectly, and some Squadron Green putty is applied to correct that. But all major things needing to be removed from the tank body are gone, and raising the dome-top means that from here on in, it will all be about adding things.


Note that the middle handrail support from the original trio on each side of the car center has been removed, as the added circumferential tank sheet will go there. The offending single safety valve has been removed from the dome top also.
     So with the completion of the “removal phase” of work on this model, I am ready for the next phase, involving the addition of new parts, especially the circumferential rivets.
Tony Thompson

Wednesday, December 3, 2014

Pismo Dunes Road, East Shumala

In my column for Model Railroad Hobbyist or MRH, the on-line magazine, in the issue for October 2014, I showed schematic maps of most of my switching locations. These were intended to help visiting operators understand what waybills were telling them. I showed one of those maps, for East Shumala, in my blog post referencing the MRH column. You can read that previous post at: http://modelingthesp.blogspot.com/2014/10/my-column-on-timetable-construction.html . In that map one of the roads shown is Pismo Dunes Road. In this post I take up the installation of that road.
     I intended from the outset of construction at East Shumala to make this road take a broad curve across the layout area, near the aisle. The simplest way to achieve a level and smooth road is to make it out of one piece of styrene. This idea has been used by many modelers over the years; I personally discovered it in an article by Marty McGuirk in Model Railroader, May 1997, page 92, but there are lots of such sources. In my case, since the road would have considerable extent, I needed a big piece of styrene sheet, bigger than what Evergreen or other vendors sell. But any commercial plastics supplier has really big pieces for sale, up to 4 by 8-foot sheets. In my area, the convenient one is TAP Plastics, and I went there to get some 1/16-inch sheet.
     My next step was preparation of a cutting pattern. I just used a sheet of newsprint, spread it out on the layout area which would receive the road, and traced a rough line with pencil, then went over it with a Sharpie (any felt pen would work) to make sure I had a good line. Note in the foreground I have also traced the layout edge.


At right you can see the beginnings of the road to the rear of the roundhouse (see: http://modelingthesp.blogspot.com/2014/09/the-road-behind-roundhouse.html ).
     Naturally the sheet of newsprint was not the right size and shape for my intended road, so after cutting out the first section, shown marked above, I used the cut-off pieces to combine with tape into a single large pattern for the road. Here it is, clearly showing the road curve I had originally envisioned.


     Now the cut-out newsprint was traced onto the plastic sheet. I use a pencil, as this draws well on the white styrene. This doesn’t have to be exactly traced.


     Next step is to cut out the shape drawn. I use a utility knife, and this is pretty quick and easy, with styrene of this thickness. My view is that I can always trim the styrene piece if necessary, but adding material onto it would be much harder — thus I would make it oversize if in doubt anywhere on the cut. Here I am cutting the straight part of the road, with a steel straightedge as a guide.


It isn’t necessary to cut clear through the styrene, as the “scribe and snap” technique works equally well with curved cuts. Below, you see the entire roadway cut out as a single piece from the sheet.


    Once cut out, the piece does fit where intended on the layout, so this process did what I wanted it to do.


     Next comes a coat of primer, then attaching the roadway, and blending its edges with a kind of shoulder to transition onto the surrounding landscape. Probably I will add a center line to the road. Finally, I will weather with acrylic washes. Those subjects will be included in a future post.
Tony Thompson

Monday, December 1, 2014

The SPH&TS meeting, San Luis Obispo, Part 3

There are two additional aspects of this particular Annual Meeting that I want to present in this third post. (Here is a link to my comments in the second post: http://modelingthesp.blogspot.com/2014/11/the-sph-meeting-san-luis-obispo-part-2.html .) One additional topic is the invited talk I presented. Given the theme of the meeting, “Decks over Cuesta” (see convention logo below), I was asked to talk about transition-era operations, both in San Luis Obispo itself, and particularly on the westward climb over the Santa Lucia Mountains.


     My talk had the title just described, and this photo by convention photographer Mike O’Brien shows me about to be handed the microphone to begin my talk, with the title slide on the screen behind me. The talk was given twice, both times to pretty large audiences.


    The other event was something I felt was a great honor, my receiving the Society’s Guy L. Dunscomb Award, given for “outstanding achievement towards the preservation of the history of the Southern Pacific Railroad and it subsidiaries.” The award was presented during the banquet on Saturday night, and the award winner was introduced by Paul Koehler. Here is Paul at the left, having just handed me the plaque (again, a Mike O’Brien photo).


     The award itself is shown below. Many eminent Southern Pacific historians have received this award over the years, and I am delighted to be thought of as suitable to join their ranks.


     I was then given the opportunity to say a few words, and I spoke about the things I believe are important about historical preservation, particularly the view that modeling accuracy can only advance when it is preceded by, and stimulated by, the dissemination of accurate prototype information. Such dissemination then becomes the responsibility of individual historians and of historical societies like the SPH&TS. That is, preservation is only effective if accompanied by dissemination. This is a view I have long held, and it was much reinforced by my good friend Richard Hendrickson, whom I thanked in these comments.


     I am proud to have been selected to receive this award, and believe it is consistent with my own seriousness about railroad history. I thank the Society and its Board of Directors for choosing me as the awardee this year.
Tony Thompson