Reference pages

Monday, April 7, 2025

The 2025 PCR-NMRA convention

The annual convention of the Pacific Coast Region of NMRA was held during March 27–30 this year, in San Luis Obispo, California. PCR is the NMRA’s oldest region, having been founded in 1940, and continues as one of the most active regions in the country. I have been attending its conventions for over 30 years, and this one had the usual high level of interest and enjoyment.

Historically, San Luis Obispo was the mid-point of Southern Pacific’s Coast Route between Los Angeles and San Francisco, and for 30 years hosted the justly famous Daylight trains. Accordingly, the choice of a convention name and logo was entirely natural and appropriate. Of course, for me as an SP modeler, it was especially attractive.

I presented two clinics, as I often do, and enjoyed the usual camaraderie around the hotel, meeting rooms, and the bar. In addition, San Luis is an attractive town, greatly enlivened by nearby Cal Poly University, with lovely weather much of the year. All in all, a nice event. And attendance was decent, about 200 in person and, interestingly, 80 for a remote (virtual) program.

A high point for me was an operating session at the San Luis Obispo Railroad Museum, housed in the former SP freight house just south of the depot. You can learn more about the museum at: https://www.slorrm.com/ . Part of the museum is an ambitious double-deck model railroad, the Central Coast Model club, depicting the SP in the San Luis area, and including the Pacific Coast Railway narrow gauge, part of the scene until its rail was taken up in 1942. 

Though not a great image, this plan from the museum’s website shows the overall scheme. The three lobes at the bottom, with two decks, allow a long run. San Luis Obispo is at the top of the drawing for the lower level. It’s evident how a really long run has been achieved. The narrow gauge is in an adjoining room.

As it turned out, this was the first organized operating session on the layout, which has a number of very promising scenes and a few near completion, but much work in progress. Their session planning was good, and eight of us really had fun operating in a layout like this, headed for prototype excellence and already running well. Naturally there were a few growing pains, but nothing serious.

One scene that is essentially compete and quite attractive depicts the early days of oil extraction in Price Canyon. I thought this was very nicely done.

Another very interesting and challenging scene is a depiction of the sugar beet unloading facility at Betteravia. The prototype was well photographed, and thus the model has to meet a high standard, and what has been done so far certainly is up to that standard.

And a signature part of the SP’s climb over Cuesta is the Stenner Creek viaduct just below Horseshoe Curve. Here is the train I was operating, heading over this very nice model bridge. Interestingly, the view here is southwestward, away from the mountainside, not what most modelers would have chosen, but very effective.

Lastly, I should show a view of the narrow-gauge pier at Avila, and the hotel at its foot. We weren’t operating the narrow-gauge part of the layout, but this modeling really is stunning. This somewhat distant view doesn't do justice to the impressiveness of the exhibit.

This operating visit really made a nice feature of the convention for me. I’ve been interested in San Luis Obispo during the transition era for many years, and actually operating it was really fun. And I heartily recommend a visit to the museum if you happen to visit San Luis Obispo.

Tony Thompson


Friday, April 4, 2025

Layout ideas and design

I was stimulated by conversations at a recent modelers’ get-together in my local area to reflect on how layout designs evolve and how they depend on the owner’s intentions — and how those intentions evolve. Many layout owners concede that they began without much idea of the final goal, however much they might have been inspired by what they saw in the model magazines. 

I should immediately mention that I realize a certain fraction of modelers are really inspired by building scenery, or structures, or complete layout scenes, without any particular interest in operations. They may well run trains here and there as part of the scenes, but without an interest in what a prototype may have done. That’s perfectly okay as a hobby, and some superb modeling has been done in this mode.

There is another subset of modelers who are interested in the locomotives and cars of railroads, and are engrossed with building superb, even museum-quality, models of them, without much interest in operating them in a prototypical manner, or necessarily even building a layout. Here again, it’s fine as a hobby, and the resulting models can be stunning.

On the other hand, there are modelers interested in operation before scenery and structures and rolling stock. I have often mentioned to friends, my experience in the Chicago area, years ago, visiting a layout which was entirely plywood track supports, Homasote track bed, and track. Not a hint of scenery or structures; stations were named with small cards at each location. But complex trackage was complete and running perfectly. We had a busy and interesting and challenging operating session because of the busy schedule, operated by timetable and train order (T&TO).

So where would my preference lie? I appreciate both extremes in layout and modeling choice. But my mind can’t escape recollections of Tony Koester’s comment (in the Foreword to CJ Riley’s book, Realistic Layouts), that modeling railroading implies that we model not only the material objects and environment of professional railroaders, but also “the actions they take to get cargo and people safely and efficiently from A to Z.”

This resonates with me. My own layout choices are primarily aimed at trying to reproduce what the actual railroading job of a local freight crew was like. I have tried to achieve as many components of that as possible, recognizing of course that a visiting operator who has never seen the layout before is in a quite different place from the prototype train crew, who in most cases did that same job every day.

But when a model railroad operating crew, following waybills and other paperwork, spot a box car at an loading dock, they are to some extent doing just what a prototype crew would have done. The photo below, from my layout, is the kind of thing I mean. 

The same goes for other actions that a crew might do in the course of their time on duty, such as spotting freshly loaded reefers at an ice deck to receive the first icing before departing on their journey (the tariff language for this is “initial icing”).

Of course, for a fair number of layout designers and builders, it’s also important that we direct our work in model operations with realistic paperwork, that is to say, prototypical paperwork. I won’t say more on this topic here, since I expanded on my ideas in this direction in a blog post last fall, part of a three-part series on “realistic operations” (see that post at: https://modelingthesp.blogspot.com/2024/12/realistic-layout-operation-part-2.html ). The point here would be that layout design doesn’t much turn on paperwork, except in the sense that a layout builder may wish to include space for operators and a dispatcher.

It’s a well-worn piece of advice, to think carefully about what you really want to accomplish in a layout you are designing (or only dreaming about). But inevitably goals and desires evolve with time, and layouts can change with them. I would just encourage layout owners faced with such evolving ideas to grit their teeth, and modify the layout as needed to achieve those goals. You”ll certainly be happier in the long run.

Tony Thompson

Tuesday, April 1, 2025

A rail load for my Dry Creek ballast car

 I recently described completing a Dry Creek Models Southern Pacific Class W-50-3 Hart convertible ballast car, a fairly straightforward completion of a 3D-printed car body. In that post, I showed an example of such cars being used to carry rail, and mentioned that I planned to make such a load for the model (see the post at: https://modelingthesp.blogspot.com/2025/03/another-dry-creek-ballast-car.html ). 

In addition to the photo I showed in that previous post, a second photo exists. (Both photos are in Chapter 3 of my book, Southern Pacific Freight Cars, Volume 1, Gondolas and Stock Cars, Signature Press, 2003.) This photo shows the men getting ready to move rail. At left are two men holding rail tongs, which each pair of men will use in moving the rail. This is 90-pound rail, a 39-foot length of which weighs 1170 pounds, and 12 men, in six pairs, will be needed to move it.

Enlarging the photo above to look just at the rail ends, and assuming that rail not visible with something over it will be at the same spacing as the other rail, leads to the conclusion that there were at least 78 rails still in the car, and four more out of the car, as the full photo shows. For a 50-ton nominal car capacity, the max load would be 85 rail lengths, though in fact overloading company cars was not unusual, so that more than 85 lengths would be quite possible. But if one isn’t compulsive about this, a lesser load of rail is perfectly reasonable too.

An important point is what size rail to use for the load. This will of course depend on your prototype and era. In the 1950s, SP’s Coast Division, which I model, was undergoing replacement of the last older rail, to bring the entire division up to 113-pound rail. Since HO scale Code 83 rail represents approximately 126-pound rail, that’s what I chose.

Part of the motivation to make this load is that the Dry Creek model is very light, and has few places that weight can be hidden on an empty car. So the combination of lengths of nickel-silver rail, and a slab of lead sheet under the load, can bring the car up to a weight that can be operated with confidence. 

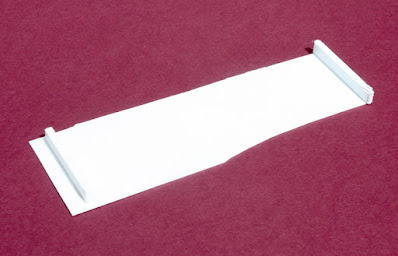
I cut a lead slab to fit inside the car, and less than the 39-foot rail length. It’s 0.062 inches thick, handily less than 0.083-inch rail. Next I cut a piece of styrene sheet, 0.005-inches thick, slightly narrower than the car interior, and 37 scale feet long, to underlay the weight and allow the rail ends abutting the lead weight to be glued to something. Now I needed a way to get the rail ends exactly even. I decided to make a gluing fixture. I just used some scrap styrene, and glued barrier strips 39 scale feet apart.

I then taped the 0.005-inch styrene in the middle of this fixture, and with pencil marked the location of the ends of the lead weight. That defined the place where I would attach short rail ends to represent the bottom layer of rail in the load. Here are a bunch of rail ends attached with canopy glue, with the pencil boundary visible. It is very simple to align these rail pieces, simply butting the ends to the fixture.

Once all the short ends of the first rail layer were in place, I added the lead sheet weight in the middle, also with canopy glue. Then the next layer of 39-foot rail was added, again with canopy glue. I decided to add a couple extra rail lengths on top. Total weight is 3.5 ounces, very helpful in a “weightless” model. Here it is in unpainted condition.

New rail could vary considerably in color, from the medium gray of mill scale on freshly hot-rolled rail shipped from its place of production, to lightly rusted when outdoors for awhile, to a deeply rusted brown color if stored outdoor for some time. I chose a medium brown, Tamiya’s “Red Brown” (TS-1) and used artist’s color pencils to add rust patches.

This load not only makes this car without end bulkheads logically sensible, and creates an additional load that can be directed to MOW use, but adds weight to a very light model. I look forward to seeing it in a operating session.

Tony Thompson