The end of my mythical Southern Pacific branch line, and the town for which the branch is named (many SP branches were named that way), is Santa Rosalia. You can see the arrangement in the map I devised for the branch location, connecting to the SP Coast Route, in my previous post about the layout locale (see it at: http://modelingthesp.blogspot.com/2011/01/layout-design-locale.html ).
The space available is the end of the layout room, beyond Ballard. Directly under Santa Rosalia will be some staging coming off the main line, so this had to be the first part of the construction project. As with the Shumala extension (which was described in a post about a year ago, and here is the link to that: http://modelingthesp.blogspot.com/2012/11/the-shumala-extension.html ), I had a sturdy bookcase underneath the area, to which some of the track risers could be directly screwed.
Here is a view into the room corner. On the wall is a Railroad Model Craftsman cover from a month when my modeling article was included on the cover. Obviously the bookcase doesn’t extend to the corner, so a post will be needed there.
The next photo looks somewhat toward the left (relative to the view above), and the mainline turnout mentioned can be seen. The staging will run along the wall, crossing along the bookcase top.
As I did for the Shumala extension, I used segments of L-girder to make the bases and risers. These make a flexible arrangement, because the two parts are independent, and the components are relatively stiff, compared to just using 1 x 4-inch lumber. In this photo, I am leveling the track board (itself an L-girder). Note the 2 x 2-inch leg against the wall, which supports the board end.
With the level established, I could proceed to glue and clamp both risers to the bases. I use yellow carpenter’s glue for these kinds of jobs. The reason not to attach them with screws is not only that it would be hard to work in the confined space, but also that it will be all but impossible once Santa Rosalia is present above this track board.
While waiting for the glue to dry, I started cutting lengths of Homasote for track support. This material only needed to be the width of this track board. This particular batch of Homasote pieces had a white-painted side, so as soon as the pieces were cut, I spray painted them with Model Master Gray Primer, to give a ballast-like color, and set them aside to dry thoroughly.
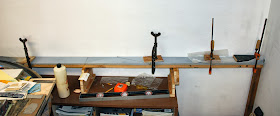
Meanwhile, with the risers glued to each base, I could proceed to glue the track board to the risers. I used bar clamps for this, with their greater reach. At left the end of the last Homasote piece in the main line is being glued and clamped to the new track board.
As soon as the glued track board had set adequately, I started clamping and gluing the newly painted Homasote pieces. Here is a photo of the last two segments being glued down.
Next comes tracklaying and connection to the main line, along with extra feeders to make sure everything is good electrically. But that will be a future post.
Tony Thompson


No comments:
Post a Comment