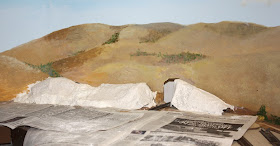
The last time I posted about the Shumala extension, I described preparing the sky painting, and getting it blended downward toward the horizon with lighter and lighter blue, although nothing was included about painting the landforms which form the skyline. That earlier post is at this link: http://modelingthesp.blogspot.com/2013/03/shumalas-extension-part-5-painting-sky.html .
There has been a lag of some time since that post, the better part of a year. The main reason was that I wanted to paint the landscape portions of the backdrop painting all at one time, on both sides of the backdrop, not only on the Shumala extension, but also the backdrop extension on the other side at Santa Rosalia. A recent post about Santa Rosalia’s backdrop can be found here: http://modelingthesp.blogspot.com/2014/01/constructing-santa-rosalia-backdrop.html .
My idea for the Shumala backdrop extension was to bring the “nearby” hill shapes to a termination, and to show much more distant hill profiles at left as a bluish gray outline. I used the acrylics that suit these “California colors,” primarily Yellow Oxide and Raw Umber, with plenty of White to lighten it, and some Neutral Gray for distance. Distant vegetation is Chromium Oxide Green, mixed with some of the brown or gray for distance. Note here that the vertical white patch, evident in my prior post (cited above), has been repaired also.
The white area just about at photo center is some paper towels. They are in an area which will become a hillside. The cut through that hill will help hide the track disappearing through the backdrop.
To make the hill, I used some styrofoam sheet I had saved, and broke it up into suitable pieces, which I then glued down with yellow carpenter’s glue. The rough base of the hill shown in the photo below is not very much like the final contour I want, but it’s a start. You can see the backdrop hole I want to make less obvious.
Next I rounded off the contours and filled gaps, using Sculptamold paper mache. I quickly realized I hadn’t gotten the hill shape I want, but it was closer, and now the needed modifications were more obvious, particularly the need to make the height a little bigger. Here’s a photo at this point.
I also wanted to continue the hill on the nearer side of the track, so that the cut would make sense. I used some old screen wire (the galvanized kind, not the aluminum or plastic kind) to make a rough contour, then used the Woodland Scenics Plaster Cloth to cover it. I discussed using this convenient and effective material in redoing the Ballard hill in earlier posts (for example, at: http://modelingthesp.blogspot.com/2013/12/repairing-ballard-hill-part-4.html .) Here is how my new hill contours around the backdrop opening looked after applying the Plaster Cloth over the formed screen.
Ordinarily, the Shumala roundhouse would fill the right foreground, but it has been moved out of the way of the plastering work.
From there, contours will again be refined with Sculptamold, as in previous steps. (I’ll describe it in a future post.) Experienced scenery modelers will doubtless recognize in this process what a novice might not: a sequence of creating a profile or surface, evaluating it, correcting by adding or removing material, and evaluate again: continue until satisfied. As I have said to novices, don’t panic, don’t even worry, if it doesn’t look right at first, but keep at it until it does.
Tony Thompson


No comments:
Post a Comment