In the previous post, number 12 in the series, I addressed some possibilities for modeling Southern Pacific streamlined passenger cars other than the familiar 10-6 floor plan which is available in plastic from Rivarossi (see that post at: https://modelingthesp.blogspot.com/2023/03/modeling-sp-passenger-cars-part-12.html ). And just to repeat, these models were imported from Italy by AHM. The procedure I described was to use the fine parts from Brass Car Sides.
I decided to proceed with the more challenging of the two floor plans I have set out to do, the 4-4-2 (meaning 4 double bedrooms, 4 compartments, and 2 drawing rooms). I showed a prototype photo of such a car in SP service in the previous post (cited above). I decided to start with a Rivarossi streamlined coach for this car. The reason it’s more challenging, as shown below, is because of the two small upper-berth windows in each compartment on the bedroom side of the car.
One approach to adding the brass sides to a plastic car like this might be to remove the original sides entirely, and attach the new sides instead. But as I mentioned in the previous post, it may be preferable to remove only the parts of the window band in the plastic car, any parts that would show through the new windows. That retains considerable stiffness in the car body, and was my choice.
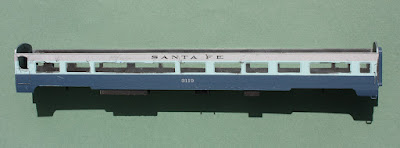
The Rivarossi coach shown below (the same one shown in the previous post, cited in the first paragraph) has been modified as described, so that new side windows will have none of the old body behind them, but as you can see, the upper and lower sides are still well connected and sturdy. This will be the aisle side of the new car.
In this photo, you can not only see the window changes on the nearest side of the car, but through the windows you can see some of the modifications underway on the far side, which will be the bedroom side of the completed car. Just visible at the top of the car side is a narrow lip, which will be the locating line for the brass sides.
The other side of the car was modified in much the same way, but with the complication of those upper-berth windows. My first plan was to cut out a strip of material from the car side where the upper-berth windows are located, then I began to think I would be better off to make just a hole for each window, instead of a long, weakening opening.
That was the procedure I followed, first drilling a hole of about #50, then using small files to enlarge the holes into a rectangular shape like those small windows. I continually checked progress against the hole shape and location in the brass car side, until I thought they were a good enough match. I took a photo of the car side at this point to show what all 8 holes in the upper side sheet looked like.
My next step was to glue the brass sides onto the modified car body. Since this action glues brass to plastic, I used canopy glue. It’s an excellent adhesive for dissimilar materials like this, and has the further advantage that it remains both tenacious and flexible. That means that temperature excursions, in which one component may change dimension more than the other in response to temperature change, will not cause the parts to separate.
I have modified a number of wooden clothes pins so that they are kind of a parallel-jaw clamp, rather than a small-area clamp like the original. Below is the aisle side of the car, receiving its brass side. The narrow lip at the top of the plastic car side is visible here; it formed a very helpful alignment edge for the new side. You may note that I removed the short segment of brass underbody skirt at the right end of the car side.
Although canopy glue adheres quite well in an hour, I like to leave a joint like this under clamp overnight.
Next came a repeat of the actions shown above, but on the other side. Again, I removed the short skirt segment at the non-vestibule end of the car, so that the original AHM carbody skirt can take its place. At the other end, I gently rolled that skirt segment to get curvature matching the AHM body. And again, canopy glue was the adhesive, and the modified clothes pins were the clamps.
With both sides of the 4-4-2 car now attached to the AHM body, I will turn to the 13 double-bedroom car and bring it to the same state: almost ready for paint. That way I can paint both cars together. There are a few issues with paint application, the final handrail details, and decals, but I will address those in a following post.
Tony Thompson


No comments:
Post a Comment