In the first post in this series, I showed the beginning steps in assembling a Sunshine Models “mini-kit” for an EJ&E box car, a distinctive car built in 1941 with 10 ft., 6 in. inside height and 8-foot panel doors. The kit supplied resin ends, doors and side sills to match the distinctive original. You can read that post at this link: https://modelingthesp.blogspot.com/2023/12/building-sunshine-mini-kit.html .
In the second post, I completed assembly of the basic model (except for a few details left for final work, such as sill steps and running board, which I almost always install last), and gave it a coat of primer. I described all that work as far applying the coat of the primer in that second post (see it at: https://modelingthesp.blogspot.com/2024/01/a-sunshine-mini-kit-part-2.html ). That brought me to the choice(s) of paint scheme.
One choice would be the original boxcar-red scheme, which is how the cars were built. The photo below is an in-service view from the 1940s (George Sisk photo, Joe Collias collection). Note that EJ&E placed its repacking stencil to the left of the car door, above the side sill.
But there is a second choice. Starting in 1953, EJ&E sent 409 of the original 500 cars back to American Car & Foundry for refurbishing. What that work comprised is evidently not known, though the external features remained the same. But the appearance was quite different, because a new all-green paint scheme was applied, with orange lettering. That scheme was shown in an AC&F photo in an article by Ed Hawkins in Railmodel Journal, “Modeling Modified 1937 AAR 40-Foot Cars, Part II,” Vol. 8, pp. 8–13, October 1996.
The green scheme is very attractive, and was one of the early examples of railroads moving away from very plain paint schemes,which many did during the 1950s; but since I model 1953, it’s a toss-up whether I really want to operate this brand-new paint scheme, or rely on the original EJ&E lettering. I have decals for both, so really was torn in making this decision.
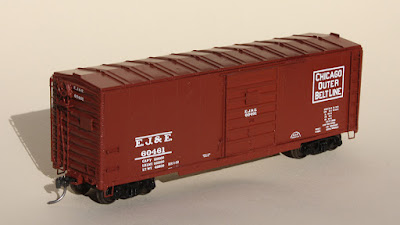
Finally I decided to go with the original scheme. I used the nice Rail Graphics decals provided in the mini-kit. Below you see the model at this point, with kit trucks and Kadee #58 couplers, but with the running board yet to be installed. The Hawkins article lists
the running board as Apex Tri-lok, helpful to know since that isn’t
visible in any of the prototype photos I’ve seen. Kadee makes a superb
version of this running board, which I will use.
Next the Kadee running board was installed with canopy glue, and an overall coat of clear flat (I prefer Tamiya TS-80 for this) was applied in preparation for weathering. My usual acrylic wash technique was used to weather the model (for description of the process and examples, see the “Reference pages” in the upper right corner of this and every post). Finally, I added some chalk marks with Prismacolor white and gray pencils, and route cards.
I have enjoyed this particular project, really an advanced kitbash of a Branchline kit with resin parts from Sunshine Models. This car will be going right into layout service. But its first public viewing was at Cocoa Beach earlier this month, in the Prototype Rails display area (for more on that, see: https://modelingthesp.blogspot.com/2024/01/cocoa-beach-2024.html ), along with two other freight cars of mine.
Tony Thompson


Great stuff Tony! I am currently building my own version of the EJE in HO scale.
ReplyDelete