Last fall, I began a series of descriptions of the work underway to complete my Diamond Scale 90-foot turntable. What remained to be done was to install walkways along each side, and, what had held me up, construct a durable yet prototypical handrail along both sides.
I showed the turntable as it then was, and several prototype Southern Pacific turntables with wood handrails — as the kit directed the builder to install —in my first post (see it at: https://modelingthesp.blogspot.com/2021/10/completing-turntable.html ).
In the second post on the topic, I showed the alternative to wood handrails, namely handrails evidently made of pipe, again in prototype SP photos. I also showed how I thought I could go about building these (see this post: https://modelingthesp.blogspot.com/2021/11/completing-turntable-part-2.html .
But before building, let alone installing, any model handrails, I needed to add walkways. In every SP photo I have seen that shows such walkways, they are wide planks. I decided to used V-groove styrene sheet, not because the grooves are prototypical, but because they delineate the planks. Judicious distressing of them, and intermediate joint grooves, will make them look all right.
I chose Evergreen styrene sheet no. 2100, meaning 20 mils thick and 0.100-inch groove spacing — which is 8.3 inches in HO scale. Word of warning: sheets aren’t necessarily square with respect to the grooves, but may be cut on a slight bias.

I cut two walks as wide as the tie extensions on each side, and added platform material at the end of one for the control cab. Normally I would prefer thicker styrene than 20 mils for almost any use, but here I wanted the walkways to lie well below the rail head, for ease in cleaning track.
Next I painted both sides of these walkways with Tamiya “German Grey” (no. TS-4). This is a dark gray, intended to represent some fading and weathering of an original black color. Once that was thoroughly dry, I applied some Pan Pastel colors, both Paynes Grey (no. 840.3) and some Raw Umber (no. 780.3), to break up the uniformity of color. The powder also gets into the board divisions I scribed, so that helps the appearance too. When satisfied, I added a protective coat of flat finish.
Once the finish was thoroughly dry, I attached each walkway with canopy glue. This is a very effective adhesive for dissimilar materials like the wood ties and the styrene walkway. At this point, I still had to account for the curved edges of the end-most cross-ties, curved, of course, to accommodate the curvature of the turntable pit.
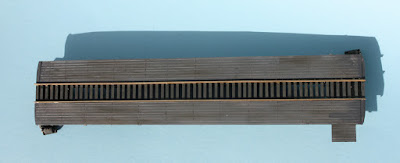
I decided to make end boards, using styrene scale 1 x 10-inch strip, trimmed to match the curvature, attached with canopy glue and painted to match. Below is a view of the turntable with the walkways and these trim boards installed.
The walkways are a little wider than the kit maker intended, because I didn’t install the outside wooden posts as kit directions instructed (see the kit drawing in my first post on this topic; link in the second paragraph of the present post). But prototype photos of SP turntables show considerable variation in width of side walkways, so I decided not to worry about it.

Finally, I needed to add a roof to the operator’s cab (I assembled the walls in Part 2 of this series; see link in the third paragraph of the present post). I used 0.020-inch styrene sheet, and pre-curved the styrene so it conformed to the arched roof shape. I attached it with canopy glue, and when that was dry, painted it the same dark gray as the walkways. I then installed windows of clear styrene, also with canopy glue. Here’s the turntable at this point, in place on the layout.

The turntable still needs the pipe handrails, as I described in the previous post, but now the turntable is ready to receive them when they are fabricated. More on that in a concluding post.
Tony Thompson
No comments:
Post a Comment