Reference pages

Thursday, December 30, 2021

Improving a freight car

 A couple of months ago, I had a challenge suggested to me by email. The suggestion was that I go through the process I would use for a freight car kit, to make it more accurate, to improve details, or whatever might be needed to improve the kit. An interesting suggestion!

What I’ve chosen for this assignment is an InterMountain kit for a 12-panel, 40-foot box car. It represents a Texas & New Orleans box car of SP Class B-50-26.

What are these 12-panel cars? The 12-panel design was briefly a “fad” after World War II, as a way to save weight by using thinner steel for side sheets. But the thinner sheets were less stiff, so the compensation was an extra side post at the seam of that extra side sheet. Before long, it was decided that the weight saving wasn’t worth the changes. But for a couple of years, a number of railroads bought such box cars.

The Southern Pacific was one. During 1946 and 1947, they purchased 2600 12-panel box cars to the design of their Class B-50-25, followed by 3000 cars of Class B-50-26. Of the total of 5600 cars, 2350 were for T&NO, the rest for Pacific Lines. These were all of 10-foot inside height, which after World War II was an obsolescent dimension. A few other railroads also purchased 10-foot IH cars after the war, including Great Northern and Baltimore & Ohio.

So how would I go about deciding what aspects of the kit to replace or upgrade? Obviously the first step is prototype photos, which can readily show the prototype’s doors, ladders, sill steps, etc., but rarely show the roof and may not show trucks or car ends well. So second, a source of information on the things not shown in photos is essential.

We can readily determine that the InterMountain kit accurately represents the SP car body for Class B-50-26, with an “Improved Dreadnaught” end, 3 ribs over 4 ribs, abbreviated 3/4) in configuration, and a straight-panel roof. This basic body is shown below in an American Car & Foundry builder photo, with the 3/4 end configuration very clear. This is the end modeled by InterMountain.

The body of my kit is shown below, lettered for T&NO, and correctly including the “builder emblem”for AC&F. It’s numbered T&NO 56729. It would have been part of a 750-car group, T&NO 56450–57199.

That this is a correct paint scheme can be seen in the builder photo below, although the car shown below is from the following class, B-50-27, with different ends and roof from the preceding Class B-50-26 cars. It’s a Pullman-Standard builder photo, just chosen to show the lettering. 

The 5600 SP and T&NO 12-panel cars had a variety of specialties installed, and it’s necessary to consult historical sources to know which cars had which appliances. My book on SP box cars, Volume 4 in the series, Southern Pacific Freight Cars (Signature Press, revised edition 2014), is such a source. The first thing I did was consult the book’s Table 12-3, giving specialties by number group for Class B-50-26.

For the model’s car number, T&NO 56729, the Table shows that it should have Ajax handbrakes, a Morton steel running board, Camel-Youngstown 6-foot doors, and ASF A-3 trucks. 

The two prototype photos above show the type of welded door needed: typed by the ribs in each of the three sections, it’s a 4/5/4 rib pattern, and has raised seams between sections. This is not what the kit’s door look like, as you can see below in a photo of the kit’s door sprue; they don’t have the raised section between panels, and are riveted.

I went to my stash of freight car parts to find the needed 4/5/4 welded doors with raised seams. I happen to have some cast resin copies of Branchline postwar doors, and these doors have the right configuration. They are from patterns made by John Spencer (with Branchline’s permission). However, they aren’t exactly right, because they are a little too tall for a 10-ft. IH car. That will be corrected in kit assembly. Here you see them with flash still present.

The kit also includes a running board apparently intended to resemble a U.S. Gypsum running board, though not terribly well done; I decided to use a Kadee Morton running board to match my prototype. The kit has an Ajax brake wheel, but I will use the better molding from Kadee. Finally, the kit’s sill steps are not the same shape as the SP prototype, and A-Line steps can be used as replacements.

With these major issues with specialties identified, I am turning to building the kit. I will return to that part of the story in a future post.

Tony Thompson

Monday, December 27, 2021

More family ops

 Once again, with my granddaughter in town for the holidays, we set up an operating session. The layout had only been cursorily run in recent months, so the first need was a thorough track cleaning. And I suppose it was natural that something would fail. In this case, it was a point rail, breaking the solder joint between it and the throwbar of a switch (the East Main switch at Ballard). You can see the lower point rail below, with a dot of bare solder next to it, where it separated. This was quickly re-gauged and re-soldered.

I should mention that this switch has had its rails cleaned a couple of times in recent months, with no problems, until of course an op session was imminent. I have a friend who always refers to such events as “pure IO,” meaning the “Perversity of Inanimate Objects.”

I then set up the various industry set-outs and pickups, as I would for any session. This time, I wanted my granddaughter to do more than just run the locomotive, good as she is at that task, so I prepared a switch list instead of handing her a handful of waybills. My plan was to be more of a spectator and do less of the conductor role. 

Our layout rotation called for us to switch Ballard for this session. The eight-car local train pulled into town on the normal eastward main, then the locomotive ran around the consist. The locomotive, just visible here behind the consist at center, is running around to start work from the back of the train.

Shown below is the engineer-conductor preparing to start work at Ballard, holding the clipboard with the fresh switchlist. She is planning out the first moves for the session.

As switching progressed, all the cars to be pulled from the front-side tracks, north of the main track, were set over onto the westward main track. The locomotive here is pulling those cars down to the left to clear Bromela Road, which is just beyond the end of the train at far right.

With that work completed, the industries to the south of the main were switched, including Jupiter Pump & Compressor. Here you see the locomotive, SD&AE Consolidation no. 103, backing those pickups into the house track to acquire the caboose, preparatory to leaving town.

Finally, with all nine cars picked up, the train returned up the branch to the mainline junction at Shumala. Here is the train, arriving there.

This session went smoothly. The young engineer is pretty familiar now with the layout and how switching is done. She did a full set of set-outs and pickups, very much as any visiting operator would have done. Nice to be able to exercise the layout this way!

Tony Thompson

Friday, December 24, 2021

Richard Steinheimer, Part 2

 Almost since I was aware of railroad photography as something beyond snapshots of interesting trains, I recognized the quality and, often, the drama of a Steinheimer image. As I mentioned in the previous post, this began for me in the 1950s in Trains magazine (you can see that post at: https://modelingthesp.blogspot.com/2021/12/richard-steinheimer.html ). 

I should mention that my grasp of Steinheimer’s work was immensely increased by visiting the DeGolyer Library at Southern Methodist University in Dallas, where the great bulk of Dick’s pre-1970 negatives reside. When I first visited there in 1988, the photo curator at the time, Kay Bost, allowed me quite free access to the Steinheimer negatives, but warned me that prints would be expensive. The Library appreciated that, in a sense, these were art photos, and accordingly used a high-end lab to make good quality prints. These would be expensive. I replied that to me, that was actually good news. 

She then added that if I wanted to obtain permission to publish any, I could wait until I chose such photos, and individually request permission then (and pay a fee for each), or I could pay a fee up front for permission to use any and all of the prints I was ordering. Luckily, I chose the latter option. Most of what you see in this post are from those prints.

In the present post, I want to offer a few amateur’s comments about the Steinheimer images that have struck me. One thing evident from the very beginning of seeing these was his ease with night shots. Doing these well is of course not trivial, and years before O. Winston Link’s wonderful night shots on the Norfolk & Western gained visibility, Steinheimer was doing them frequently. Here’s one I like, the operator at Saugus, California handing up orders to eastward No. 806. Note that we see the entire operation: the operator hooping up, and the fireman reaching out for the hoop.

This photo also includes another real skill of Steinheimer’s, portraying employees doing their job without any apparent awareness of the photographer. Dick told me one time that his approach to such photos was to chat with the employee for a few minutes and set any misgivings at ease. Then he would move a little ways away and wait for the right moment.

Below is an example of this. It comes from a set of about 20 photos Dick took in the Los Angeles PFE shops in December 1950, showing car rebuilding (negatives at the DeGolyer). His aim, he told me, had been that PFE would want to buy the images for publicity use. To his dismay, PFE made clear that the last thing they wanted to publicize was rebuilding of old equipment. I used many of these images in the Car Shops chapter of the PFE book. This one shows workmen completing a rebuilt car interior.

Dick is of course known for his many dramatic and even artistic images. But he took lots of photos that could be called “documentation,” too. One example, which was included in Backwoods Railroads, is this useful view of the Santa Maria Valley Railroad with its typical pair of GE 70-tonners, passing the La Brea Ice Co. deck in Santa Maria. Like many of Stein’s images at the DeGolyer, this was in a paper sleeve with his trip notes typed on the outside, most interesting and informative.

 (By the way, it’s true his nickname was “Stein,” but primarily in the third person. Most who knew him, including me, always addressed him as “Dick.”)

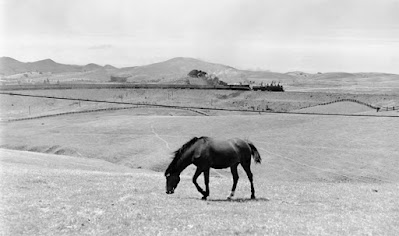
One of the most famous Steinheimer photos is his image of the horse in the middle of Horseshoe Curve, above San Luis Obispo. As I know from looking at his negatives at the DeGolyer Library from this day in 1953, he took photo after photo of passing trains, always with the horse turning his rear toward the camera, or with his head down. Here’s just one of the images.

But Dick just wasn’t happy with what he was getting, as he once told me. Finally, the descending Daylight blew its air horn for the Gold Tree crossing, and the horse raised his head. That was the shot Dick wanted, and that’s the famous image. But this episode shows that even the great photographers have to have both vision and patience, and may expose lots of shots you would normally never see.

These five photos are a necessarily brief representation even of my own favorites among Dick’s work, never mind the innumerable favorites of others. But I wanted to keep this at a reasonable length. I will conclude my comments in a forthcoming post.

Tony Thompson

Tuesday, December 21, 2021

The shortest day comes around again

 The shortest day, December 21, falls this year on one of my usual posting days for this blog. December 21 has long been a day of note for me, beginning with the fact that my dad invariably spoke of it. So once again, I want to repeat a post from 2012 on this topic, including a wonderful poem by Susan Cooper about this day and why it’s an occasion. I repeat it below.

The shortest day

One of my vivid memories from childhood is my father relishing this day, which seemed odd to me then, what with the days shortening and the nights closing in, and of course colder and rainier weather. But he always said, “Now the days will be getting longer,” and of course, so they will.


What hadn’t occurred to me in those days was that humans for many, many centuries have had the same feelings about this day that my dad did, and in more primitive times, for better reasons.


Ever since my wife and I discovered the performances known as Christmas Revels, we have attended here in the Bay Area, more years than not. Revels was created by John Langstaff in 1957, and the tradition gradually grew and extended over the years. Today Christmas Revels is performed in several cities around the country (for the location of those cities, you can visit their map at this link: http://www.revels.org/about-us/revels-nationwide , and from there go to their home page to learn more about their history and what Revels is.)


A favorite part of the performance of every Christmas Revels is the reading, toward the end, of a poem by Susan Cooper, written for Revels in 1977 and for me a delight. I reproduce it below, with permission from Cooper, to whom I wrote an email and requested the use. (The poem is all over the Internet, in both written and spoken form, though often mis-punctuated and sometimes with words changed — imagine the nerve!) 

She sent me a copy of it as she wrote it, so that it could be presented correctly. (If you’d like to know more about her, please visit her web site: http://www.thelostland.com/ .) She also mentioned that she was happy to give permission for use in this blog, as she is descended from three generations of English railwaymen!

THE SHORTEST DAY

By Susan Cooper

So the shortest day came, and the year died,
And everywhere down the centuries of the snow-white world
Came people singing, dancing,
To drive the dark away.
They lighted candles in the winter trees;
They hung their homes with evergreen,
They burned beseeching fires all night long
To keep the year alive.
And when the new year's sunshine blazed awake
They shouted, revelling.
Through all the frosty ages you can hear them
Echoing, behind us -- listen!
All the long echoes sing the same delight
This shortest day
As promise wakens in the sleeping land.
They carol, feast, give thanks,
And dearly love their friends, and hope for peace.
And so do we, here, now,
This year, and every year.
Welcome Yule!

     A far more eloquent presentation of our traditions than I could ever have written. I hope you enjoy it as much as I do.
Tony Thompson

Saturday, December 18, 2021

Richard Steinheimer

 I was tempted to call this “An Appreciation,” but Steinheimer’s reputation needs no appreciation from me. Let’s just call it a reminiscence. I have always been surprised to hear younger modelers not completely sure who Steinheimer was. I want to begin with his many publications.

Dick was eleven years older than me, and as it happened, attended the same high school as me, Herbert Hoover High School in Glendale, California. He began railroad photography in 1945, when he was 16, and soon graduated from a Baby Brownie to an Argus and, in 1947, to a Speed Graphic. 

Even his earliest photos show a distinctive “eye” for composition. I often realized in the 1950s, when I would open a new copy of Trains magazine, that I could recognize a Steinheimer photo at a glance. David P.  Morgan, editor of Trains, was an early enthusiast of Dick’s photography and published it often.

But I think that there had not been major attention to Steinheimer beyond readers of Trains until 1963. Two books were published that year featuring his photography, the first of many. One was Backwoods Railroads of the West (Kalmbach), a 9-1/4 x 13-inch horizontal format book, entirely of his images. 


 The book was not commercially successful, and both Kalmbach and Dick were disappointed. Some said it was the word “West” in the title, with so many railroad enthusiasts living in the eastern two-thirds of the country. Others thought it was the word “Backwoods,” since that suggested small, obscure railroads, though in fact many mainline railroad images are in the book. But it remains a marvelous collection of Steinheimer photography, readily purchased on line.

The second was The Central Pacific and Southern Pacific Railroads, by Lucius Beebe (Howell-North ), an 8-1/2 x 11-inch, 632-page book, which as the front cover mentioned, featured 121 of Steinheimer’s photos. This seems to have suddenly created recognition from many who had not fully appreciated the occasional images in Trains.

A long-gestating project of Dick’s was a collection of his marvelous photographs of the Milwaukee Road electrified lines, entitled The Electric Way Across the Mountains (Carbarn Press), 1980. Dick often spoke of this book as his finest work, and I had the pleasure of working with Dick and his wife, Shirley Burman, to produce a second edition of the book, published by Signature Press(2005).

In 1982 and 1983, Interurbans Press in Pasadena produced a pair of excellent photo albums, entitled Growing up With Trains, the first a Southern California album by Dick and his longtime friend and fellow photographer, Don Sims, the second by Dick and Ted Benson. Volume 2’s cover is a photo by Steinheimer of Dick Dorn in the snow. Both are 8-1/2 x 11-inch softcover books.

 There have been two beautifully produced overviews of Dick’s work, both with a strong biographical content. The first was Done Honest & True (Pentrex, 1998), with an appreciative text by Ted Benson. It features many of Dick’s finest photos. It’s a 9 x 12-inch vertical format soft-cover book.


The other is the monumental and truly serious photographic compendium, A Passion for Trains (W.W. Norton, 2004), with an informative text by Jeff Brouws. (You just know it’s an art book when the pages aren’t numbered.) Roughly 12 x 12 inches in size, it’s a magnificent reproduction of Dick’s best work, and I have said to a number of people that if you just want one Steinheimer album, this is the one to have.

This isn’t every Steinheimer book, but it is a good sample. I also want to offer some personal impressions of the photographs themselves, but will reserve that for a future post.

Tony Thompson

Wednesday, December 15, 2021

Distributing ice reefers

 The title of this post may seem ambiguous, but bear with me. I am referring to the way(s) that empty ice reefers were, or may have been, moved to the shippers that ordered them. Here I assume the reader knows the background of Empty Car Bills, Waybills, and so on. If you don’t know, you can use either term as a search term in the search box at right, to find my earlier posts on those topics.

The crew of a local freight train, pausing to work in a particular town and with only a single packing house in that town, would certainly know where the empty reefer in their train was headed. So if the train was like the one below, arriving in my layout town of Santa Rosalia and pulling down to the depot to confer with the agent, the crew didn’t need to be told about the reefer.  The agent, who had placed the order for the car, could tell them where it went, but they know very well that it’s headed for Coastal Citrus, at left of this view.

The locomotive here is SP 2344, a Ten-Wheeler, and today the local crew has been saddled with one of SP’s cordially disliked boxcar cabooses, SP 18037, a “temporary” conversion and a lot less comfortable to ride than a conventional caboose. It’s a Westerfield model.

And of course both agent and crew assume that the car they are delivering was correctly chosen by the Car Distributor to fulfill the order. If pre-iced, that was probably done at the ice deck in the local train’s departure town. So they can spot the empty with no further thought.

But what if the situation is more complicated? There may, for example, be two packing houses, both of which have requested empties, and perhaps, as in my layout town of Ballard, one of them (Guadalupe Fruit) has requested a pre-iced car and the other (Western Packing) wants an un-iced car. Now there may be two or several empty reefers in the train. But unless the crew sees water coming from the drain chutes on one of the cars, they can’t tell from the outside which car is which. No problem, the agent can tell the crew which is which.

Here the Santa Rosalia local is just arriving in Ballard, with, as usual, the locomotive running in reverse on the outward leg of the job (it’s SD&AE Consolidation no. 103). Where the two reefers are to be spotted is not yet known to the crew, as there are four packing houses here. They will get the answer from the agent.

But it can be even more involved. I am well familiar with the idea that a group of packing houses, all packing the same crop, will receive the exact same car types. This is implemented at the La Mesa Club’s famous Tehachapi layout in San Diego, when one switches Arvin. The Arvin switch job goes out with a string of 30 reefers, all nominally identical, and spots them at about 8 packing houses, all of them loading potatoes. 

I’ve described this process, devised I believe by Jason Hill, before: http://modelingthesp.blogspot.com/2012/11/operating-on-tehachapi-part-2.html . Below is a photo from that post, showing two of the large potato houses (only in the form of paper signs when this photo was taken), and their triple-track sidings. Just as at prototype Arvin, the houses load potatoes in three-abreast cars.

Naturally, it doesn’t matter which house gets which car; but it will matter when the cars are loaded, so the switch crew has to make up a switch list of which cars came from which houses, and then the various destinations of each house’s cars can be added to outbound directions. In the foreground of the photo above, you see the switch list being compiled by the conductor of this job, which identifies who loaded which car.

But what if the cars are not interchangeable? In my visit last October to the Twin Cities, I had the pleasure of operating on the layouts of Mike Jordan and Bill Jolitz, both of whom have devised interesting challenges for crews spotting empty reefers. (My brief description of both is at this link: https://modelingthesp.blogspot.com/2021/11/out-of-town-operating-part-3.html .) Mike in particular has a scheme where some shippers have ordered fan-equipped cars, and the switch crew has to select from the available empties to supply the correct cars. 

This could well be realistic. Car fans were a great help, both in speeding the initial cooling of a load, and also in making and keeping internal load temperatures uniform throughout the car. In particular, any shipper needing pre-iced cars could well also order fan cars; so might shippers of denser produce like melons or citrus, for which temperature uniformity was more of a challenge.

So if a crew has several empty reefers to deliver in a particular town, and the agent message merely directs them to place the car(s) with fans at one shipper, how do they identify those cars? During one period, PFE painted the fan shafts, or a metal plate representing a fan, black, and these are easy to see above the left-hand trucks, as in this photo of a Class R-40-26 model:

But farther into the 1950s, as the all-orange sides came to include fan shafts or plates, you have look more closely. For a time, an outline symbol was used, as shown below on an InterMountain model of Class R-30-18:

I will experiment with crew messages and other means to direct crews to spot the fan cars at the right shipper. If any of it seems interesting I will report further in a future post.

Tony Thompson

Sunday, December 12, 2021

More about flat car decks

 One of the model freight cars that I most often see on visited layouts that cry out to be “improved” are flat cars. Not because the car body itself is in any way wrong (though it may be), but because of the deck. This involves a number of issues.

There is a myth among many modelers that the lumber of flat car decks was creosoted, and doubtless some railroads at some time periods must have done so. But non-creosote types of pressure-treatment for wood that would see outdoor service were available before World War I, and Railway Age articles in that period of rapid change in freight car technology do refer to these treatments. My own impression from photographs is that even in the 1920s, and certainly by the steam-diesel transition era, creosoted decks were rare to non-existent.

Of course a bigger issue in the color of decks is simple aging due to sunlight and changes in the wood with age (even wood inside the walls of structures, exposed to no sunlight, darkens considerably with age). Of course any flat car fleet would contain a few cars, either freshly delivered or freshly re-decked, but most would have varying degrees of darkening from age.

I have discussed weathering methods to achieve these changes in deck color in my “Reference pages,” with links at the top right of this blog post, and in a prior post, at: http://modelingthesp.blogspot.com/2011/05/weathering-flat-car-decks.html . Below are examples.

In this photo, the uppermost car has a plastic deck, and the lower two have wood decks. All have been scraped, gouged, scored and roughened to give some realistic texture. Then all have been worked with acrylic tube colors, not washes but painted, mixing Neutral Gray, Burnt Umber, and Black. These decks look considerably more realistic than fresh wood or, worse, freight car color. Few railroads bothered to paint flat car decks.

Yet another issue to be recognized is wear and tear. Blocking and other dunnage for loads was routinely spiked to the wood deck. Over time, this steadily tore up the deck surface. For any flat car of moderately advanced age, it is difficult to reproduce these levels of damage in models. In addition, many consignees receiving a shipment on a flat car simply left the old dunnage, spiked down or not, for someone else to remove. The same goes for miscellaneous steel strapping, cables and ropes, and sometimes even tarpaulins.

There are lots of examples out there in prototype photography Let me show just one, a Richard Steinheimer photo (DeGolyer Library). It was taken from Glendale Tower, and the Southern Pacific double-track main is here crossing the Pacific Electric’s double track running in the center of Brand Boulevard, the street you see (notice the overhead wires). Coming toward the camera is SP 6153, heading up Train 804, a train from Bakersfield, and a westward freight out of Taylor Yard is passing it on the right. Our subject now, of course is the two flat cars.

Doubtless, Steinheimer was not interested in the flat cars, except that they provide a gap in the train though which he could photograph the oncoming diesel locomotives. But even a glance shows the rough condition of the foreground car’s deck, which is in sunlight (Train 804 shadows the other one). Let’s look at it more closely.

There are numerous wood blocks or strips in places around the deck, a jumble of what looks like steel strapping at the far end, and some other material, strapping or cable, nearer the camera. And the deck surface is quite extensively distressed. 

Would all this junk remain on the flat car when it is spotted at the next shipper’s siding? Likely not. Most yards had a clean-out track, and cars about to be delivered would be cycled through there if needed. But the car we see above must be destined to somewhere well beyond Taylor Yard, since they haven't cleaned it.

It’s my belief that a flat car fleet ought to contain at least a few cars showing a bunch of dunnage. Here is one example, modeled by Richard Hendrickson, and it certainly is a clear example of what I’m talking about (it’s a Proto2000 model). Of course, if the same flat is to accommodate (removable) loads also, the dunnage has to be judiciously placed so as not to interfere with those loads. This model also shows considerable distressing of the deck (you can click to enlarge if you wish.)

The comment about loads reminds me to mention that in general, I am an advocate of removable loads. Occasionally a load requires complex tie-downs and is better installed as a permanent load, but I would usually rather cut some corners on the completeness or accuracy of tie-downs in favor of a readily removable load.

And lastly,  this commentary on flat car decks reminds me that I, too, have a few cars with far-too-clean decks, and will need to pull a few cars back onto the bench for some work.

Tony Thompson

Wednesday, December 8, 2021

The eleventh anniversary of this blog

 Every year, on December 8, I recollect the beginning of this blog, on that date in 2010. And once again, as I look back over the years, and glance at the statistics to date, I am as amazed as I ever was with the interest and readership. To date I have put up about 1350 posts, and there have been over 3000 comments on the posts (and many more beyond that in the form of off-list emails to me). Further, on November 26 just past, the total page views edged past 2 million views. Two million!   

Over the years, there have been some slow periods and a few unaccountable highs, but there remains, over recent years, a gently rising average. Below is a screen shot from Google‘s data, taken today. The current month, of course, looks low because it’s just begun. Recent months have been running around 18,000 page views or so a month.

I like to look back over each previous year, to remind myself of the topics that seemed to predominate. For this year, by which I mean most of 2021, one prominent topic is that I was wrapping up a long series of posts about freight car graffiti (you can use that phrase as a search term in the search box at tpo right, if you would like to see some of those posts.)

There were also a number of posts about layout operation, both on my own layout and as a visitor to others’ layouts (“operation” is a good search term). Operation, of course, is how a layout comes alive, and hopefully, brings its builder’s vision into being. That’s often how I feel when a visiting crew operates on my own layout, and I think most layout owners feel the same way.

As in most years, there are a great many posts having to with freight cars, how they are built and how they can be operated realistically. That’s entirely natural, as freight cars are in fact my principal interest in the hobby, both their prototype history, and modeling techniques to represent them in HO scale.

For some years now, I have been interested in learning more about prototype waybills and how they were used in the pre-computer era, and during most years I have posted several times on this topic (“waybills part” as a search term would get you into the numbered series of those posts). This year there have been 14 of them, bringing the series to no. 93. I guess this means that I am still learning, and that’s a good thing.

I stopped the other day to consider the state of my layout. Though not complete, parts of it are about as complete as they are going to get, which is to say, as complete as I want. The view of East Shumala below, with Pismo Dunes Road along the edge of the layout,  is such an area. Yes, there are a few more things that could be done, but they are (in my mind) fairly minor.

On the other hand, I have no illusions about areas with glaring voids, such as the need for a structure to house Channel Islands Kelp Products, represented at the moment with only a slip of paper. Of course this or any “industry” can ship and receive cargoes without an actual building, but yes, I do intend to add a structure here. The business, by the way, harvests giant kelp and red kelp just offshore, producing alginate, agar agar, and carageenan for commercial use.

This small remaining group of layout tasks to be done does not arouse any great urgency, but I do have plans for most of what’s still missing. Maybe by next year I can show more areas that are complete. But until then, this is how things look on the eleventh anniversary of this blog.

Tony Thompson

Monday, December 6, 2021

Modeling icing directions

 In the previous post, I showed a range of prototype photos to support a discussion of what was involved in ice refrigeration on the railroads. Though I alluded to modeling aspects, that was not the focus of the post (you can read it at: https://modelingthesp.blogspot.com/2021/12/reflections-on-ice-refrigeration.html ). In the present post, I discuss how we can direct model icing.

The first decision about any model perishable cargo is whether it would be iced or ventilated. Ventilation, in which ice hatches were latched open at about a 30-degree angle, allowed air to pour through the car when the train was moving. If for example the cargo was tomatoes, ideally shipped at about 50 degrees F, external temperatures in that range would be just fine. So certain cargoes, at certain times of the year, would move under vent service, saving the cost of ice. 

Realistically, at least in HO scale, it is impractical to open and close model ice hatches. Thus one ordinarily models the individual refrigerator car with hatches either open or closed. Some years ago, I offered a post about this, at: https://modelingthesp.blogspot.com/2013/07/modeling-open-ice-hatches-on.html .

But let’s focus on icing. The first thing to realize is that, with very few exceptions, all perishable loads were “initial iced,” as the tariff terminology was, as soon after loading as possible, filling the bunkers. So all outgoing loads under ice refrigeration, if you are modeling a shipper of perishables, would be iced. In layout operation, this can mean that crews are directed to move all departing perishables to the ice deck to fill the bunkers. 

Or of course you can give more explicit directions. Back when I was using Allen McClelland’s update to the Doug Smith card system, one of my 3 x 5-inch car cards, with perishable waybill inserted in the pocket at right, might look like this:

In that day, I didn’t know much about waybills, so was using the skeleton form shown.

To direct icing, and other service details like coopering doors or cleaning out cars, I created “service order” slips like this (shown oversize):

Then of course this service order was inserted into the waybill pocket, so a crew picking up this car would have the directions in front of them. This certainly worked, because the service slip was impossible to ignore, as you can recognize below. 

But moving on to a more realistic waybill for perishables, I abbreviated the substantial “Protective Services” section of the prototype waybill to create the segment you see below, just under the routing information. This includes reconsignment (which may happen en route), and whether to pre-ice, initial ice, and which CPS section applies. The waybill below only calls for initial icing.

Note that there is a box labeled “CPS,” meaning “Carrier Protective Services.” The CPS tariff has chapters or Sections for each kind of protective service, and Section 2 is for standard types of icing.

For one of my packing houses, seasonal Guadalupe Fruit in the layout town of Ballard, they do order pre-iced cars because they don’t have any pre-cooling facilities for their outgoing produce. This is shown in a waybill very clearly, as you see below. This is still Section 2 CPS, just adding the pre-icing step.

If a car is to move in ventilation service, that falls under CPS Section 3, and that is noted on the waybill, but in fact, the car spotted to be loaded would usually be a model with ice hatches already open. This particular load, blending wine in wood barrels, is effectively being shipped in an insulated box car, so likely the season is fall or spring. The agent filling out the waybill has written in, “vent svc.” to make sure the crew knows what they are looking at, though it’s redundant with “CPS Section 3.”

So waybills, of whatever kind, are one way that icing can be called out in layout operations, depending on how much detail is wanted. Another way would be to provide the crew with a written message from the agent. For example, here is an agent message (using a spare telegram blank, as was common on SP), for my town of Shumala, where there is an ice deck. For more discussion about agent’s messages, you may wish to read my prior post at: https://modelingthesp.blogspot.com/2015/06/operating-with-agent-messages.html .

On my layout, cars needing icing are all outbound loads, simplifying communication. So far, I have not had reason to model icing needs on passing shipments on SP’s Coast Route. If they did arise, I would use an agent’s message to tell the crew what to do.

Tony Thompson

Friday, December 3, 2021

Reflections on ice refrigeration

 During my recent trip to the Twin Cities and Wisconsin, the subject came up of the details surrounding ice refrigeration. One person present said I had never described it in full in my blog. To which I somewhat lamely replied that “it’s all in the PFE book” (Pacific Fruit Express, by Thompson, Church and Jones, 2nd edition, Signature Press, 2000).

It’s a lame response because nowhere in the book is the topic really summarized, though there is certainly very extensive factual material as well as photos showing icing, ice plants, and ice refrigerator cars. So the present post is an effort to provide a summary. For background, let me mention a post from some years ago, on the terminology of ice service (you can see it at: https://modelingthesp.blogspot.com/2012/12/refrigerator-car-service-terminology.html ). 

For an even broader description of some of the topics of the present post, I recommend an article of mine in Model Railroad Hobbyist, in the issue for September 2013. This issue is still available, for free, to read on-line or download for your use, at mrhmag.com ), and was Part 1 of a two-part article about Pacific Fruit Express. Some of the photos in the present post are repeated from that article.

Let me begin with empty cars. All major refrigerator car owners maintained “service centers,” as we might call them, where nearly all returning empties were cleaned and checked for any mechanical repair needs. As car owners, they wanted to make sure that cars supplied to shippers for loading were clean and in good condition, especially important for food and food products. 

That’s not to say that modeling a local clean-out track for reefers is incorrect, only to say that it was unusual, outside the car-owner facilities. Many yards had clean-out tracks for box and other cars, though reefers would not normally have been cleaned there.

As an example, shown below is the PFE cleaning track at Roseville, California (PFE photo). The length of the string of cars being cleaned and checked for any needed repairs testifies to the scale of this operation, typical of any large owner of reefers. Some cars still had “body ice” inside (described below) and it’s been pulled out. Drains have been cleared and are emptying onto the apron.

(Incidentally, I should mention that the photo above was taken in November 1962,  almost ten years after PFE discontinued periodic washing of its cars in about 1953.)

Sometimes fumigation is mentioned. Occasionally, insect infestations did occur, and empty cars were fumigated to eliminate the pests. Again, the car owner, such as PFE, carried this out at their own shops. In my interviews with retired PFE people, they said that this was an uncommon requirement.

Once cars were certified by the car owner as ready for use, they were moved by the railroad to the harvest areas for loading. In peak periods, this could be a difficult and delicate balancing of the needs of each area, based on crop and weather forecasts, along with management experience. 

By the way, for a professional’s recollections on this topic, and on icing, you might like to read a segment of one of my interviews with PFE’s Pete Holst (you can find it here: https://modelingthesp.blogspot.com/2012/09/pfe-operations-from-pete-holst.html ).

The shipper made the decisions about all Protective Services, as they were called, meaning both icing and use of car heaters. And icing might mean normal bunker icing, along with the possibility of “top icing” (shaved ice shoveled or air-blown over the top of the load inside the car) or “body icing,” placing small blocks of ice among the packages of produce inside the load. Likewise, the opening of ice hatches in “vent” (ventilation) service was determined by the shipper.

The photo below, from the ART book (American Refrigerator Transit, S.T. Maher, G.J. Michels and Gene Semon, Signature Press, 2017), shows shaved ice being blown over a load of spinach baskets with air pressure, in Robestown, Texas in 1944.

The term “icing,” therefore, had multiple meanings. And the language in the Perishable Protective Services Tariff refers to bunker icing prior to spotting the empty car for loading as “pre-icing,” whereas filling the ice bunkers of a just-loaded car, prior to its departure to destination, as “initial icing.” 

The shipper chose whether to specify (and pay for) pre-icing, usually according to whether they had their own cooling facilities in which they could cool the produce before loading. If not, pre-icing at least got the shipment loaded into a cool car. But remember, the thermal mass of a carload of produce greatly exceeded the thermal mass of the car and air inside the car. Loading pre-cooled produce into a warm car was not considered damaging.

Then of course the car set out on its journey of hundreds or thousands of miles. Icing was conducted “as needed,” or as specified by shipper, usually meaning every 24 hours, but times would be extended in cooler weather. Bunkers were simply filled to the top, after a foreman estimated visually how many pounds it would take (shippers were billed for all icing). Likewise with vent service, the shipper decided whether and where the hatches were opened or closed, based on weather forecasts for the transit territory. Telegrams could be sent ahead to modify initial instructions.

The icing process itself distinctively used two tools, in ice deck operations throughout North America. One was a wood-handled “pickaroon” with which ice could be either pushed or pulled; the other was a heavy, forged steel fork, called by some a "bi-dent,” which was used to chop ice. I will show two photos. First, a 1952 photo by Richard Steinheimer (DeGolyer Library), on what he described as a “hot summer night” in El Centro, California. This reminds us that icing took place around the clock.

Secondly, I cannot resist showing again this superb Jim Morley photo, taken at Roseville in 1948, showing men not posing for the photographer but in the act of doing their jobs. Like the photo above, this photo clearly shows the drop-down aprons and portable bridges used to move ice to the hatches.

We are also reminded by both of the above photos that the large 300-pound ice blocks manufactured in the ice plant were quartered on the deck by a workman called a “splitter,” and then the “passer” moved the blocks to the man on the car roof, the “chopper,” who reduced the size of the ice chunks according to what had been ordered for that car. The 1951 photo below at Bakersfield shows this also (PFE photo).

For more, please consult my 6-part series of blog post on “handling ice on ice decks,” a phrase that can be used as a search term in the search box at the top right of the present post. 

Obviously, the sheer scale of big-time refrigerator car operations would be challenging to model. The saving grace for modelers is that local packing houses were often on a far smaller scale, and their operating cycles can be modeled realistically.

Tony Thompson

Tuesday, November 30, 2021

Gondola interiors

 Open-top cars, especially gondolas with tight bottoms, inevitably get considerable dirt, rust, and dunnage remnants accumulating in their interior. Anyone who has viewed prototype gondolas from above knows what I am talking about. Yet often this is not modeled, even for cars that would be far past their construction date on a particular layout.

Awhile back I read an interesting comment in one of the modeler forums on the Model Railroad Hobbyist site. Here is a link to the particular node: https://model-railroad-hobbyist.com/node/35193 . The person providing the images only identified himself as “Terry,” so I can’t give full credit. Here is one of the images, recently photographed, a Missouri Pacific car:

The accumulation of miscellaneous material, and the rusty floor, is evident. Another example was this GONX car. Here the rust is a little less evident, but the color, especially of the floor, is considerably different that the paint color.

I recently observed a whole fleet of superb gondola interiors on Bill Neale’s excellent layout depicting the Pennsylvania Railroad in 1939 (see my blog post about the layout, at: https://modelingthesp.blogspot.com/2021/11/attending-prorail-2021.html ). With Bill’s permission, I will show a couple of examples that I photographed. First, some black NYC gondolas, with interiors quite different in color:

Another example, this one a Pennsylvania car, shows an even more dramatic interior, though certainly well within the range of what one sees on the prototype:

And I will show a couple of cars in my own fleet. First up is a model I inherited from Richard Hendrickson, a B&O USRA gondola (Westerfield resin, I think), Class O-27, with distressed sides, some interior color change, and considerable remnant dunnage:

Another is a fairly recent Tangent model of the Pennsylvania G31C class, which would be recently built in my 1953 modeling year, with mostly dunnage inside but some rust developing on the interior of the sides:

Lastly, I wanted to try and get some of the tan “dirt” colors seen in the Bill Neale models. I tried using a mix of three acrylic tube colors: Neutral Gray, Raw Sienna, and a little bit of Burnt Sienna. This seemed to give a good “dusty” or sandy look. Below is an Ulrich GS gondola that I’ve operated for some time, with added interior color. I intend to try more intense versions of this.

All these cars show some of what I want to achieve, including the dunnage remnants and soil colors that I want, but I want to move further toward having some of my gondolas with truly rusty or sandy interiors. I will show some further results in a future post.

Tony Thompson