Reference pages

Monday, July 29, 2024

An Athearn “Blue Box” tank car, Part 2

In the preceding post, I showed my collecting together of the main parts for one of Athearn’s insulated tank cars, that they call a “chemical” tank car — a term with no specific meaning as to tank car type. I also showed my early modifications, primarily replacing the huge valve bonnet of the original. And I mentioned the car I wished to represent, owned by Shell Chemical Co. That post is here: https://modelingthesp.blogspot.com/2024/07/reworking-athearn-blue-box-tank-car.html .

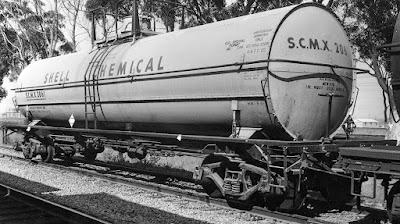
Having stated the goal, I show below a photo of the prototype car. This photo, taken October 26, 1952, at Pittsburg, California by Chet McCoid  (Bob’s Photo collection, courtesy Ted Culotta) was the basis for the recent decal set, D-245, available from National Scale Car (see their listing at: https://nationalscalecar.com/decals-ho-scale/ ).

Several interesting details are visible in this photo. One is that the gray color of the upper tank extends to the bottom sheet, though many tank cars like this had black bottom sheets. The underframe, though, is black. And note the tank hold-down band, which emerges from the tank jacket right below the junction of the top and bottom halves of the jacket, and is connected directly to the bolster via a turnbuckle. Here’s a closer view:

The Athearn bottom sheet, as noted in the previous post (link in top paragraph, above) was obviously designed for the three-compartment uninsulated Athearn model. To represent the double tank bands of the prototype single-compartment car, Athearn molded a pair of “fins” on each side of the bottom sheet, doubtless a more practical choice than a pair of slender bands.

These fins were removed and the area sanded flat. What they would be replaced by is a representation of what you see in the prototype close-up above, a turnbuckle connection to the bolster. I have some nice Tichy turnbuckles in my parts drawer, part no. 8021, which should do fine. With fins removed and roughly sanded, here is the bottom sheet. Sanding will be refined before painting.

I will continue to additional details for the car, and paint and lettering, in a future post.

Tony Thompson
Friday, July 26, 2024

Early HO couplers

Looking at some freight cars I’ve picked up at swap meets, and seeing the variety of couplers on some of them, led me to reflect on these components in the early years. The standard of practically all HO modelers today, the excellent Kadee coupler, was just arriving on the scene before 1960, and was different from today’s version.

In the 1950s,one had three kinds of choices. A number of kit makers gave you dummy couplers, some of them poorly shaped, which were white metal castings. But Varney gave you a black plastic dummy which was scale size and shape. These are so good looking and accurate that I have installed them in contest models, just for appearance, though of course they aren’t very suitable for layout use.

If you operated with these couplers, you had to lift one of the cars to be coupled, and lower it down to engage the coupler on the other car. Not a big deal, but hardly prototypical, and it slowed down all switching moves.

For operating couplers, what seems to have been the original design was the Devore coupler. These were white metal, and had an operating rod that was designed to look like an air hose. When the rod was raised, it freed the knuckle to open, much like the prototype coupler pin. Note that this is the “new 1950” coupler.

These could be remotely uncoupled with a physical ramp, a slight incline which would put upward pressure on the rod and open the knuckle. When it worked, this was nice. And when knuckles were open, two of them would automatically close and couple when brought together.

The problems were several-fold. First, when one of these was really operating right, it was quite a pleasure to use. But for every one like that, you had a couple that weren’t consistent, and sometimes didn’t work well, and at least one that was stubborn and hardly ever cooperated. Also, as they were white metal, you had to paint them, and paint hardly ever improved operation. After a time, this coupler was sold by Devore to Model Die Casting, and for a number of years was included in Roundhouse kits.

Devore, incidentally, made all kinds of other castings and even freight cars. I have one of their 36-foot depressed center flat cars, and still have its original box. I posted awhile back about restoring this car for operational use (see the post at: https://modelingthesp.blogspot.com/2020/08/restoring-devore-kit-part-2.html ).

But for the serious operating modeler, there was a far better choice than dummies or Devore couplers: the Mantua coupler. This was a hook and loop design, made of brass, and it too required a ramp; but its operation was entirely dependable and consistent. Its operating pin, under the coupler box area and thus largely invisible, simply raised the hook and allowed uncoupling.

From beneath an installation, you can see the single screw used for attachment, and at a slight angle, the large operating pin. Here the hook part is barely visible, seen within the loop.

From above, the coupler could be painted black, minimizing its rather grossly unprototypical appearance. Here, the hook part is more visible. Still, for many modelers, the appearance of this was really not okay on otherwise realistic models.

The first Kadee coupler in the late 1950s looked much like its later appearance, but with an important exception: the operating pin was long and straight, sticking down below the coupler, and the reason was that a ramp was needed to operate it: a converging pair of, usually, wires which pressed the two coupler pins toward the center and opened both couplers. 

Even so, the new Kadee was very dependable and reasonably similar in appearance to a prototype coupler, and quickly made inroads among those who wanted to be able to operate freight cars. The later introduction of magnetic rather than mechanical ramp uncoupling was a further improvement.

Today, we are accustomed to extremely reliable operation of Kadee couplers, and when they are installed throughout a fleet, Accumate couplers, but back in the early days, choices were more complex.

Tony Thompson

Tuesday, July 23, 2024

An operating weekend around Chicago

This past weekend, four Californians traveled to Chicago for operating sessions on four outstanding layouts. This was an informal visit, arranged partly for the benefit of teenage modeler Dean Deis, whose name may be familiar because of his recent article in Model Railroader (the issue for May 2024). All four of us, and our hosts, enjoyed the entire event, which really went well.

We visitors all met at Midway Airport from our various inbound flights, and on the way to our first layout, we had the opportunity to visit one of two excellent hobby shops that we patronized on this trip, Lombard Hobbies. Then it was on to the op session.

Our first layout was Steve Cizek’s Marquette & Grand Marais, which would set the theme of the weekend: iron ore railroading. I’d operated there a couple of times before, and this time was lucky enough to get the West Yard job. Really interesting set of trains to build, some for the following day so no particular pressure, and lots to do. Everything ran well and was fun to carry out. Here’s a view of “my” yard, with its husky 0-8-0 switcher at lower right:

The next morning we headed off to Jerry Zeman’s layout, called the Spokane Southern (resembling the SP&S), with ample Great Northern and Northern Pacific components: an impressive and huge layout. Dean and I were in charge of Worley Yard, where we were kept pretty busy. Below is a view of the yard from the end I worked, with my power, an NP 0-8-0, in the foreground. That’s Dean in the distance, who was yardmaster.

On the way to our next layout, we had the opportunity to visit the second hobby shop, the justly famous Des Plaines Hobbies, where we were lucky to land in the midst of an all-store sale! Needless to say, a few purchases were made.

The next layout was Bob Hanmer’s Great Northern/DM&IR, where I have operated a number of times while at the annual Naperville RPM meetings of past years. It’s a really well-designed layout and we enjoyed its equally well-thought-out operating scheme. Having drawn a good number for job selection, I chose the Grand Rapids switch job, which I’ve done before and always enjoy. This job is centered around a paper plant, and therein lies a tale.

Awhile ago I was searching for additional industries to ship inbound to my layout’s printing company, so Googled the kind of paper I was familiar with from Signature Press books, coated paper sheet (not rolls), which is common in the book trade. I wanted a company that had been in existence in 1953, my layout’s era, and found a leading American company of this kind, Blandin Paper. This sounded faintly familiar, but I wasn’t sure why. I then looked at the location, which is Grand Rapids, Minnesota, and then the light came on. This is the paper plant I’ve switched at Hanmer’s! 

I told Bob this story and he said he’d like to see my inbound waybill, so he can make the corresponding outbound bill for his layout. Here’s the bill I had made:

I like the way Bob has depicted the plant, with a plain color for the plant’s footprint, and landscape scenicking right up to the building edge. (This isn’t the whole paper plant, just the shipping and receiving building.) I presume in the future he may add just the lower edges of building walls to emphasize that there is a building here. Here’s my switcher at work.

The final layout was Lou Steenwyk’s Ashland & Southern, where I got the Ashland East switch job. What a layout! I hadn’t been there before and was really impressed with the quality as well as the sheer scale of the layout, which had two decks. Just to show one example, here is most of the “ore yard,” where ore is collected prior to loading into a lake boat. (There is also a massive ore dock, and full-scale ore boat, modeled next to this.) You can click on the image to enlarge it if you wish.

A great weekend for us visitors, and I’d think for the hosts as well. As with other visits of this kind that we have made (for a recent example: https://modelingthesp.blogspot.com/2024/07/an-operating-visit-to-salt-lake-area.html ), it’s really more enjoyable than the usual mob scene of 60 or 80 people at a formal event. Genuine fun and well worth the travel.

Tony Thompson

Saturday, July 20, 2024

Reworking an Athearn “Blue Box” tank car

I have written numerous times in this blog about the uses I have found for Athearn’s old “Blue Box” (40-foot) tank car, whether the conventional car or the insulated car (called a “chemical car” by Athearn). I won’t go into all the background here, but will just give one example of previous work: https://modelingthesp.blogspot.com/2011/05/modeling-sp-tank-cars.html .

I have in mind a conversion of the insulated version of this car, to create a credible high-pressure tank car. I rummaged around in my various stashes of tank car kits and parts and left-over pieces, and soon found one of the insulated bodies, but no other parts from a former kit. No problem. Years ago, I purchased multiples of nearly all the parts for this kit, directly from Athearn (see this post: https://modelingthesp.blogspot.com/2015/12/athearn-tank-car-parts.html ).

The goal is one of the Shell Chemical high-pressure cars, for which decal set D245 has just become available from National Scale Car (here’s a link: https://nationalscalecar.com/product/d245-shell-tank-cars/ ). These are for a car in series SCMX 2001–2147, which were General American Transportation Co. (GATC) ICC 105A-300W insulated and pressurized tank cars of nominal capacity of 11,000 gallons for transportation of anhydrous ammonia. This is close to the size of the Athearn insulated tank body, and its underframe, though crude, is intended to represent a General American frame.

So I could quickly put together what are the basics: the insulated body, one of Athearn’s bottom sheets, the two-part underframe, and most important, a package of Precision Scale parts 31005: correct-size brass valve bonnets for high-pressure cars (for more on valve bonnets, you can visit this: http://modelingthesp.blogspot.com/2010/12/upgrading-old-models-2.html ).

The first step is to remove the immense Athearn attempt at representing a valve bonnet (oversize even for S scale), filing the area smooth, and fitting a Precision Scale bonnet in its place. For joining dissimilar materials like these, I have found canopy glue to be the best choice, making a good bond regardless of the two materials, and being quite tenacious when set.

The next step is to remove all the rivet detail from the bottom sheet, correctly placed for a three-compartment car but obviously extraneous for an insulated car, with its smooth outer jacket. I simply filed and sanded the rivets away. Incidentally, many tank car owners chose to make the bottom sheet black, along with the underframe, while applying various colors to the top part of the tank. Such a paint scheme is quite easy with the Athearn design, as the two parts are separate.

Here are both these parts, as modified, and the Athearn weight, which from experience I know to be about right for these cars, and which I will use.

There is an additional modification which, though minor, does need to be made. The Athearn underframe, as mentioned, was designed for their three-compartment tank car, and as such, has representations of three outlet or drain pipes in the underframe. Naturally the outer ones would be removed for a single-compartment car, and all should be removed for a pressure car, which cannot be unloaded from a bottom outlet. The photo below shows, at left, that center outlet and at right, one of the three-compartment outlets. These are simply snipped off.

With these parts of the project completed, I can go ahead and paint the tank body parts a light gray color. Safety appliances such as grab irons, ladders, and dome platform were usually black on cars like this, so I can install and paint them separately. But I will cover those steps, along with assembly and lettering, in a future post.

Tony Thompson

Wednesday, July 17, 2024

Another Hendrickson project

In addition to the many freight cars I inherited from Richard Hendrickson, there were also a considerable number (over 200) of resin and plastic freight car kits. The great majority of these I auctioned on-line through the Steam Era Freight Cars list. Of his roughly 250 completed car models, I gave away about half to Richard’s many friends and admirers, and kept the balance. But there were also several freight car projects in progress.

[For anyone who does not know, or has forgotten, who Richard Hendrickson was, it might be of interest to read the memorial essay of tribute I wrote after he passed away in June 2014. That essay can be found here: http://modelingthesp.blogspot.com/2014/07/in-memoriam-richard-hendrickson.html .] 

One of the projects was an interesting kitbash, using parts of at least four different kits, making a Santa Fe automobile car; I described completing it (see the concluding post at: https://modelingthesp.blogspot.com/2018/11/hendrickson-auto-car-part-6.html ). Another was a 65-foot gondola re-detailing project, which I described in a post some years ago (it is here: https://modelingthesp.blogspot.com/2016/07/an-interesting-hendrickson-gondola.html ). Yet another project was a W&LE gondola, which I completed awhile ago and described in a post (you can find the post at: http://modelingthesp.blogspot.com/2015/05/completing-richard-hendrickson-freight.html ). 

The latest one to come to light (and I confess it had been stored where I didn’t expect it) is a Tichy kit for a Georgia Railroad rebuilt USRA single-sheathed car. Richard had begun work on it, but it was well short of finished. This was an attractive project and I decided to complete it. 

Here is a brief prototype history: the Georgia received 300 USRA box cars, built by Haskell & Barker in late 1918 and early 1919, numbered GA 19000–19299. Then, as happened with a number of USRA cars in later years on several railroads, the Georgia rebuilt these cars in the late 1930s and into the 1940s to replace deteriorated wood sheathing, and the original Murphy roofs, which tended to fail at the outer end of the carlines. The rebuilt cars were renumbered 19500-19799. In the April 1940 Official Railway Equipment Register, over half the cars had been rebuilt.

The Georgia had upgraded these cars by welding steel sheathing to the insides of the steel body framing, replacing the wood sheathing, and on most of the cars, added new shop-built roofs. They also replaced the original wood doors with Youngstown corrugated steel doors, and replaced side grab iron rows with ladders. There are two articles containing information about these cars: Richard Hendrickson’s article in Model Railroading, Vol. 17, January 1987, pp. 9–15, and Patrick Wider’s article in Railway Prototype Cyclopedia, Vol. 17, 2008, pp. 1–51.

The photo below is representative of these cars in the 1950s. The features described above are evident. The cars did retain their original underframes and Andrews trucks, and the 5-5-5 corrugated steel ends, but were upgraded with AB brakes and power handbrake gear. (Photo dated January 1954, but no location or photographer identified. Bob’s Photo collection)

The cars became famous far beyond their meager numbers (originally 300 cars) because in the late 1950s they were painted in a gaudy silver scheme, with black roof, ends and doors. But prior to that time, they  were painted in workaday boxcar red, as the photo above shows. Richard intended to paint his model that way, because there were white decals in the kit box, and I will too.

Richard had assembled the basic body and had modified the roof to resemble the shop-built style used on these cars, with a minimal seam between panels. He represented this by adding a 0.010-inch styrene rod at each seam. In the photo below, the model rests on the Tichy “assembly feet.”

The underframe had been begun but not advanced very far, so that is the starting point for my work on the kit. Richard had omitted the train line, as he ordinarily did on freight cars, considering it to be essentially invisible. 

My first step, as stated, is to complete the underbody, including AB brakes, and then to continue with addition of details on the upper part of the car body. But I’ll describe any interesting parts of that process in a future post. 

Tony Thompson

Sunday, July 14, 2024

Modeling SP passenger cars, Part 21

In a previous post, I described lettering for my two streamlined Southern Pacific passenger cars, a 13 double bedroom car (13 DB) and a 4 double bedroom–4 compartment—2 drawing room or 4-4-2 car. I included mention of two sources of decals for these cars in Lark service. That post can be found here: https://modelingthesp.blogspot.com/2023/10/modeling-sp-passenger-cars-part-18.html .

Then we come to full-width diaphragms, which I wanted to place on one of these cars. I had a pair of suitable parts in my stash for years, and had to poke around to find out their source. They are brass, and it turns out they were made by Samhongsa, for Key Imports, originally as a test sample for some Daylight equipment planned by Key. They are non-working representations of the full-width design.

As you can see above, the part has tabs above and below the door which presumably were intended to attach to a car body. These interfere with the door surround on a Rivarossi car body, so I cut them off. I painted the brass interior and exterior areas with Lark Dark Gray (the color of the car ends), and attached the parts to the car end of my 13 DB model with canopy glue. At this point, the aisle side looked like the photo below.

The next step was to add the Lark color scheme of Two-Tone Gray (TTG) to the outer edges of the diaphragm parts, and black aligned with the roof. This was done by hand with a brush. The completed bedroom side of the car is shown below.

A second project among my existing fleet of passenger cars is one of the Rivarossi streamlined 10-6 (10 roomettes-6 double bedrooms) models, painted in Lark colors and lettered SP 9049. It lacks weight, and has only a partial view block (made with Bristol board). 

In fact, the entire interior should be blocked, because all the accommodations are rooms with doors. You should only be able to see through the car with doors open, which normally they would not be. You can see below that I originally added a view block along the side aisle, which borders the double bedrooms, but not beyond into the roomette area.

I made another view block with styrene, adding a heavy styrene strip along the bottom to act as a foot, and painted it dark gray (Tamiya “German Gray”) on both sides. This is then easy to install with canopy glue inside the car.

Finally, I added two weights, 1/2-13 steel nuts, painted flat black and attached with canopy glue. Two of these nuts total about one ounce of weight, a big help with the relatively light Rivarossi body. In the view below, note also that I have included a passenger figure partway along the view block at left, visible through an aisleway window.

A third project that has been completed was a simple re-lettering effort. I had purchased one of the Class 77-C-1 chair cars that Athearn produced, lettered for the T&NO’s Sunbeam. I wanted to re-letter it for the Daylight, far more appropriate for my layout’s location on SP’s Coast Division. I used an ancient Champ set of Daylight emblem decals and car numbers, and chose a number of a Class 77-C-3 car, not really right (I don’t know that this particular car was ever assigned to the Daylight) but certainly close enough.

As these cars get completed, I can take satisfaction in the interesting construction challenges of the modeling process, and the chance to do additional prototype research to make sure I understand the background of the cars and their operation.

Tony Thompson

Thursday, July 11, 2024

Rolling stock maintenance — still happening

From time to time I have described previously my various experiences maintaining the rolling stock on my layout. Much of this effort is routine and of no particular interest. But from time to time, I do find something that is either new to me, or that I think might be enough out of the ordinary to be of interest to others. (For one prior example, see this earlier post about trucks: https://modelingthesp.blogspot.com/2019/06/comments-on-truck-maintenance.html .)

An important issue that can arise in operating sessions is coupler height, and of course the ancillary problems of the Kadee trip pin height, and sticky knuckle springs. These of course should be checked long before an op session, but things can go wrong. I’ve had couplers exhibit a brand-new droop in an operating session, and fixed it by just tightening the screw in the coupler box lid!

About the sticky knuckle springs, I have long known that when I operate any of the freight cars I inherited from my late friend Richard Hendrickson, I have to double-check coupler operation. Richard never had an operating layout, so details like this understandably escaped him. He was quite meticulous about coupler height, but a fair number of his couplers, properly painted very dark brown, did get paint into the knuckle pivot pin, easily remedied with a drop of paint thinner onto that knuckle pin. (For background on Richard, for who who didn’t know him, see: https://modelingthesp.blogspot.com/2014/07/in-memoriam-richard-hendrickson.html .) He passed away just ten years ago.

Another point on couplers: over the years, I have become accustomed to one of the banes of the rolling stock operator: the press-in coupler box lid. I realized this is an economy for manufacturers, just mold the box lid with a pin to fit into a hole in the coupler pivot peg in the box. And it is also quick and easy to assemble when building a kit. Many of the Proto2000 kits had this kind of design: coupler box at left, underside of lid at right.

Sooner or later, naturally, that peg in the hole manages to loosen or completely separate. I hate to glue it, in case coupler replacement or repair ever becomes necessary, so I would usually drill out the hole in the box, drill the lid centered on where the peg was removed, and tap both for 2-56. 

I do something similar with InterMountain cars, some of which have a clunky coupler box. Here again, drilling and tapping for 2-56 works (as I showed earlier: https://modelingthesp.blogspot.com/2022/01/improving-freight-car-part-2.html ), but this is a good example of where a Kadee box might be as easy, and perhaps a somewhat better final result.

An even worse design is the old Athearn “Blue Box” tank cars, in which the cover plate for the coupler box was pressed into place. This was durable for months at most. Below you see this cover plate from underneath, and what friction there is, is right at the end sill.

Since that tank car is a good starting point for most of Southern Pacific’s tank car fleet in my modeling year of 1953, I have upgraded a fair number of them, and have a method for fixing the coupler pockets (shown in this post: http://modelingthesp.blogspot.com/2019/05/fixing-athearn-tank-car-coupler-pockets.html ). 

Finally, in an operating sessions a few months back, I noticed that one of my passenger cars was kind of “limping” along the track.  The train returned to staging all right, and after the session I pulled out the car to take a look. The metal “tire” on one of the plastic wheels had become separated, and had slipped to one side. I considered trying to glue it back in position, but instead replaced all the wheelsets for the entire car. (Like many passenger car models, these were 33-inch wheels, not the prototype’s 36-inch wheels.)

All these things are ongoing maintenance issues, and as every experienced layout operator knows, any piece of rolling stock can, at any time, suddenly exhibit a new problem. I try to be proactive on these and watch for them in setting up operating sessions, but naturally some come to light in the relatively intensive use of rolling stock during sessions. I have learned not to be surprised.

Tony Thompson

Monday, July 8, 2024

Operating an SP business car, Part 2

In the previous post, I described my attempt to use the Rivarossi heavyweight observation car as a stand-in for the actual Southern Pacific business car assigned to the Coast Division superintendent for the time I model, 1953. (That post: https://modelingthesp.blogspot.com/2024/06/operating-sp-business-car.html . )

In that previous post, I showed a Mac Gaddis photo at San Luis Obispo, of SP 119 arriving on Train 72, showing the left side of the car. Mac later photographed SP 119 in its usual visiting location, a stub track near the freight house, and this shows the right side (fall 1953).

As Mac told me in an interview, the car visited this part of Coast Division often because its assigned user, Coast Division Superintendent J.J. Jordan, liked the cooler summer weather along the coast, and liked to dine on fish and shellfish, fresh from the coast. In fact Jordan (known in the third person as “Jimmy” but not to his face) loved the Coast so much that he declined promotion to other places on the SP and remained as Coast Superintendent from 1931 to 1956.

Often seen with a cigar in his face, and famed for his desk-thumping “old-time railroading” style, Jimmy Jordan was a fixture up and down Coast Division. Here is a photo of him from the SP Bulletin.

I mentioned in the previous post that my Rivarossi observation car, standing in for the Coast Division official car, remained “out of service” once I discovered that it wasn’t numbered correctly and had several differences from the prototype.

But recently I was going through the SPH&TS official car book (briefly reviewed in the previous post, link in the first paragraph at the top of this post), and found the series of SP photos of the car after it was upgraded at Sacramento General Shops in the summer of 1953 with new mechanical equipment, and air-conditioned. One of these photos, taken from the book, is shown below.

This photo emphasizes another difference of SP 119 from the Rivarossi model: its rear end wall is at the outer end of the car sides, not inset to make a bigger platform, as is true of the Rivarossi model.

Still, I decided to see what changes I could conveniently make to the Rivarossi model to bring it closer to the prototype SP 119. I could move the rear wall outwards, and I could add the very evident truss rods using heavy brass wire. I had already removed the somewhat overblown awning under the platform canopy on the original model (internet photo):

I began with the rear wall. By repeated slicing with a hobby knife around the periphery of the wall, I was able to remove it intact, as shown below. You can see the previous location by the change in floor colors. Here the removed wall is at lower left, and the molded Rivarossi interior is at right. All colors shown can remain, as I move that wall rearward.

In a future post, I will show the completion of work on that rear wall, along with addition of truss rods to the body, and addition of some weight to the car. The model will still differ from the prototype in some ways, but I believe I am on the way to an acceptable stand-in for SP 119.

Tony Thompson

Friday, July 5, 2024

An operating visit to the Salt Lake area

For almost 30 years, an operating weekend was held in the Salt Lake City area, called the “Great Basin Getaway” or GBG. In the last few years it has not been held, but last weekend a group of nine people, five of us from the Bay Area, made an informal visit, referred to as “GBG Lite.” Weather was fairly hot, but low humidity, and the air was gloriously clear, as it can be at the foot of the Wasatch. 

We operated on two excellent layouts, Rob Spangler’s 8th Subdivision of the Western Pacific, and Lee Nicholas’s Utah Colorado Western. I have said a bit about both layouts, in my description of the GBG event in 2016 (that post is at this link: https://modelingthesp.blogspot.com/2016/09/great-basin-getaway-2016.html ).

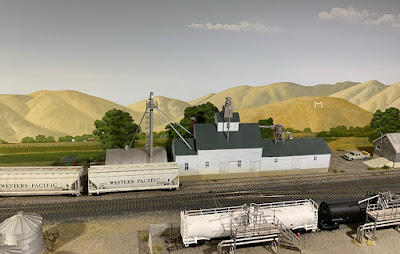
The first layout we operated was Spangler’s. As on my previous visit, I greatly admired his many excellent structures, fine backdrops, and impressive scenery treatments. Here is one of the structures that to me looked “just right,” at his town of Milton (note the “M” on the hillside in the background), a feed mill. The backdrop painting, for me, is a wonderful impressionist style, suggesting more than it shows.

An example of a fine scenic treatment is this depiction of a canyon, with one side of it shown only in part, but very convincing. I would say the same about the rock layers just visible on the hillsides.

One of the large industries is the Graymont facility at Lakeview, shown below. So often on model railroads our industries don’t look like they would need even one freight car for shipping, but this one certainly doesn’t fall into that error.

And just to the left of the above view was a nice treatment of a classic layout problem, how to handle a road that is heading directly into the backdrop. The Graymont sign in this view is right at the backdrop, so everything that looks like it is beyond the sign is just backdrop paint. And what nice mountains!

The second layout was Lee Nicholas’s well known and greatly respected Utah Colorado Western. I had really enjoyed operating here once before, and accordingly was really looking forward to another session. The train I drew was the CB&Q mine run, exchanging empties for loads at four coal mines. These were either facing point or trailing point switching, so planning was needed to do the work in most cases. Here’s one of those mines:

At the end of the run, all the (removable) loads were taken out of the cars in staging, and returned to all the empties that had been set out during the run. This of course set up the following session, when all that would be repeated. The actual operating plan was for me to run the train of (now) empty cars back over the entire route, so that the empty train would be at the original starting point.

But the way I was told that I now had the job of running the train in the opposite direction sounded to me like I was supposed to repeat the process: setting out empties and again picking up loads, just going in the opposite direction. This was actually pretty interesting, because the trailing point jobs in the original direction were now facing point, and vice versa. 

But as I neared the completion of this second run, I was told that no, I wasn’t supposed to repeat the switching, just run the empty train. But since I was now almost done, I finished up, and then went back, again replacing loads in the empty cars I had set out. I thought my version of the job was really better than the intended version! And Lee agreed with me, stating that my version of the job might become the new standard.

As before, I really enjoyed the finished scenery and many interesting and challenging industries all over the layout. And the backdrops are just as good. Here is the town of Cobre, with the depot at left, and my coal train on the main at the road crossing.

Another example of excellent scenic treatment is an even bigger challenge than the road heading into the backdrop: a road heading into a room corner. This adjoins the large (and impressive) sugar beet mill at Jiggs. The edge of the layout is about at the tall Texaco sign by the gas station. The road curving behind the store is entirely on the backdrop, painted on the coved corner.

It was a great weekend, operating on two great layouts. We all had a lot of fun, no surprise on layouts as good as these, and it most certainly was time well spent. Thanks again to Rob and Lee for hosting us!

Tony Thompson


Tuesday, July 2, 2024

Update on switch machine installations

On my layout, nearly all switches are hand-thrown (as would be such switches on a prototype rural branch line like I have modeled). But in a few places around the layout, where manual access is not convenient, I have had to provide an alternative (for more discussion on this subject see: https://modelingthesp.blogspot.com/2019/02/powering-turnouts.html ).

The one place I have powered the switches is where the track runs right behind some industries, making it awkward (and potentially damaging to structures) to hand-throw the switches. But this installation, in the track between my towns of Ballard and Santa Rosalia, has been involved with some trackwork difficulties. 

When the original track switches were in place, I could operate them easily with the MP1 machines, because the throwbars of the switches were not very close together. I described this installation in a previous post (you can see it at: https://modelingthesp.blogspot.com/2024/04/trackwork-wars-part-11.html ). Here is how it looked:

But when I had to replace these two track switches, a variety of track conformation issues caused the throwbars to be located closer together than before. This in turn meant that the MP1 machines would interfere with each other if the two actuating rods were both perpendicular to the track. As a compromise, I located the right-hand MP1 at more of an angle to the track.

This does require a little longer throw, easily accommodated in the MP1 because the throw distance is adjustable. But there was also another effect, greater friction, and sometimes the machine would only throw the switch part way. I was pondering what to do, when the track issues got worse.

The machines had to be disconnected and moved out of the way when the switch-gauge shrinkage issues were being corrected, that is, by restoring the track gauge (see this post: https://modelingthesp.blogspot.com/2024/05/trackwork-wars-part-14.html ). I then decided to try moving the two machines to be more symmetrically oriented to the track. This essentially involved enlarging the throwbar “trenches” somewhat to the left of the existing trench for each machine, preparatory to relocating the machines.

When installed, the two machines now had a nearly perpendicular throw direction, relative to the track axis, which quickly proved to be a much better mechanical arrangement. 

Next, as previously, the tubes over the throw rods (visible above) will be “buried” with paper mache to conceal them. But the important part, at this point, is that both of the two MP1 machines now operate properly, with the  more nearly perpendicular throw angles.

Tony Thompson