Reference pages

Sunday, February 28, 2021

Waybills, Part 82: deciphering a waybill

 I know from many conversations in the corridors at modeling meets that modelers tend to view waybills as simple and straightforward documents. Of course, some examples are exactly that. But many are not, and the subtleties are endless. I thought it might be interesting to consider some examples of the various complexities that sometimes arose.

For the present post, let me choose an example that relates to routing. Modelers often assume that an originating railroad would naturally route loads as far as possible on its own rails, and when free to do so, they would indeed do that; but shippers had the absolute right to choose routing, and normally did so. Yet routings can be head-scratchers, whoever chose them. The example for today is a Frisco waybill I was given some time ago, darkened with age. (Feel free to click on the image to enlarge it, if you wish.)

Let's look at the routing. In the upper left column of the bill, you will note that it states the routing as “FRISCO CBQ CMSTP&P NKP DLW BM” in moving this load of lumber from Birmingham, Alabama to Mountainview, New Hampshire. Junctions are not listed, though the form clearly states, “Show each junction . . .” The yard stamps at the bottom show what actually happened, and when. Note that stamp colors vary from black and purple to blue.

The waybill is dated May 19, 1950, normally the day (possibly the day before) the load is to be picked up, in SOU 11836, a 1937 AAR box car of 40-ton capacity. The first stamp at lower left indeed shows the car received in the yard at Birmingham on May 20. The car was not weighed, however, until May 22, as the white scale slip (pasted on) tells us, with a cargo weight of 54,300 pounds (the waybill itself states 50,000 pounds, likely an estimate at time of loading).

The second yard stamp is from the Burlington at St. Louis on May 23, and right above it is another Burlington stamp, for Willis Yard at Galesburg (Illinois) on May 25. Then the car was interchanged at East Moline (note handwriting above routing list) with Milwaukee Road, then entered the Chicago area. The next stamp is a Milwaukee stamp, showing the car received at Bensenville, Illinois on May 27. 

Note on the waybill that “Cheneyville” has been handwritten in the routing area, and indeed, that occurred, a transfer from the Milwaukee to the Nickel Plate at Cheneyville, Illinois on May 28. The next stamp, on May 30, shows the transfer from the NKP to the DL&W, though a location isn’t given. Presumably it was Buffalo, New York, the only interchange point between the two roads that is listed in the Official Railway Equipment Register (ORER) in 1950.

The Lackawanna transferred the car to the Delaware & Hudson at some point (though that isn’t in the original routing), evidently at Binghampton, New York. Note the stamp in the upper center of the waybill, mentioning this routing change. The car arrived at Mechanicville, New York on May 31. It was then transferred to the Boston & Maine that same day, and arrived on June 1 in Mountainview, NH, on the far eastern edge of New Hampshire.

It’s a roundabout trip, no question, and one might wonder why that happened. Birmingham was the easternmost point on the Frisco, and they moved the car as far north as they could, to St. Louis. From there, however, it’s murky. If you were going to use the Nickel Plate anyway, why not route directly to Buffalo from St. Louis? Shorter, and certainly faster than routing through the congestion of Chicago, then coming back south to Cheneyville. Or for that matter, why not transfer to the Nickel Plate in Chicago? 

And the routing could have been even simpler. From either Chicago or Buffalo, the New York Central’s water-level route seems an obvious eastward choice, and the Central could even have been selected all the way from St. Louis to the interchange with the final railroad, Boston & Maine, at Troy, New York.

So, a complex routing and thereby an interesting waybill. But what’s the point? First, this example shows how much information can be deciphered from a waybill after it reaches destination. Second, the complex and somewhat roundabout routing reminds us that the obvious and direct route is most certainly not always used. (Though in this case, it could be argued that north from Birmingham to Chicago, then eastward to New Hampshire is at least approximately always in the right direction.) I have seen less direct routings in some cases.

Model waybills normally are not prepared with yard stamps, so all these details would not be possible to reproduce in most model situations. But the scale weighing slip and a few of the stamps in the middle of the bill could certainly be reproduced. This particular bill doesn’t carry many hand-written remarks, but some bills are covered with them. These are easily added to a model bill. Whichever features one might choose to reproduce in model form, the goal is a more realistic model waybill.

Tony Thompson

Thursday, February 25, 2021

GAEX box cars, Part 2: modeling

 Part 1 of this pair of posts was about the prototype GAEX box cars, 50-foot single-door cars with DF (“Damage Free”) loaders, built by General American Transportation Corp. (GATC). This was part of their agreement with subsidiary General American-Evans Corp. jointly owned with Evans Products Co., builder of the DF equipment. You can read that post here: https://modelingthesp.blogspot.com/2021/02/the-gaex-box-cars.html

As mentioned in that previous post, many of the 540 GAEX box cars were built with a prominent horizontal seam on the sides, but 340 of them were built with conventional vertical panels, 8 on each side of the door. The photo below shows an example (George Sisk photo, Charles Winters collection), drawn from the 110 cars built in the late fall of 1950 and leased to the Pennsylvania Railroad.

The Branchline Trains model of this car isn’t quite accurate; it doesn’t have the exact side sill contour of the prototype. The rest of the body, though, with 16-panel riveted steel sides, Improved Dreadnought ends, and diagonal-panel roof, does match the prototype. The paint scheme shown above is reproduced too. Thus the model is a good overall approximation of this GAEX car group. 

Probably the most visible discrepancy is the trucks, which Branchline supplies as ordinary AAR trucks, but the prototype had the distinctive Chrysler FR-5E trucks with external hydraulic snubbers. The photo of the whitewashed truck below shows the appearance clearly (PFE photo, author’s collection).

These trucks can be modeled, as I showed as part of modeling a PFE express reefer (that post is found at: https://modelingthesp.blogspot.com/2016/02/pfe-40-foot-express-cars-part-2-trucks.html ). For this GAEX car, however, I decided not to pursue that part of the modeling. (Maybe I’ll come back later and redo the trucks.)

Lastly, concerning the prototype, I want to show an illustration of the flexibility that was promoted for the Evans Products DF loader system. Shown below is a cutaway view of a car with quite a variety of cargo items, from boxes and crates to barrels and drums. All could be snugly loaded together and secured with combinations of crossbars and deck- or bulkhead boards.

A comment about operation. As was indicated clearly in the MBA thesis I cited in the previous post, it was canned goods that seem to have been the cargo type benefiting earliest from loader equipment. So the photo below (Southern Pacific image N-5365-1), showing cartons of canned “Chicken of the Sea” tuna being secured in an SP DF car. is a typical use of loaders in the early days of the GAEX cars.

The Branchline Trains kit I mentioned is from their 1000 series, kit number 1020, for GAEX (several different road numbers originally supplied). It is a straightforward kit to assemble. I cannot resist also mentioning what a pleasure the Branchline kits are to assemble — I had forgotten in the intervening years since I last did one. And just because it’s straightforward, I will only mention here the things I did that were different than the instructions.

The first one was to replace the kit’s pin attachment of coupler box lids, by drilling through the lower box (that you glue to the floor) and tapping it 2-56. Then the pin on the lid is sliced off, its center dimpled, and drilled to clear 2-56. I did the same with the truck mounting hole, drilling through into the body and tapping 2-56.

Second, since I drilled through the floor to allow some screw length for the coupler box and truck attachments, the nuts provided for weight were relocated inboard of their designed location, attached with generous amounts of canopy glue. I have found this to be an effective adhesive in this situation. And third, I chose to attach the running board with canopy glue. 

Everything else was according to the kit directions. In the photo below (note car number, compared to photo above), only light weathering remains to be done. You can click to enlarge if you wish.

This is a car with an interesting backstory, and I plan to operate it on my layout carrying canned goods, both inbound to my wholesale grocer, and outbound from my fish cannery. As mentioned above, there are indications that that kind of cargo was an important part of the earliest days of operations of the GAEX cars, and I will take advantage of that.

Tony Thompson

Monday, February 22, 2021

Yep, still operating

 Since the pandemic began, almost a year ago, most modelers have not been able to attend or host operating sessions. For myself, I substituted operating sessions with my granddaughter, who likes the challenge and is quite a good and careful engineer with an NCE throttle. This last week, with her visiting us on a week-long school vacation, we did it again.

As we’ve done before, my wife Mary acted as conductor, and this time the session took place on the side of the layout containing the town of Shumala. As usual, they began by getting the waybills and a switch list organized, then went to work. In the photo below, you see Mary in the foreground, and the nine-year-old standing on a step stool behind her, just bringing back the cars that were picked up in East Shumala.

Here is one of the cars they spotted at East Shumala, a Euclid grader delivered to the team track. That’s Phelan & Taylor Produce in the background, and at right is the small freight shed at the team track, something Southern Pacific placed in some small towns. (My article about team tracks, and about building this shed, was in Model Railroad Hobbyist, the issue for August 2018; you can read that issue on line, or download it for free, at their website, www.mrhmag.com .)

Having several sessions under their belts, these two worked together well and the session proceeded quite smoothly. Here is the switcher, about to run around the string of cars brought back from East Shumala. Mary is describing the next moves that needed to be made.

Toward the end of the switch job, the tasks were to spot the recently loaded reefers at the ice deck for initial icing, wait for icing, and spot them for pickup by the Guadalupe Local. Last task was to spot the propane car. Below you see the tidy yard, and the switcher on its last move.

As always, it was fun for me to have a session to organize and prepare (and gave me a reason to clean a lot of track that has just sat for quite awhile, along with cleaning locomotive wheels). And of course it was great fun for the grandchild. She and I have now worked together to build three freight car kits of her own, and we always include at least one of her cars in each of the sessions she does. And it was definitely no surprise that fun was had by all.

Tony Thompson

Friday, February 19, 2021

Waybills, Part 81: more model stamps

 My next step with waybill stamps was to create some images I could use on model waybills (I have previously described how I do this in Photoshop, and it may well be possible in other graphic applications; that post can be found at this link: https://modelingthesp.blogspot.com/2020/10/waybills-part-73-creating-rubber-stamps.html ).  The previous post about prototype stamps is located here: https://modelingthesp.blogspot.com/2021/02/waybills-part-80-scale-weights.html

One stamp I especially wanted to make was the red WWIB stamp, which was taken from a waybill in Andy Laurent’s collection, the one I showed previously at: https://modelingthesp.blogspot.com/2021/02/waybills-part-79-weight-stamps.html , where I included this red stamp on its waybill. As usual, I cleaned up the background waybill lines and text, leaving only the stamp image behind. Here it is, “as cleaned,” as I might say.

Then this image is placed on an added layer in Photoshop, and the background deleted, leaving the red parts on a transparent background. This image can then simply be pasted on top of a waybill image, since my waybills are all tiff images. Here is an example of using this stamp image. (You can click on the image to enlarge it if you wish.)

I also wanted to make a couple of Trans-Continental Freight Bureau (TFB) stamps, because that was the West Coast bureau. (In earlier posts, I discussed the various regional Weighing and Inspection Bureaus, or WIBs.) The post showing an example of a TFB stamp is available as my Part 80, the second link provided in the first paragraph of the present post. Here is that stamp, cleaned up; note that the stamp looks like it “bounced” a little, giving a slight double image in places, and no image in others. An excellent bit of realism!

Note that in this particular style of stamp, the agreement number is not part of the rubber stamp, but has to be typed in by the agent when preparing the waybill. This stamp image could of course be used just like you see it above, but it is more flexible is to remove the typed agreement number. Then any desired agreement number can be typed into the model waybill, and the stamp image carefully placed so that the typed number is correctly located (again, you may click to enlarge). 

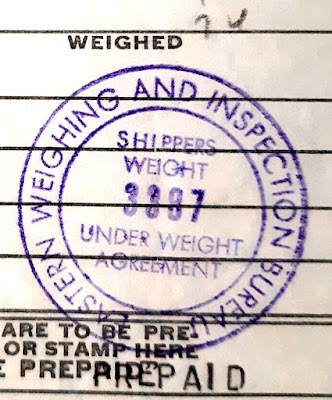
For one final example, here is the EWIB stamp shown in the previous collection (see link in the second paragraph of the present post). The purple ink makes it distinctive.

These efforts to create images of rubber stamps to add to waybills certainly can enhance model waybills, bringing them one step closer to the prototype, which, as I’ve shown,  often carried stamps just like these.

Tony Thompson

Tuesday, February 16, 2021

The purpose and uses of this blog

 From time to time I receive comments, either on individual posts, or in personal emails separate from the blog, asking, essentially, about the title of the present post. I have touched on these subjects in a number of previous posts, but thought it might be useful to bring my various points together into a single post. That is the present topic.

The blog began back in late 2010, as I have regularly recounted in my annual posts on the anniversary date, December 8. At that time, I had been toying with the idea of perhaps writing a blog, but really felt like I had no idea where to start. Then I read a blog (not one about modeling) which was exactly the kind of thing I wanted to write: casual, personal, compact, and very much on point for its subject. “I could do that,” I said to myself.

I immediately began browsing a variety of blogs about model railroading subjects. I very quickly realized what I did not want to do. I didn’t want to write excruciatingly long posts, but wanted to keep them short and easy to read. Also, I didn’t want to post as rarely as four times a year, as in one blog I found, but frequently enough that people could form the habit of checking it regularly and reading the posts. So the goal was fairly short, frequent posts.

In particular, I didn’t want to write a personal diary, for example mentioning when I had been sick, or bought new shoes, or other purely personal subjects, though of course much of the blog would be about my own model railroading activities. Modeling was to be the focus.

I think I have stuck to those decisions. And even now, when a draft of a post seems to meander in subject matter, I still ask myself, “What is the point here?” I want to stay on-topic in each post, and convey information and knowledge, along with modeling experience, and hopefully it will be of value and interest to readers.

Let me turn to uses of the blog. One of my most common  topics has been freight cars, and often about weathering them (note at the upper right corner of the present post, the links to “Reference pages” about my weathering techniques).

But of course the blog covers far more topics than that. I realize that with more than 1250 posts already to the blog, searching is essentially impossible in a browsing mode. But that search box provided, near the top of each post, is really very effective. I use it myself all the time to find previous posts. As with any search engine, you need to give a little thought to your search terms, and if you don't succeed in finding something with your first try, devise a different search term.

A comment about topics. I have chosen what I hope is a wide range of “key words” or labels for posts. I list them below to suggest the variety and kinds of things that you can find. Here’s the list, alphabetically:

Car fleet, couplers, electrical, freight car data, freight car modeling, freight cars, handout, history, industry, loads, locomotives, Mac Gaddis, maintenance, paint and lettering, passenger modeling, ,perishables, PFE topic, photography, publications, railfanning, scenery, signals, SP topic, standards, tank cars, techniques, trackwork, traffic, trucks, typography, vehicles, and waybills.

I am sure I was not always consistent in choosing these, but they do give a starting point in finding topics of various kinds. 

There have been a fair number of posts about projects around my layout, such as the photo below in my layout area called East Shumala, looking up Alder Street from Pismo Dunes Road. You can see Caslon Printing in the left background (modified from a KingMill Enterprises flat) and Phelan & Taylor Produce Co. to the right (a Showcase Miniatures kit), and of course the Union 76 gas station in the foreground, kitbashed from a City Classics kit. All three have been the subject of blog posts.

Showing the layout reminds me to explain that I am not modeling a specific place or specific structures. I greatly admire those who have done the research and, often, the extensive scratchbuilding to accurately portray a real place at a real time. That has never been my goal. Instead of a museum set-piece, my goal has always been reproduction of the Southern Pacific as a railroad, as it was and as its employees did its work. 

I do choose to try and convey a particular area, the Central Coast of California, and have chosen 1953 as the year. As described in a number of previous posts, the layout is primarily an “imaginary branch line” of the Southern Pacific. This allows use of the familiar locomotives, cabooses, structures, etc. of the SP while giving the opportunity to proto-freelance industries, consistent with the geographic area. All these layout goals have been discussed in a number of posts.

Naturally those goals lead to a considerable interest in operations of a prototypical kind. I have posted many times about the design and creation of waybills for use in layout operation, waybills that mimic prototype waybills, along with a prototype timetable and other documents. Operators are also notified of mainline trains not in the timetable, such as this mail extra passing the depot in my layout town of Shumala.

I encourage anyone wanting to find information in this blog’s extensive backstory to use the search box. I believe you will find it useful and effective, and give you access to a substantial amount of knowledge and experience that I have tried to share in this blog.

Tony Thompson

Saturday, February 13, 2021

The GAEX box cars

 What the heck is GAEX? some readers may be saying. It was the reporting mark of General American-Evans Corporation, an entity set up to build and lease DF (“Damage-Free”) box cars with internal loader equipment, starting in 1950. There was a fine article about these cars by Pat Wider in Railway Prototype Cyclopedia No. 15. Though not the first “DF” cars, the GAEX fleet made the concept highly visible to railroads and shippers alike, and would result in many such cars being built in later decades.

The idea behind these cars was to provide a “modern” box car that would attract (or keep) shippers. They were 50-foot cars with 8-foot doors and reinforced, nailable-steel floors, and had Duryea underframes and easy-riding trucks (Chrysler FR-5E) to minimize damage. Most importantly, they were equipped with the Evans Products Company “Damage Free” loader equipment (more on that in a moment). They were not available for purchase, but were leased to railroads. Here is the first car in April 1950.

This car has a horizontal side seam, as many though not all of the cars had. It was dark green with  yellow lettering and diagonal stripe (in subsequent cars, the stripe stopped short of the ladder). The Chrysler trucks are evident. Most later cars had six-digit numbers beginning with “1.” (Photo from General American, via the Wider article).

The key to the Evans DF loader idea was steel angles attached to the car side walls, parallel to the floor. These had punched holes in them that would accept the locking mechanism on bars that could be installed crosswise in the car, thus the alternate name, “cross-bar loaders.” With the addition of various boards for vertical and horizontal separators in loads, a workman could construct whatever partitions and divisions were needed to restrain loaded cargo from movement.

Each car came equipped with 10 deck boards, 10 bulkheads, a set of doorway members, and from 25 to 70 crossbars. The deck boards were larger than bulkheads, and could also be used as bulkheads. The image below (General American photo) shows the way all this equipment was supposed to be stowed in an empty car, and the way a consignee was supposed to leave the car after unloading (the latter naturally was problematic). The steel sidewall angles are also evident.

The flexibility of this system was one of its strengths. It was easily adaptable to cargo items all of one shape, but could readily accommodate mixtures of sizes and shapes. An example of a workman assembling a load is shown below (Southern Pacific photo), with a deckboard being used as a bulkhead. Note also the doorway members already in place, and the use of deckboards to provide horizontal separators in the load. Some crossbars are on the floor.

There happens to be a fascinating account available on-line, of the early days of using DF cars from GAEX to ship canned goods. It is a 1954 MBA thesis by Burnis J. Sharp at Boston University. Here is a link to the PDF:  https://core.ac.uk/download/pdf/142051966.pdf . Of additional interest, Sharp was able to compare performance of the GAEX DF loader cars, with the Pullman-Standard “Compartmentizer” equipment, as installed in the famous Western Pacific silver ”Feather” box cars.

Sharp’s thesis describes the experience of a shipper, the Frank M. Wilson Company of Stockton, California, which was a canning company, with shipping canned goods in the two kinds of loader cars, versus regular box cars. He worked with the Wilson Traffic Department, and the thesis includes letters from satisfied consignees as to the success of the loader cars. 

Because the DF cars were leased to a wide range of railroads, they went all over the country under their GAEX reporting marks. Sharp mentions that these cars were readily obtained empty by the Wilson company when they had been unloaded elsewhere on the West Coast. Lessees paid GAEX a monthly fee for the use of the car, and the lessees then collected mileage from each shipment (6 mills, or 0.6 cents, per mile). It was very much in the interest of each lessee that the cars were kept moving.

Including one of these box cars in a model operating fleet of the transition era in any part of the country is very suitable. Starting in 1954, GAEX also began to produce an insulated DF box car, usually painted yellow or light orange, but as I model 1953, that is beyond my era. A model of the green box car was once produced in HO scale by Branchline Trains. In a following post, I will address a Branchline model GAEX box car.

Tony Thompson

Wednesday, February 10, 2021

Waybills, Part 80: scale weights

 In recent blog posts about a single aspect of prototype waybills, I have shown ways the car weight was shown on the bill, weight being the basis for tariffs of essentially all cargoes. (There were also carload tariffs which did not require weighing, but still used weight as a basis.) In the previous post, I showed a range of weight agreement stamps, which allowed cargo weight to be established without using a railroad scale. You can see that post here: https://modelingthesp.blogspot.com/2021/02/waybills-part-79-weight-stamps.html

In the present post, I want to say more about scale weights, as they pertain to Weighing and Inspection Bureaus, or WIBs. A railroad scale could be certified by a WIB, in which case the scale slip or printout would be so identified. A shipper’s scale could likewise by certified, and a stamp used to document that certification. And I want to include the West Coast’s Trans-Continental Freight Bureau, or TFB. As in several earlier posts, all the waybill examples shown here are from Andy Laurent’s collection.

To choose an example, below is a WIB stamp, from the Southern WIB, for a scale located at Montgomery, Alabama on the L&N, and it has spaces to write in the weights; but note that the stamp was applied at an angle, and the weight readings themselves written in the spaces provided in the waybill itself,, not in the spaces in the stamp.

This kind of stamp, evidently certifying the railroad’s scale, was widely used, though usually stamped so that the spaces for weights lined up better with the waybill’s lines than the above example. Here is a WWIB stamp, which happens to be blue, to illustrate the point. Interestingly, the scale was on the Copper Range Railroad, at Houghton, Michigan, on the Upper Peninsula. Note also that the weights have been typed in where designated on the stamp, not on the underlying waybill form.

 I showed “scale slips” in the previous post (see top paragraph, above), which were slips printed out by the scale mechanism and pasted onto the waybill. Below is one from the TFB. As you can see, this scale was at Alturas, California on the Southern Pacific. 

It is interesting in the above stamp that the Weighing Department is shown as part of the Freight Bureau, which may have been true of other regional Freight Bureaus. The gross weight here is 105,040 pounds and the tare weight 45,100 pounds, giving a net weight of 59,940 pounds. This would be 59,900 pounds to the nearest 100 pounds.

There were also weigh agreement stamps from the TFB, as you see below. This one has quite a bit more lettering on the stamp than most weight agreement stamps, and note that the agent had to type in the number of the weight agreement.

The TFB, of course, also certified railroad scales (as implied by the paste-on scale slip shown above), and this shows up in stamps. In this case, the scale was located at Appleyard on the Great Northern, just east of Wenatchee, Washington.

It is interesting to see these various stamps used for weight information on waybills, though most model waybills provide no space for the kinds of weight data the stamps contain. One exception is the larger-format waybills some layout owners have chosen, such as Paul Weiss’s bills, that I described in a previous post (see it at: https://modelingthesp.blogspot.com/2020/06/waybills-part-69-another-approach.html ). Here’s an example, in this case with an example of a weight agreement stamp:

In a future post, I will show some of the stamp images I modified to use on model waybills (I have previously described how I do this in Photoshop, and it may well be possible in other graphic applications; that post can be found at the following link: https://modelingthesp.blogspot.com/2020/10/waybills-part-73-creating-rubber-stamps.html ).

Tony Thompson

Sunday, February 7, 2021

Freight car graffiti, Part 23: Golden West cars

 This is part of my continuing series of posts about applying graffiti to freight cars for a layout set in 1996, with a basis in photography of prototype graffiti, both on freight cars and elsewhere. For background, please consult my article in the Model Railroad Hobbyist, in the “Running Extra” segment of the issue for January 2020. To most easily locate previous posts in the series, use “freight car graffiti” as the search term in the search box at right.

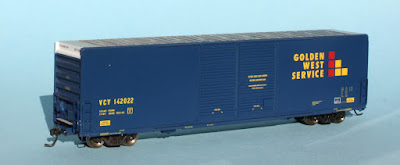
The present post concerns two former Southern Pacific cars, which had been sold to Greenbrier and repainted for “Golden West Service,” with reporting marks from short-line railroads such as the Ventura County Railway (VCY) or the Galveston Railroad (GVSR). The distinctive blue paint scheme, with red and yellow emblem lettering, was once very familiar in railroading. I discussed this topic in more detail in a previous post (you can see it at: https://modelingthesp.blogspot.com/2021/01/freight-car-graffiti-part-20-couple-of.html ).

To begin, let me show a Golden West box car, which happens to have VCY marks. As with many of the models I have been working on, it had a very light dusting of grime when I received it.

For this car, I chose several decals and tags. On the left side, I used two graffiti, each from a Microscale set, numbers 87-1523 and 1533. Once the decal work was finished, I weathered the car with acrylic washes, as I usually do, applied a coat of flat finish, and added tags, mostly with a “Gelly Roll 08” white pen. Here is how it looked:

For the right side, I again used two Microscale decals, bu wanted them to look quite different from the other side. I chose from sets 87-1535 and 1536. Then, of course, weathered the model and added some tags.

The other Golden West car in this pair is another of the Ortner-type hoppers (I showed a previous one in an earlier post, the same one cited in the second paragraph above). You can see below that it was somewhat weathered as I received it.

For this car, as it was already weathered, I only had to apply the graffiti decals, and lightly weather those decals themselves, put on a coat of flat finish, then add tags. On the left side, the decal I added was from Microscale set 87-1533.

On the right side, I used a decal from Microscale 87-1534, light weathering, and some tags, again from the Gelly Roll white pen.

These two models, with their dark blue body paint, pose the challenge of weathering and tagging so that the results are visible, but not extreme. The white Gelly Roll pen was essential for the tagging part, and I have found these pens to work quite well after a protective coat of flat finish. I will return to freight car graffiti in future posts.

Tony Thompson
Thursday, February 4, 2021

A B&O wagon-top covered hopper

 A few years ago, I found an assembled B&O “wagon-top” covered hopper at a swap meet. Price was reasonable, so I bought it, recognizing that it wasn’t quite completed. It was lacking sill steps and the locking rods for the hatch covers, and part of the running board was broken. “Aha,” I thought, “this could be a freight car guy challenge.” (For more on that, you may consult my previous post on the subject: http://modelingthesp.blogspot.com/2019/10/whats-freight-car-guy.html ).

The model represents some 200 prototype cars that were built in B&O shops in 1940, with the same idea as the wagon-top B&O box cars and cabooses: the side ribs curved across the top of the car to support the roof. This eliminated the joint between sides and roof, a joint that often proved troublesome in house cars. These covered hoppers were Class N-34 on the B&O. They were built with wood running boards, and most of the cars kept those running boards all their lives. Here’s the prototype when relatively new (B&O Historical Society):

This car shows the paint and lettering that was on the cars when built.

The car I purchased had been built from a “West Shore Line” kit (Central Hobby Supply), a line of resin kits molded by Steve Funaro. The seller had included the kit directions and the left-over parts from the kit in the sale box. 

Among those parts was a resin rendition of a wood running board. This was relevant to my model, because the original builder had chosen to add an overly thick resin representation of a steel grid running board, evidently also supplied in the kit. But part of that running board was broken off and missing, and as stated above, these cars mostly kept their wood running boards.

I began by stripping off the remaining parts of the steel grid running board. Here is the car at this point.

As mentioned, you can see that the model had not had any sill steps added (they were in the kit box, along with the original resin “wood” running board), nor are there any locking rods for the roof hatches. I decided to begin with what seemed like the most challenging problem, the sill steps. The challenge is that the frame near the car ends is quite narrow. You can see this below.

The sill steps, which are Delrin moldings with the correct two rungs (see prototype photo above), have attachment pins, as you see in the sprue below (These are Tichy parts, their part number 3045). 

To attach these by drilling vertically into the sills would not be easy to get right, and if the resin is brittle at all, drilling thin-walled holes is treacherous. One solution would be to add a reinforcement strip behind the side sill to thicken it, providing more volume into which to drill, or perhaps to remove the attachment pins and glue on the sill steps as a butt joint with CA. I decided to do it a little differently. I first glued the steps to a length of scale 2 x 6-inch styrene. Canopy glue will work for these two materials.

When the glue had set up (I allow a couple of hours), the segments  of styrene strip can be cut to suitable length, then attached inside the side sill with canopy glue. This “sandwiches” the pins between the side sill and the styrene strip. Do keep in mind that you need left-hand and right-hand pieces if you want length in the final piece (see photo below). I found that this method worked, and when the glue had set up, seemed solidly attached.

Next I need to turn to details and corrections on the roof of the model, and of course match the paint, but I will take that up in a future post.

Tony Thompson

Monday, February 1, 2021

Waybills, Part 79: weight stamps

 In a number of previous posts about waybills, I have touched on the issue of car weights, most recently in a post about various ways these weights were shown on prototype waybills. I included some comment about how model waybills could show the same. To consult that post, you can use this link: https://modelingthesp.blogspot.com/2021/01/waybills-part-78-car-weights.html .

In the present post, I want to show some additional prototype weight agreement stamps, all from the waybill collection of Andy Laurent, whose help I greatly appreciate. I will begin with the question of the various regional bureaus that administered weight agreements (both calibrating scales and negotiating unit-weight agreements). 

I’ve shown in previous blogs, examples of the stamps of the Western Weighing & Inspection Bureau (or WWIB), which covered the Midwest, not the Far West. An example is shown below for a WWIB stamp, with its agreement number in the center. This was usually stamped, as here, in the area of the waybill where weights were recorded. One thing I like in this example is that it is a little unevenly stamped, left to right, a realistic detail that will look good on model waybills.

There were also Eastern, Central and Southern WIBs, and the Far West was administered by the Trans-Continental Freight Bureau. I will have more to say on the TFB in a future post, but that makes a total of five bureaus. There may even be others; if any reader knows of others, please let me know.

Let me extend my examples. First, here is an EWIB stamp. Note that it was stamped with purple ink, though the great majority of these stamps were black.

I don’t know the boundaries of the various WIBs, only their approximate territory, though there is reason to believe that they were creatures of the regional Tariff Bureaus, which had the same kind of regional names. If the boundaries were the same, it would simplify matters.

I mentioned a Central WIB above. Andy has not found many Central stamps on his waybills, but here is one example. Note that the name is reversed: Central Inspection and Weighing Bureau (CI&WB).

The Canadians had their own system, apparently divided into Eastern Lines and Western Lines (if a Canadian reader can correct that statement, please do so.) Here is a Canadian Freight Association stamp:

I mentioned above that most stamps were black, and that is borne out by looking at many, many waybills, Purple does show up occasionally, and so does red. Here is a red example.

These stamp images can be converted to “transparent” images that can be overlaid onto waybill forms, as I have shown in previous blogs, and in a future post I will talk about that topic a little more. But this post shows the regional differences I am aware of.

Tony Thompson