My work at this point in the project was to finish adding the trim strips all around the structure. This actually went pretty quickly, though there are a lot of these strips. The kit provides a generous amount of material, so there are no worries there. Here is the right side at this point. I have already done some weathering over the doorways.
My next step was starting on the roofing. Preparing the roof parts for the kit structure is not without its pitfalls. I recommend doing a test fit of all parts to make sure you know which ones are which, and which side is the top of the roof part, because you will be adding “roof tabs” on the underside of each part, and none of them are interchangeable or usable if inverted. (Don’t ask how I know this.)
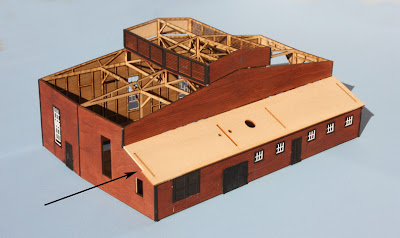
One step I had to take was to notch the boiler house roof at the back, where the machine shop contacts the roundhouse. Here is a shot of that roof edge, test fitted, with an arrow indicated the notch. You can click on the image to enlarge it, if you wish. The two unfilled window openings will be covered by the machine shop.
An additional point: the louver frames on each clerestory section should be notched at their lower outside corner, to accommodate the roofing sheets on the lower roof. I used a small square file to make these notches after the frames were glued in place. This view should show what I mean.
Next I finished adding the rest of the scale 2 x 8-inch roof trim to all roof edges, overlapping the plywood beneath.
The kit directions recommend that roofing, which is silk-span tissue, be applied with spray adhesive. I don’t doubt that this is an effective method, but I decided to apply it in a way I have used before (usually with Kleenex tissue, which is coarser than the silk span). I mop on a wet coat of the roofing color I want, and quickly lay the tissue into it. Any place not thoroughly wet by the paint can be touched up once the tissue is in place. This process both colors the tissue, and glues it to the roof. The color I chose is SP Lark Light Gray, which is similar to a standard color of rolled roofing.
Although the kit’s recommended method of applying strips of silk span about 4 scale feet wide should work fine, there is always the issue of raised seams (as the photos in the kit directions demonstrate). I took a simpler approach. I applied full sheets of silk span to cover the roof, then went back when it was dry, and used a sharp No. 2 pencil to draw lines, 4 feet apart, to indicate the rolled roofing. Here is how it looks.
The two panels at right, over the stalls, are removable. I simply made a small overlap in the silk span on the left panel, so when both are in place there is no gap.
As the kit directions say at this point, we are in the home stretch. Final details, including the boiler stack and chimneys over the stalls, along with layout installation, are shown in a following post.
Tony Thompson


No comments:
Post a Comment