Friday, September 30, 2022

Ready-to-run?

 The question mark in the title of today’s post will remind older readers of previous discussions of this topic on my blog. And that stems in turn from a clinic my late friend Richard Hendrickson used to enjoy giving. He would open with a photo of a “ready-to-run” model right out of the box, shiny as anything, and then show a prototype slide of fairly new car, but of course showing signs of service. He would then put the original model shot back on screen, and dramatically exclaim, “Ready to run? I think not.”

He then went through the steps he himself used to prepare such models until they really were, in his standards, ready to run. I’ve described the same sort of process in this blog, but not recently, and in any case, my own approach has evolved a little. So I’m going to show it one more time.

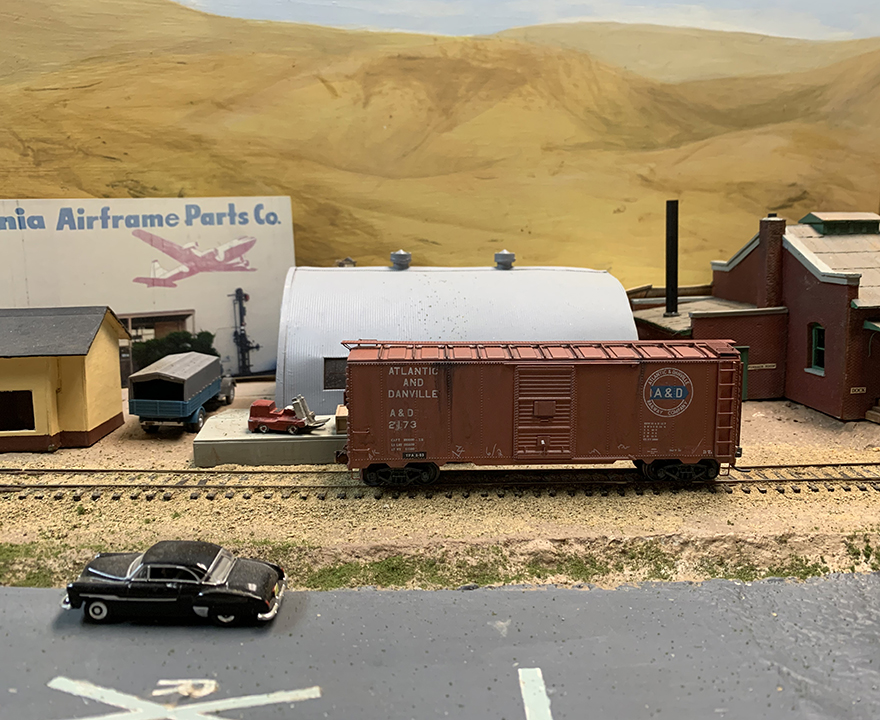
I have somewhat arbitrarily chosen a new “R-T-R” model from my shelves for this project. It’s a recent InterMountain product, a 40-foot PS-1 box car. It happens to be L&N 6255, and though not “mirror glossy,” it is certainly shiny. As you can see, it has an 8-foot door, in common with new PS-1 orders by L&N totalling more than 2000 cars by the time I model, 1953. This particular car has a built date of April 1952.

My first step with a model like this is a coat of flat finish. I usually prefer the Tamiya product (their number TS-80), because of the far more dependable spray can, but do use Dull-Cote sometimes. The car has to be flatted for the next step, application of my acrylic-wash weathering process, because the water-based washes won’t “wet” a glossy surface.

Now some may comment that a new car just out of the builder’s shop would indeed be glossy. That’s true. But prototype photos of cars only a month old already show a duller finish and often a few chalk marks. If you model a specific month, as for example Richard Hendrickson modeled October 1947, then yes, a car built that month can be clean and shiny. Otherwise, I would maintain, a shiny car is a poor model.

So once the model is entirely flat, I weather just the roof, with my usual mix of acrylic tube paints (I like Liquitex), Neutral Gray, Burnt Umber, and Black. The water-base wash method is fully described in my “Reference pages,” linked at the upper right of this blog post. I might mention here that roofs got dirtier than car sides, as many prototype photos show, and I usually weather accordingly. Here is the car at this stage. It’s obvious how bright and white the unweathered lettering still is.

Why just the roof? That way, I have lots of model to hang onto while working on the roof. And in the following step, I can hang onto the model with the roof and underbody (or truck bolsters), while working on sides and ends. I have occasionally tried doing the entire car at once, but for me at least, it’s unnecessarily difficult and I often make a mess.

This might be a good place to mention trucks. Though most wheelsets coming with an R-T-R model have at least somewhat blackened wheels, they are at best semi-gloss and too pale. Moreover, the sideframes are usually jet black and glossy. Though my preliminary overcoat of flat finish mitigates the glossy sideframes, the whole truck still needs work.

I brush-paint the wheel faces with Tamiya “German Grey,” XF-63. I used to paint the axles and the insides of the wheels too, but since it’s almost impossible to see those surfaces on a layout, I no longer do that, just painting the wheel faces. While I’m at it, I usually dry-brush some of the Grey over the sideframes. The photo below shows the result. 

In this photo you can see the flat gray wheel faces, along with the coupler sides and trip pin, and a kind of highlighted gray on the sideframe. Note that the “NEW” date here is 4-52, so my modeling year of 1953 would have found this lettering still in place, along with the builder emblem next to the door. Work on the trucks isn’t finished. I will come back to them when I weather the car sides.

Next step is to weather the sides, very much like the process of doing the roof. This car is not too old, so I don’t want to make it very dirty, but do want to tone down the bright white lettering. The photo below shows the left side at this point. Note the dark splotch toward the right end of the visible side, at the top. I sometimes add things like this, which one certainly sees in occasional prototype photos, for variety.

You may also note the bulge upward in the running board, where it has come partly unglued from the roof. I have no idea what kind of adhesive is used in assembling these models, but I am confident it is not canopy glue. I simply run a razor blade under the running board from end to end to complete the “de-gluing” process, then re-glue with canopy glue. It is not only a tenacious adhesive, but remains flexible for years. Etched metal parts I canopy-glued 25 years ago are still fine.

My last step with the overall model is a coat of flat finish to protect the acrylic pigments of the weathering. Without that, a fingernail scratch can mar the acrylic layer, but flat finish is very effective in protecting it.

Finally, I add chalk marks with a white Prismacolor pencil, and add a small rectangle of white or manila-color paper to the route card board. With most models, I would also have to paint-patch areas for the reweigh and repack stencils (as I have described in this blog numerous times), but this car is so new it would not even have required a repack by the time I model. So the model is complete, as shown in this view of the right side:

I have spent the space to describe this finishing process fairly fully, just to clarify the steps I would pursue on any so-called “ready-to-run”model. My friend and mentor Richard Hendrickson was right: a model like this that you acquire is really only “ready to finish.”

Tony Thompson

Tuesday, September 27, 2022

Operating session number 75, and so forth

 Last weekend, September 24 and 25, I hosted the 75th and 76th operating sessions on my layout. It was almost hard to believe there have been that many, but I have documentation of the switching assigned for every one, so I’m sure the numbers are right.

On September 24, I asked one of the crews, Jim Providenza at left and Seth Neumann at right, to get ready for a photo, then told them that it was the 75th session. You can see their delight! Jim was the conductor on the Santa Rosalia Local, and Seth was engineer at this point. They are working at Ballard.

The other crew on this day was Mark Schutzer, seen at right when they took their turn, running the Santa Rosalia Local of the day, and Clif Linton at left, who was conductor on the train.

As he often does, Mark brought some of his own SP steam power to operate, and it was especially fun to have an 0-6-0 switcher, even though I don’t have any evidence that any worked on this part of the Coast Division.

We did find one fault in the trackwork, naturally one that had never occurred before. It was yet another example of Jim Providenza’s axiom, “nothing is gold.” It was a new sag in Track 7 at Ballard, right in front of Jupiter Pump & Compressor, short enough to bother 8-coupled locomotives. After the session, I wedged a No. 11 hobby knife blade under it, which tends to raise it just a little, and repeated that action until a straight-edge showed that the rail no longer had a sag.

The next day was the 76th session, and a new crew of four was working. To begin, Pat LaTorres (at left in the photo below) and Richard Brennan were working at Shumala. Pat, holding the waybills, was the conductor. You can see that they used the diesel switcher for this session.

The other crew began by taking the Santa Rosalia Local to Ballard, and below you see them working there: John Sutkus at right, and Steve van Meter at left. Steve was conducting.

This was a pair of sessions that went well (despite the chance to again demonstrate Providenza’s Axiom), and fun was had by all, certainly including me. I look forward to the next one!

Tony Thompson

Saturday, September 24, 2022

Stand-ins? Well, yes

 I was asked awhile back if any of my model freight cars were “stand-in” versions, meaning, I suppose, models that were not really correct but at least “in the ballpark.” I replied, “Absolutely.” There are just too many desirable objectives and too few convenient routes to model them. And I should emphasize “convenient” here, because sometimes a stand-in is just a labor-saving approach, on a prototype you aren’t terribly serious about.

I am, I like to think, a reasonably serious modeler for several prototypes, notably most Southern Pacific equipment (but an exception is included below), Pacific Fruit Express, and a few other railroads that have caught my fancy over the years. But filling out a freight car fleet now numbering in the several hundreds, I cannot be and have not been meticulous about everything. Some projects are stand-ins.

Last year, I wrote a blog post about such a project, beginning with an old C&BT Shops box car kit that I wanted to re-detail and use for something “interesting.” As I described at some length in that post, I chose the Atlantic & Danville (see that post here: https://modelingthesp.blogspot.com/2021/08/a-c-shops-box-car-part-2.html ). And here’s a prototype photo (Jim Seagrave collection) from the 2100-series of these box cars.

And here’s how that model turned out, using a nice set of K4 decals to letter it as A&D 2173. The model is spotted at an industry in my layout town of Ballard. Superficially similar to the prototype, entirely different in lots of details, and that’s a classic example of a stand-in.

Another example is a Rock Island stock car, a stand-in for which I assembled from an Accurail stock car. Turns out the prototype Rock Island cars were a lot different from the Accurail model; they had four-panel Pratt truss sides, not the six-panel Howe truss sides of the Accurail version. But I intended to use the car in passing trains, where ordinarily spectators are not counting side panels, so I decided to go ahead. Here is the prototype (photo provide by Steve Hile, but I can’t find the source from which he got the photo):

My version, decal lettered as RI 75119, is shown below in a lightly-weathered state that will likely get more intense next time I do a batch of car weathering, shown being switched at my layout town of Shumala. (You can click on the image to enlarge it if you wish.)

In the photo above, note also the SP gondola. It’s lettered as SP 161035, a member of SP Class G-50-25. The model was built following an article by the late Bruce Petty, using a Mantua high-side gondola as a starting point. Problem is, the Mantua model is a ten-rib car, while the prototype, as you see below (Paul Dunn photo), was an eleven-rib car, and a number of other details are different also. (Ignore the post-1956 car number and lettering on the car below.) But now I do have one of these moderately distinctive SP gondolas among a lot of commercial models of other classes.

Bottom line? Sure, my fleet contains stand-ins, most of them deliberately built as such, along with a few that I found out later weren’t accurate after all, and just turned out to be stand-ins. Now sometimes a model turns out to be totally bogus (most manufacturers have no shame, as is well documented), and those baddies do tend to be re-sold or given away.

But if the model looked good, wasn’t grossly inaccurate, and filled a hole in my fleet, yes, I kept it, and will operate it from time to time. And it’s likely I will build more of them from time to time.

Tony Thompson

Wednesday, September 21, 2022

Waybills, Part 99.1: response to comment

 This post is an update to the previous post with this number (99), to respond to thought-provoking comments by John Barry. I felt it might be better to give them some space for elaboration, rather than make a short response in the comments to Part 99. (You can read that post at this link: https://modelingthesp.blogspot.com/2022/09/waybills-part-99-more-on-overlay-bills.html )

Let me begin by show again John’s comments, divided into two parts. Here is the first:

“Why bother combing through all your outbound bills? Why not generate SP bills for all of your cars with just the car info that shows above the overlay and have the remaining fields blank? Three items in the sleeve, the unique inbound full Bill, the empty car bill and behind it, the blank outbound Bill with the car info. Make all your outbound loads short bills that you can slip on top of the car specific card. File your used inbound bills by industry and car number and your outbound bills by industry only. That should minimize time on searching for a suitable waybill as you re-stage. You can also add yellow delivery overlay bills to direct empties to industries for loading.”

There are several parts to John’s comments, so I want to answer each. First, John’s suggestion that all cars have a SP “blank” waybill: he is right that this would work. But in effect, doing this wastes one bill. I did start to do this with my perishable bills for reefers, and realized, “why waste a bill?” Any use for another destination makes an overlay necessary, but for at least one movement, no overlay is needed. And I have used overlay Empty Car Bills from the beginning.

His suggestion, that all bills be filed by industry, is what I already do. And within each industry file, the bills are in order, first alphabetically by reporting mark, then by car number for each reporting mark. This makes bills easy to find, and in fact I do little “searching” for bills. This is because of the tool I created to list existing bills, my “pairs list,” which I’ve described in previous posts (for example: https://modelingthesp.blogspot.com/2012/02/waybills-17-pairs-list.html ).

It is quick and easy to look up any car number in the pairs list (so named because it shows pairs of industries, the shipper and the consignee), pull the corresponding bill, and add overlays if needed. 

My storage system uses a storage box produced by one of the companies that makes storage materials for baseball trading cards (the clear plastic sleeves I use for waybills were intended for those trading cards). I described that in a previous post (see it here: https://modelingthesp.blogspot.com/2017/03/waybills-part-58-more-on-managing-bills.html ). Here is what it looked like, with dividers for industries, in a photo from a few years ago (it now contains more waybills):

Let me now turn to the second part of John’s commentary:

 “After a car is spotted, if it still has its inbound Bill, the next session, it’s still unloading. If you’ve pulled the inbound Bill, the empty car card will show, and you can either send it home by simply removing the inbound Bill between sessions or send it for loading with an industry overlay. Spotted empties get their empty car card moved to the back of the sleeve when loaded and a destination overlay added. From staging, pull and store the car and store it with its sleeve of empty car and SP blank load bills, ready for a new inbound Bill.”

In an operating session, any car that will not be moved will not have a waybill visible to crews (I separately store waybills for “inactive” cars). For operators, this is prototypical: you handle the cars for which you have paperwork. The railroad was in some ways just like the military: nothing happens without paperwork.

I don’t remove the bill with the inbound load for a car that is spotted: it is just slipped behind the yellow Empty Car Bill that is also in the sleeve. That yellow bill returns the empty (commonly)  to Los Angeles, or other destination. 

Here’s an inbound load, and an Empty Car Bill to return the car when empty, both in the sleeve. This particular Empty Car Bill moves the car homeward via the reverse route (see the inbound waybill; you can click on the image to enlarge it if you wish).

For the opposite kind of sequence, in which an empty car is spotted for loading, then later picked up with an outbound load, the process is reversed. That is, the car arrives with its inbound yellow bill in the sleeve, then the outbound bill in the sleeve behind the yellow bill simply comes to the front. Both items in the sleeve can be overlaid with a partial or overlay bill of the correct type.

To summarize, John suggests a series of waybill actions that are the same as what I do, with one major exception: I don’t have, and don’t plan to have, a bunch of “blank” SP waybills. As I said, I don’t see any point to “wasting” a blank bill. Why not have one of the destinations for that industry be on a bill? If it’s a common destination, I can also make a duplicate as an overlay so that other cars can do the same. 

Thanks again to John Barry for carefully thinking through the waybill process, and making interesting suggestions about how it can be managed. I have enjoyed thinking through this process anew, and I hope my responses and explanations are clear.

Tony Thompson


Sunday, September 18, 2022

SPH&TS Modesto 2022

 This year’s Southern Pacific Historical & Technical Society convention was in Modesto, California, last week. It’s the 42nd year of the society, though not the 42nd full convention, as many early ones were really one-day meets. This was the first convention since the pandemic, and naturally many of us were delighted to see old friends and make new ones, though as many organizations have discovered this year, attendance is half to two-thirds of pre-pandemic levels. But I enjoyed it quite a bit. It was well organized and ran smoothly.

The city of Modesto was actually interesting to visit. Their downtown, like most smaller cities, has greatly changed, and they have managed to make an “entertainment” area, with many restaurants and cafes in place of the old business district, and the atmosphere was pleasant. They have even restored the famous “Modesto arch,” first installed in 1912 and greatly deteriorated by its centennial in 2012. But the city and many private donors stepped up to restore it, and today it looks beautiful.

(They are also in the midst of restoring the large and distinctive Modesto SP depot, but completion of that looks someways off.)

One thing that a visitor notices again and again is the pride the city feels about the fact that they were the place the famous movie, American Graffiti, was filmed. Not only the plaques in the “Walk of Pride” but many other evidences can be seen. I liked this small billboard for a car club, the Pistons, on a wall downtown.

In the convention, the primary activity was presentations, with a full schedule every day. There were some quite good talks, including local photographers Ted Benson and Tom Taylor. One I enjoyed was about making “perspective” maps, by John Signor. Below you see John about to begin his presentation.

My own talk, about “Modeling Transition-era SP Motive Power,” was on the schedule too, and the handout for it was provided three days ago on this blog (see it at: https://modelingthesp.blogspot.com/2022/09/handout-modeling-transition-era-sp.html ).

The contest room was pretty lightly populated. I entered my Maintenance of Way kitchen-dining car, which will be familiar to anyone who has looked at even a few photographs of my layout. I thought it might be a good entry because it does represent some modeling effort to modify a commercial kit (described here: https://modelingthesp.blogspot.com/2013/04/modeling-some-sp-mow-cars-part-3.html ). Below you see it in the contest area. Since it was the only entry in the MOW category, it did win a prize.

I should mention a dramatic entry in the contest, by new SPH&TS Board member Andrew “AJ” Chier. He brought a train with six piggyback flat cars that were loaded with two trailers each, and two empty flat cars so you could see how they looked also. Below is a view of a loaded car. What is noteworthy here is that the trailers are one-piece models, 3-D printed by Andrew.

I include below a shot of one of the empty flat cars. This isn’t exactly how an empty SP TOFC car would look (see Chapter 13 in my book on flat cars, Volume 3 of Southern Pacific Freight Cars, Signature Press, 2004), but is intended to be the starting point for a model load.

Andrew also showed some quite impressive SP passenger cars, assembled from 3-D printed parts. I will devote a forthcoming post to more information about those cars. 

These kinds of models are an excellent example of what may well be the future of the hobby: the ability to make 3-D printed versions of almost anything we may need for a particular prototype. I look forward to the emergence of these capabilities on a broader scale.

As almost always is the case, attending a railroad historical society convention like this one is immensely interesting and informative, a major part of the fun. If you’ve never attended the conventions put on by the society for your favorite railroad, I’d urge you to give it a try. I am certain you would enjoy it.

Tony Thompson

Thursday, September 15, 2022

Handout: modeling transition-era SP motive power

 This handout is to provide background and readily available on-line resources in support of the talk, along with printed book and magazine resources. The primary foundation for this presentation was my article in Model Railroad Hobbyist for February 2019, entitled “Developing a realistic loco fleet.” It was part of the “Running Extra” portion of the issue, can be downloaded at: www.mrhmag.com

A point of emphasis in the talk is appropriate prototype locomotives to model, nearly all based on known locomotive assignments. One of my favorite SP locomotives is Class C-9 Consolidation 2829, shown here at San Luis Obispo, where it was assigned for years (Dallas Gilbertson photo).

But of course one draws inspiration from elsewhere on the Southern Pacific; most locomotive types operated on numerous divisions across Pacific Lines. An obvious example is the “signature” SP steam power, the cab-forward. The image below, taken west of Roseville in June 1956 (Jack Bowden photo) shows a freshly painted 4163 with a reefer block.

I begin my sources of additional information to supplement the talk, with a fair number of my blog posts on these topics. In most cases, the link includes enough of the post title to inform you of what is included. These have been listed chronologically.

General discussion about SP motive power rosters:

https://modelingthesp.blogspot.com/2011/04/choosing-1953-locomotive-roster.html

Steam motive power modeling:

https://modelingthesp.blogspot.com/2011/05/sp-steam-power-in-early-1950s.html

https://modelingthesp.blogspot.com/2014/02/southern-pacific-f-unit-diesels.html

https://modelingthesp.blogspot.com/2016/12/locomotives-for-layout.html 

https://modelingthesp.blogspot.com/2018/07/sps-whaleback-tenders.html

https://modelingthesp.blogspot.com/2018/12/the-sp-4-8-2-from-athearn.html

https://modelingthesp.blogspot.com/2020/03/sd-locomotives-on-sp.html

Diesel chronology and modeling:

https://modelingthesp.blogspot.com/2011/03/modeling-diesel-locomotive-chronology.html

https://modelingthesp.blogspot.com/2011/06/modeling-diesel-locomotive-chronology-2.html

https://modelingthesp.blogspot.com/2022/05/diesel-chronology-modeling.html

https://modelingthesp.blogspot.com/2022/08/baldwin-road-switchers.html

There are a great number of books containing excellent historical information and considerable photo coverage of all the kinds of motive power I discussed. As I showed in the talk, there are lots of titles about the entire SP, but for my Coast Division topic, these are especially valuable, and each is included in the list below:

I will admit in the following list, to being more rather than less inclusive, in the interest of completeness. Many of the items shown are out of print, but are readily found for sale from on-line book dealers.


Church, Robert J., Cab-Forward (Revised Edition), Central Valley Railroad Publications, Wilton, CA, 1982.
   
Church, Robert J., The 4300 4-8-2’s (Revised Edition), Signature Press, Wilton, CA, 1996.
   
Crossley, Rod, Chasing the SP in California, 1953-1956, SP Historical & Technical Society, Upland, CA, 2011.
   
Diebert, Timothy S., and Strapac, Joseph A. Southern Pacific Company Steam Locomotive Compendium, Shade Tree Books, Huntington Beach, CA, 1987.
   
Dill, Tom, Southern Pacific’s Scenic Coast Line, Four Ways West Publications, La Mirada, CA, 2003.   

Dunscomb, Guy L.,  A Century of Southern Pacific Steam Locomotives,  2nd Edition, Guy L. Dunscomb and Sons, Modesto, CA, 1972.
   
Garmany, John Bonds, Southern Pacific Dieselization, Pacific Fast Mail Publications, Edmonds, WA, 1985.
   
Gilbertson, Dallas, California Rails 1950, Four Ways West Publications, La Mirada, CA, 2008.
   
Menke, Arnold, “The Compendium Companion,” A. Menke, Bisbee, AZ, various editions.
   
Southern Pacific, Annual Report, San Francisco, 1954.
   
Strapac, Joe, “Three Decades of Southern Pacific F Units,” Trainline (magazine of the SP Historical & Technical Society), issue 66, Winter 2001, pp. 8–25.
   
Strapac, Joseph A., Southern Pacific Historic Dieselss, Vol. 4, “SD7 and SD9 Locomotives,” Shade Tree Books, Bellflower, CA, 1997.
   
Strapac, Joseph A., Southern Pacific Historic Diesels, Vol. 8, “Alco Roadswitcher Locomotives,” Shade Tree Books, Bellflower, CA, 2001.
   
Strapac, Joseph A., Southern Pacific Historic Diesels, Vol. 10, “EMD Freight F Locomotives,” Shade Tree Books, Bellflower, CA, 2003.
   
Strapac, Joseph A., Southern Pacific Historic Diesels, Vol. 11, “Baldwin Switchers and Roadswitchers,” Shade Tree Books, Bellflower, CA, 2005.
   
Strapac, Joseph A, Southern Pacific Historic Diesels, Vol. 18, “Alco and GE Diesel Switchers,” Shade Tree Books, Bellflower, CA, 2013.
   
Strapac, Joseph A. Southern Pacific Diesel Locomotive Compendium, Vol. 1, Pre-1965, Shade Tree Books, Bellflower, CA, 2004.
   
Thompson, Anthony, “Modeling a Southern Pacific Alco S2 with tiger stripes,” Railroad Model Craftsman, Vol. 56, No. 12, May 1988, pp. 54–57.
   
Thompson, Anthony W., and Signor, John R., Coast Line Pictorial, Signature Press, Wilton, CA, 2000.
   
Thompson, Tony, “Southern Pacific Diesel Locomotive Chronology,” Trainline (magazine of SPH&TS), issue 29, 1992, pp. 18–23.  

Thompson, Tony, “Notes on Modeling Espee F Units,” Trainline (magazine of SPH&TS), issue 66, Winter 2001, pp. 25–29.
   
The books and magazine articles listed above will provide a far more complete picture of my subject than it is possible to do in a single talk. I hope these resources prove valuable.

Tony Thompson

Monday, September 12, 2022

Why model a branch line?

 I have touched on this topic a bunch of times in the course of writing this blog over the years, but not long ago I had an email essentially asking the title question. 

There are several strands to the answer, and I will take up each in turn. First and foremost, I believe that trying to model a heavily trafficked main line, whether it’s Horseshoe Curve on the Pennsylvania or Donner Pass on the Southern Pacific, is asking for trouble. Our model layouts necessarily are limited in size, and running 75-car trains in prototype frequency is just an overwhelming challenge, both in layout design and in equipment management.

Second, I’ve adopted (with enthusiasm) the idea of the imaginary branch line. As I described in a very early post, more than ten years ago (you can see it at: https://modelingthesp.blogspot.com/2011/04/imaginary-branch-lines.html ), the concept of modeling an imaginary branch line of a familiar and well-known railroad was something I encountered the year I lived in England. 

During that year, I quickly discovered that on practically any weekend, there would be a model railroad exhibition within reasonable driving distance, and I went to a lot of them. Many were superb examples of modeling, were relatively small, and in many cases modeled (naturally) fairly small segments of reality.

( One product of living in England was a column I wrote for the NMRA Bulletin, from October 1983 to April 1984, entitled “The View From . . . England.” Older modelers might conceivably still have a stash of those magazines — otherwise the only way you might find them is via the NMRA’s own digital archive, at https://digital.nmra.org/ — but I haven’t explored my columns that way yet.)

The typical exhibition layout, small enough to be readily portable, is an imaginary branch line of the Great Western, or London and North Eastern, or whichever railway was chosen. There was an excellent example of this type of layout in the 2011 issue of Model Railroad Planning, an article by John Flann (though his layout isn’t portable). Below is one of John’s photos, illustrating roughly half of his layout.

The gray stone structure toward the left end of the photo is the depot, with the goods shed (freight house) behind it. John has set the scene in the imaginary Dorsetshire town of Hintock Magna, and sure enough, it’s an imaginary Great Western Railway (GWR) branch.

(I should mention in passing that for British modelers, there are two watershed dates to consider in modeling: 1923, when “The Grouping” occurred, uniting dozens of large and small railways into four major regional ones, including GWR, and 1948, when all railways were nationalized into British Railways. Hintock Magna is set in the 1930s.)

What I liked most about this approach is that it incorporates a familiar railroad. That means that viewers readily understand the context of what they are seeing. The locomotives and rolling stock (in U.S. modeling, especially cabooses), the signaling and structures, and even the operating details, are all things you already know. In John Flann’s example, the railway is the GWR; for my layout, it’s the SP.

I also have had the goal, as I’ve mentioned a number of times in this blog, of modeling the railroading, not the specific railroad places. For that reason, modeling free-lance towns is simply a way to produce the railroading I want to operate. Rolling stock, from locomotives to freight and passenger cars, to cabooses, is pretty strictly prototype (with an occasional excursion beyond: https://modelingthesp.blogspot.com/2012/08/whimsy.html ).

But of course even an imaginary town ought to have realistic appearance, which is what I have tried to do. In fact, I think imaginary towns call for even more effort to have a credible appearance and to be visually pleasing. An example is the scene below at the intersection of Alder Street and Pismo Dunes Road in my layout town of Shumala. 

And of course the real pay-off is the switching, the life blood of a branch line anyway. Just as a single example, below Consolidation 2752 is spotting a two-compartment tank car at the Associated Oil dealer in Shumala, just behind the engine servicing tracks in the foreground. Multiply this by thirty or so other industries, and you have an operating session.

My choice of a branch line to model has continued to satisfy the goals I have arrived at in my model railroading, and I commend it to anyone with goals of the same kind.

Tony Thompson

Friday, September 9, 2022

Operating stock cars

 Years ago, I gave a brief summary of what I expected when operating stock cars on my layout, as part of a post describing the choices I had made for my stock car fleet (see that post at: https://modelingthesp.blogspot.com/2011/02/choosing-model-car-fleet-3.html ). But with the passage of time, additional considerations have arisen, thus this post.

As a Southern Pacific modeler, naturally I mostly need stock cars of that railroad, and awhile back I wrote a post just about SP stock car modeling (it’s here: https://modelingthesp.blogspot.com/2015/07/modeling-sp-stock-cars.html ). Many readers will also know that I wrote a full account of the prototype cars, Volume 1 in the series, Southern Pacific Freight Cars (Signature Press, 2002).

One interesting example among my “home road” cars are Texas & New Orleans cars, especially the post-WW II conversions done by T&NO to use old Class B-50-13 and -14 box cars for conversion into stock cars. The example below, T&NO 15259, is an example, having steel ends that survived from the predecessor box car. The model was built from a Sunshine kit.

As the photo above shows, on my layout I do have a small stock pen, used of course for loading or unloading stock cars. A post about the background of that facility is here: https://modelingthesp.blogspot.com/2015/03/a-stock-pen-for-east-shumala.html . The construction of that pen was also described in a post: http://modelingthesp.blogspot.com/2015/06/the-east-shumala-stock-pen-part-2.html .

An important source for understanding stock car operation is the recent excellent book, Live Stock Operations, by Stephen Sandifer (Santa Fe Society), which I reviewed when it came out (see the review at this link: https://modelingthesp.blogspot.com/2020/11/new-book-on-live-stock-by-stephen.html ). Very many important features and details of operations are included, though many are specific to the Santa Fe.

An important point has to do with resting animals. Federal law prescribed that animals could not be confined in stock car for more than 28 hours (which a shipper could request to extend to 36 hours). When that time expired, animals had to be let out of the cars and allowed to rest for 5 hours before reloading (in practice, rest periods were often longer, at railroad convenience). In addition animals would be fed, and after a suitable interval of time, also allowed to have water.

These regulations meant that stock traffic was handled as expeditiously as possible, usually in the fastest manifest trains or in dedicated stock trains. But when animals were unloaded for rest, it was common to send any empty foreign cars homeward and reload into the home road’s cars (provided, of course, that home road cars were available). But for just that reason, it is not unusual to see foreign-road stock cars in prototype photos.

I show one such photo below, taken at Kino, Arizona in 1953 by Bob Knoll. The lead stock car, behind the cab-forward, is an SP Class S-40-11 car (rebuilt from a “Harriman” Class B-50-5 box car), and behind it are two Texas & Pacific stock cars. One has a yellow door to identify it as a double-deck car, something many roads did. I took this as inspiration to add a T&P stock car to my fleet.

My model, built from a Sunshine kit, does show up from time to time in operating sessions. You see it below being switched by SP Ten-Wheeler 2344 in my layout town of Shumala.

After a rest period, it was permissible to reload animals into the same cars, but bedding had to be inspected, and additional bedding added if needed. Any fresh cars had to have fresh bedding, as did the cars spotted for initial loading. Cars were normally cleaned between runs, some railroads using steam cleaning, and shippers had the right to reject for loading any car which in their judgement was not clean.

A bedding example is this one, a Santa Fe photo from the Kansas State Historical Society collection, taken from Sandifer’s book. The men are shoveling sand into the stock car to serve as bedding; the recommended depth was two inches throughout the car.

Last, I want to show a favorite model, even though it turns out to be a stand-in only. Many years ago, before the availability of the Internet resources we enjoy today, I had only a poor photo of the rebuilt stock cars the Denver & Rio Grande Western had created. It looked like the steel ends were Dreadnaught ends, and the cars had a steel panel roof. Since the Athearn “Blue Box” box car of the day had those features, I cut the sides out of such a model, and spliced in the sides of the Athearn stock car. The result is shown below. 

Unfortunately, as I now know, the actual D&RGW cars had corrugated ends, not Dreadnaught, and were not as tall as this model. But it was an interesting project (including the broken board that you can see above), and I do still operate the car. Nostalgia definitely has its place in my world of model railroading.

Tony Thompson

Tuesday, September 6, 2022

Waybills, Part 99: more on overlay bills

 This post relates my thoughts after I had one of those stunning realizations that we all have occasionally. More on that in a moment. First, let me mention that this wide-ranging series of posts about waybill topics is quite searchable by using a variety of search terms for whatever sub-topic you’d like, in the search box at right. 

In the present post I will give some background for purposes of clarity for less-familiar readers of the blog, while realizing that some readers will have seen it before. But as Enrico Fermi once said, “one should never underestimate the pleasure we feel from hearing something we already know.” So if you’re in that group, enjoy.

Now I’ll describe the realization mentioned above. I was talking to a modeling friend not too long ago, who was asking questions to understand my use of “overlay bills” or partial waybills. My first description of this was back in 2015 (see that post here: https://modelingthesp.blogspot.com/2015/06/waybills-part-41-overlay-bills.html ). I was repeating those ideas, concentrating on refrigerator car waybills, which on my layout are very predominantly outbound from packing houses on the layout.

Just for clarity, let me show the kind of thing I mean. Below, at left, is a waybill for PFE 36171, with a cargo outbound from the Coastal Citrus Association in my layout town of Santa Rosalia. At right is an overlay bill which, if placed atop the bill at left inside its clear plastic sleeve, makes the outbound load depart from Phelan & Taylor in Shumala. Either cargo would receive a Southern Pacific waybill, so the combination is perfectly suitable.

Obviously this can readily be done for any kind of car, moving anywhere, provided that we have the same “typewriter” face used to fill out both parts of a combined bill. I do use a variety of typewriter faces, as was the prototype case, on inbound waybills from various railroads around the country. An example is below, a typical “typewriter” appearance.

The complication is that I only use the Bell Gothic face for SP and UP waybills, reflecting those roads’ prototype appearance. That’s the face you see in the pink perishable waybills above. So back to my conversation.

My friend innocently remarked, “So the reefers can take any outbound cargo, right?” and I agreed. Then came that kind of moment when your arm jumps up and your palm makes a dent in your forehead. He said, “So do you do this for all your cars?” Suddenly I realized that he was right: as long as I had at least one outbound SP waybill for a particular car, then I could add overlay bills to any destination whatever.

I had never thought it through this way: every freight car that can be free-running, ought to have at least one waybill with the SP header. That way it can accept any outbound overlay bill from any industry on the layout. I will illustrate. First, let’s choose an inbound waybill to one of my industries, California Airframe Parts, and it’s a load in SP boxcar no. 61035.

In the sleeve with this waybill is an Empty Car Bill that would return the car to Los Angeles, empty, after unloading. An example of this arrangement of load and empty bills is shown below, using the “tall format” waybills I created for the layout of the late Otis McGee.

But what if I’d like to re-load the same box car mentioned above, SP 61035,  with an outbound load? I do have overlay bills for this industry, such as the following:

But of course this overlay bill uses the SP billing typewriter “look-alike” face, Bell Gothic. It would have to go over a waybill for this car, SP 61035, that’s an SP waybill. Looking into my “pairs list,” (a very important tool I’ve written about several times before; see for example the discussion at: https://modelingthesp.blogspot.com/2012/02/waybills-17-pairs-list.html ), I find this waybill:

Now I can pair this waybill with the overlay bill above, and it no longer matters that the underlying waybill is to a different industry; the combination is just fine, and it looks like this in the sleeve:

I am now combing through a lot of my waybill files, looking for instances where an outbound SP waybill, from any industry whatever, does exist so that overlay bills can be used for any other industry.  And it’s all from a conversation that I had no idea would lead where it did.

Tony Thompson

Saturday, September 3, 2022

The new SPH&TS book on 4-8-0 locomotives

 The Southern Pacific Historical & Technical Society (SPH&TS) has just published an excellent book for those of us interested in motive power. Entitled Southern Pacific 4-8-0 Locomotives, it’s authored by the late Tom Dill and by Joe Strapac. As always, Strapac’s masterful hand in selecting photos, providing technical specifics, and laying out a handsome volume, are at the fore. But Tom Dill’s superb photo collection and operating experience were an essential part of the project too.

Here’s the cover. You can buy the book at the SPH&TS website (visit it at: https://sphts.org/shop/ ) if your local hobby shop — where of course you should shop first — doesn’t carry it. I recommend that you order it from SPH&TS.

It’s an 8 x 11.5-inch hardbound book, with 208 pages, richly illustrated with photos from the long careers of many of the SP 4-8-0’s. People may not realize that SP owned 80 engines of this wheel arrangement, and some lasted to the end of steam, mostly on account of low axle loadings required on many Oregon branch lines.

The book contains twelve chapters. Seven of them are devoted to the individual classes of these locomotives, TW-1 to TW-8 (there was no Class TW-5), “TW” of course for “Twelve-Wheeler.” There is another of Arnold Menke’s outstanding chapters on tenders, and there is a complete locomotive roster including dates for such things as the conversion of the original cross-compound steam distribution to simple.

One very small quibble. On page 162 appears the photo shown below, an Allan Styffe image at San Luis Obispo from March 1952. I might raise two points about the photo caption: first, it says that “This is the only black-and-white image yet found showing a twelve-wheeler at this location . . .” It also states that the locomotive was soon thereafter moved to Oregon and was retired thirteen months later, which would be April of 1953.

Now as to the statement about this being a singular B&W image, obviously the authors weren’t aware of Malcolm “Mac” Gaddis’s photographs, of which I once borrowed all the negatives and made prints for my own use (with Mac’s generous permission). Below I show one of them, also of SP 2918 at San Luis Obispo. Mac worked at San Luis for several years in the early 1950s.

Now of course no author can find every photo out there, and I don’t really have any criticism of Dill and Strapac for not having checked into the Gaddis photos. But there is a second point: Mac’s date for his photo is August 1954. I know Mac kept track of his dates, because when I interviewed him, he pulled out a stack of little booklets in which he had written down photo dates. The  engine obviously was not in Oregon in August 1954, nor was it retired. Nevertheless, author Strapac’s citation of SP locomotive records is better information.

But as I said, these are really tiny quibbles. It’s an excellent book, and I’m still enjoying reading in it and studying photographs. And yes, this is definitely one of those books that repeatedly brings the nose down to the page to examine details. 

I was especially pleased that they included one of my favorite photos from Wilbur C. Whittaker, a 1937 photo by the young Wilbur along the shore between Watsonville and Santa Cruz, with a single-car Train 187 behind SP 2923. Marvelous eye for composition!

As you can tell, I really like this book and heartily recommend it. And I’m delighted the SPH&TS is serving its audience with such an excellent publication. Congratulations all around!

Tony Thompson