Tuesday, October 31, 2023

The 2023 SPH&TS annual meeting

This year’s annual meeting of the Southern Pacific Historical & Technical Society was held last weekend in Bakersfield. It was an enjoyable meeting, buoyed by the attendance of 140, a considerable advance over last year’s meeting in Modesto which only drew 75. Many organizations around the country are reporting slow attendance recoveries like this from the pandemic years, so I guess we are in that pattern too.

A notable feature was the large and quite busy vendor and sales room. Some sellers we haven’t seen for awhile were there, and we saw some intriguing new products (the most notable ones will be the subject of a separate post or posts). Here’s a view of the room:

Clinics were presented in a quality program, an aspect I always enjoy, because I learn a lot every time. A notable speaker was Jean-Guy Dubé, the arctitectural draftsman who has been measuring and recording a number of SP depots in blueprint form. He used as his introductory slide, the cover of his beautiful book which collects some of those drawings.

I should mention that I also gave a talk, combining my Model Railroad Hobbyist articles from January and October of this year, to speak about SP heavyweight and lightweight sleeping cars. There’s a handout for the talk here: https://modelingthesp.blogspot.com/2023/10/handout-for-passenger-car-talk.html .

The model display was also excellent this time. I really liked a number of the entries. The one I think I like best was this re-creation of the Arrowhead Water tank car, often called “the water bottles,” for obvious reasons. It was 3-D printed by A.J. Chier. This model is just like the prototype photos.

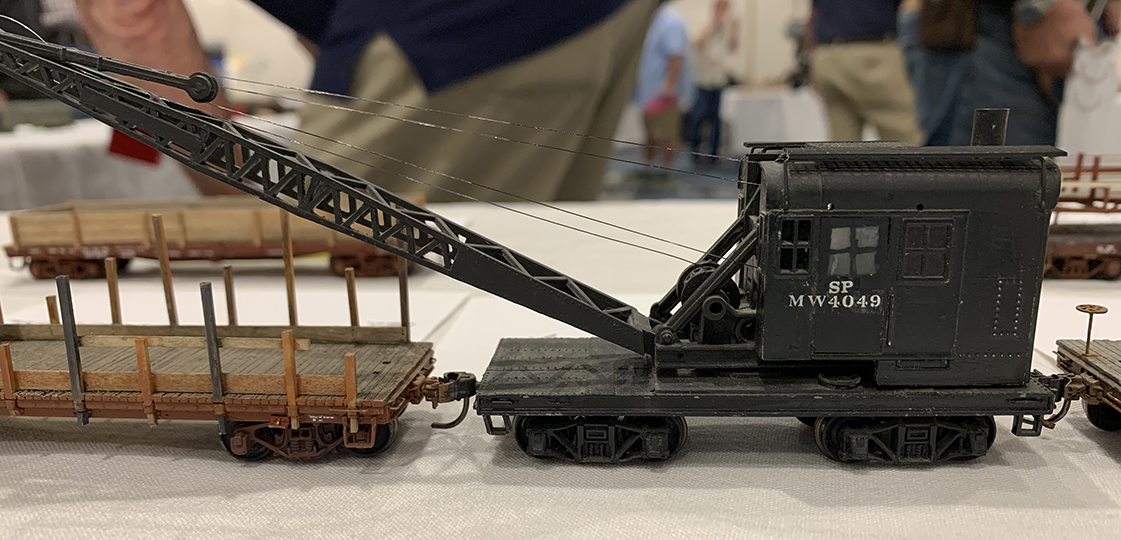
Another entry that got me thinking was this nice modification of the Walthers 25-ton crane, a type the SP owned in some numbers. In fact, this model suddenly made me think, “Haven’t I got a kit for this model in my storage somewhere? I could do one of these too!” Can’t beat that for inspiration. (Sorry my photo cuts off the end of the boom.) I found out later the model is by Jason Hill.

Another interesting model entry was among those placed in the Saturday-morning only “Railroad Prototype Modelers” meet, open to the local modeling community, SP or otherwise, without convention registration. I think this broadening of the meeting with an RPM event was a great idea, if for no other reason that it provide more nice models to look at! 

 That specially interesting entry was from Charlie Slater, who brought this Santa Fe Class Ft-X flat car. Both the  ready-to-run car and the transformer load are from Class One Model Works, except Charlie removed some boards from the end deck, as he has seen shippers do, so that hold-downs could be welded right to the car frame. The boards were then left loose on the car, and could be re-bolted in place at a later date. You can click to enlarge.

All in all, a nice variety of events in the meeting (marred only by a substandard banquet speaker), lots of camaraderie with the good attendance, and even nice weather, something for which Bakersfield is not normally known. I liked it. If you’ve never attended a meet like this, I encourage you to try one. You would probably like it too.

Tony Thompson

Saturday, October 28, 2023

Handout for passenger car talk

 This post is a handout for a talk about Southern Pacific passenger car modeling. The talk concentrates on sleeping cars, both heavyweight and lightweight. Much of the modeling described in the talk is included in articles I wrote for Model Railroad Hobbyist (the January and October 2023 issues).  

My core idea, for this part of the SP passenger car equipment fleet, is using the sleeping car models produced by Rivarossi in Italy, and marketed in the U.S. by AHM (Associated Hobby Manufacturers). A very useful one is the “1920 Pullman” car, as AHM sold it, since it models the most common single floor plan in the original Pullman fleet: a “12-1,” as they were called, 12 sections and 1 drawing room. 

Also produced was an AHM “1930 sleeper” model, which is essentially a 10-6 (10 roomettes, 6 double bedrooms), probably the most common lightweight sleeping car floor plan. It can be repainted for Lark service, as I have done, and given upgraded details. Below you see one of these cars, with an AHM heavyweight Pullman conversion right ahead of it, passing the depot in my layout town of Shumala.

The AHM “1920” heavyweight Pullman can readily be kitbashed into a number of other floor plans, as shown in a superb series of articles in Mainline Modeler, in five issues during 1981. Magazine issues can be hard to find, on-line or elsewhere, but a perhaps easier source for these articles are the verbatim reprints of all five articles, contained in the Mainline Modeler reprint book shown below.

An essential source of information and photographs, for the Southern Pacific modeler, is the five-volume series of books entitled Southern Pacific Passenger Cars and published by the SP Historical & Technical Society. For the present topic, Volume 2 on sleeping cars was vital.

In addition to the many important pieces of information about individual cars in the book shown above, there is another SPH&TS book of great importance also, the painting and lettering guide. Both can be purchased on-line and the latter from the Society at its website.

Here are references for the five most important books mentioned in the talk: 

___________, The Best of Mainline Modeler’s Passenger Cars, Volume 1, Hundman Publications, Seattle 1991.

Cauthen, Jeffrey Alan, and John R. Signor, Southern Pacific Painting and Lettering Guide (“Locomotives and passenger cars, 1913–1996”), SPH&TS, Upland, CA, 2019.

 Ryan, Dennis and Joseph Shine, Night Trains of the Coast Route, Four Ways West, La Mirada, CA, 1986.

SPH&TS, Southern Pacific Passenger Cars, Volume 2, Sleepers & Baggage-Dormitories, SPH&TS, Pasadena, 2005.

Wayner, Robert, Pullman Company Descriptive List of Cars, 1950, Wayner Publications, New York, NY, 1985.

In the talk, and in the MRH articles mentioned in the first paragraph, I showed a variety of sleeping cars that I was able to build from the AHM sleeping car models. The MRH articles contain extensive bibliographies. Much if not all of the material was previously shown in my blog; links are below.

First, some links to basic passenger car modeling, the concluding posts in each series:

https://modelingthesp.blogspot.com/2014/09/modeling-sp-passenger-cars-sleepers.html

https://modelingthesp.blogspot.com/2014/07/modeling-sp-passenger-cars-heavyweight.html

https://modelingthesp.blogspot.com/2018/02/my-pullman-projects.html

https://modelingthesp.blogspot.com/2018/05/the-problems-of-dark-olive-green.html

https://modelingthesp.blogspot.com/2022/11/heavyweight-sleepers-conclusion.html

https://modelingthesp.blogspot.com/2023/10/modeling-sp-passenger-cars-part-18.html

I have also written extensively about passenger car diaphragms, full width and otherwise:

https://modelingthesp.blogspot.com/2014/06/modeling-sp-passenger-cars-part-5.html

https://modelingthesp.blogspot.com/2021/05/passenger-car-diaphragms-part-2.html

https://modelingthesp.blogspot.com/2021/08/full-width-diaphragms-part-2.html

https://modelingthesp.blogspot.com/2021/08/full-width-diaphragms-part-3.html

https://modelingthesp.blogspot.com/2021/07/passenger-car-diaphragms-part-4.html

Among the other blog posts that may be informative, here are two about the Lark:

https://modelingthesp.blogspot.com/2021/07/modeling-sp-passenger-cars-part-11-lark.html

https://modelingthesp.blogspot.com/2021/07/the-challenge-of-full-width-diaphragms.html 

With these links, it should be possible to see the background modeling in more detail than was possible to present in a single talk, or for that matter, in the two MRH articles. In addition, most of the above posts that are linked contain significant prototype information too.

Tony Thompson

Wednesday, October 25, 2023

My latest column in _Model Railroad Hobbyist_

In the October issue of the “Running Extra” section of Model Railroad Hobbyist (MRH), I have another column in the continuing series of “Getting Real” columns, written (currently) by four people including me, in rotation. You can find the article on their website, www.mrhmag.com , though if you’re not a subscriber to “Running Extra,” you will need to pay $2.99 for it. (Price per issue is cheaper if you subscribe.)

This latest column is about modeling Southern Pacific lightweight sleeping cars, something I have been describing in this blog in recent months, and it complements my column about modeling heavyweight SP sleeping cars, which was in the January 2023 issue of MRH. The two articles have a few details in common, but largely are the two ends of the same story.

My focus has been on sleeping cars because I have always admired the Lark. It was still steam-powered in my modeling year, 1953, and if I had the layout capability, I would be creating full Lark consists to operate. Maybe I can convey that with the Bill Olson photo shown below, taken in the summer of 1952, at Glendale, the Lark’s last stop before arrival at Los Angeles.

The core of the MRH article, and of the series of blog posts, was the use of Brass Car Sides products to model a couple of cars with less-common floor plans. Shown below is one of the sides, in the process of being glued (with canopy glue) to an AHM coach body from which all areas that showed behind the Brass Car Side had been cut away. Reversed clothes pins are being used as parallel clamps. (See: https://modelingthesp.blogspot.com/2023/04/modeling-sp-passenger-cars-part-13.html .)

But of course the goal is to produce finished cars that can be operated on the layout. Painting and lettering was naturally a vital part of that; see my post about decals, at: https://modelingthesp.blogspot.com/2023/10/modeling-sp-passenger-cars-part-18.html , and preceding posts in this series. Here’s an example of a result, the bedroom side of the 13 double bedroom car, with its distinctive paired windows. The roof is in place, as are the handrails.

As I’ve mentioned in previous posts, I have done this kind of striping for years by masking and airbrushing. Decal stripes on a long car are just not a fun project, as I learned the hard way. Below is a close-up illustration of what can be accomplished, on a car with a full-width diaphragm.

And when the cars are completed, I usually operate them, one or two at a time, in short passenger extra trains, representing deadhead moves, or sometimes in excursion trains. (I described my efforts to operate passenger equipment realistically on my fairly small layout in a post a couple of years ago: https://modelingthesp.blogspot.com/2021/05/mainline-passenger-cars-on-small-layout.html .)

In the photo above, you see my completed 4-4-2 (4 compartments, 4 double bedrooms, 2 drawing rooms) sleeping car, one of the two cars I constructed using Brass Car Sides, bringing up the rear of a deadhead move. Ahead of the Lark sleeper is a heavyweight Pullman sleeper, an RPO car, and a baggage car. The train is just passing my layout town of Shumala, located on SP’s Coast Division main line.

One part of this latest column that may be of particular value (if you're interested in SP sleeping cars) is that I provided a long series of links at the end of the article, for the relevant blog posts I’ve created over a span of years. Much of that is included in my handout for my talk about this topic, which is at this link: https://modelingthesp.blogspot.com/2023/01/handout-for-sp-passenger-equipment-talk.html .

It was interesting to extract the essence of a number of previous blog posts, and a number of additional model and prototype photos, and create a completed article for MRH. It captures, I think, my approach to representing at least some of the allure of the Lark.

Tony Thompson

Sunday, October 22, 2023

Route cards, Part 27: back to grading cards

 In an evear-growing series of posts, I have been writing about both route cards, cards that direct movement of freight cars, and grading cards, those that give results of an inspection of a car interior for loading. This one continues my topic of grading cards and systems. The previous post on this part of the subject can be found here: https://modelingthesp.blogspot.com/2023/09/route-cards-part-25-still-more-grading.html . As before, all cards are from the collection of Michael Litant.

The first example I want to show is from the Chicago & Eastern Illinois, identifying a car that is suitable for grain loading. It’s 3 x 4.25 inches in size. Note that the form would permit an inspector to choose a class of loading (for example, A, B, C, etc.) but here the choice was a specific cargo, perhaps because lots of grain was being loaded. The car number, 64127, is clear, but the only initial shown is “C,” probably the usual practice of abbreviating the home road’s cars. If so, it was a 40-foot boxcar of 1937 AAR design.

A second example is another of those interesting multi-sided cards, this one hexagonal, from the Burlington. It’s 6 inches across the parallel sides. It’s dated June 18, 1968 at Cicero, Illinois, and the car given a grade 1 rating was Q 48056, a 50-foot, double-door box car of 70-ton capacity. Note that the second side has a lot of non-grading segments, such as clean out, quick clean, bad order, light weigh, and so on.

The next example is a really interesting pair of cards for the same railroad, Northern Pacific, but they are quite different from each other. The first one is a fairly typical type of card, 5 inches square, with the usual range of grades. The side used was the second side, and the grade of CC chosen for car 48056. It was graded at Auburn, Washington on November 1, 1968. Since the preceding card was for the same car, a 50-foot box car, and the date is later, obviously collector Michael found these two cards with one atop the other. 


The other NP car is of the “extreme cargo detail” variety, and is evidently meant to be folded to make the operative side uppermost. It’s 5 x 10 inches overall, but folded it would be 5 inches square. It appears to be dated May 27, 1965 at Seattle, and the car was NP 97034, a 50-foot RBL (bunkerless) refrigerator car.


My fifth example is from the M-K-T, usually called the “Katy,” and is interesting because it seems to contemplate only one typical cargo for each grade, A and B. It’s 4 x 4 inches, and isn’t filled out.

As a final example, here is a card from a much smaller railroad, the Savannah & Atlanta, and is 4.5 x 5 inches in size. It isn’t filled out. The back just shows “P.W.-10,” the meaning of which I can’t supply.

This marvelous collection of route and grading cards, loaned to me by Michael Litant for scanning, is really a trove of information for me. I hope others have also found these cards informative as well as interesting.

Tony Thompson

Thursday, October 19, 2023

The new Class One flat car

 Many of you will have seen the announcements by a relatively new model manufacturer, Class One Model Works, for a 58-foot heavy-duty, depressed-center flat car. (You can visit the Class One site to see these models at: https://classonemodelworks.com/product-category/model-type/flat-cars/ .) Several railroads built very similar versions of this car, because General Steel Castings Corp. (GSC) produced a one-piece steel casting for the entire car. This of course made a very strong and durable car body.

Below is an example of one of these 58-foot GSC frames, produced under the “Commonwealth” name, whitewashed for the photo (GSC photo for Southern Pacific, Steve Peery collection).

Either a car builder or the railroad’s own shops could add brake gear, desired decking, and suitable trucks and couplers to complete the car, a straightforward job for most railroad shops. One of the interesting things about the flat cars produced with these body castings is that many of the railroads chose to use a heavy-duty 6-wheel Commonwealth truck produced by GSC, a distinctive-looking truck (GSC photo for Southern Pacific, Steve Peery collection).

As you can tell from my photo credits, Southern Pacific was one of the railroads that bought these cars, with these trucks. But Class One is not offering an SP version. I have an idea why not. 

The Class One models offer either a wood end deck or an open-grate end deck, and all cars have the end-to-center transition area open, with the slots showing (see the frame photo above). But SP covered the transition-area slots with steel plate, and welded steel plate onto the end decks also. This rather vertiginous photo, taken from the overhead crane at the T&NO shop in Houston (SP photo, Steve Peery collection), shows this, though this is a slightly different car from those shown above.

That of course raises the very interesting question of whether the Class One model can be modified to match the SP cars shown in these photos. I am still contemplating that option. But to assess whether that would be feasible, I went ahead and bought one of their cars, Erie 7265, a car built in 1948. Like all the cars, it has the Commonwealth trucks (they are roller-bearing trucks, not correct for the Erie car in its original state.) It’s a very nice model and will certainly be going into action on my layout, pending truck correction. This model has the wood end decks.

I even admire their shipping box for the cars, a crate-like look that I show below. Inside, the model is securely positioned at an angle to the short directions of the box, and arrived in perfect condition.

I will return to the question of whether I can or will modify one of these cars for Southern Pacific in a future post. But I do know how to back-date a roller-bearing truck to plain bearings, as I did for my helium car model some years ago (see the post at: https://modelingthesp.blogspot.com/2012/04/helium-cars-part-1.html , scroll down to the bottom). I may do the same for the Erie car shown above.

Tony Thompson

Monday, October 16, 2023

Upgrading a Red Caboose SP stock car

Over ten years ago, Red Caboose released an HO scale model of a Southern Pacific stock car, representing Class S-40-5. This was a large car class, as stock cars go, more than 800 cars. Along with Class S-40-4, the -5 class represented a standard stock car body design, differing only in whether their underframes comprised one or two center sills. Succeeding classes S-40-8 and -9 were all but identical, representing the great bulk of SP’s stock car fleet. Many survived into the 1950s. 

For these reasons, the choice by Red Caboose of Class S-40-5 to model is a good one. A post from some time back summarized how they can be upgraded (the post is here: https://modelingthesp.blogspot.com/2015/07/modeling-sp-stock-cars.html ). The primary issue to be addressed is trucks. Red Caboose supplied these models with T-section trucks, a design much used by SP between 1912 and 1925; but unfortunately, not used for stock cars except for some much later rebuilds.

Instead, SP applied Vulcan trucks to most of its stock cars, and as I know from perusal of the SP Car Ledgers, there were no examples of T-section trucks ever applied to Class S-40-5 cars. Shown below is a prototype photo of a Class S-40-5 car, taken from my book, Volume 1 in the series Southern Pacific Freight Cars, entitled “Gondolas and Stock Cars” (Signature Press, 2002). It’s an SP photo, taken at Dunsmuir in 1928, from the Shasta Division Archives. Like the rest of its class, it has Vulcan trucks, and still has the periods between initials in the reporting marks, correct until 1931.

Luckily, Kadee makes a very nice Vulcan truck. When I wrote the post linked in the paragraph above, they only offered the Vulcan design in a “sprung” truck with working springs. Subsequently, they have added an “HGC” version, with HGC standing for “high gravity compound” as the truck material. 

More importantly, the HGC trucks have a molded sideframe, thus without the far-too-open “real springs” of the sprung truck (for more on those issues, you might want to look at my MRH article, September 2016; some blog commentary is at: https://modelingthesp.blogspot.com/2016/09/my-column-on-trucks-in-september-mrh.html ).

Below is one of the Red Caboose stock cars, with truck changed out to Kadee Vulcans. Note that the 1946 introduction of spelling out the road name instead of using the initials “SP,” has caused a rather long board to be required for that road name.

But in the early 1950s, one sees, in prototype photos, evidence that some shop repaints of SP freight cars did not bother with that full road name but just applied the initials (the pre-1946 practice). In 1953, the change back to initials became official. On stock cars, this led to the interesting result of that long board remaining, but only initials lettered on it. 

Below is a prototype example, no doubt taken to record the pair of new Trainmaster locomotives, 4810 and 4815, at Carrizozo, N.M. where they first went into service, by Lewis Harlow (Bob’s Photo collection). But this June 1955 image also records SP stock cars 70998 and 73970, both with long “road name boards” now occupied only by car initials. (You can click on the image to enlarge it.) Note also that the deep color on the stock cars suggests that they have probably been relatively recently repainted.

Lettering like this was included in the Red Caboose production of the Class S-40-5 cars, such as my model shown below, SP 73691. But in this photo, the original T-section trucks are still present, despite my having weathered the car and added chalk marks, route cards, and repack stencils. Given that the replacement of the spelled-out road name with initials was only from 1953 onward, and the discontinuance of the 1-inch stripes above and below the reporting marks was in January 1952, I tried to maintain most of the original color in the weathering, as the photo above suggests.

Of course, the truck issue is easily corrected. I simply replaced the Red Caboose trucks with those Kadee HGC Vulcan trucks, product number 1573 (with the 0.088-inch wheel treads), and added a little grime to the sideframes. I also replaced the lame couplers supplied by Red Caboose, with Kadee “scale head” whisker couplers, my de facto standard these days.

The car can now be used in layout operating sessions as a fully prototypical SP stock car, and its lettering is consistent with the model’s reweigh date of March 1953. I like variety in my stock cars, and the “remnant” long road-name board on this model provides that.

Tony Thompson

Friday, October 13, 2023

Modeling SP passenger cars, Part 18

In the previous post, Part 17, I showed the completion of painting and striping applications to the two cars of different floor-plans that I am working on, a 13 double bedroom car (13 DB) and a 4 double bedroom–4 compartment–2 drawing room (4-4-2) car.  You can read that post at this link: https://modelingthesp.blogspot.com/2023/09/modeling-sp-passenger-cars-part-17.html .

In the previous post just cited, I mentioned the problems of decal availability. I do have one of the Champ Lark sets (Champ PH-110), and could go ahead with lettering. This represents compromises. The Champ lettering is white rather than SP Lettering Gray (though on these gray sides the difference is minimal), and the lettering does not have the 1/8-inch wide black outline that SP continued to apply until 1956. In HO scale, those compromises aren’t crushing.

There happens to be an alternative. Todd Osterberg has recently completed artwork for several Southern Pacific streamlined passenger trains, including the 1941 Lark. These are excellent renditions and do include the outlining that was in use in the year I model, 1953. These decals will be available in a few weeks or so, and will be sold via Owl Mountain Models (their website is at: https://owlmtmodels.com/ ; that’s not a link to the decals, as they aren’t up yet). Here’s a sample. You can click on the image to enlarge it if you wish.

The car number shown, SP 9352, is the number I will apply to my 13 DB car.

The background on the locations of lettering on Lark cars, and the car numbering for the cars modeled, was described in a previous post (see it at: https://modelingthesp.blogspot.com/2023/05/modeling-sp-passenger-cars-part-15.html ). The first interesting lettering pattern for these two cars is for the 4-4-2, which had the distinctive small windows in pairs for the upper berths in the compartments. The prototype photo below (Lawson K. Hill, San Francisco, August 1953) illustrates the lettering part of the problem: the road name had to be located well off-center to clear those windows.

This was of course how I lettered the model, adding the car number below the Lark emblem. The car shown above is SP 9106, and I chose that number for my model. Below you see the same side of my model 4-4-2 as in the above prototype photo (the bedroom side). The off-center road name is certainly distinctive. Note, incidentally, that the remnant skirt seen above is reproduced on the brass car side used for this model.

You may also note above that a diaphragm face plate has been attached to the car end, and brass wire used to represent the diagonal stabilizer bars that are so visible on prototype diaphragms (for more discussion and illustration of this point, see my post: https://modelingthesp.blogspot.com/2021/06/passenger-car-diaphragms-part-3.html ). Here’s a better view of such model bars, shown on an AHM 10-6 car (repeated from the preceding post in the series, cited in the first paragraph, above):

Note in the photo above that there are handrails either side of the door. At the other end of the car, the blind end (no vestibule), there was a single handrail and a step for the use of brakemen or switchmen. The photo below (Pullman-Standard photo, Rob Evans collection) shows this on a brand-new 13 DB Lark car in March 1941. The handrail was cadmium-plated, the step was painted body color.

On some of my streamlined car models, I have added the handrails with wire; on others with a length of 0.010-inch styrene rod.

Another issue that arises with cars like these is that they were “all-room” cars, that is, all accommodations in the car were rooms with doors. That means that you could never see through such a car (unless someone was just opening a room’s door). But these AHM cars have no such interior. I have made full-length view blocks, using 0.020-inch styrene sheet, braced with 1/8-inch square styrene strip along the bottom (which also provides a gluing surface). 

The side that will be toward the aisle-side windows should be a passenger interior color (I chose an ivory shade), and the back of it (lower one below) is dark gray. That means that from the bedroom side of the car, you won’t be able to see anything inside, which is realistic. I might mention that I once went to the trouble to draw room doors with pencil on an aisle-side view block. However, these were almost impossible to see through HO-scale side windows, and I haven’t ever repeated the exercise.

These need to be installed inside the car relatively close to the aisle-side windows. Aisles in these cars were only about 30 inches wide, so that scale distance is appropriate. I attach them with canopy glue, taking advantage of the bottom bracing. Below is the aisle side of the 4-4-2 car with view block installed (this side of the car was lettered with the Osterberg decals).
With lettering well along and view blocks installed, the main remaining task is to deal with diaphragms. I want to install full-width ones on one of these cars, and will return to that topic in a concluding post.

Tony Thompson

Tuesday, October 10, 2023

Trackwork wars, Part 7

 Most of my layout maintenance challenges have been electrical, not issues to do with trackwork, thus the long series of posts called “electrical wars” (to find those posts, use that term as the search term in the search box at right). But trackwork issues do arise, and this post addresses the latest one of those.

As it happened, this latest issue arose at the same switch (at the lead into all the industries at East Shumala on my layout) as the recent post in the “electrical wars” series. That post, with some views of the trackwork, can be seen here: https://modelingthesp.blogspot.com/2023/10/electrical-wars-part-21.html .  

The problem was derailments in the same area as the electrical glitch, so it required a separate investigation. I discovered that the crosswise level of the track had deteriorated, perhaps due to shrinkage or warping of the support materials underneath this area. But the job was to correct the track.

I used a tool I have shown before, a transparent plastic “plank” on trucks. It permits you to see what is happening underneath it in areas of derailments or other problems (see that post at: https://modelingthesp.blogspot.com/2019/11/trackwork-wars-part-4.html ). Here’s a photo of it in the affected area. A small level is resting on it.

Since the “plank” is kind of tippy, one needs to take care in making sure the vehicle is itself resting flat on the truck bolsters, so that the small level reflects the state of the track, not that of the plank. 

Right in the area shown above, the track into East Shumala was found to be tilted downward toward the camera, that is, the nearer rail was significantly lower than the far rail. You can see this in the level’s bubble below.

Having demonstrated the defect, the next step was to correct it. My experience has been that if you slice into the material under the track, it tends to raise the track. My preferred tool for this is a putty knife, as you see below, with the “digging” in progress. I insert the tool under the track and gently pry upwards. Then check the level and, if needed, pry a little more.

Here is the result. It only took a few tries at prying to achieve this, and rolling stock over this area did indeed perform dependably.

I dislike having to confront it, but there are now a couple or three areas on the layout where support underneath has shrunk or sagged or something, leading to track that has a dip in it, or is not crosswise level. I am quite sure I didn’t install it this way, and tracking problems over these sections have only emerged recently and had to be corrected. I’ve learned that I just have to keep after these kinds of things.

Tony Thompson

Saturday, October 7, 2023

Route cards, Part 26: car movement

 In a lengthening series of posts, I have been showing the fascinating (at least to me) variety in grading cards and route cards used by different railroads, all from the Michael Litant collection. Grading cards were used after an empty freight car had been inspected, and the card identified what class of loading could be put into that car. Route cards directed car movement, usually to an interchange or specific yard track. But some cards, as seen in the present post, directed other movements.

[Previous posts about grading cards or route cards can easily be found by using “route cards” or “grading cards” in the search box at right.]

I will begin with a couple of straightforward cards, intended to direct cars for repairs. The first, a New York Central card, is interesting in that one side directs a car to be moved to a shop for repairs when empty; while the other side directs immediate repair, probably for cases where the car could not or should not be moved. It is 3.5 x 8 inches in size and has not been filled out.

A similar card from the Denver & Rio Grande Western is 4 x 8.5 inches, and is dated June 4, 1968. Here one may assume that the red-color side is the equivalent of the “Shop at Once” side of the NYC car above. That is also the side filled out. The car number indicated is 3481 but no initial is shown. That may, of course, indicate that it was a Rio Grande car, but at that time D&RW had no cars with that number. It may be an abbreviation.

A second type of these “directed movement” cards directs something like a car needing inspection, as with this example from the Chicago & Northwestern.It is 3.5 x 5.5 inches in size, and the back is simply a stamp, “40 St.,”, probably a destination to which the car should go next. It is not filled out.

We can go further with this, in the case of a Southern Pacific card filled out at Roseville on May 18, 1965. Though it states the car can be loaded, no grade is given. The other side would direct a car to be washed out inside. It is a 3 x 5-inch card. The car is CN 539613, a 40-foot, 65-ton box car. I don’t know the meaning of the “symbol,’ 3-3-1, but could be a block of cars in the yard.

A similar card is this from the Milwaukee Road, directing a car to be weighed. It is 3 x 4 inches. The interesting side, though, is the reverse, originally blank but stamped “Miller Brewing Co. 4101.” The car identity isn’t clear (U 27013) but the logical inference is that this is a URTX 27013, a 50-foot refrigerator car, an RBLcar (bunkerless and insulated, with loader equipment).

Finally, a pair of placards obviously intended for the placard board, not the route card board, and the two car sides would probably get one of each. Each is 4.25 x 7 inches in size. The source is the Hoerner-Waldorf Corporation of Montana, and the cards are dated Jan. 2, 1973. A good example of a shipper-supplied cards instead of cards supplied by the railroad.

These cards are a kind of variation in the typical route cards, in that they direct movement in a somewhat different way. They certainly add to the wide variety of card types and designs that were in use.

Tony Thompson

Wednesday, October 4, 2023

Layout operating session no. 85

I note in my layout records that the operating session I hosted on Friday,  September 29 was the 85th on the present version of the layout (adding to a few dozen on the previous version). As it happened, this was kind of a special session, organized to take advantage of a visit to the Bay Area by Bob Hanmer, well-known layout owner and operator from Chicago. 

Having enjoyed operating on Bob’s excellent GN and DM&IR layout in Chicago during Naperville RPM meets in several previous years, I was delighted to help with hosting. My session was one of three organized so Bob could attend. The first session was at Jim Providenza’s Santa Cruz Northern, and my session was second.

One thing that I revived for this session, that hasn’t been included in the last half-dozen or so sessions, is the operation of the ballast train. I described the idea behind this, and showed the company “Bulletin” provided to crews and agents to make them aware of the operation, in a previous post (you can read it at this link: https://modelingthesp.blogspot.com/2019/11/more-operating-sessions.html ). The idea is that re-ballasting is taking place elsewhere on the division, and this train is picking up empty ballast cars that have been spotted in different areas as work progressed.

The crew for this session, in addition to our guest Bob, were Dave Falkenburg, who teamed with Bob, and John Rodgers and Richard Brennan. Below is a view of Bob and Dave (left to right), operating at Ballard. Bob was the conductor here,  and Dave the engineer. Looks they are switching the area north of the depot, judging by the refrigerator cars being moved at this point.

Meanwhile, at Shumala on the other side of the layout, Richard and John (from left to right) were working through the switching they needed to do. At this point, Richard was the conductor (as may be evident from his thoughtful expression) and John was the engineer. I’m not just blowing smoke about that “thoughtful expression.” I have watched many crews switch the first shift at Shumala, and this was one of the best-organized jobs I have seen.

The next day, Saturday, there was an operating session at Paul Weiss’s very large and impressive Central Vermont layout, and Bob participated, with several different train assignments. Here he is crewing a passenger train, CV’s No. 1, with Cydney Abatecola (at left). You can see their train at far right, passing alongside East New London yard. (I was yardmaster here.)

It was great to host Bob Hanmer for these sessions, and the varied styles and requirements of these three layouts were bound to have been a varied and interesting experience for him. And the rest of us had a good time too!

Tony Thompson