Monday, February 27, 2023

Home Shop forms

For decades, prototype railroads have used a paper form intended to route a damaged car to its home shop for repairs. Usually of a size to be stapled to a route card board, they were usually light card stock. I thought this might be a good form to introduce on my layout. 

(For background on route card boards, you might wish to look at this post: https://modelingthesp.blogspot.com/2011/11/chalk-marks-and-route-cards.html , with more information on the actual AAR standards for such boards described at this link: https://modelingthesp.blogspot.com/2011/12/route-cards-6.html .)

Here’s a Southern Pacific example of such a Home Shop form, well darkened by being out in the sun and weather until I rescued it from a car body with no trucks (thus probably no longer headed somewhere). The original is 3.25 x 7 inches in size.

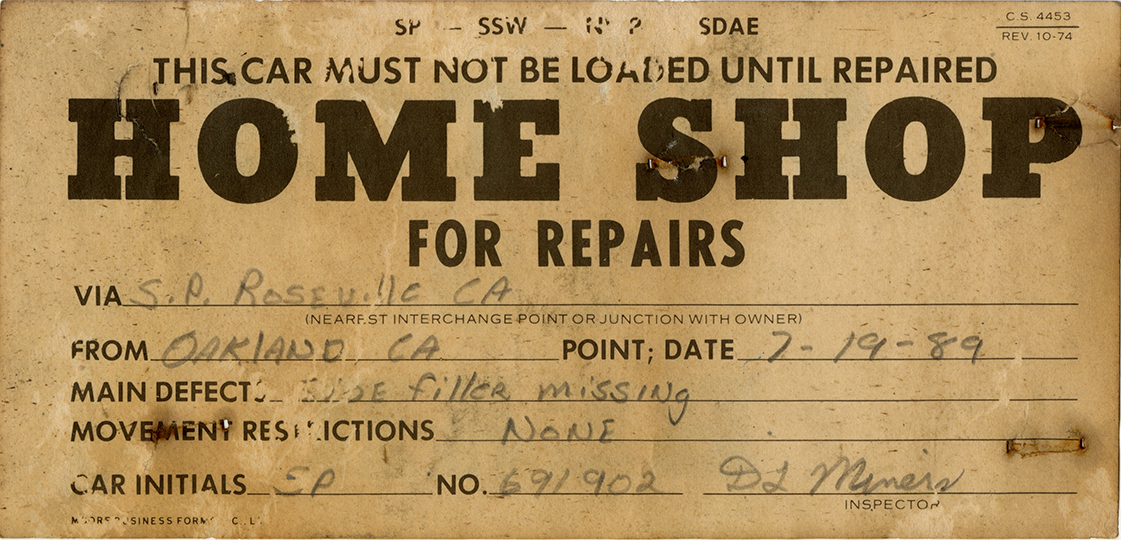
The back of this card is interesting: it can serve to direct a car’s location in a train, for example a very light car might well be handled preferentially at the rear of the train. I will have to give some thought to whether I can use this in model form.

The card is a little damaged and quite dark in color. But of course in Photoshop all that is fixable. I lightened the background, removed the pencil writing, and repaired a few damaged areas. This gave me a starting point I could use.

Next I removed the part of the image that wouldn’t fit with my era, namely the four railroads listed at the top of the form (SP, SSW, NWP, SDAE). I then sized the image so it would fit into my waybill sleeves, which are baseball-card-collector sleeves, with a long dimension of 3.5 inches. This could now be printed out for use in an operating session.

To illustrate, here’s a yellow Empty Car Bill, overlaid with a filled-out Home Shop card. This doesn’t change how the car will be handled in my operating session, but it makes a different direction being given to the crew. The variety seems like a good feature. On some layouts, with foreign-road interchanges, or with main yards that direct empties for loading, this could change car handling. 

I filled this out in ink for visibility, but most prototype examples I have seen were filled out in pencil. I will experiment with a soft pencil to see if that can be more visible. The prototype form is over twice as big and so writing is easier to read on it.

I should mention here that I do have a prototype SP bad-order card in use on the layout, as I have described previously (you can see my post about it at: https://modelingthesp.blogspot.com/2018/04/a-new-bad-order-card.html ). But because it is “nice looking,” as one person put it, visiting operators don’t like to use it to designate cars that need work. I like the “Home Shop” card because it can be used to move cars or to indicate bad orders.

I should also show an example of a Home Shop card from another railroad, in this case Santa Fe. I found this on a car not at Stockton, as the card mentions, so either the car was continuing to be moved, or had been repaired and the card not removed. This card is 8.75 x 3.75 inches in size.

The back is quite interesting; it is a Bad Order card, so obviously a carman could use whichever side suited his needs. It calls for quite a few specific indications of why the car is bad-ordered, and is of course a rather eye-catching color (the original is more of a fluorescent orange).

I will return to the topic of ways such cards could be used in model layout operation, along with results of my own experiments, in a future post.

Tony Thompson

Friday, February 24, 2023

Modeling in O scale, Part 2

Though a confirmed HO scale modeler from the very beginning of my model-building career, I do have a soft spot for O scale models, especially freight cars. As I mentioned in the previous post in this series, they do make me “itch” as a modeler who likes freight car details (you can see that post at: https://modelingthesp.blogspot.com/2023/02/modeling-in-o-scale.html ).

In the previous post, I showed two of my O scale models, an Athearn metal box car (originally owned by Paul Shimada) and a styrene PFE steel reefer from InterMountain. Another Athearn metal model that I especially like (as a confirmed Southern Pacific modeler) is a 40-foot car decorated for SP’s “Overnight” service, the famous black box car scheme.


 One of the really nice things about this Athearn metal car (and also for the HO scale version done by Athearn in a metal kit) is that the trouble was taken to make new pressed ends, with the post-war “Improved Dreadnaught” contour, not true of other Athearn metal box cars. And not only that, but new sides were made too, to correctly show the ACR (Alternate Center Rivet) pattern of the side sheets — also done for the HO scale version in metal. Here’s a photo:

Another model I really enjoy owning is another Athearn metal car. It represents one of the two PFE rebuilt cars in Class R-40-14, but with nearly all aluminum bodies. And as one can readily prove with a magnet, the model’s sides are actually aluminum. Now PFE only had two of these cars, in a fleet of nearly 40,000 cars, but it will certainly grace my display case. It is modeled with its original 1946 paint scheme.

The underframe and all safety appliances, such as ladders and grab irons, were steel and painted black, as were door hinges and latch bar. It’s a lovely model of a distinctive PFE car.

Last, I want to show a little about an SP tank car model from Pecos River Brass. I wanted to letter it correctly, and as it happens, back when I made the artwork for SP tank car decals in HO scale (first sold by Jerry Glow and now by Tichy), I also made one set that was in O scale. Here is a link to the first post about the decals: https://modelingthesp.blogspot.com/2011/05/sp-tank-car-decals.html .

Shown below is the model, with decals freshly applied and a coat of flat finish sprayed on. Couplers are removed for the weathering step, which is next. As you can see, it has an operating manway cover on the dome.

Next came weathering. I followed my usual method using washes, with pigment from acrylic tube paint, but realized one more time how very large O scale cars really are, for someone accustomed to the size of HO scale cars. If you’re interested, background and illustration of my weathering process can be found in the “Reference pages,” linked at the upper right corner of the present post. This view of the right side of the car reminds that this side of SP tank cars had neither dome walk nor ladder.

By contrast, the other side does have the single ladder and dome walk, and in this case I’ve applied an “empty” placard as well.

All three of these O-scale models represent prototypes that are very familiar to me, as an SP and PFE modeler and historical researcher and writer. All are a pleasure to own, and also will soon be displayed in a wall display case. That will be nice!

Tony Thompson

Wednesday, February 22, 2023

Operating sessions no. 80 and 81

 This past weekend I hosted a pair of operating sessions on my layout, and these were sessions no. 80 and 81 on the layout in its present form. That’s not a fact of any importance, just a passing mention. The reason for the session was as a tune-up for the forthcoming BayRails event for out-of-town operators in March. 

(For those interested, I have written about BayRails previously. This event is held in March of odd-numbered years, and the 2023 edition will be the ninth in the series. The post about the eighth event in 2019 [we skipped 2021 for obvious reasons] is here: https://modelingthesp.blogspot.com/2019/03/my-sessions-at-bayrails-this-year.html .

My layout was also involved during an earlier BayRails, the seventh event in 2017, and there’s a write-up for that, too, which can be found at this link: https://modelingthesp.blogspot.com/2017/03/bayrails-2017.html . But the point of the present post is to describe my tune-up for the 2023 event.)

The first day, my crew comprised Pat LaTorres, Dave Stanley, Jeff Aley, and John Sutkus. As crews nearly always do, they paired off and each pair started on one side of the layout, moving to the other side when the second branchline train ran. Here are Dave (at left) and Pat, getting close to finished with their switching at Shumala.

Meanwhile, on the opposite side of the layout, switching Ballard, was the other pair of operators, Jeff Aley (left) and John Sutkus. As I recall, Jeff was the engineer for this part of their work, and John was conductor.

I must admit we found a few problems, including a loose point rail in a switch and another point rail that had become slightly bent and no longer touched the stock rail when the switch was thrown. These were addressed in the evening after the session. These are trackwork elements that have been in satisfactory use for a considerable time, but as the Providenza maxim reminds me, “Trust nothing.”

On the following day, the crew comprised Mark Schutzer, Ed Slintak, Seth Neumann and Richard Brennan. They of course benefited by the flaws found and the problems corrected from the previous day, and happily, new ones were not found. Shown below are Seth (at right, checking on a point of information). He was the conductor at this time — note the clipboard with switch list. Richard Brennan, at left, was the engineer here.

Meanwhile, Mark and Ed were hard at work on the other side of the layout. Below you see them sorting out a long string of cars at Shumala. That’s one of Mark’s very nice SP 0-6-0 switchers, working at Shumala today, by Ed’s left hand.

One of the interesting parts of every session is the return of the first branch train to Shumala. Its power has to be exchanged onto the next train outbound to the branch, and the caboose likewise has to be transferred to the new train. This can be done in quite a few ways, some much simpler than others. Below you see Richard and Mark figuring this out. The long string of cars with the caboose is the arriving train, and on the track to the right of it is what will be the outbound train. The arriving road power has just been cut off and is moving out of the way so the Shumala switcher can exchange the two consists.

Two good sessions, a number of flaws found and (I believe) fixed, in advance of BayRails next month. But I’ll continue to exercise the trackwork in the meantime, reminding myself as I do so, to “Trust nothing.”

Tony Thompson

Sunday, February 19, 2023

Building a BAR reefer

 Some time back, I wrote a blog post about the BAR (Bangor & Aroostook Railroad) refrigerator cars that showed up in PFE territory during the summer in the 1950s. Though purchased by BAR for potato service, most of them would have sat idle in the summer. Leasing them to PFE meant that BAR collected the mileage payments on these cars when used by PFE, often in very long journeys across the country and back. 

There are a few details about the BAR end of the story in that post, including the fact that the lease in most years ran from June 1 to October 1, with all the cars due on PFE rails on June 1, and all of them back to BAR on October 1. Here’s a link to that post: https://modelingthesp.blogspot.com/2019/08/bar-reefers-in-pfe-service-part-2.html .

I’d like to show an example of one of the BAR reefers on the Southern Pacific. It’s an Al Phelps photo of an eastward fruit block from San Jose and the Coast Line, behind Class AC-8 cab-forward no. 4179. It was just leaving Broderick, California (now part of West Sacramento) on September 3, 1955, and is about to cross the Sacramento River. 

The BAR reefer, BAR 7107, at left in the photo above, is quite obvious. Ahead of it is PFE 3969, Class R-40-25. Here is a larger view of the BAR car.

This view does show several of the features of these cars that differ from the Accurail version, as I have already described previously (see the post linked in the second paragraph of the present post). It has double rivet rows on the sides, a tabbed side sill that is black, and a different placard board arrangement than the Accurail model (which follows a Fruit Growers prototype). And of course the Accurail car has molded-on ladders and grab irons.

Since this car is only seasonally present on my layout and in any event does not represent a railroad that I have chosen to model closely, I will accept most of the compromises just mentioned, in part to preserve the paint and lettering of the Accurail version. I will confess that if I were using this car body to model a PFE Class R-40-26 reefer, I would be taking matters to a higher level.

(This topic reminds me of a conversation at a model railroad meeting some time back, quite possibly in the bar at the end of the day. A particular modeler, who I won’t name, said “Does your model of an iron foundry really contain a furnace that can melt iron? No? So does that make your model unacceptable? No, of course not, because it looks like a foundry. We apply that to nearly everything we model: does it look enough like the real thing to be ‘okay.’ So that leaves just the problem to define “enough.”)

But one area where I hate to compromise, even on a stand-in, is car roofs, because we see them so clearly on a model railroad of typical height above the floor. I used the attachment posts of the Accurail running board to fill the holes in the roof, then I installed a Plano etched-metal Apex running board, part 197, to this car, attaching it with canopy glue.

Moreover, the Accurail body has no corner grab irons on the roof. In the spirit of the molded-on grabs on the rest of the car body, I installed some Tichy roof corner grabs, with the vertical legs cut off, with canopy glue. This accords with the Richard Hendrickson observation that sometimes there should just be something in that location, even if it’s not quite correct.

For the operating side of the model, I installed Kadee No. 158 whisker couplers in the Accurail coupler boxes, and InterMountain 33-inch semi-scale wheelsets in the Accurail truck frames.

With car assembly complete, I weathered the car with my usual method using washes, with pigment from acrylic tube paint. Background and illustration of this can be found in the “Reference pages,” linked at the upper right corner of the present post. Chalk marks and route cards are added.

One final comment. The prototype BAR cars like this had “tabbed” side sills (see photos at top) , and the Accurail model has these cutouts indicated on the back side of the side sill, so you can easily do this if desired. The tabs provided, though, don’t exactly match the BAR cars. More importantly, the tabs are painted black on the BAR cars and thus aren’t very evident. I decided, in light of the other compromises, to leave the side sill as it is.

Though this is a car that I can only operate seasonally (June to October), and has compromises in modeling, I am still pleased to add a steel BAR reefer to my freight car fleet. I am sure it will be carrying produce on my layout this summer.

Tony Thompson

Thursday, February 16, 2023

Waybills, Part 105: briefing, Part 1

For some years, I have introduced each operating session on my layout with a short oral briefing on my waybills, so that operators know how to read them and follow them. 

I have occasionally been asked if I could write all that down, not the waybill fundamentals, as those have been covered in a number of articles, but the briefing itself. I was never inspired to do that, until Paul Weiss constructed such a written briefing for his Central Vermont layout. “I could do that,” I thought. 

In my oral briefing, I  begin by pointing out the main features of the waybill design that I use. I always point that, just as in the prototype waybill, the bill is divided down the middle, with shipper information on the right and the destination or consignee on the left. That’s why prototype conductors often folded the bills in half lengthwise; they were only concerned with the left side. Model operators likewise can just read the left half if they wish.

Below is a graphic that I used in an MRH (Model Railroad Hobbyist) article in January 2018 (see: https://modelingthesp.blogspot.com/2017/12/my-new-column-in-model-railroad-hobbyist.html ). It shows the car initials and number at top, as the prototype does; and note also, below the consignee address, the routing of the car is shown. (You can click on the image to enlarge it if you wish.)

At this point I emphasize that the consignee address may not be at the company’s own spur track, but at the town’s team track or house track. I use an example waybill from an actual event on the layout, when an operator, holding this bill, asked me, “Where is Carlson’s Furniture? I don’t see it on the layout.” I just pointed my finger at the address notation, “HS. TRK.”

And of course a waybill could at least equally likely direct a car to the team track as to the house track.

The next form to present is the Empty Car Bill that I use, based on the Southern Pacific paperwork of this kind. It was common for railroads to choose yellow or tan or manila for these Bills. Note that the car’s destination is only to the town in question. This is simply because the agent for that town ordered the empty car to be delivered. He would not have identified the shipper, nor need he do so.

But of course that means that a road crew, in order to deliver this empty, need to find out where it goes. On the prototype, the crew’s conductor would step into the depot and find out from the agent. On the layout, we duplicate what would occur when the train arrives in town outside the agent’s duty hours: there is a bill box. I’ve written extensively about bill boxes; here’s a good background post: https://modelingthesp.blogspot.com/2012/03/bill-box.html .

Here’s the kind of message that would be in the bill box, along with any waybills or Empty Car Bills prepared for outgoing cars that the crew should pick up. (On the SP in the 1950s, most agents’ desks contained lots of pads of blank telegram forms, though telegrams were going out of fashion; thus these pads became used for all kinds of notes written by agents.)

Note here that empty car PFE 40559, shown in the Empty Car Bill, is here directed to be spotted at Western Packing in Ballard. A few other car moves are specified also.

I would summarize what’s just been described this way, in terms of what information a switching crew has. First, they have complete information on both inbound and outbound loads, and on outbound empties, and can go ahead with their work. Second, there are some cars, inbound empties, where they only have partial information, and must get an agent’s message to proceed. And third, there are some cars about which they have no information, and those should be left where they are.

This is the core of my waybill briefing. There are a number of additional features that I also describe, and I will cover those in a following post.

Tony Thompson

Monday, February 13, 2023

Modeling in O scale??

This is something you probably didn’t know about me. Though I am a confirmed HO scale modeler, and have been from the very beginning, when I built Strombecker wood kits as a boy, there is an O-scale side to me too. Fact is, O scale has its attractions, and sometimes (as I often say), looking at an O scale model makes the modeler in me just itch to build and detail such big, beautiful models.

During the time I lived in Pittsburgh (Pennsylvania), my very good friend Larry Kline, who was an O scaler himself, encouraged these little impulses. (Larry passed away in 2014, as I memorialized in a blog post some time back; you can see it at: https://modelingthesp.blogspot.com/2014/04/in-memoriam-larry-kline.html .) 

And in addition, Larry had a fine O scale layout that ran beautifully, so that if I bought or built any O scale equipment I would be able to operate it. (A few photos illustrating Larry’s last layout can be found in one of my older blog posts: https://modelingthesp.blogspot.com/2013/03/rpm-east-and-correction.html .)

So the bug did bite. I think the first nibble was when Paul Shimada, long-time NMRA Pacific Coast Region leader (and NMRA President in 1984–1986), passed away. I saw that there was to be an auction of his models, and couldn’t resist buying one, because I had met and liked Paul. Then there was another one, and another one . . .

The Shimada box car is a stock Athearn metal kit. Further, I know from Paul’s own notation on the center sill, that it was purchased in November 1963 and assembled by him that same month. I have not upgraded details (it lacks sill steps at present, and still has its O-scale Devore couplers!), but I did fix its reweigh date.

Larry Kline, having successfully infected me with the virus, urged me to try the InterMountain styrene O-scale kits for PFE reefers when they were released. I didn’t “get right to it,” as Larry would have said, and he built one of the Class R-40-10 ones for me as a Christmas present that year (he also build several for himself, so it went fairly quickly, he admitted). This is the car, just as built.

Incidentally, regarding this model, InterMountain clearly went to some trouble to do accurate lettering and paint colors. In fact, when in later years some of their HO models of PFE cars had a peculiar off-orange color, I told one of their people, “Go look at your own O scale model! It’s a dead match for the paint chip!”

Here’s one more example. It’s a Precision Scale brass caboose, Southern Pacific Class C-30-1, very accurately modeled. I painted and lettered it. You see it here without couplers, as it was in the midst of upgrading its original couplers.

One of my treasured possessions is one of Larry Kline’s freight cars. It’s a brass model of a GS or General Service gondola, with (working) drop-bottom doors. But the car number is imaginary, and literally none of the other lettering is correct or in the correct location, except the SP emblem (I think Larry bought the car this way and didn’t change it — he certainly knew better).

Partly in honor of Larry’s memory, and partly so I can display the car with a clear conscience, I’d like to correct the lettering. Luckily for that goal, there is a Protocraft decal set for these cars. I will take up that project in a following post. 

Tony Thompson

Friday, February 10, 2023

Waybills, Part 104: yard stamps

 This part of the long series of blog posts about waybills is about Empty Car Bills. It’s now well known that all railroads used some form for paperwork to move empty cars. (The adage often quoted is: “Just like the military, nothing happens on the railroad without paperwork.”) 

The most important thing to know about these types of Bills is that they were only valid on the issuing railroad, unlike waybills, which could move a car to the next town or across the country.

I have written several posts about these kinds of Bills, and those are readily found by using the search box at right, with Empty Car Bills as the search term. A good starting point is this one: https://modelingthesp.blogspot.com/2012/04/waybills-22-handling-empties.html

For more detail, I recommend the excellent summary of waybill preparation by Harry Dolan; he includes a mention of the Empty Car paperwork (see: https://modelingthesp.blogspot.com/2013/06/waybills-29-waybill-preparation.html ). Today I want to concentrate on one feature often noticed on them. It’s the fact that many of them carry rubber stamps. Here’s one example: https://modelingthesp.blogspot.com/2016/10/waybills-part-53-car-slips-and-tickets.html .

It is of course understandable that an office that repeatedly has to use a particular text on documents would have a rubber stamp made to do so. It simply saves time. As mentioned, this is visible on prototype Empty Car Bills. For example, look at the C&O example below, provided to me by Ted Pamperin. Here a Nickel Plate box car was received at the East Buffalo, New York yard, and the yard stamp shows that name, and gives the station number, 9235:

Another example is this Reading Empty Car bill, provided by Rob Mantler, with stamps not only for the receiving yard (Newberry Junction, PA), but also for the destination, (Sunbury, PA). It also has a time stamp for Newberry Junction. You may also note on both these forms that the car initials and number are hand-written.

For my layout, the yard that supplies most of the empties is Los Angeles, with West Oakland firmly in second place. It occurred to me that both these large yards might well have employed rubber stamps in their paperwork. Now one can readily find lots of “rubber stamp” fonts on the internet, allowing one’s model paperwork to carry that appearance, but real rubber stamps are easily varied in color and in the placement of the impression on the paperwork.

It now seems blindingly obvious, but it suddenly occurred to me to just have some rubber stamps made. Surely this must be possible in the modern age on the Internet? And indeed it is. There are lots of sites, and I only tried one, but it worked quickly and for a modest price. I used TheStampMaker (see the wide range of their offerings at: https://www.thestampmaker.com/custom-rubber-stamps.aspx ), and ordered the two yard names mentioned above.

The stamps arrived promptly. Here is a photo of them. I assume the two different bodies are merely due to the different lengths of the two legends.

I tried making out a couple of my usual Empty Car Bill forms, leaving the originating yard blank, and used two different stamp pad colors. On one, I tried writing in the car identification in pencil, in the spirit of the prototype examples shown at the top of the present post. The other one is typed in the font I have chosen to resemble the billing typewriters that SP and UP used, Letter Gothic.

These look good to me, and I will continue to use them. In fact, I intend to replace some of my existing Empty Car Bills with new ones bearing these stamps. It’s yet another example of making more realistic paperwork for moving freight cars.

Tony Thompson

Tuesday, February 7, 2023

Ken Harrison’s marvelous addition to SP history

The immense labor of Ken Harrison to track down information on tens of thousands of pieces of Maintenance of Way (MOW) equipment of the Southern Pacific and subsidiaries, more than 20 years of work, has finally come to fruition in the form of a completed book. Just published by the Southern Pacific Historical & Technical Society, it’s a massive volume of 496 pages.

Ken has long recognized that even though this topic is for many people a tangential part of the SP’s history, in fact a huge amount of information and photography does exist. In a sense, only the highlights can be presented in the book (cover below). Attached inside the rear cover is a CD-ROM containing a enormous data collection in the form of car rosters. I have only sampled it, but there is really a lot of data here.

As is evident above, this is a horizontal-format book, with 8.5 x 11-inch pages. Price for this massive book is $149.95, which doubtless sounds huge to many, but if you have been paying attention to prices in general and books in particular, this is no longer a remarkable price for a book this size. You can purchase it directly from the SPH&TS at their website (see: https://sphts.org/product/pre-order-southern-pacific-maintenance-of-way-equipment/ ). The handsome layout of the book interior was created by John and Jonathan Signor.

The book contains hundreds of photos (I haven’t counted them), dating from the end of the 19th century to near the end of the SP in 1996, a substantial number of later ones in color. I know Ken tried to include as many unpublished photos as possible, so a few familiar images that one my recall are not present. Ken hopes to prepare a follow-up volume with some of the many photos omitted from the present book, along with a considerable number of the drawings which couldn’t be included here.

The list of chapter titles reveals the extent and sheer breadth of coverage. Rather than type those titles, I will just show the Contents page. (You can click on the image to enlarge it if you wish.) I suspect that most readers will not have envisioned all of these categories in their personal impression of MOW equipment. Note also the subsidiary railroads, and even Western Union in Chapter 20.

I mentioned the extensive photo coverage. There are any number of photos that really bring the nose right to the page. Here’s one I particularly liked, unloading kegs of spikes from a flat car (page 336: SP photo, Steve Peery collection). The flat car is a revenue-service car pressed into service for this job; note the Supply Car behind it.

Another one I liked, a really typical kind of track gang conversion of an old box car, is listed as a  “boarding bunk” car (“boarding” meant it was used to house or feed personnel; page 245: John Signor collection). The four paired over-under windows at each end, and the two in the middle around the door, were a common arrangement — the word “standard” should not enter your consciousness when thinking about MOW equipment. It’s shown below.

(Incidentally, the low car number has nothing to do with relative age; most MOW car numbers were re-used repeatedly over the decades. This was just an available car number at the time of conversion, and was the third car to carry this number.) There are a great many more photos as clear as this one in the book.

If I had any criticism of the book, it is that roster information is buried in text. If you want a quick way to find a particular car, it’s pretty time-consuming. Of course the information is also on the CD-ROM in tabular form, but even going back and forth is a little cumbersome. There is a nice table for flangers on page 14, and a list of fire train cars on page 279, then . . . nothing.

But the phenomenal depth and range of information that Harrison has collected here certainly overwhelms any criticism. It is worth mentioning that this book further extends the already remarkable scope of SP rolling stock documentation. It ranges from the extensive steam locomotive information from Bob Church and Joe Strapac, and the total coverage of diesel locomotives by Strapac, to the five-volume passenger car book series by the SPH&TS passenger car committee (chaired by Jeff Cauthen), and the five-volume series on freight cars that I authored for Signature Press. Harrison’s book is a worthy addition to the list.

I don’t merely recommend this book. I would say that anyone serious about the Southern Pacific needs to own (and use) this book. For nearly everyone, it will greatly expand your knowledge and understanding of the railroad. That’s something accomplished by very few books.

Tony Thompson

Saturday, February 4, 2023

A Bill Welch freight car

At this year’s Cocoa Beach meeting in early January, Ted Culotta approached some of the attendees, including me, with an offer of some of the late Bill Welch’s incomplete freight car projects. These were offered to those who would be willing to complete projects, or repair damaged models. I jumped at the chance. (For my comments about this year’s meeting, you can look at: https://modelingthesp.blogspot.com/2023/01/cocoa-beach-2023.html .)

One of the models was a 1932 ARA box car, built from a resin kit and lettered for Chicago Great Western. The model had probably been completed, but both side ladders and a sill step were missing, and, like nearly all of Bill’s models, it was not weathered. I knew about the prototype for this car, from Ted Culotta’s excellent book,  The American Railway Association Standard Box Car of 1932 (Speedwitch Media, San Mateo, 2004). Below is a builder photo from the book.

There were 500 of these cars purchased by the CGW from Pullman-Standard, 89000-89998 (even numbers only). Note in the builder photo the distinctive door. This was a Pullman-Standard proprietary door design. It resembles the Chicago Railway Equipment Co. (Creco) three-panel door, except that it has recessed seams between panels instead of projecting ones.

Bill’s model has all the features visible in the builder photo, including the door and two-piece corrugated ends (doubtless from the kit). I simply added ladders from my parts stash that matched the width and rung spacing of the end ladders, using canopy glue. I straightened a Tuttle sill step to match the others on the model.

I then gave the model a coat of clear flat finish (Tamiya) and weathered it moderately using my normal method of acrylic washes (see the “Reference pages” linked at the top right of the present post). Bill had already added some chalk marks, and I added a few more, plus route cards. 

Here’s a side view, showing the door and other features, including the correct Ajax hand brake. Note that Bill chose the car number corresponding to that in the builder photo.

The model also has an interesting roof, described in CGW builder information as a “Pullman All Steel Riveted” roof. It comprises sheets of flat steel plate, riveted in overlapping sections.

As was very much Bill’s pleasure in modeling, he has done a full underbody brake arrangement, though not one of his later-years models, in which he was including every clevis in the brake rigging. But I’m delighted to have this one. (You can click on the image to enlarge it if you wish.)

It was a nice idea to hand out a few of Bill’s unfinished or damaged models to willing recipients who could and would do whatever work was needed. I’m delighted to have this one.

Tony Thompson

Wednesday, February 1, 2023

A fine new book about railroading

 Just recently released is a new book from prolific railroad historian H. Roger Grant, entitled The Station Agent, and subtitled “The American Railroad Experience” (Indiana University Press, Bloomington, IN, 2022). It is substantially a cultural history, but for model railroaders, does contain a great deal of information about the station agent’s job and how it related to railroad operation. 

It’s a 6 x 9-inch book, hardbound, of 208 pages. It’s not a photo book, it’s primarily a text, but does contain 40-some images, some quite interesting. As you’d expect from a professor of history, it contains extensive end notes and bibliography. And it’s what is known as “jacketless,” meaning the cover art is on the end boards, and there is no dust jacket. Price is $28.00.

Your local bookstore can order it (which is the way that I bought it — they need your support), or you can purchase it online, at: https://iupress.org/9780253064349/the-station-agent-and-the-american-railroad-experience/ . Here’s the front cover (with a C&NW agent in uniform shown at work, copying a train order, which would be handwritten in the early 20th century):

There are 5 chapters, their titles suggesting the overall thrust of the book: from Chapter 1, “Formative Years,” through Chapter 3, “Maturity: Complexities,” to Chapter 5, “Legacy.”

One photograph in the book that I enjoyed showed a conductor and agent exchanging waybills, a 1940 image taken at Brookings, South Dakota on the C&NW (H. Roger Grant collection), page 60. Grant provides a brief summary of the management of waybills on pages 45, 46.

Naturally a fair segment of the book is taken up with methods of ensuring safe operation, particularly train orders and all the associated issues. In the 1970 photo below, Santa Fe operator Don Burns types a 19 order at Perry, Oklahoma (page 146). The depot still has a telegraph connection; note the traditional tobacco tin sounder, in the background just above the operator’s hands. (Don L. Hofsommer photo)

One of the iconic sights of the heyday of the timetable–train order era was the operator handing up orders to trains. There are several such photos in this book. One I especially liked (page 52) is this view at Biloxi, Mississippi, the agent using a bamboo hoop to hand up orders to the engineer of a northward L&N freight; note he holds another hoop in his left hand, which will be used to hand up the orders to the conductor in the caboose (J. Parker Lamb photo, June 1956).

I enjoyed this book, and it brought together quite a lot of lore about stations and agents, emphasizing that the agent was usually the local face of the railroad in small communities. This was both a responsibility and an opportunity.

I am pleased that Indiana University Press saw fit to publish this interesting book. I recommend it to anyone interested in the broader sense of railroad operations.

Tony Thompson