Tuesday, May 31, 2022

More reflections on layout goals

Last month, I attended the 2022 edition of ProRail, and at one point I was in the hotel bar with several of the attendees. One turned to me, and said something like, “I’ve operated on your layout, and know the layout in more detail than just from a visit, because I read your blog from time to time. But I don’t feel like I understand what you are aiming at.” (There was a ProRail report in a previous post; see it at: https://modelingthesp.blogspot.com/2022/05/prorail-2022.html . )

I gave a kind of general answer, but the question wouldn’t go away. So I have reflected further on the subject, and part of my thinking was expressed in the clinic I gave at the Eugene convention of PNR (see my post about the meeting at: https://modelingthesp.blogspot.com/2022/05/another-nmra-regional-convention.html ). Entitled “Operating the Santa Rosalia Branch,” the talk went a little ways into my thoughts about goals — in all candor, recognized long after I had implemented them in building the layout.

Many of the goals can be heard verbally in my introductory remarks of the YouTube video about my layout, produced by TSG Multimedia (it can be viewed at: https://www.youtube.com/watch?v=RUfmRvun2_w ). There, I explained that my goal was to try and reproduce the work of train crews that did local switching. That means the freight cars and locomotives, reasonable waybills, appropriate other prototype paperwork (see my article in MRH in January 2018, reviewed at: http://modelingthesp.blogspot.com/2017/12/my-new-column-in-model-railroad-hobbyist.html ), and a modicum of knowledge of prototype practice.

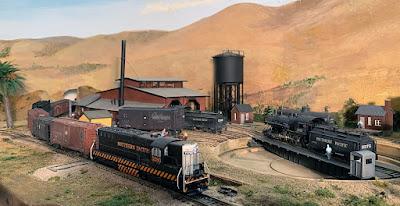
Below is a photo of my layout town of Ballard. I built it over a span of years, always with confidence in what I was doing, but without a clear idea of why I did things the way I did. This post is an effort to clarify what those goals actually are.

Let me start at the beginning. My primary goal is that I wanted to model the Southern Pacific in California, from long familiarity with the railroad and the area. The most interesting part of the SP in California for me was the Coast Division. Second, I knew from the beginning I wanted to model the transition era, because of its interesting mix of motive power.

To address the issue of realism of train crews’ work, I wanted my layout freight traffic to realistically mirror the traffic of the SP. That means I had to research the area I would choose to model. There exists a great deal of information about both agricultural and industrial traffic on the SP, so this was a practical goal. Note that this effectively means creating a realistic “beyond the basement” flow of traffic to and from the layout.

Then to be more specific about the layout itself, I knew I wanted a layout that was not too large, to reduce construction demands as well as future maintenance. Second, I wanted my main line to be level, including all staging: no grades. Both these points were lessons learned from my previous layout in Pittsburgh. 

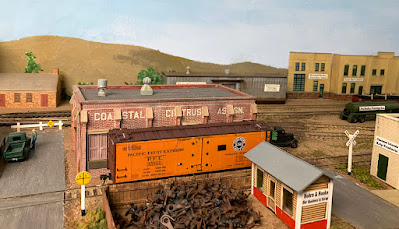
Third, I wanted to model a somewhat or entirely rural area, to offer a more spacious feel of towns and to engender agricultural shipping in PFE reefers. I’ve achieved that, with six packing houses on the layout. Below is one of them, the Coastal Citrus Association in my town of Santa Rosalia.

Beyond these specifics, I focused very early on the idea of a branch line. This of course allows fewer large trains (we can rarely operate really prototypical train lengths on transition-era layouts, unless we model branch lines). I chose to model a branch line that never actually existed.

My liking of the “imaginary branch line” stems from my year living in England, where modelers totally embrace this idea (see my post about this: http://modelingthesp.blogspot.com/2011/04/imaginary-branch-lines.html ). It provides the motive power, cabooses, depots, and much else about a familiar railroad, but in a freelanced area.

The schematic below, though not very complicated, does clearly show my layout plan, with the two “open” dots indicating locations not modeled. My SP main line is just a loop to and from staging, with the stub-end branch the major modeled area.

I continue to refine my thinking about goals, largely in understanding what I have done rather than what I intend to do. This may seem backwards, but it is what I find interesting at this stage of the layout. I expect I may write additional posts on these topics.

Tony Thompson

Saturday, May 28, 2022

Waybills, Part 98: more on design

 In the preceding two posts, I touched on the issues of waybill design that can help operators not familiar with a layout to understand what they need to do. In the immediately preceding post, I showed some examples of assistance in the form of color blocks or stripes or coding (see it at: https://modelingthesp.blogspot.com/2022/05/wayills-part-97-waybill-roles.html ). Now I want to explore some more subtle options. 

First, I can show another idea that was tried on McGee’s layout. Here we added a color letter, more subtle than a strip or color block. In the waybill below, derived closely from the prototype waybill, you will see it contains a red letter “E” in the lower part. This denotes movement eastward (by Southern Pacific railroad direction, away from San Francisco). In the system of which this bill was planned, all such codes are red, and the letter indicates how the car is to be moved. Again, not prototypical, still an extraneous code, but a minimal intrusion on the waybill.

This is at least subtle, but still involves adding a non-prototypical element to waybills, which some don’t want to do. What else might work?

I have talked to a couple of modelers who didn’t want to add non-prototype codes or colors but simply relied on basic geography. Let’s say your layout is set in central Ohio. You can assume any visitor knows that Denver and Seattle are westward destinations, or Philadelphia eastward. Meanwhile, avoid small Ohio cities that are off-layout but their direction would only be known to relatively local people, such as Findlay or Steubenville: are they east or west? 

One way to implement such an approach would be to choose simplified geography, and make a map for guidance of visiting operators. Below is the map I made for this purpose on Otis McGee’s layout. The layout does diverge in the northward direction (Southern Pacific railroad east) into two routes, as shown. Yard work at Dunsmuir has to divide arriving cars for trains destined to the two routes.

Note that all three branches of the map identify specific towns that may be found on waybills, and also includes the notation, “all other Oregon (or California) destinations,” so that a waybill for an Oregon or California destination not listed can be correctly assigned.

Or you could do as Bob Hanmer does, which is to use station codes. These of course are opaque to visitors, but a simple chart tells them what they mean. The red arrow below shows the station code, Y195, something commonly done on prototype waybills and thus no intrusion on accuracy. This waybill is derived from the Steve Karas system, which is called “Flexbill.”

These are only a few examples of ways layout owners have used complex-looking waybills, but with some “help” addition to make it easier to use. I personally like the approach of avoiding colors or codes (except maybe Frank Hodina’s clever use of the “service paster”), and prefer to try and avoid any unnecessary complexity in the waybills.

Tony Thompson

Wednesday, May 25, 2022

Diesel chronology modeling

 I have posted a few commentaries on trying to achieve accurate diesel power for my 1953 Southern Pacific layout. In particular, I want to have the right diesel paint schemes and the right prototype bodies. My introduction on this point was back in 2011, and it may be helpful background (see it here: https://modelingthesp.blogspot.com/2011/03/modeling-diesel-locomotive-chronology.html ).

My topic today is the SD7 model from Electro-Motive. This was EMD’s first roadswitcher. In 1952, when SP first ordered SD7s, they already had several years’ experience with Baldwin 6-axle roadswitchers, and were ready to seek out roadswitchers with more dependable engines and less-rigid trucks. (All over the SP, track maintenance people fumed about the Baldwins.)

As well summarized by Joe Strapac in Volume 4 of his magisterial series, Southern Pacific Historic Diesels (Shade Tree Books, Bellflower, CA, 1997), in April of 1952 SP decided to try other manufacturers of roadswitchers. They ordered 23 of Alco’s RSD-5 model, and 15 of the then-new EMD SD7. Both models were quite new on the market, so SP’s dissatisfaction with the Baldwin product is evident.

In all, SP would purchase 43 of the SD7 model before transitioning to the SD9 model in 1954. All were delivered in what is termed the “Tiger Stripe” scheme, orange stripes and lettering on a black body. Here is an EMD photograph of SP 5280 before delivery, part of the first group delivered (SP 5279–5293).

Most of these SD7s were intended for use on the Northwestern Pacific, and were moved there upon delivery. But in the summer of 1953, a final group of 20 SD7s (SP 5316–5335) was delivered with steam generators. These were intended as relief passenger units, but were also tried out around the entire Pacific Lines system to see what they could do.

By December 1953, SP had decided that roadswitchers were really more road engines than they were switchers, and the switcher-related Tiger Stripe scheme began to be replaced with the familiar “Black Widow” scheme used on F units. The tendency was to repaint units whenever they were in the shop for enough time to do the job. Below is a photo of SP 5324 at West Oakland on a freight train (John E. Shaw photo).

A noteworthy feature of the passenger-equipped engines was the large Mars signal light atop the hood, often called an “ash can” by railfans and modelers.

For my modeling of the Coast Division in 1953, the SD7 ought not to show up very often (nearly all of them were working on the NWP), but the system-wide tryouts mean that I can operate one occasionally. Below is a photo of SP 5280 in its original paint scheme, heading a westward freight on the Coast main line on my layout.

Whether the Black Widow-painted SD7 units ran on the Coast, I don’t know, but I do have a model, SP 5324, that is used occasionally, shown here just approaching Shumala on my layout with an eastward freight.

The SD7 is an often overlooked diesel series, and in fact EMD only built 188 of them; but SP purchased 43, as mentioned above, fully 23 percent of the total, well above than any other railroad. Of course, the introduction of the SD9 in January 1954 led to far greater sales, including to SP; but that’s after my modeling period.

The transition-era SP motive power on my layout only includes the SD7 as a sidelight, but it is definitely part of the history

Tony Thompson

Sunday, May 22, 2022

Updating the car fleet plan: flat cars

 One of the least common freight cars in the national fleet in 1953, the year I model, was flat cars. However, it’s important to realize that this varied greatly by region, and Southern Pacific handled huge quantities of lumber shipments in that period, which explains the large SP flat car fleet.  

To illustrate, here are bar-graph representations of the national car fleet (left) and the SP car fleet (right) in 1950. Both graphs show the car types in same order, in order of descending size for the national fleet, then in the same order for the SP fleet to dramatize its differences. Note that flat cars made up 9 percent of the SP fleet, while nationally, flat cars were just 3 percent. (You can click on the image to enlarge it, if you wish.)

As part of a multi-post effort back in 2011 to present all of my car fleet plans, separated by car type, my fleet plan for flat cars is at the following link: https://modelingthesp.blogspot.com/2011/02/choosing-model-car-fleet-5-flat-cars.html .

It’s interesting to look back at that 2011 plan and note that I only had two special-use flat cars, a depressed-center car (AAR FD) and a 4-truck car. The balance were 20 “general service” cars, AAR Class FM, though 5 of those 20 were unbuilt kits and five more were stand-ins, due for replacement. 

Today the number of unbuilt kits has risen slightly (though not the same ones!), most of the stand-ins are gone, and there are a number of new cars. And today my overall fleet of flat cars is about 7 percent of the total fleet, probably about right for SP in 1953.

In that 2011 post, I noted that lumber was a major category of flat car loads for SP in the 1950s, and I’ve posted several descriptions of such loads I’ve built for these cars (see for example: https://modelingthesp.blogspot.com/2014/08/open-car-loads-completing-owl-mountains.html ), or one of my posts about the lumber loads that Richard Hendrickson built, and which I inherited (available at: https://modelingthesp.blogspot.com/2015/06/richard-hendricksons-lumber-loads.html ).

I also described, in a later post, the variety that ought to be present in lumber loads, as to both height of lumber stacks, and size of lumber in the stacks. These aspects of course varied from carload to carload (that post can be found at: https://modelingthesp.blogspot.com/2019/07/more-about-lumber-loads.html ).

Thke latter topic is only one part of the broad subject of open-top car loads, about which I have written frequently; to locate any of those posts, I would recommend using “open-top car loads” as the search term in the search box at the upper right corner of this post.

I continue to enjoy open-top cars, of course including flat cars, because of the variety of loads they can carry. An example is below, a car and load currently operating on the layout, an ancient Athearn 4-truck car (not really quite correct, but . . .) with a large casting load (for more on the load, see https://modelingthesp.blogspot.com/2020/06/blocking-for-big-loads.html ). 

Most of my loads, including the one shown above, are removable, permitting their use on a variety of flat cars (or, in some cases, also in gondolas). For another example, this short girder, braced according to the AAR loading rules, is shown on the Pennsylvania F30A flat car I recently discussed  (https://modelingthesp.blogspot.com/2022/05/the-new-rapido-pennsy-flat-car.html ). Background on the girder load can be found at this link: https://modelingthesp.blogspot.com/2012/03/open-car-loads-poles-and-girders-in.html .

Flat cars remain, as they should, a minor part of my overall freight car fleet, but I think my earlier 2011 goals for sizes, types, and railroad name variety are being met.

Tony Thompson

Thursday, May 19, 2022

Getting the car you want, Part 4

 This series of posts is about modeling a car from a specific number series within the Pacific Fruit Express Class R-40-10 refrigerator cars, 4700 cars built during 1936–37 and numbered 40001–44700. The InterMountain Railway Co. kit I am building has been renumbered and details modified in previous posts (see the last one: https://modelingthesp.blogspot.com/2022/05/getting-car-you-want-part-3.html ); prototype photos were provided in earlier posts in the series.

In the last installment, car body details wee complete, except for the roof. The first decision to make about the roof is the ice hatches. The original fabricated steel hatch covers remained on many cars throughout their lives, but when needed, they were replaced in many cases with the later-design one-piece formed steel hatch covers.

Below is a photo clearly showing these hatch covers, though the car shown is from the later Class R-40-23, obviously with a Morton running board, and with the dot over the reporting marks that designated the presence of fans. The photo is from General American, author’s collection.

Partly because the molded hatch covers in my kit had warped (and were brittle, thus not straightenable), I decided to replace them with the formed steel variety. I had some in my parts stash, I think made by Red Caboose, and nicely including the short hand grabs on the inboard side of the hatch (see photo above). I applied these to the roof, followed by the corner grab irons, the running board (with scribed board divisions added), and end running board supports, latter two things attached with canopy glue. I also applied the hatch cover latch bars from the kit (note how prominent these are in the photo above).

Next came weathering and finishing. I gave the car a final coat of flat finish, then turned to my usual techniques with acrylic tube paints, applied as washes. (For more detail on all that, see my “Reference pages,” linked at the top right of every blog post.) The car at this point is shown below. Note that during the application of washes, I used a Q-tip to “wipe clean” the reporting marks.

Next I added a patch of clear gloss at the points that would receive a reweigh patch, then added the paint patch with a small rectangle of orange decal. Then old Sunshine reweigh lettering was added. 

Lastly, a route card was added on the route card board on the bolster end at the left of each car side, and a few chalk marks were added with white Prismacolor pencil. A final dusting with flat finish, and the car was ready for service. (You can click on the image to enlarge it if you wish.)

This was a simple and fun project, upgrading and renumbering an otherwise standard kit, while making some decisions about age of the paint scheme, etc. The car will definitely be active in my next operating session.

Tony Thompson

Monday, May 16, 2022

Another NMRA regional convention

 This spring, with the pandemic at least less evident, regional conventions of the NMRA (National Model Railroad Association) have resumed in many parts of the country. Not long ago, I wrote about attending a convention of that kind in my home region, Pacific Coast Region (you can read that post at: https://modelingthesp.blogspot.com/2022/04/pcr-2022.html ). Last week I attended another, that of an adjoining region, Pacific Northwest Region (PNR). It was held in Eugene, Oregon.

Because PNR is nearby, I have attended a number of their conventions, and thus know a fair number of people in the region. This makes it fun to attend, and this iteration, even though sparsely attended in comparison to pre-pandemic events, was enjoyable. I also gave two talks, one of them a new clinic, whose handout was posted recently (the handout is available at: https://modelingthesp.blogspot.com/2022/05/handout-layout-operations.html ).

One of the pleasures of this convention was a reunion with an old friend, C.J. Riley, who I first met 45 years ago when we both lived in Pittsburgh. Together with the late Larry Kline (see my remembrances of him at: https://modelingthesp.blogspot.com/2014/04/in-memoriam-larry-kline.html ), we formed a tight group of three, not only traveling to NMRA conventions together but getting together weekly for operating sessions or work sessions on our three layouts.

As it happened, C.J. was giving a clinic at this PNR convention, on the subject of his recent Kalmbach book about scenery and detailing techniques. It’s a fine book and I recommend it highly; he had copies with him and sold a fair number to clinic attendees. (For a review of the book, see this: https://modelingthesp.blogspot.com/2020/05/riley-layout-book-published.html ). Below is C.J. at right, with the first slide in the clinic.

There were some excellent models in the contest room at this convention. A number of them were fine models that were shown for display only, not contest entries. One of them was Greg Kujawa’s very nice box car, SP&S 13421, which was well rendered with weathering, chalk marks and route cards.

The contest entry that impressed me the most was Ted Kruysman’s Southern Pacific dome car, SP 3600, partly because he had to do an awful lot of work. He started with a Rivarossi passenger car, filled almost all the windows, and cut into the roof so that parts of a two Life-Like domes could be inserted. He then cleaned up the body and repainted, also adding working diaphragms, and passengers inside. Very nice workmanship and a polished final product.

Lastly, I enjoyed the HO scale sectional layout set up by the South Rogue Model Railroad Club, led by Dave Olsen and Bryan Orisen. It’s quite large, filling a lot of a hotel ballroom. Though it wasn’t possible to photograph the whole thing, here’s a view from one corner. Having once been part of a modular group, I admired their scenicked return loops, each comprising several sections. Just visible near the door at photo center is one of their signature scenes, a bascule bridge section.

Here’s a close-up view of this operating bridge (they raised it from time to time). Nice attention-getter!

Like I almost always do, I enjoyed attending and participating in this regional convention. And I’ll repeat my frequent suggestion: if you have never been to one of these, you ought to give it a try.

Tony Thompson

Friday, May 13, 2022

Handout: layout operations

 This post constitutes a handout for a talk on operation of my layout. I have come to prefer a handout in this form because it can easily be updated or corrected, even in real time, and can contain live links to a variety of on-line resources, neither of which is true of paper handouts. In addition, it can readily include color graphics and other resources that get complicated to reproduce on paper. 

This particular talk is about my layout goals, both the prototype aspects and the modeling goals. It also includes a segment on the waybills I use, as a route to more realistic operation. This means finding out about freight traffic on the prototype. I have benefited by the information in an SP conductor’s time book, as shown here:

http://modelingthesp.blogspot.com/2011/02/modeling-freight-traffic-coast-line.html

My layout design and goals are derived from the SP prototype. Below is one example (Dallas Gilbertson photo, Tom Dill collection) of the kind of operation I want to model. It shows the Guadalupe Local, at Hadley as it departs San Luis Obispo, with Consolidation 2752 operating tender-first. The crew had to choose which direction they would operate in this configuration, as there were no turning facilities at Guadalupe.

For background on my layout locale and modeling approaches, for the Southern Pacific Coast Division in 1953, I would recommend these two posts:

https://modelingthesp.blogspot.com/2019/08/conveying-ones-layout-locale.html

https://modelingthesp.blogspot.com/2012/04/coast-line-operations-1953-for-my.html

For more on waybills, there are numerous sources, including an article in Model Railroad Hobbyist. Below are a couple of links, the first to the MRH article description, but these extend far beyond these two write-ups. Sub-topics within the subject of waybills can readily be found by using the search box at top right of all posts, and selecting a search term for the specific interest that you have.

https://modelingthesp.blogspot.com/2017/12/my-new-column-in-model-railroad-hobbyist.html

https://modelingthesp.blogspot.com/2014/09/waybills-part-34-one-piece-waybill.html

Below is a summary, showing all the information contained in my model waybills. This closely mirrors the prototype waybill.

When all these elements come together — the prototype-oriented layout design, the trains and the freight cars, and the waybills that make it all function —  can enjoy something like the photo below, a Santa Rosalia Branch local, having finished its work on the branch and returning westward with the cars it picked up, heading to Shumala.

This talk has been interesting to prepare, as it brings together several threads of topics long discussed, but usually only separately. It has been a pleasure to look at all of them at once, and bring them together into a presentation.

Tony Thompson

Tuesday, May 10, 2022

The new Rapido Pennsy flat car

 Rapido Trains has recently released a distinctive and well-made HO scale model of a Pennsylvania Railroad Class F30A flat car. It’s distinctive because it was a one-piece freight car: the entire frame, side and end sills and even stake pockets all comprised a single General Steel Castings (GSC) product. This made the car extremely strong and durable, and they survived for decades.

For information on these cars, I naturally turned to the superb book by Elden Gatwood and Al Buchan, entitled Pennsylvania Railroad Flat Cars (Pennsylvania Railroad Technical & Historical Society, Kutztown, PA, 2008), which I’ve mentioned it before: https://modelingthesp.blogspot.com/2021/01/another-simple-resin-kit.html , and will say again, it’s one of the great freight car books. 

The F30A cars were built during 1933–34, assembled at PRR’s Pitcairn Shops, a total of 1500 cars. This was by far the largest flat car class ever on the PRR.  It was just 50 feet long (in later years, 53 feet, 6 inches became a de facto standard length), but in the 1930s, 50 feet was a long flat car. They had 70 tons capacity, again, large for that day. Below is a prototype photo (PRRT&HS Archives). Note how thin in the side sill.

The one-piece frame/body casting from GSC is shown below (PRR photo, Dave Sweetland collection), whitewashed for visibility. Photo is dated April 18, 1934. You can see that stake pockets were cast onto the body.

The Rapido model is cast metal, thus heavy. (It weighs fully 3 ounces!) It also reproduces beautifully the prototype underframe complexity, as you see below.(You can click on the image to enlarge it, if you wish.)

The prototype car was strong enough that it could be built at the absolute minimum height, which is the top of the standard draft gear. As you see below, this was evident on the model (and prototype, of course) as the top of both bolster and draft gear were flush with the deck. This arrangement became a familiar sight in later years, especially after World War II, when many railroad bought similar cars, but this was a pioneer.

The trucks are another impressive part of this model. The PRR used a somewhat unusual truck for these cars, called 2D-F10, similar to the standard 2D-F8 PRR freight truck, but with a wider spring package to accommodate a leaf spring between the two outer springs in the spring package. The spring rate of the two spring types differs, minimizing harmonic “bounce” with these trucks. Below are the prototype truck at left, and the model truck at right. Obviously the latter has been tooled specially. Impressive work, Rapido!

Part of the long-term survival of these cars was their adaptation in later years for several other uses, including trailer-on-flat-car (TOFC) service in the 1950s, including 250 cars of Class F30D built in 1951 with the same underframe design. Rapido offers this variation too (see examples on their site, at: https://rapidotrains.com/ho-scale.html?cat=1114&railroad=91 ), though most are now at dealers; I got mine at a hobby shop. Some of the TOFC cars were later sold to Trailer Train.

This is a really nice model, and will certainly find work on my layout! If you find freight cars interesting, even if you aren’t a PRR fan, you might like to pick up one or two of these fine models yourself.

Tony Thompson


Saturday, May 7, 2022

Waybills, Part 97: waybill roles

 In the previous post in this (long) series about waybills, I took up the topic of the various roles that waybills may play in operation of model railroads. In my view. such roles ought to mimic, at least to some degree, the role that waybills play in prototype operation. You can read that preceding post at: https://modelingthesp.blogspot.com/2022/04/waybills-part-95-role-in-operation.html

One can route freight cars in a layout operating session in a number of ways, of which waybills are only one. I personally think that some form of waybill, in model usage, captures an aspect of the prototype that is useful and appropriate to include in layout operations, for any era before the 1970s. But if some see it as too complex, what ways can simplify it s help to the reluctant? I mentioned color coding, with stripes or dots on the waybill, in the previous post. 

(Below is an experiment I did for the late Otis McGee to consider for his layout. This was to label through cars with a blue stripe for eastward destinations, pink for westward — this idea was rejected by both of us in favor of just training operators. I will say more about that training presently.) But if not color stripes or dots, what else might be done?

One possibility is to code waybills for destinations, particular trains, or even just direction of movement. For example, you could add a code as well as a color block it to use the block at the top left of a prototype waybill (which is labeled “Place Special Service Pasters here). Such a “service paster” might well be in color, so this location could be used very flexibly, as Frank Hodina did in the example below. Note that this form closely follows the AAR prototype.

Another possibility is to use a code on the waybill, and to highlight such codes to make it even easier for an operator to find. Below are two examples from Ted Pamperin’s Chesapeake & Ohio layout, with codes at top left for through trains eastward and westward (E and W, in the yellow blocks). This approach has the advantage of using soft colors, thus minimizing any intrusion.

These are only a few examples of ways layout owners have chosen a prototype-looking waybill design, but with some “help” addition, often in color, to make it easier to use. I personally admire Frank Hodina’s clever use of the “service paster,” and commend any approach that is similarly  of minimal intrusion on the prototype appearance. 

But my personal preference is to avoid color codes  — I would rather figure out how to make the waybill more comprehensible — and I will take up further possibilities in a future post.

Tony Thompson

Wednesday, May 4, 2022

ProRail 2022

The title, as many will know, refers to a nationally invited operating weekend where something like 60 operators gather for three days of operation, typically one layout on each of three days. This happens to have been the 50th anniversary of the first such event, held by “RailGroup” in Chicago in 1972, and so this 50th anniversary was very appropriately held in Chicago. “ProRail” stands for “Prototype Railroad Operations.” For more on the history, you may visit the site: http://www.prorail.org/history.html .

I enjoyed this event once again, and had the good fortune to operate on three fine layouts. The first one was Jerry Zeman’s Spokane Southern Railroad, an amalgam of Great Northern and Northern Pacific operations in 1952 in the Northwest. My assignment was Worley Yard, along with Travers Stavac, who was yardmaster. In the view below, Travers is in the distance in the dark shirt. Just behind him is Doug Harding, engineer of an arriving train.

This is a very large layout, not only occupying a large floor space but parts of it built on three levels, connected by a 12-turn helix. One feature of Jerry’s layout that I found ingenious and effective was his method of protecting the operating knobs for the Blue Point push-pull switch controls. He simply added a drawer pull outside of each one, neatly preventing inadvertent bumps.

The second layout I visited was Lou Steenwyk’s relatively new layout, modeling a free-lance railroad serving Minnesosta iron ore country in 1959. The foundation is the Ashland & Iron Range, though two other railroads are also modeled. The large yard at Ashland, Wisconsin is in two parts, and I handled one of them, while Henry Freeman handled the other. Below is a shot of the yard I worked. This is not one of the ore yards, but handles general freight and a number of local industries, some of which are visible along the backdrop. I liked the layout, which operated well and has comfortable aisles.

The last day, I operated on John Goodheart’s LECS (Lake Erie, Columbus and Southern), modeling the former Erie Lackawanna line from Columbus to Cincinnati, Ohio, and set in 1969. It’s a large layout, about 1100 square feet, and was enjoyable to operate, with a very long run to cover the entire layout on its two decks. The large yard on the layout is shown below, with Phil Monat at left, working the yard, and beyond him, John Bauer. At right is Paul De Luca, engineer on a passing train.

This was, as usual, a very pleasant and invigorating ProRail. I was pleased to be invited and greatly enjoyed operating on the three layouts to which I was assigned. I look forward to next year in Kansas City!

Tony Thompson

Sunday, May 1, 2022

Getting the car you want, Part 3

 As I described in the first post in this series, this project is to modify an existing kit so that I can produce the particular car number series that I want. In this case, it’s a Pacific Fruit Express refrigerator car of Class R-40-10, and the starting point is an InterMountain Railway Co. kit — an excellent kit in most regards. I did have to correct a warped body molding, as I showed in Part 2 (see that post at: https://modelingthesp.blogspot.com/2022/04/getting-car-you-want-part-2.html ).

Applying the kit detail parts to the body is mostly a straightforward task. But the InterMountain bracket-style grab irons, though a beautiful molding, are frighteningly delicate, and break easily even when cutting them from the sprue. And in service on the layout, they are occasionally damaged during operation. Luckily, I have an alternative: brass versions. 

Over 25 years ago, Dennis Storzek (who works for Accurail) had some of these made, by the simple expedient of using styrene offset-attachments moldings as the masters in a “lost wax” process to produce sprues of brass ones. Richard Hendrickson obtained some of them, and Richard passed a few on to me. You can see them below. The “posts” that fit the holes in the kit body are there underneath, of course. Both side and end grabs are included.

Next I spray-painted the whole sprue black, cut what I needed from the sprue with side-cutters, and applied to the body with canopy glue. Meanwhile, I continued adding other side and end details to the car body.

I also added Kadee trucks and couplers, using the 2-56 holes already drilled and tapped in the car body, as mentioned before. These include cutting off the center posts of the coupler box lids, and drilling with a 2-56 clearance hole. I like this step, as the trucks give the model something to sit on when upright.

About this time, I decided to do the renumbering, as described in my first post (here is a link: https://modelingthesp.blogspot.com/2022/03/getting-car-you-want.html ). For this, I relied on the excellent Microscale set 87-501. (If you have an older version of this set, discard it and get the current version, superbly updated and improved by Dick Harley and entirely dependable and accurate.)

Incidentally, you may note that the model has no placard boards or route card boards on the car side. As shown in the first post of the present series (see the link in the previous paragraph), prototype photos of the R-40-10 class show that the cars did not have these boards as built, nor were they applied in later years (for example, the 1946 photo in that post). Thus I have not applied any to the model.

One of the “Achilles heels” of kits like this is the delicate and good-looking sill steps, which however are correspondingly fragile. I managed to install all four of the corner steps as kit parts, but first one and then another broke, despite efforts at careful handling. The answer is simple, A-Line Style A steps, for which I drilled holes, installed with canopy glue, and painted black. Here is one of them before painting.

Finally, I will apply the roof details, including decisions on the ice hatches, but I will describe that process, along with weathering and finishing, in a future post.

Tony Thompson.