Recently I showed the partially completed gondola that was rescued from Richard Hendrickson’s workbench after he passed away. The body of the model was the Model Die Casting white-metal 40-foot car. As I illustrated, Richard clearly intended it to be a C&O gondola from their 44000 series cars with the high, rounded ends. That first post is at this link: https://modelingthesp.blogspot.com/2025/01/a-richard-hendrickson-freight-car.html .
The model needed some detail work, namely the grab irons and hand brake on the B end of the car, but before doing that, I wanted to solve the coupler box problem. The original MDC cast underbody has a nearly scale width coupler box, but this is too narrow for a Kadee coupler. Rather that try to cut off and remove this coupler box, I hunted around in my scrap box and found a pair of Chinese knock-off copies of the Kadee design, which work all right even if not as well as an actual Kadee coupler. Then I could add styrene coupler box covers.
Next I needed to complete the B end detailing. I added grab irons with brass wire, a brake step, and an Ajax brake wheel and gearbox(see the prototype end photo in the preceding post, linked in the top paragraph, above).
With that work completed, I painted the model. I have been wanting to try a Tamiya color I hadn’t used before, “Rubber Black,” (TS-82), a slightly grayed black. Since this is a flat finish, as soon as it had dried, I added a coat of Tamiya “Semi Gloss Clear” (TS-79) on the outside of sides and ends, for decal application. I have found this semi-gloss to be fine for decaling, while avoiding that “mirror gloss” which can be hard to reverse.
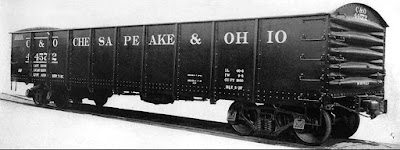
For lettering, I dived into Richard’s decal stash, and used Champ set SHS-276. I followed the prototype photo from the preceding post in this series, which I’ll repeat below (a C&O photo). The decals didn’t have the exact size and spacing shown in this photo, so I got as close as I could with what I had.
When the decals were all applied and given a protective coat of clear flat, the model looked like this. It still needs to be weathered inside and out, but that’s a separate topic, to which I’ll return.
I’ve enjoyed completing this project of Richard’s, and soon it will be at work on my layout. Tony Thompson


No comments:
Post a Comment