The kit in question is a Devore depressed-center flat car, a 40-foot car that was cast in white metal all in one piece. This kit dates back to the early 1950s, and when originally built, had oversize grabs and sill steps, along with Varney dummy couplers.
So what is this kit, really? I’m sure there are readers of this blog who have never seen a Devore kit box, so it’s shown below, in two images, both an angled view and the box end. You can click on the image if you wish to enlarge it.

You will notice in the image of the box end that this beauty cost all of $1.60 in that era.
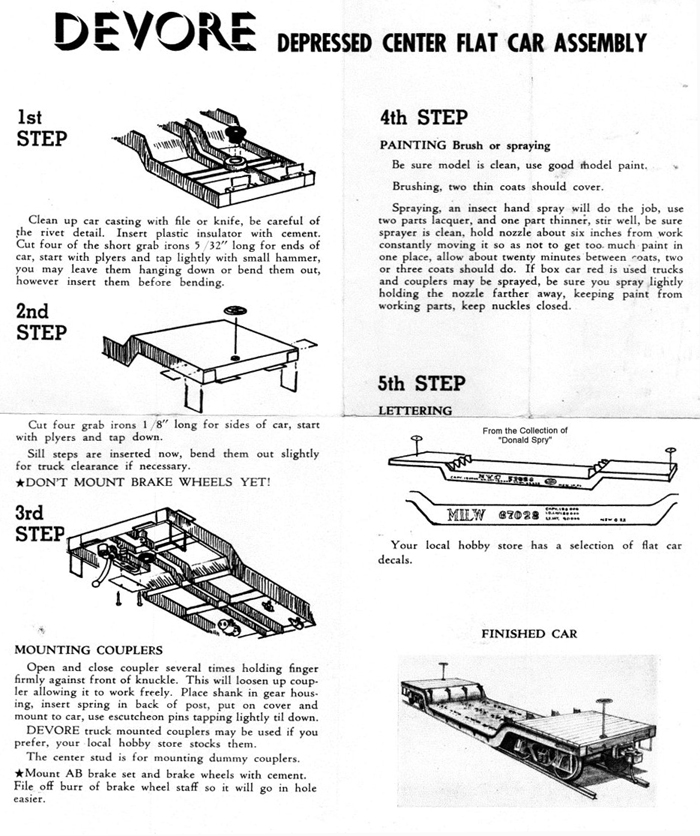
Having a one-piece body, the kit instructions are simplicity itself. They did occupy a full sheet of paper, and are shown below. You can find old kit instructions like these on the HO Seeker web site (a great resource of its kind). You can click on this image to enlarge it if you wish.
I had damaged the sill steps in storage over the years, the Zamac truck sideframes had disintegrated, and the Varney dummy couplers just were not going to operate well with the Kadees on the rest of my fleet. And the paint was flaking off in places. I really don’t know what paint this might have been, but it was probably the Roundhouse 410-M product, of which I used a lot in that era.

So what’s needed here? I tried paint stripper to clean the paint off, but it hardly touched it, so I resorted to lacquer thinner, which did indeed soften it so it could be rubbed off. I was able to pull all the damaged grab irons from the body, and then used a #75 drill to make sure the mounting holes were all clear.
At that point, I began by installing the old grab irons to make the end grabs, that are inserted in holes in the bottom of the end sill, and then are bent 90 degrees to make them horizontal. These look somewhat okay, and aren’t very visible on a car in service, but they are quite oversize, as you will see in photos below.
Next I installed A-Line Style B sill steps at all four corners, and these did fit the mounting holes. The same was not true of the scale 18-inch grab irons I had on hand, so I had to bend new ones to fit the actual mounting hole spacing, about 21 inches. I used some bronze wire I had on hand, 0.013-inch diameter, then secured the grabs and steps with CA. In this photo, the side grab is barely discernible, but the sill step is clear.

A second photo shows the side grab more clearly, and you can compare it to the end grab’s oversize diameter.

What is needed next, to complete detailing, is to drill holes for the vertical-staff brake wheels at each end, which I clearly hadn’t done when I first assembled this kit (you can see the location in the photos above). That task, along with bringing the car weight up to the desired value, figuring how to install Kadee couplers, and choosing 70-ton trucks, will be covered in a future post.
Tony Thompson
Tony, Regarding your question,"So what is this kit, really?" The answer is that it is now! Looking forward to rest of the story. Lou Adler
ReplyDelete