For those who don’t know, WestRail was a business run by the late Richard Hendrickson, with extensive help from his wife Sandra. WestRail began with several kitbashing projects, using as starting points, the “raw materials” of the day, mostly Athearn Blue Box models. After marketing several such kits, Richard brought out a mostly new car kit, using Athearn 50-foot gondola underframe center sills but otherwise new parts. The gems of the parts were the stake pockets. Richard had these cast in lost-wax brass, and they are exquisite.
(As a further aside, anyone not sure who Richard Hendrickson was, may be interested to read my “in memoriam” post on his passing. It can be found here: https://modelingthesp.blogspot.com/2014/07/in-memoriam-richard-hendrickson.html .)
I had gotten the hardest part of the kit completed, drilling all the holes for the mounting pegs on the stake pockets and getting the pockets straightened up square with the body and glued in place. I had also done the simplified underframe, omitting brake details that would be invisible. But there I stopped, and back into a storage box went the flat car. Here’s a photo of the bottom of the model at that point. (You can click on the image to enlarge it if you like.)
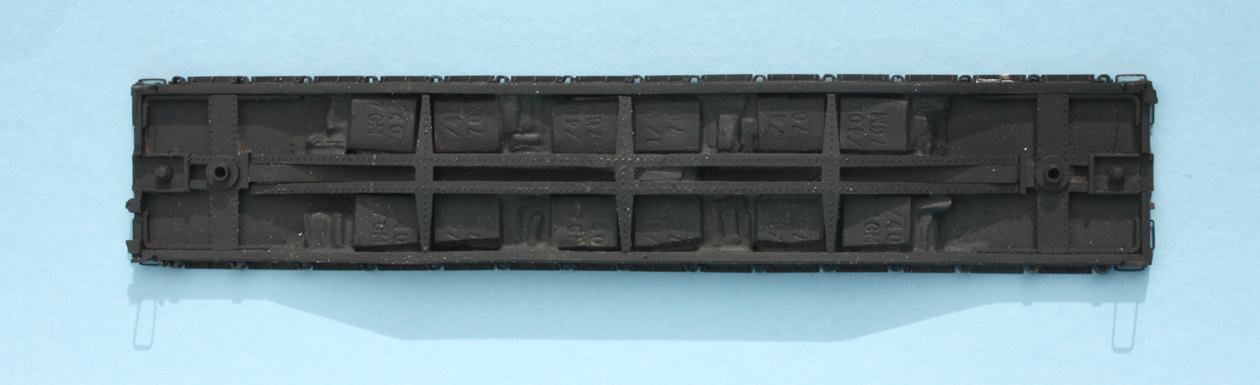
You can see that I used a bunch of A-Line weights under here, as one of the biggest potential operation shortcomings of flat cars is inadequate weight. It has all been painted black because the intended prototype is Northern Pacific.
The biggest challenge remaining was to make the deck. The decks on these cars were what is called “overhanging,” meaning that their width overhung the side sills and extended out to the outer edge of the stake pockets. That in turn means that the deck needs to be notched, if you will, to clear each stake pocket. This is a bit of a tedious task, but with a no. 11 X-acto blade it actually goes pretty quickly. The material I used is Evergreen V-groove sheet with 0.080-inch spacing. I then cleaned up the notches with a small flat file.

You can just see, about one-third of the way from the right edge, where I joined two pieces of the styrene sheet to make it long enough. The next step was to use rough sandpaper to give some texture to the deck, and to gouge some scars into it, reflecting the kind of hard use that flat cars get. I also used the corner of a razor blade to drag down some of the grooves, widening them. One often sees on prototype decks, that boards are distressed in this way.
With work on the deck completed, I primed it with Tamiya “NATO Brown” (no. TS-62) as a base color, though it will be thoroughly weathered. It could then be glued to the car body. The body is a thick styrene sheet, with the car sides and ends along its outsides, and the Athearn center sills glued to the underside. I showed the bottom view in the first photo of the present post, and here is a view of the top of the car at this point.

If you click on the image to enlarge it, you can see the angle-iron supports between each stake pocket, which will support the overhanging deck.
Now I used styrene cement to glue the deck to the body, and left it under weight to dry thoroughly. When that was done, I used the Champ decal set provided in the kit, no. HC-639, to letter it for NP 62186 (the cars were in the number series 62000–62299), and added a brass wire brake staff, with the kit’s brass brake wheel soldered to it. Here is the car at this point, with my standard Kadee no. 58 couplers and the kit trucks, with Reboxx semi-scale wheels.

The deck of course needs considerable weathering, which was done at the same time as the car sides and ends and trucks were weathered. I lightly weathered the sides with acrylic washes, then used pretty much straight acrylic paint out of the tube, in a mixture of colors, to do the deck. (At the top of this post, on the right-hand side, are links to my Reference Pages on acrylic weathering.)

The completed car is shown below, together with my other WestRail flat car, lettered for Union Pacific. (I started building the UP kit as soon as I got it, also in 1988, and actually completed it then.) Note that the UP car has a deck of a lighter color, suggesting that such a deck has been in service for a longer time. The two cars are of course identical in length, so the apparent difference is just one of perspective.

As he did with all the WestRail products, Richard Hendrickson chose railroad owners of these cars carefully to correspond with the 50-ton prototype design. I am pleased to have these two WestRail flat cars in my fleet.
Tony Thompson
Tony, I cover these cars on my web site. They were built by AC&F (lot 2601) in 1-6/1943. Nice modeling job.
ReplyDeletehttp://www.railgoat.railfan.net/other_cars/np_cars/np_number/062000-062299.htm
Thanks, Lee. Good to see your coverage of this group of cars, with a nice photo.
ReplyDeleteTony Thompson