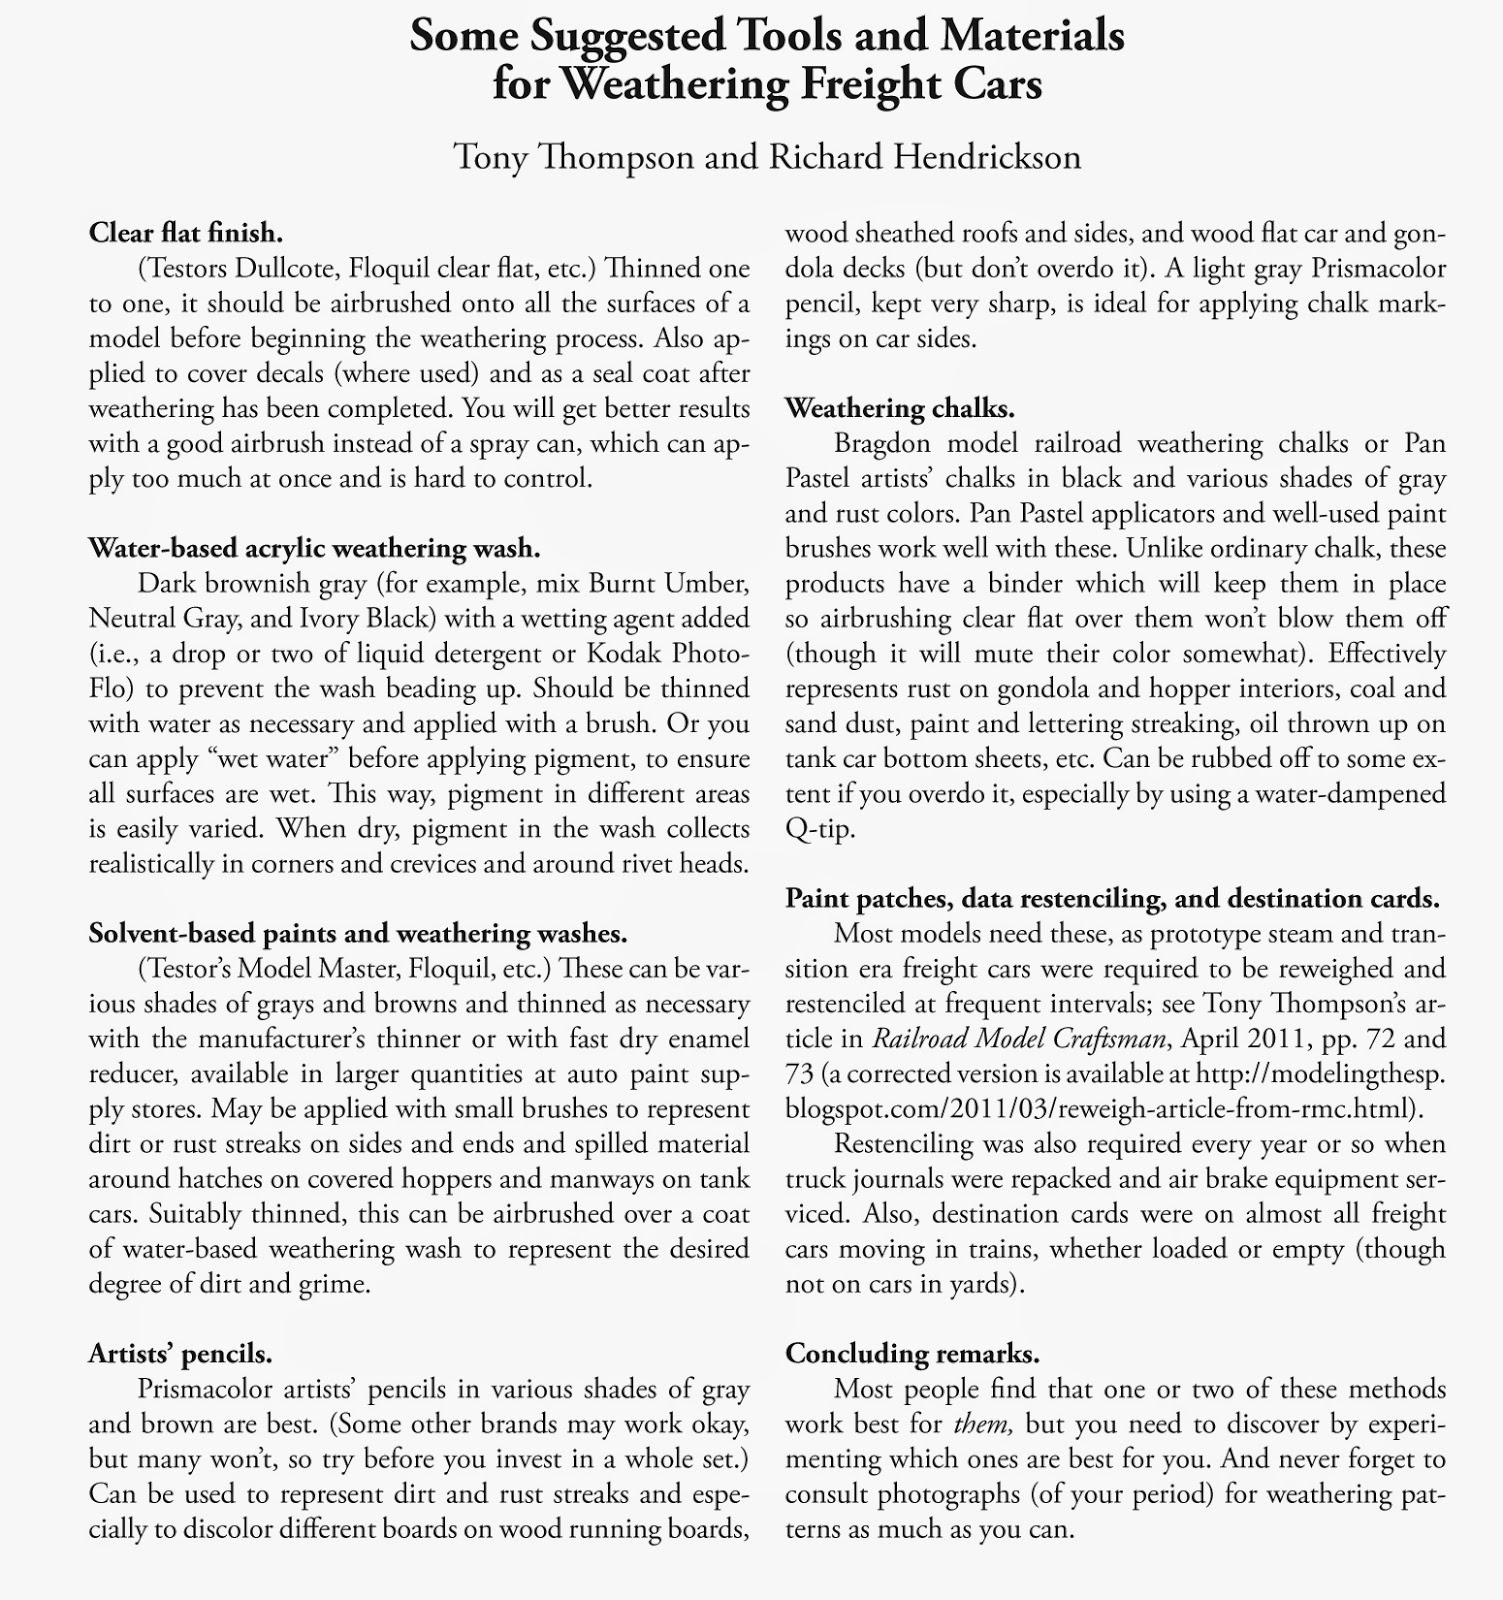
A few years ago, Richard Hendrickson and I developed a joint clinic on weathering of freight cars, which we duly presented at a number of RPM and NMRA meetings, starting in 2011. Although we could not think of a way to make a very meaningful handout for this talk, we did create a summary, including a few basic facts about the materials we used. That clinic handout is included below, and you can click on it to enlarge the image.
Since the creation of this talk and its handout, I have been thinking about the description problem off and on, and am going to try and present in words, with a few photos, what my method is, and a few cautions and recommendations during the process.
I begin with tube acrylic paints, available at any art store. There are premium paints and there are inexpensive ones, and for weathering I certainly advise the lower priced brands. I use a lot of Neutral Gray to tone down other colors, along with Ivory Black, and my main brown color, Burnt Umber. For rust colors such as gondola interiors, I would use Raw Sienna (the color of yellow rust) and Burnt Sienna (brick red). I almost never use any white. So that’s about it. Here are my three basic Liquitex colors, and the brush I use for most of this.

At bottom in this photo is one of my cardboard palettes. I usually just cut a square of corrugated cardboard for a palette, for example from a box flap of a cardboard carton.
The weathering process begins by squeezing out a small amount (maybe as much as a small grape) of the black, gray and umber, onto the palette, and then mixing as seems good at the time. I’m mixing in this photo using my brush.

Here I have spread out a piece of newspaper to keep the weathering process off the kitchen table, and have a small dish containing water with just a small drop of dishwashing soap in it, to make “wet water.”
I should mention that models to be weathered must have a flat finish with this method. Water will simply bead up and not spread, on any glossy area, which in turn would mean that the weathering will be pretty unsatisfactory (try it on something discardable as a test).
Next I set up the models to be worked on. For house cars, I usually do the roof only, in one step, then do the sides and ends on another day. That way, you have something dry to hold onto for both steps. Likewise with open-top cars like gondolas and hoppers, I would do the outside in one session, the inside in another. Tank cars are a special challenge, as you really have to do the entire car in one go, and I will say more about that presently.
Once I have a small amount of pigment ready, I clean the brush (a coffee cup of plain water is on hand for this), and wet the model part(s) to be weathered. I just apply the wet water liberally over the area to be done. Here I show a refrigerator car roof being wetted. You can see I am just mopping on the water, not delicately dabbing.

Now that it’s wet, you can add pigment. Before discussing that, I should note that where I live, winters have damper and cooler air, summers warmer and drier. I mention this because it affects the rate at which water evaporates off the model surface you are working on. That in turn sets the time scale on which you can work the wash around on the car.I would advise experimenting to learn what rate you have to work at, on a particular day. In the winter I can work slowly if I like, but in summer I have to work right along.
Next I splodge on some pigment, just dabs here and there on the roof. With experience you will quickly learn about how much to use, for lighter or heavier weathering. This reefer roof is not being given too much pigment so I can achieve a modest amount of dirt. Next, start evening out the pigment with your loaded brush, so that all areas of the roof have about the same amount.

You can see in this photo that the pigment tends to puddle together rather than spread uniformly. Remember, you are not painting, this is a wash. The process now is to stroke the pigment out in each roof panel, making it more uniform, and keeping the strokes in the direction in which water would run off, which on a roof means all strokes are perpendicular to the running board. Repeat until the water has begun to dry, which may be quickly in summer (for me), more gradually in winter.
Once dry areas begin to appear, caution is needed (experiment with not being cautious and you will see what I mean). The shrinking wet areas can still receive brush strokes to even out puddles, but if you stray onto the dry areas, suddenly you are painting, not working with a wash any longer. Results can be interesting, but can also be ruinous. As I say, experiment to learn how this works.

I don’t want this to sound like a small error means it’s all over. Far from it. Acrylics are very forgiving, in that if you don’t like how an area is working out, just scrub it with clean water, the pigment will come off readily, and you can do it over. But do this fairly promptly. Over time, an hour or two, say, the acrylic seems to take much more of a set, and becomes pretty resistant to water.
Roofs are relatively easier than car sides, which I cover in the next part.
2. Car sides and Ends
Now we can turn to car sides, once the roofs are thoroughly dry (I would normally wait until a subsequent day). Again, the process is to apply wet water generously, now to sides and ends of the car. You can see below that I am pretty much mopping on the water. And wet the truck sideframes, too. They need to get dirty just like the car side does.

Pigment is now applied, mixed from the gray, umber and black as desired. I usually choose a more blackish mix for cars of eastern railroads, where coal soot was more prevalent, a little browner shade for cars of western railroads. Here I am applying a fair amount of pigment, and you can see the relatively gray color mix I have made for this particular model.

The next step is the same as on roofs, namely to spread the pigment around the sides and ends. Here is a car with a fair amount of pigment, and still pretty wet in this view.

Three things to note in this view: first, the pigment is collecting at the bottom of the sides, just from gravity as the wet material flows downward; second, the trucks have a generous dose of pigment too; and third, a small dry area is already evident at the very top of the sides. Those dry areas need to have the pigment-loaded water stroked upward to cover them. So I am far from done at this point.
The brush can be sloshed in the cup of clean water to reduce pigment load, stroked (on the newspaper you put down under the project) to remove excess water, and then can be used to “wick” water and pigment from the bottom of the car side, and, if desired, stroked upward to maintain a heavier dirt load, or else washed out in the cup to get that much pigment off the car, and reduce the dirt load. Here I am wicking up that water.

With the car side beginning to dry a little, and with pigment loads kept fairly even over the car side. I will pause in the description. There are several more details to understand, which I cover next.
3. Some additional aspects
Here are some of the details to recognize in this process. One point to keep in mind is that single-sheathed cars require more work, both to get wet everywhere and also to distribute pigment evenly, because every panel between posts and diagonals has to be treated as a kind of independent region. Here I am wetting such a car.

Note here the palette in the foreground, a small dish of wet water at right, and at left, a coffee cup with clean water in it.
Another point: the low surface tension of the wet water will hold the water + pigment mixture as a continuous film or web from grab irons and ladder rungs to the car side, and that web will dry that way (not good). I simply blow gently to break that film and push the water + pigment away. This photo shows me blowing through the grab irons on that same car seen above.

Meanwhile, the same process as described in Part 2, the stroking upward of any water + pigment accumulated at the bottom of the car side, continues with a single-sheathed car as it would for any other car.

The next thing to be watching for is the emergence of dry areas. As I mentioned in Part 1 in describing the roof weathering, dry areas require caution — if you continue the process you are using on the wet areas, into a dry area, you will immediately find different behavior of the pigment. What is happening is that suddenly you are no longer working with a wash, you are beginning to paint on the dry area, using whatever pigment happens to be on the brush. The effects can be interesting, or bad, and if bad, just use some clean water to rinse off the offending area and work as before with the “wet” technique.
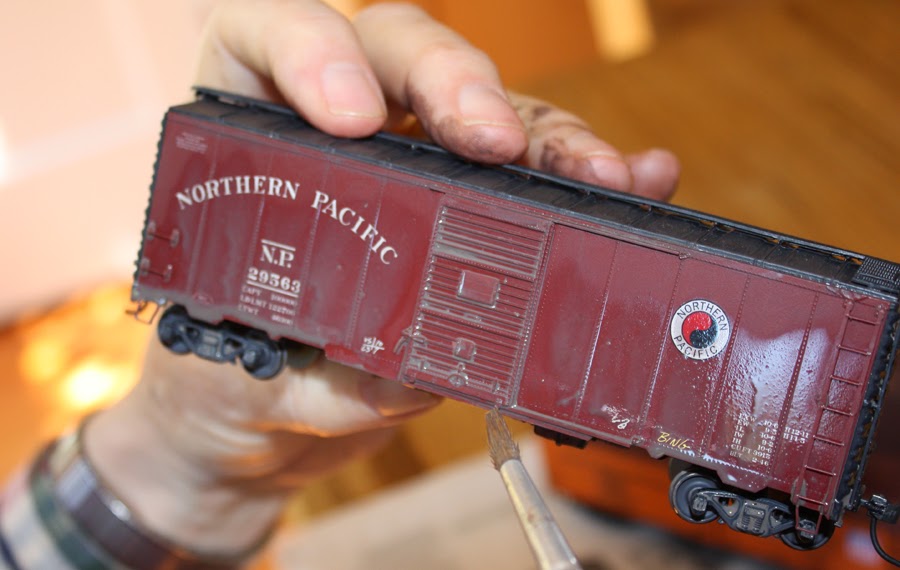
Here is the Northern Pacific box car shown in Part 2, just starting to dry at the top of the sides (there is still pigment to be dealt with at the bottom of the sides). As I said, you have to stay in the damp/wet areas for consistency,or else stroke upward to keep re-wetting the dry areas with the water + pigment.
When the car side is very nearly dry, it will look like this next photo. You aren’t done, but it is getting close. Note I am making sure the pigment is evenly distributed on the trucks.

At this point, I carefully check every place there may be extra water accumulated. That’s because accumulations often result in a little ring of pigment when it dries, if not corrected. This may be at door latches or hinges (on refrigerator cars), or at the attachments of grab irons. Again, the brush is an effective tool to wick up these undesirable accumulations. As you experiment, you will learn what I mean.
4. A few finishing touches


Some highlighting or streaking can add to the effects of the overall wash in this method. As I have described the process so far, the pigment will have accumulated around rivets, corners, or protrusions of any kind, but if you have been careful as I described in previous posts, color will be pretty uniform. But photos of real cars often show more variation. Here are some ways to depict those variations.
First, some cars show either light or dark dirt near ladder rungs, presumably from the boots of yardmen or brakemen. In this photo, I have used some pure black to dash on a little such color on the lower part of the ladder (pure Burnt Umber works well too). Note again here that truck side frames have been weathered too.
In the photo above, I am just turning to the door area. Around door latches, there are often dirty streaks or patches, and if the door rollers or door track have been greased, there can be dark brown or black stains in those areas. In the photo below, I am adding those, again with a little straight Umber or black.
As dirty water drains from the roof in a rain shower, it is channeled along the top of the car side and drains preferentially from the ends of door tracks. This is an effect visible in some prototype photos. Dilute the straight pigment a little by adding water to the palette, or minimize the amount on the brush by just stroking it onto the newspaper under the work area, and then stroke downward at either or both ends of the top track, as you see here.
Note that my fingers atop the car have accumulated some paint. This comes off with water in seconds once you are done, so don’t worry about this development. Most fabrics, however, absorb the pigment, and thus are a different story, so I do try to keep from weathering my clothing.
One other point. Sometimes the effect turns out too mild for what you had intended. It is easy to go back and add more pigment after everything is dry (sometimes I add a protective overcoat of Dullcote first). Below is a reefer having a little more dirt added to the roof (the yellow “color” is actually reflected light). But always remember that although it’s easy to add more color, it’s a lot harder to “add less,” that is, to remove pigment, unless you do so fairly soon after application. Better to work up to the desired level of dirt from the lighter end of the scale.
Last, I like to allow all water to dry, even in crevices , behind ladders, or in other places water can hide, before adding the final Dullcote layer. That layer not only protects the acrylic pigments from scratching, but will also kill any shine, which sometimes can happen with this method. Where I live, sunshine is common all year round, and warming up in sunlight has proven a very effective drying technique.
Here you see the two cars for which I did roofs only in the session shown in the first post of this series, at right, and then at left, the two cars for which I did the car sides and ends in the second post (roofs had been done earlier).
These details complete the overall process of my acrylic weathering technique. There is more to say about car weathering for specific car types, which I will take up in another page, but this page covers my basic method of acrylic weathering and some key details.
Tony Thompson
Tony Thompson
Tony, thank you for bringing this series of posts together in two documents. Your generosity and willingness to share your expertise are very much appreciated!
ReplyDeleteThanks for the information. I had been using alcohol to break the surface tension and it is unpredictable. I will try dish soap on the next model. Thanks again.
ReplyDeleteAlcohol does reduce surface tension but unfortunately also does other things. I tried it once, never since.
ReplyDeleteTony Thompson
I've been experimenting and have done quite a few cars with the craft acrylic paint you can by at WalMart. They are 50 cents to a dollar.
ReplyDeleteI’ve found using Windex as a thinner works well for acrylics without the drawbacks of alcohol. Additionally, I like to use a knife edge brush to go over weld seams and rivet lines, where dirt accumulates.
ReplyDeleteSto facendo un struttura trovata sulla rivista ModelRailroader del febbraio 2012 ma non capisco se le due pareti lunghe e basse con 5 finestrine piccole sia chiuso o aperto,non trovo nessuna spiegazione . Grazie per un vostra risposta in merito
ReplyDeleteHere is my best attempt at rendering the Italian into English: I'm making a structure found in the ModelRailroader magazine of February 2012 but I don't understand if the two long and low walls with 5 small windows are closed or open, I can't find any explanation. Thanks for your answer on this matter
DeleteI will answer after locating the article.
Tony Thompsonk