5. Tank cars
In the previous four sections (in the reference page “Weathering with acrylic washes: basic technique”), I showed my materials and process. I mentioned in that page that tank cars really cannot be done with my usual two steps (roof, then sides and ends), as there is no “separate” part you can identify to weather differently from the rest of the car, as there is in roofs vs. sides. In this section I describe my weathering process for tank cars.
The overall weathering is the same, in that the model is thoroughly wetted with wet water (be generous), then a chosen amount of pigment is applied and spread evenly over the car. The draining downward of pigment, evident on any more or less vertical surface, was described and illustrated in talking about car sides, and here it is even more prominent. Suggestion: once your weathering work on house cars seems to go all right, then try a tank car.
I usually end up holding the car with fingertips at the bolsters, as you have to weather the walkways and trucks, along with the tank and even the center sill. As with any of these methods, you will get a fair amount of acrylic pigment onto your fingers during the procedure, but it comes off easily with water and should not be a worry. You will definitely experience this with a tank car.
Let’s look at a prototype car to illustrate the points to be pursued. This is an SP car, whose paint scheme shows it is in company fuel service. Note the spillage around and below the dome. Notice also that the entire tank is streaked vertically, as rain has washed dirt downward. (You can click on the image to enlarge.)

Also trucks are quite dirty, in a brownish color. The photo is from the Bruce Petty collection.
Weathering a tank car fairly heavily is quite realistic, as these cars often went many years between paint jobs. Here is a Proto2000 model of a Union Oil Company tank car, which I would call “moderately” dirty.

I try to achieve some of the same dirt streaking on the tank, and dirt over the walkways, as is seen on prototype cars, that is illustrated in the detail shot below. The weathering looks uneven in the bright light used for the photo, but under layout lighting this effect is not visible.

Note that walkway and trucks are weathered too, and that a route card has been simulated with a small square of paper on the edge of the running board. On the prototype, these were often stapled or tacked to the edge of the wood running board, which is why tank cars usually did not have route card boards as such, until the advent of metal running boards. For more about route cards, you might wish to read my discussion of the use and application of them at: http://modelingthesp.blogspot.com/2011/11/chalk-marks-and-route-cards.html .
A detail seen in a number of prototype photos is a strip of rust alongside the tank hold-down bands. This occurs because the tank is anchored to the underframe only at the car center, and thus expands and contracts with changing temperature by sliding longitudinally on the underframe. In a prior post about modeling a tank car (that post is available at the following link: http://modelingthesp.blogspot.com/2014/04/associated-oil-tank-cars-modeling.html ), I showed this rust detail. Here is a repeat of a photo from that post; the model is a modified InterMountain kit.

A more challenging task in many cases is lightly weathering a tank car, especially with a light-colored model. This Atlas tank car model, lettered for Warren Petroleum, would be a pretty new car on my 1953 layout and thus is only weathered a bit. Again, I tried to capture the downward streaking on the tank, as well as dirtying up the “glossy new” look of the ready-to-run model.

This then is a general summary of my approach to the separate problems of tank cars, compared to house and other cars such as open-top cars. Those are shown in the following two sections.
6. Flat cars and covered hoppers
I will begin my open-top car commentary with flat cars. An earlier post about this described my method briefly, and it can be viewed at this link: http://modelingthesp.blogspot.com/2011/05/weathering-flat-car-decks.html . I won’t repeat that material here, except to point out that the decks of flat cars, being out in the weather as well as accumulating dirt and debris from some cargoes, tend to get really dark in color over time. Here is an image of a 25-year-old SP car, a Craig Bossler photo at Reading, PA:


I will begin my open-top car commentary with flat cars. An earlier post about this described my method briefly, and it can be viewed at this link: http://modelingthesp.blogspot.com/2011/05/weathering-flat-car-decks.html . I won’t repeat that material here, except to point out that the decks of flat cars, being out in the weather as well as accumulating dirt and debris from some cargoes, tend to get really dark in color over time. Here is an image of a 25-year-old SP car, a Craig Bossler photo at Reading, PA:
Note also that the deck is pretty beat up. Few modelers reproduce either the dark colors or the damage to the deck. The photo above admittedly shows a car later in its life, but it does depict the direction that deck appearances are headed. And by the way, the SP did not creosote decks of its flat cars, nor did it paint them, so the color shown did not arise from those reasons.
This means that raw “real wood decks” on model flat cars can only represent a just-installed deck, which would be a rare observation. To illustrate, on Otis McGee’s layout, which rosters about 75 SP flat cars for lumber loading, there is only one car with an unweathered deck. For these cars, I paint with acrylics, rather than use washes, although the same colors are used as shown in Part 1, link above. Shown below is a photo from my previous post on decks (link in previous paragraph) to show both “real wood” and plastic decks, as modified.
A related problem arises with bulkhead flat cars, for which there is both a steel body and bulkhead frame, and a wood deck and bulkhead facing. This is one of the bulkhead car models, produced by the Southern Pacific Historical & Technical Society, of the 1949 home-built SP modifications to Class F-70-7 flat cars. I weathered the body with washes, the deck and facings with paint.
Another car type that presents its own problems is the covered hopper. In the early 1950s that I model, these cars were almost entirely used in cement service. It was not long before spilled cement from the loading process accumulated on roofs and trailed down car sides. That’s shown here with some dry-brush streaking with acrylic Titanium White, about the only time I ever would use white, and even here, I mixed in a little Neutral Gray to tone it down. There is also some brownish dirt on the car, but it is not very heavy, as this car was built in 1951 and I am modeling 1953. The model is an InterMountain product, and like nearly all of SP’s 1950s covered hoppers, has “closed” sides. You can click to enlarge.
But despite the predominance of cement cars, there did exist covered hoppers in other service, including chemical and mineral service. Here is an example, a car leased to American Potash and Chemical, and assigned to haul the mineral trona; it’s an InterMountain model with open sides. Both these cars were weathered as house cars, that is, the roof was weathered in one session, then the sides and ends were done in a subsequent session.
Some readers of this page will have seen the November 2014 issue of Model Railroader magazine, with several articles on weathering. The one by M.R. Snell on freight cars, curiously, only addresses covered hoppers, presenting three methods. One of these uses acrylic paint, not washes as I use, and really describes painting the car sides. This is a far different technique than I have been illustrating in this series.
The next topic by car type takes up gondolas and hopper cars.
The next topic by car type takes up gondolas and hopper cars.
7. Gondolas and hopper cars
In this section I take up open-top cars such as gondolas and hoppers. For them, I once again prefer to weather in two sessions, once to do the outside of the car (sides, ends and trucks) and again to do the inside. Insides are often different in wear patterns, degree of rust, debris, and other factors. The rest of the basic method is about the same.
I will begin with a kitbash I did some years ago, following a Richard Hendrickson article in Prototype Modeler magazine (“Mill gondolas and how to model them,” Part 2, Vol. 5, No. 8, November-December 1982, pages 12–16; Part 1 was in the preceding issue, September-October 1982). It’s an EJ&E gondola modified from an Athearn model with fishbelly sides cut off, and given new, correct ends (from Detail Associates), a lever hand brake, and a wood floor. It was also necessary to add rivet-impressed styrene overlays inside the car to add rivets there (today, this would be far easier, and look better, with the use of Archer rivets). You can click on the image to enlarge.
As you can see, there is some yellow rust streaking on the inside of the sides, along with some red rust, and the wood floor (represented with scribed styrene) has been weathered much like the flat car decks shown in Part 6 (link provided above).
Another example is a model upgraded from the old metal Model Die Casting low-side gondola, which has a steel floor. These cars naturally took a beating inside, as do most gondolas, and in this model you can see the extensive rust. You can also see some debris inside. Many receivers of cargoes shipped in gondolas or flat cars simply left dunnage and bracing remnants on or in the car, and viewing prototype gondolas today still shows this kind of debris.
The way to represent rust, as I’ve said before, is to use Raw Sienna (yellow rust) and Burnt Sienna (red rust), along with Burnt Umber (older, brown rust), again in the form of the usual washes.
A car type which took particularly hard use, in fact comparable to hopper cars in some ways, was the General Service or GS gondola in the West. Most western railroads rostered substantial numbers of GS gons instead of traditional cross-dumping hoppers, and used them for a wide variety of cargoes, not least mineral and sand/gravel cargoes. Here is an example of interior rust and dirt added to a steel SP GS gondola. The interior looks visibly different from the exterior, as it should.
As a modeler of a western railroad, my interest in, and modeling of, hopper cars is at a pretty low level. I mostly have GS gondolas on my own roster. But I do have a couple of hoppers that may be of interest.
First is a War Emergency twin hopper. These cars were wood-sheathed to save scarce sheet steel in the early part of World War II. Some of them survived into the 1950s on the Santa Fe with their original wood sheathing, and the model shown below is Richard Hendrickson’s weathering. (He gave me the model, with its limestone load permanently installed, because he had done two models like this, in his view one more than he needed.) Artist’s color pencils have been used to give individual boards a little contrast and fade, and lettering is also faded. The overall effect is quite nice.
One conventional hopper I do have is an old Ulrich metal kit, which has separate ladders and wire grabs. It is not too bad a match for some cars owned by the Montour. When I moved to Pittsburgh in 1977, the Montour was shutting down and a lot of equipment was on the scrap line. The weathering and rust in the image below is based on a photo of one of the cars I saw there. In regular service, coal can be abrasive to paint and rust alike, and probably the car interior would not have looked quite like this.
These different open-top cars give some idea of the kinds of approaches which may be useful for your own fleet.
8. Refrigerator cars


In this section, I concentrate on the problems of light-colored cars with my wash method. The most common type with such paint is the refrigerator car, but the same considerations apply to any light-colored car, including tank cars.
I should begin by repeating something I have said in previous posts, that reefers certainly did get pretty dirty in service, and it was quite noticeable on their light-colored sides. I discussed earlier several aspects of modeling Pacific Fruit Express (PFE) reefers in 1953, and in Part 2 of that thread, talked about grime accumulation and showed some photos. You can read that post at: http://modelingthesp.blogspot.com/2011/03/modeling-pfe-reefers-in-1953-2.html .Here is another prototype shot to illustrate the point, of how varied these cars could look in service. It is a John E. Shaw photo, taken at Green River, Wyoming on Sept. 3, 1955, used with permission. You can click on the image to enlarge it.
The variation from car to car of this all-PFE train is something few modelers, including me, have accomplished, though I keep trying.
Of course, not every car is severely dirty. Cars did get repainted, and some car owners, notably PFE, did wash cars whenever their grime was getting excessive, on average about every four to five years. For that reason, PFE car weathering cannot simply be scaled with the age of the paint scheme, because an older paint scheme may have been washed recently, and the car might then appear cleaner than a more recent paint scheme. Numerous statistics on PFE car washing can be found in the PFE book (Pacific Fruit Express, 2nd Edition, by Thompson, Church and Jones, Signature Press, 2000). The Fruit Growers car shown below is intended to depict a car which is moderately dirty.
But it is realistic as well as fun to try for seriously dirty cars too. Here are three of my recent PFE weathering efforts, ranging from very light on the car at right, to fairly dirty at left.
Some time back, Richard Hendrickson sent me a photo of several of his PFE cars, and as you can see, one of them is truly dirty, while the one at far right was new in Richard’s modeling year of 1947. But this dirtiest car is not beyond what is visible in color photos, so it might be a desirable end point for any weathering program.
I have continued to work on variations in weathering on light reefer paint schemes. As an illustrative example, here is a private owner car with a medium amount of weathering. This model of an AC&F-built reefer is from a Westerfield kit.
Finally, I should say something about salt staining on reefers. Heavy salt was often used with loads of meat and packing house products, but if used at all with produce, was far less, for example 5 percent vs. 30 percent. For that reason, I would advise modeling salt stains near ice hatches only on meat reefers, like this Swift car modeled by Richard Hendrickson.
As you will find if you experiment, getting a uniform acrylic weathering coat over a light color takes some care. Of course it can be done and with practice, I think anyone can do it, but it does require some extra attention.
9. Some additional details


In this sectin, I discuss some of the details of the weathering process. These are all little things, but things that really can make a difference in how a model looks. All are based on prototype photos, and are part of the effort to reproduce what is seen there.
One thing to do prior to overall wash weathering is to emphasize boards in wood parts of cars. Cars with wood sheathing, wood running boards, or wood roofs, typically weathered a little unevenly, as the individual boards held paint a little differently. One way to bring this out is the use of artist’s color pencils. There are several brands of these, and both my and Richard Hendrickson’s experience is the the Prismacolor brand works well. Some other brands do not.
In our joint clinic on weathering, Richard and I showed examples of the use of pencils. Following are some photos from that clinic. A brief summary of our clinic, in the form of a handout, is available at the following link: http://modelingthesp.blogspot.com/2011/10/weathering-clinic-handout.html .
Here is a photo showing the process of varying the color of a painted running board. Such variations definitely do show up in prototype roof photos. You can click to enlarge.
The same applies to wood sheathing, especially on light-colored cars like refrigerator cars. Again, remember that the overall weathering comes later, and these perhaps exaggerated streaks will then be less evident.
Another place the Prismacolor pencils can be effective is on stock cars, and here again, individual boards can weather differently from each other. Vary the color of some boards with the pencils prior to overall weathering. Another point: stock cars were cleaned between all runs, often steam cleaned, and many prototype photos show their paint as faded. (They most certainly did not show staining from manure, old straw bedding, or other carry-overs from the previous trip, as any shipper would have rejected such a car as insufficiently clean for movement of his stock.) Here is a model example of the kind of fading I mean. The car is a Red Caboose product.
Another example of how effectively stock cars can be faded and weathered is shown in this photo of a Santa Fe class SK-T car, modeled by Santa Fe modeler Michael Gross (photographed by him and the photo used by Richard and me with his permission). Board to board color variations are visible here. I also like his subtle paint failure on the roof. This effect is easy to caricature, but here Michael has done it very effectively.
The use of pencils, as shown in these few examples, is just one of the ways to make weathering more detailed and more effective, particularly if it is kept subtle. Ideally the viewer likes the “look” of the model without being hammered over the head with specific effects, and that is the result we are striving for.
I mentioned in the second section of the “basic techniques” page, that streaking of car sides with the wash, even though less evident after the whole process is complete, can be subtly effective. Here I mostly mean streaking caused by drainage of water off the car, especially the roof. Here is another view of that being done, again prior to final weathering, when streaks like these will be somewhat muted. This is a Richard Hendrickson photo, from the weathering clinic we jointly designed and created, and then presented at several meetings, but what you see here is identical to my method. Subsequent weathering layers will subdue what may look like stark streaking at this point.
The same kind of streaking can be done on car ends, to represent the dirty water thrown up by the car wheels in wet weather.
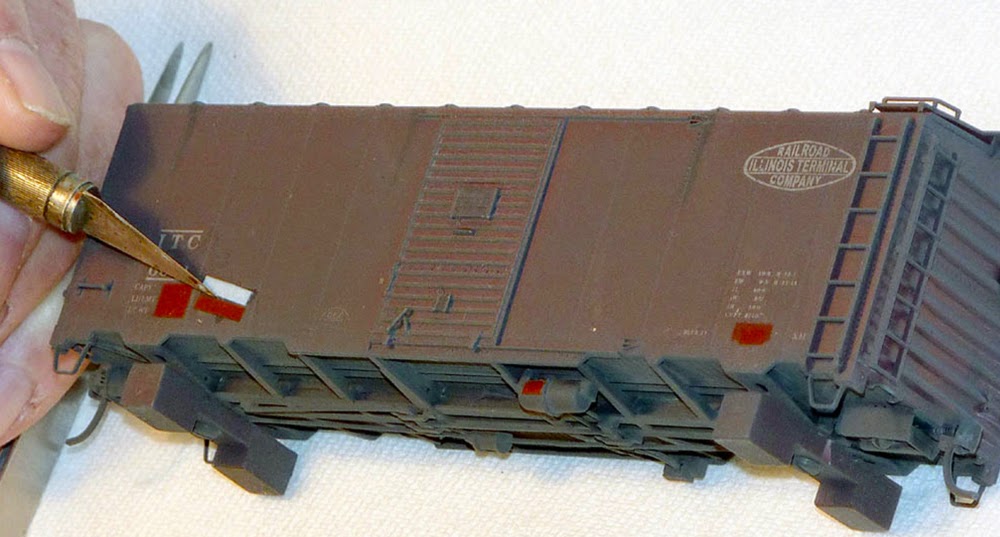
Once the weathering is completed to your satisfaction, you should in most cases add a reweigh paint patch and lettering, and if you are meticulous, also a repack stencil and even a brake reservoir stencil. For more information on the reweigh requirements for freight cars, you might wish to consult the article I wrote for Railroad Model Craftsman, a corrected version of which can be accessed at: http://modelingthesp.blogspot.com/2011/03/reweigh-article-from-rmc.html . As for the brake reservoir lettering, which is often neglected, I posted a summary of how that was indicated on freight cars at this link: http://modelingthesp.blogspot.com/2014/04/brake-service-rules-part-2.html .
One way to do show all these lettering modifications on a model is just to brush-paint an irregular patch over the NEW or weight date, and prototype photos certainly support such an appearance, or you can make a careful rectangle, most easily with decal sheet of boxcar red, black, orange, or whatever car color you have. This is another Richard Hendrickson photo, showing the decal process. Note the paint patch on the reservoir, to accept that stencil also.
The other detail I add to almost all my cars is the route card, which was also discussed in the post just cited. Here is a small square of paper being applied to a PFE refrigerator car, in the common location near the door. Another common location was near the bolster at the bottom of the car side on wood-sheathed cars. On steel cars, of course, the route card would have to be tacked on the route card board, but on wood cars, clerks could and did place them all over. Most route cards appear to have been white or manila in color, but there are photos which clearly show pink, yellow, blue and green, so occasional cars having route cards of those colors would be realistic.
This car also has a reservoir stencil to indicate brake system servicing.
Prototype photos frequently show that fragments of prior route cards remain on the car side or route card board, sometimes torn partly away. This is easy to reproduce with irregular little pieces of paper, as in this example.
Note also the “compressed gas” warning placard on the placard board, and the scuffing to the right of the door where the paint has been scraped.
Once those kinds of details are added you should in most cases also add chalk marks. These marks were made by clerks or switchmen, and certainly were not graffiti, but were intended to provide information to switching or train crews. I have written about this aspect in an earlier post; you can see it at: http://modelingthesp.blogspot.com/2011/11/chalk-marks-and-route-cards.html .
Here is the process of making these marks on a model, again using a Prismacolor pencil sharpened almost to a needle point to accomplish HO-scale handwriting. In another Hendrickson photo, you can see this process, and visible here are the reweigh and brake reservoir stencils also. The route card board on the car door has already received a small paper square as a route card. You can click on the image to enlarge it.
These details are among the things that make a routine sort of weathering job jump up to a higher level, and these details can really make a difference. In section 10 I wrap up all the features of my acrylic weathering method in an overview.
10. Overview
I have now completed my individual descriptions of aspects of the method I use with acrylic washes to weather rolling stock. This Part 10 is an effort to summarize all this material, and show comparative examples of some of the work. In Parts 2, 3 and 4, I showed work in progress on a Red Caboose box car, lettered for Southern Pacific, and I have had some viewers observe that the car does not look very weathered to them. Here is that car as completed, including a paint patch for the reweigh date.
But though it may look like little has been done, here is that same car at right, alongside an unweathered box car from the same source.
This photo illustrates one strength of the acrylic wash method, that it can provide an overall “dirt” level and create a faded look. The level of dirtiness is something you can choose during application, and if it turns out not to be as much as you wanted, you can always repeat the application. The car shown above at right, SP 96606, has a post-1946 paint scheme though built early in 1942, and accordingly is not represented as terribly dirty.
That brings up an important point. For nearly all freight cars, the level of dirt seen on a particular car would scale with the time in service since it was last painted. It is thus necessary to recognize a car which has been repainted, even one of considerable age. Here is another comparison; you can click on the image to enlarge it.
The car on the left is a Class A-50-14 automobile car, built in 1941, and still has its original paint scheme, with the SP initials as reporting mark. On the right is a Class B-50-15 box car, built back in 1925 but with a post-1946 paint scheme. So even though the car on the right is 16 years older than the car on the left, its paint scheme is actually newer, and thus a little less dirty, than is the auto car at left.
Another example of moderate weathering is the car on the left in this next image, a model of one of the 100 box cars the NWP obtained from the USRA. Photos document that NWP tended to keep its equipment painted and in good repair (evidenced also by the fact that 98 of those 100 cars remained in service by the time I model, 1953). Both models are the Accurail double-sheathed USRA car, with the one on the right unweathered.
Finally, I will show the three models I have built of SP’s famous black Overnight box cars. The prototype cars did not seem to show dirt too badly, though as this photo from the late 1950s shows, eventually they got dingy. (Photo from the Bruce Petty collection) That’s an EXPLOSIVES placard on the door, reflecting the car’s assignment to ammunition service.
Here are my three models, varying in amount of dirt from right to left, but none of them terribly dirty.
These examples illustrate some of the ways I want my model freight cars to look (of course, previous parts of this thread did so also). These four cases are not extensive, but I think they illustrate the general results of my weathering method.
This concludes my summary description of the methods, both basic and detailed, that I use to weather rolling stock with acrylic washes.
Tony Thompson
Great info and many thanks. John in Maryland
ReplyDelete