Tuesday, May 30, 2023

Small project: Replacing brake wheels

Brake wheels on model freight cars have to be replaced on occasion, usually because either the wheel itself gets broken, or with vertical-staff brakes, the staff is broken. The latter is very common on ready-to-run models with plastic brake staffs, which are fragile and quite vulnerable to damage even when carefully handled. I recently did several of these replacements. 

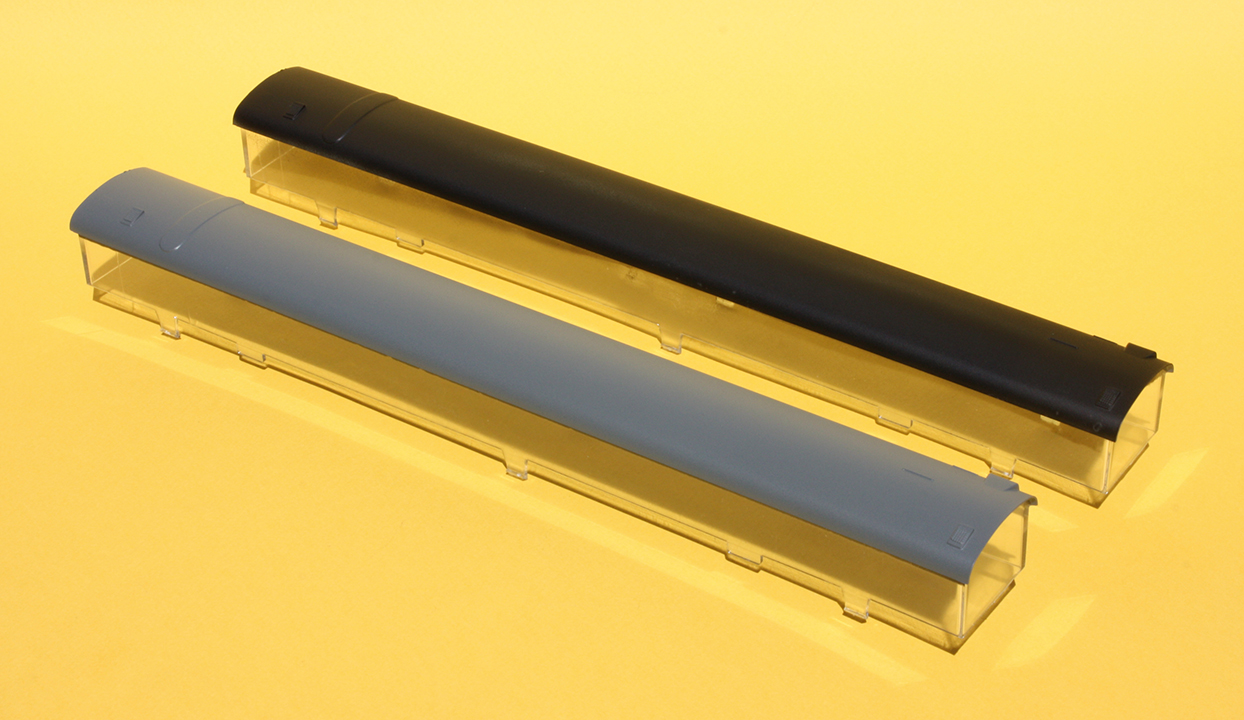
The vertical-staff brakes in a kit may be of the type with a plastic brake wheel, with a metal wire staff. These too are vulnerable, and I usually replace the wheels during construction. In fact, I like to keep some pre-built replacement parts around, created by soldering a Cal Scale brass brake wheel to brass wire. Then I have these on hand whenever needed. Usually I solder a wheel to each end of a piece of wire:

Then when a replacement is needed, I just cut one end of such assemblies to suitable length.

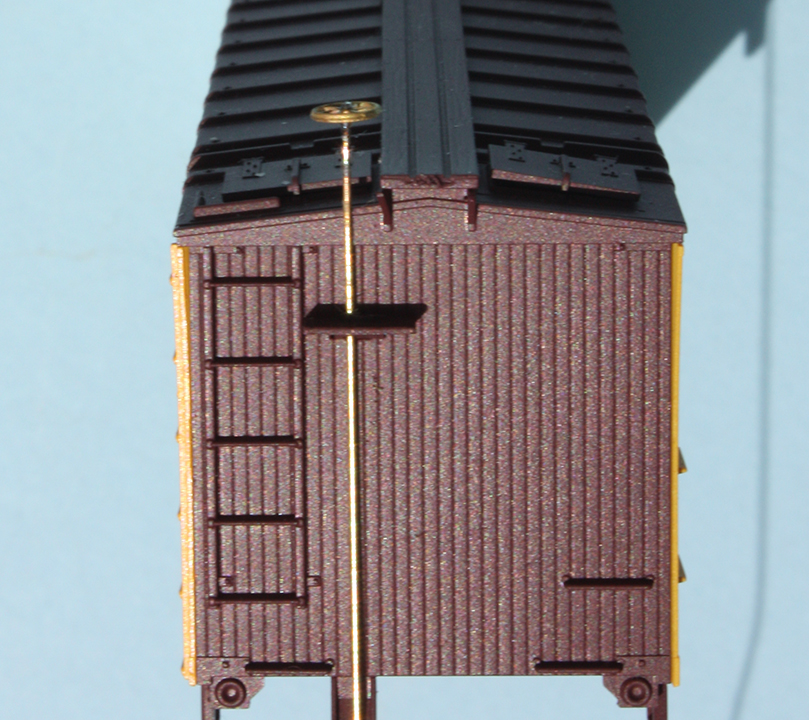
One example is the InterMountain ready-to-run tank cars. The plastic brake staffs rarely survive more than a couple of operating sessions. Here is the kind of replacement I make, using brake assemblies like those shown in the photo above (obviously still to be painted black):

I also use the soldered wheel-staff assemblies when building any tank car kit. As an example, here is the new brake staff on an Athearn tank car underframe (replacing the rather improbable vertical-wheel arrangement provided by Athearn). The gray material is Tamiya putty, filling in the hole intended to hold the Athearn brake assembly.

These kinds of brake installations are sturdy and long-lasting.

As stated, I make some of the brake wheel-staff assemblies long enough to use on house cars that need them. This example is an Accurail reefer body, which will now have a far sturdier brake wheel.

Another situation is a model freight car which has had its brake wheel broken in service, though not a vertical-staff example like those above. For those, I dig into my stash of brake wheels and try to find one that matches what was there before, or what the prototype should have.

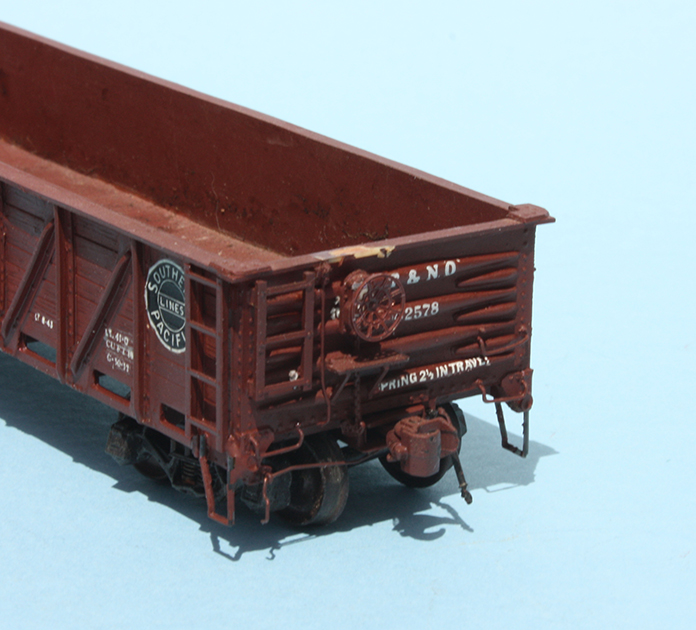
An example is my Funaro & Camerlengo T&NO War Emergency 40-foot gondola. It experienced a collision with another model and damaged the brake wheel. (Additional damage is visible on the top chord of the end.) I removed the damaged wheel and replaced it with a Kadee Ajax wheel, a very nice part. The car, T&NO 42578, would be a member of Class G-50-17, built with Klasing hand brakes; but in later years, SP and T&NO tended to replace any damaged hand brakes with Ajax. Thus my replacement is characteristic of the prototype.

Brake wheels are just one of the many maintenance issues that can arise with model freight cars. I find that I get brake wheel replacements taken care of more quickly if I have the soldered wheel-staff assemblies on hand, and just attach them where needed.

Tony Thompson

Saturday, May 27, 2023

Handout: operating like the prototype

This is a new talk handout, intended to provide citations to many of the printed and on-line resources mentioned in the talk with the same title as this post, along with links to those on-line. Listed below are all the published sources and cited articles from the talk, for those wishing to examine any of them further. 

In the talk, I reviewed some hobby history, and spent time discussing the contributions of Frank Ellison, John Allen, and Allen McClelland to the understanding we have today, of what a layout can be and how it can be operated. As it happens, I have written blog posts over the years about all three of those gentlemen, and links to those posts are included below.

I tried to comment on how and why we see so many truly complete layouts today, like the scene below on John Breau’s Kansas City layout, modeling the Great Northern in eastern Montana (the scene is a local freight, just departing his town of Dutton, Montana). It was not that long ago that very few layouts approached this kind of completeness. Then I commented on what we can do today or try to do, with such layouts.

Here are the references to publications mentioned or shown in the clinic.

Allen, John, Model Railroader appearances: cover, September 1952 and April 1973

Armstrong, John H., The Railroad – What It Is, What It Does (Chapter 8, Railroad Operations), Simmons-Boardman Publishing, Omaha, 1982. [there are several subsequent editions with updates; the original is closest in time to the era I model]

“Boomer Pete,”see under Kalmbach, A.C.

Chubb, Bruce, How to Operate Your Model Railroad, Kalmbach Books, Milwaukee, 1977.

_______, Compendium of Model Railroad Operations, Operations Special Interest Group, Downingtown, PA, 2017.

Coughlin, E.W., Freight Car Distribution and Handling in the United States, Car Service Division, Association of American Railroads, Washington, 1956.

Ellison, Frank, “The Art of Model Railroading, Part 6,” Model Railroader, August 1944, pp. 342–347; reprinted as “All in the cards” in Model Railroader, January 1965, pp. 52–55.

Ellison, Frank, “The Art of Model Railroading,” six-part series n Model Railroader, 1944; reprinted in 1964, August to January 1965.

Ellison, Frank, “Delta Lines,” Model Railroader, November 1955 (contains full track plan).

Kalmbach, A.C. (writing as “Boomer Pete”), “Realistic Operation,” Model Railroader, March 1939, pp. 127–130.

Kalmbach, A.C. (writing as “Boomer Pete”), How to Run a Model Railroad, Kalmbach, Milwaukee, 1944 (revision of earlier book, Operating a Model Railroad, 1942).

Koester, Tony, “In search of the perfect waybill,” Model Railroader, February 2012, p. 82.

Koester, Tony, Realistic Model Railroad Operation, Kalmbach, Waukesha, WI, 2003 (2nd edition, 2013).

Koester, Tony, Allen McClelland and the Virginian & Ohio, Kalmbach Media, Waukesha, WI, 2023.

McClelland, W. Allen, The V&O Story, Carstens Publications, Newton, NJ, 1984.

Palmieri, Michael M., “Frank Ellison and the Delta Lines,” https://www.meridianspeedway.net/frank-ellison-and-the-delta-lines.html

_______, Railway Accounting Rules, Accounting Division, Association of American Railroads, Washington, 1950. [numerous editions exist; this one suits my era]

Smith, Doug, “The latest word on card operations,” Model Railroader, December 1961, pp. 52–62.

Sprau, David, and Steven King, 19 East, Copy Three, Operations Special Interest Group, WoodDale, IL, 2013, 

Thompson, Anthony, “Prototypical waybills for car card operation,” Railroad Model Craftsman, December 2009, pp. 71–77.  

Thompson, Anthony, “Contents of a Waybill,” The Dispatcher’s Office, Vol. 16, No. 2, pp. 17–24, April 2010.
[corrected version available at: modelingthesp.blogspot.com/2011/01/waybills-2.html ]

Thompson, Anthony, “Freight Car Handling and Distribution,” The Dispatcher’s Office, Vol. 17, No. 4, pp. 28–31, October 2011.
[corrected version available at: modelingthesp.blogspot.com/2011/09/my-article-in-dispatchers-office.html ]

Thompson, Tony, “Getting Real: A More Prototypical Waybill for Model Railroads,” Model Railroad Hobbyist, pp. 31–46, May 2012.

Thompson, Anthony, “Progress with Prototypical Waybills for Modelers,” The Dispatcher’s Office, Vol. 22, No. 4, pp. 26–33, October 2016.
[corrected version available at: modelingthesp.blogspot.com/2017/11/yet-another-correction-of-dispatchers.html ]

Thompson, Tony, ”Getting Real: Operating with Prototypical Waybills,” Model Railroad Hobbyist, January 2018. 

Thompson, Tony, “Thoughts on John Allen, Part 2,” blog post, https://modelingthesp.blogspot.com/2019/07/thoughts-on-john-allen-part-2.html

Thompson, Tony, “Remembering Allen McClelland,” blog post, https://modelingthesp.blogspot.com/2022/11/remembering-allen-mcclelland.html

Thompson, Tony, “Frank Ellison: An Appreciation,” blog post, available at: https://modelingthesp.blogspot.com/2023/05/frank-ellison-appreciation.html 

Westcott, Linn, Model Railroading with John Allen, Kalmbach Books, Milwaukee, 1981.

Many of the foregoing published articles contain mention of many more sources, for those wishing to pursue some of these topics further. 

Tony Thompson

Wednesday, May 24, 2023

Passenger cars: “skeleton” diaphragms

The topic of diaphragms on the ends of passenger cars, particularly the Southern Pacific ones I model, has been raised in this blog several times. One example, illustrating home-made striker plates, can be found here: https://modelingthesp.blogspot.com/2014/06/modeling-sp-passenger-cars-part-5.html . But perhaps more relevant is this post, about minimal diaphragms: https://modelingthesp.blogspot.com/2021/05/passenger-car-diaphragms-part-2.html .

The present post is about the cars in later years that had had the canvas or metal “folds” in the diaphragm removed, so that only the striker plate and its supports were left. These could be termed “skeleton” diaphragms. With persistence, one can find photos of this condition in published photographs, particularly in Volume 3 of the SPH&TS series Southern Pacific Passenger Cars, “Head End Equipment” (Pasadena, 2007).

Here is a clear example,  Northwestern Pacific baggage car no. 679, NWP Class 60-B; there can be no doubt that the folded part of the diaphragm (sometimes called the “curtain”) is missing at the left end of this photo, because you can see right through it!  This was taken at Tiburon about 1945 (Steve Peery collection).

Here is color view of another NWP baggage car with a diaphragm in the same condition (Bruce Heard photo). Notice, incidentally, how faded is the Dark Olive Green! Photo at Tiburon about 1958. If you click on the image to enlarge it, you can easily see the state of the diaphragm at the right end of the photo.

Possibly diaphragms were reduced in this way for cars that would not often require passage from car to car, and those passing would be crew, not passengers.

Some Precision Scale HO baggage cars have been modeled this way, as I’ve mentioned previously. Shown below are two angles on one of these models with this type of diaphragm.

The only points I would raise with respect to this model diaphragm is, first, that there is visibly some floor element in prototype diaphragms like this, despite their lack of side curtains. There is no diaphragm floor in the model. Second, some prototype photos seem to show two attachments at the top corners of such a diaphragm, not a single center attachment as you see here. Admittedly that may have varied from car to car.

I decided to see what I could do to model this appearance. I decided to use styrene to model both the floor and top attachments, and use a Coach Yard stainless steel striker plate. This was for a car with couplers extended a ways outward, so I wanted a sizeable diaphragm length. The styrene I used was scale 6 x 10-inch (the floor element) and 6 x 6-inch size, attached with canopy glue. Here’s a photo of the front and back of what I built.

These versions of the skeleton diaphragm are fairly tall, a little too tall for older models like the Ken Kidder brass head-end cars (a product of the height of the striker plates). But they work all right for other models, such as my Soho postal-baggage car, Class 70-BP-15-3, presented as SP 5150. Shown below is this car with a skeleton diaphragm like those shown above.

I will explore further variations in this type of skeleton diaphragm, using other striker plates, and also exploring less length of the projecting diaphragm structure, for cars with differently located couplers. As they are applied to models, I will show them in future posts.

Tony Thompson

Sunday, May 21, 2023

An SP diesel fuel tank car, Part 2

In a previous post, I showed the prototype paint scheme I wanted to reproduce on a model car, a corrected and upgraded Athearn “42-foot tank car.” I also showed a couple of features of how I do that, and showed a model project that had gotten stalled because of an error in construction. You can see that post here: https://modelingthesp.blogspot.com/2023/03/modeling-another-sp-diesel-fuel-car.html .

I decided to correct the wrong-side removal of a dome walk by reversing the location of the dome-top safety valves, which should be at the B end of the car. That end, of course, is determined by the brake gear on the underframe, but the remaining dome walk needs to be on the left-hand side of the car, as viewed from the B end. So here is the model, B end now at left, after slicing off and replacing the safety valves. The two round black scars are where the safety valves were located before removal and placement on the other side of the manway.

My next task is the handrail. As I have shown previously, one can readily bend a new handrail from brass wire (see my project description at: https://modelingthesp.blogspot.com/2011/06/modeling-sp-tank-cars-2-handrails.html ).  That previous post also describes how to make a “pipe union” to join lengths of handrail, using stainless steel hypodermic tubing or brass tubing.

In making tank car handrails, one first needs to recognize, to repeat a point made in the post just cited, that prototype handrails were made from nominal 1-1/4-inch iron pipe. And that, as any table of nominal pipe sizes will tell you, has an outside diameter of 1.66 inches. This corresponds to a hair over 0.019 inches in HO scale.

Since the convenient packages of wire from Detail Associates went away, I have been using K&S no. 8159, which conveniently contains 12-inch lengths of 0.020-inch wire. That length is almost the circumference of an SP tank car in HO scale, so the length matters. In the photo below, you can see partial progress in bending the wire to the necessary shape: not there yet, but getting close.

It takes lots of trial fitting, adjustment of bending, more fitting, and so on, to get to a satisfactory part. This is one of those tasks I only undertake when feeling like I have lots of patience. Below you see the main handrail ready to attach, and the short piece that will complete it (length not yet finalized), along with the short piece of tubing below the railing that will be the pipe union.

But before adding the handrail, I wanted to complete painting. As shown in two prototype photos of these cars in service on the SP (included in the previous post, link in the first paragraph of the present post), these cars had black bottom sheets and black handrails and ladders. I went ahead and masked the upper part of the tank body seen above, and sprayed the bottom sheet with Tamiya Matte Black (TS-6). 

But before proceeding with the handrail, I turned my attention to the underframe. I explained in some detail previously how I re-work this Athearn underframe (see: https://modelingthesp.blogspot.com/2011/05/modeling-sp-tank-cars.html ). 

This frame is in two parts. To begin, I fitted the parts together, and drilled through the post in the coupler pocket, starting from the handy hole in the top of the underframe, and right through the pocket cover underneath, so that I can tap for 2-56. 

Then I cut the coupler pocket covers off. I want to make those removable, not part of the underframe itself. Then I glued the bottom part of the frame to the top. With that attached, I used canopy glue to add some brake rodding to the molded-on levers, and some piping to the triple valve (a little hard to see below; you can click on the image to enlarge it if you wish).

The Athearn vertical-wheel handbrake stand represents a very unusual arrangement for a tank car of this era. I fill the hole where it is intended to be placed, using modeling putty. That’s what you see at the far right end of the view above. I will replace the Athearn part with a wire staff and soldered-on brake wheel.

I'll continue with completion of this tank car model in a future post.

Tony Thompson

Thursday, May 18, 2023

My column in the May 2023 Model Railroad Hobbyist

As many readers know, I am one of a rotating group of monthly columnists in the Model Railroad Hobbyist on-line magazine. The columns are all called “Getting Real,” and are intended to present prototype-oriented modeling ideas and projects. My latest contribution, which happens to be the 25th one I’ve published in the series, is in the May issue (you can visit www.mrhmag.com ), in “Running Extra.”

My topic this time, and the title of the column, is “Tank Cars and the Wine Business,” and the title was chosen to show that I wasn’t just going to write about wine tank cars, but about how the wine business worked (and still works), in connection with wine transportation. As a transition-era modeler, my emphasis is naturally in that era, but I provided history back into the pre-Prohibition era too.

To some extent, this article is an outgrowth and expansion of a blog post from some time ago, entitled “Wine as an Industrial Commodity,” which can be found at: https://modelingthesp.blogspot.com/2012/02/wine-as-industrial-commodity.html , with a considerable addition of information about the tank cars that carried wine, much of it courtesy of my late friend Richard Hendrickson.

An important point I tried to make is that the wine business is complex, in that there has for years been a lively traffic in blending wines, and also in wine grapes, moving from place to place. As I stated it, there are vineyards that make no wine, but simply sell their grapes; there are wineries that make wine but grow no grapes; and there are bottlers that have no winery.

I took some pains in the article to clarify that although the common perception is that a wine tank car had six compartments, like the one below, there were also many four-compartment and three-compartment cars, and many of the three-compartment tanks had been converted from single-compartment cars.

The car shown above is a very typical wine car, in that it is insulated (jacketed, if you will), has frangible-disk safety equipment instead of spring-loaded safety valves, is lined with glass (in the form of porcelain enamel), and is an AAR Class 203 car, not an ICC class. The article goes into some detail on these features.

The numerous three-compartment cars that had been converted by adding end compartments are distinctive and important to model if you have any amount of wine traffic. I have modeled such a car by the very prototypical approach of adding domes to an existing car model. The modeling needed to do so is described in the article, but here’s my model (starting from an Proto2000 insulated tank car):

The modeling the resulted in this car was described in an earlier blog post (you can see it at: https://modelingthesp.blogspot.com/2017/05/creating-wine-tank-car-part-2.html ). The model is shown above at the loading rack of my winery in the town of Ballard.

At the same winery loading spot is shown an excellent HO scale version of the iconic 6-compartment wine tank car, from Precision Scale. It’s correctly sized and has been decal lettered as GATX 972.

Of course for most modelers wine tank cars would simply move in mainline freight trains, but since I have both a winery and a wine-shipper’s warehouse on my layout, I can show car loading. That’s true for the photo above, and also at my warehouse, where in this case barrels of blending wine are being readied for loading:

So spotting a car for loading is part of my layout’s wine traffic, and for me, an interesting addition to the totality of what gets switched in an operating session. Here the Santa Rosalia Local’s power is spotting a Tangent 8000-gallon car, lettered for Roma Wine Co., for loading at my winery.

The article was fun to research and write (only occasionally aided by consumption of the subject beverage), and I hope it give more modelers some ideas about the varieties of wine-business traffic they can add to their operating sessions.

Tony Thompson

Monday, May 15, 2023

PNR-NMRA 2023

Coming less than a month after the annual convention of my home NMRA region, Pacific Coast Region (PCR), the convention of PNR (Pacific Northwest Region) was held last weekend in Tacoma, Washington. This is the adjoining region to the north of my own, not terribly far away, and I often attend the PNR meeting as well as the PCR. 

As I’ve stated before, I like to report on these meetings because of a long-held conviction, 40 years in the making, that regional NMRA conventions are fun and worthwhile attending. (My report on this year’s PCR meeting is here: https://modelingthesp.blogspot.com/2023/05/pcr-nmra-2023.html .)

The PNR convention this year was kind of a mixed bag, with, unfortunately, a sub-par hotel, but there was good content in the convention activities, and an interesting neighborhood around the hotel. Just a block below us was the railroad depot facilities for both Amtrak and regional rail, both the Sound Transit light rail (street cars) and heavy-rail regional service (the Cascades and Sounder trains). Here’s a Sounder with its distinctive Bombardier bi-level coaches.

Incidentally, that’s our hotel at the top right of the photo!

As always, for me the clinic program at the convention was a major time consumer, and there were a number of good ones. Below I show Rich Mahaney, who gave a bunch of different talks, during his presentation on modern tank cars. I also gave a talk in the program.

I am always interested in the contest room, since you can depend on seeing some outstanding models. This convention was no exception. For me, the star this time was Donald Rose’s large-scale model of a narrow-gauge, outside-frame 0-6-0 of the Oahu Railway.

And the closer you looked, the more you saw. Below is a view into the cab, with all the piping and valves that were installed. This was a pretty impressive model.

 
Finally, I had the chance to scratch another of my many itches, discovering the Tacoma Book Center just a block from the hotel. The view below is just one of 12 aisles. I love places like this and could probably have spent all day there quite happily — and would equally probably spend a pile of money, and have to buy another suitcase to take all those wonderful purchases home!

As always, an enjoyable NMRA regional convention. Despite a few problems, congratulations to the organizers, who I know put in a considerable amount of time and effort to make one of these events happen. And to state it one more time, if you’ve never attended one of these conventions, it’s worth a try.

Tony Thompson

Friday, May 12, 2023

Modeling SP passenger cars, Part 15

In recent posts on this topic, I have been describing a project to build two Southern Pacific streamlined sleeping cars, for the floor plans 4-4-2 (meaning 4 double bedrooms, 4 compartments, and 2 drawing rooms), and 13 DB (meaning 13 double bedrooms).

I’m doing this by applying Brass Car Sides for those two floor plans to old Rivarossi “1930 streamlined” cars, a coach and a sleeping car. (The plastic model products of Rivarossi in Italy were imported by AHM, Associated Hobby Manufacturers, thus called “AHM cars” for short.) The previous post, no. 14 in this series, can be found here: https://modelingthesp.blogspot.com/2023/04/modeling-sp-passenger-cars-part-14.html

Now it’s time to turn to painting and lettering these two cars. As I’ve mentioned, I want to apply the Lark paint scheme to them, two-tone gray with the dark gray on the window band. Here’s a photo from December 1955 at San Francisco, showing the overall appearance (Lawson K. Hill photo) of a 13 DB car.

This is the post-1946 version of the Lark scheme, with only the light stripes above and below the window band. For dimensions and details, see Southern Pacific Painting and Lettering Guide: Locomotives and Passenger Cars, 2nd edition, Jeff Cauthen and John Signor (SPH&TS, Upland, CA, 2019).

Roofs were black, as you see above, so I will replace the original color that happened to be on the Rivarossi cars. Those roofs were gray, as I showed in that first post (see it at: https://modelingthesp.blogspot.com/2023/03/modeling-sp-passenger-cars-part-12.html ); I used Tamiya Matte Black (TS-6) after masking the clear glazing areas. Here is one painted black, one still original gray.

Next I needed to make sure the brass sides were clean, particularly of any fingerprints or other contamination that might not hold paint. I carefully wiped all surfaces with isopropyl alcohol, which in my experience removes finger oils well, but won’t affect the plastic in these cars. Then I air-brushed the car sides with Lark Light Gray, which I lightened slightly for more contrast with the Dark Gray (compare the prototype photo above).

The view above shows the bedroom side of both cars. Since it also reveals the car interiors, I should mention that these streamlined sleeping cars had a partition the whole length of the car, alongside the aisle. That means you should never be able to see through a model of a car like this. I will just add an off-center styrene wall.

Then I masked the Light Gray except for a 2-ft., 9-in.-wide window band, using the excellent Tamiya masking tape. (For dimensions and other details of painting and lettering of these cars, I relied on the Cauthen and Signor book mentioned above). Below are the bedroom sides of both cars with the Lark Dark Gray added, except for the door. I used P-B-L Star Brand no. STR-26 for this color.

The next step will be striping. I have tried using decal stripes on cars of this length, and what a struggle to get them really straight! I have had much better success with simply masking for each stripe, which is this case should be SP Lettering Gray, not white. More on that in a following post.

Lettering: When these cars arrived from Pullman, the car numbers were on the letterboard at each end of the car, and the center of the letterboard carried the word “PULLMAN.” The Lark insignia was centered beneath the window band. In 1946, the car numbers were removed from the letterboard and instead were centered under the Lark insignia. In 1948, with the sale of most of the Pullman car fleet to the railroads, the word “Pullman” centered on letterboards was replaced with “Southern Pacific.” The car type, “Pullman,” was then placed at each end of the letterboard in small letters. Compare the prototype photo at the top of the present post.

Car numbering: These sleeping cars were purchased from Pullman with car numbers only, not names, unlike most North American sleeping cars. The original six 4-4-2 cars were numbered SP 200–205, and were renumbered during 1950–51 to SP 9104–9109. The original eight 13 DB cars were delivered as SP 300–307, and in 1950–51 became SP 9350–9357. Since I model 1953, I will use the later numbers.

In a future post, I’ll show both the striping and lettering parts of the project.

Tony Thompson

Tuesday, May 9, 2023

Memorial freight cars

By this I mean freight cars from historical layouts of prominence. I was reminded of this topic while writing my previous post, an appreciation of Frank Ellison and all that he pioneered in our hobby. (Here’s a link to that post: https://modelingthesp.blogspot.com/2023/05/frank-ellison-appreciation.html .) Ellison’s completeness of layout and serious operating approach captivated me even in my youth.

There was a very informative article about Frank’s Delta Lines layout in the November 1955 issue of Model Railroader. The article emphasized how the operating crew, anywhere from six to eighteen people, ran the layout. In the photo below, John Kolp at left, and Ellison himself at right, are making a meet between two trains at Marthaville, both using the same local “cab” control panel. Both wear intercom headsets so that they can communicate with the dispatcher over a “party line.”

I remembered that I do own a Delta Lines freight car (in HO scale, so obviously not a souvenir of Ellison’s O-scale layout), purchased from a second-hand seller, and probably one of the “famous” freight cars produced by NMRA a couple of decades ago. I believe it’s an InterMountain box car.

Turning to the Gorre & Daphetid, I have previously mentioned the G&D freight car I created (the railroad name was pronounced, as most people know by now, “gory and defeated,” in the sense of “after the battle”). That post can be found here: https://modelingthesp.blogspot.com/2019/07/thoughts-on-john-allen-part-2.html

Back when photos by John Allen of his second G&D layout were frequently the centerpiece of Varney ads on the back cover of Model Railroader, one of them gave me a clear view of Allen’s lettering on a Varney stock car, G&D 45, in the foreground. Incidentally, I also loved the icing platform at photo center, and once owned the Fine Scale Miniatures kit for this structure, intending to build it for my layout — but sold the kit and moved on.

If you’d like a closer look at the stock car, you can click on the image above to enlarge it.

The “Wild West” kind of lettering for the road name on the stock car could be duplicated . . . but what about the G&D emblem? I hunted through John’s magazine articles until I found a good image I could photocopy, then reduced it to appropriate size on paper and added it to the model. I used a Train Miniature HO stock car, definitely a better model than the old Varney car.

That brings me to my third car of this kind, from another layout that I admired, and a modeler that I respect: Allen McClelland. I recently reviewed the new book about McClelland’s Virginian & Ohio layout and all the things he pioneered in the hobby, an excellent book by Tony Koester (that review is here: https://modelingthesp.blogspot.com/2023/04/koesters-book-on-mcclelland-and-v.html ). 

Below is a photo from the Koester book, showing Allen with a hand-held throttle, controlling the coal train on the main line at Fullerton, Virginia. It looks like every car is a V&O hopper. 

Years ago, when I lived in Pittsburgh, PA, in NMRA’s Mid-Central Region, the region had a promotion in which V&O hopper cars were sold to raise money (and of course Allen got a full set of all the car numbers made, which if I recall correctly were all numbers he hadn’t yet included in his fleet). 

I don’t move a great deal of coal on my layout, especially in eastern-road hoppers, but when I do, occasionally this car will show up in an operating session; most will recognize it as an Athearn offset-side twin.

None of these are, of course, lettered as models of prototype rolling stock, yet they represent hobby pioneers who did much to bring us to where we are today. So yes, they do appear in an operating session from time to time, my own small homage to the accomplishments of these three layout builders and operators.

Tony Thompson

Saturday, May 6, 2023

Frank Ellison: an appreciation

Frank Ellison was an O-scale modeler who became famous after a 6-part series in Model Railroader during 1944 about his layout, the Delta Lines. Through the late 1940s and well into the 1950s, Ellison continued to publish article in both MR and Railroad Model Craftsman, writings totalling in the hundreds. Yet younger modelers often express confusion as to who Frank Ellison was, or why he should be remembered. This post is an effort to correct that.

The Delta Lines was a large layout, powered by outside third rail, as was common in the early days of O scale. It was covered in some detail, emphasizing operation, in that 1944 MR series. Below is the first page of the first article; each month, these were the feature articles of the issue. They contained the first publication of Ellison’s famous statement, that the layout is really a stage, and the trains the actors that perform on it, and the timetable the plot. This idea was doubtless a legacy of Ellison’s own years performing in vaudeville. (For a nice biography of Ellison, I recommend this site: https://www.meridianspeedway.net/frank-ellison-and-the-delta-lines.html .)

From August 1964 through January 1965, MR reprinted all six articles.

The layout filled a large space in Ellison’s house in New Orleans. Designed to provide numerous routes through the layout, the plan can be confusing to look at. Here is the MR version (you can click on the image to enlarge it if you wish):

To see what is meant by the “routes,” here is a version of the track plan with routes shown in color (from a German model railroad magazine), between the end-point yards at Fillmore and Chapelle, via the intermediate yard at Colbert. The key at the top shows the station sequence.

Two of Ellison’s towns had considerable switching. One was Donaldson (like many of his towns, named for one of his children). It’s the peninsula just to the right of Colbert in the track plan. In the June 1950 MR, he showed a clear plan of the track layout and industries there:


Below is a view taken from the left end of the drawing above, looking toward “Spur B” as a local freight is picking up a reefer from the icing platform (February 1950 MR). Nearest the camera is “Hamm & Berger” meat packers, one of Ellison’s many “humorous” industry names.

At a time when few model railroads had much scenery, or many buildings beyond depots and roundhouses, Ellison had numerous industrial buildings served by his way freights. And he eventually wrote construction articles about many of them. Like most model railroads, many were unrealistically small buildings, but not always. This handsome structure was shown in the September 1951 issue of Model Railroader. I especially like the shadowy suggestions of equipment inside.

Ellison wrote a great deal about operation, including timetables, scheduling, way freights, and other details. Having worked two years as a telegrapher on the L&N, he understood what he was talking about.

At one time, Ellison as probably as well known as any layout owner, through his many articles about a layout far more complete than most. And his articles usually included encouragement to try operation. In the mid-1950s, he would be overtaken in visibility by John Allen (about whom I’ve posted before; see for example: https://modelingthesp.blogspot.com/2019/07/thoughts-on-john-allen-part-2.html ). But Ellison pioneered many advances in the hobby in his day, and deserves more recognition that I think he receives nowadays.

Tony Thompson

Wednesday, May 3, 2023

PCR-NMRA 2023

This past week, the Pacific Coast Region (PCR) of NMRA held its annual convention, this time in Sacramento under the auspices of Sierra Division. As I almost always do, I attended the meeting and quite enjoyed the experience. 

I report on meetings like this not because of their intrinsic importance, or because it matters that I was there, but because I hope to encourage modelers who don’t typically attend such conventions to give them a try. I have always found NMRA regional conventions to really be fun.

For me, the primary attraction at such a meeting often is the clinics, where remarkable degrees of expertise in many, many areas of our complex hobby are on offer. This convention was no exception. I show below just one example, Mike Roque during his fine talk diving deeply into the prototype, “Signals: Identification, Aspects, Types, and Meaning.”

I did give a couple of clinics myself at this meeting, something I am usually happy to contribute to the fabric of the program.

I always enjoy the model and photo contest room, where often some very impressive modeling is seen. My favorite this year was Earl Girbovan’s pile-driver barge, a marvelously complicated and yet business-like model. I would love to have sat down and played with it, while examining all the details! Terrific stuff. (You can click on the image to enlarge it if you wish.)

Another part of most regional conventions is layout tours and operating sessions for local layouts. I had the pleasure of operating on Bill Burg’s “Sacramento Northern Belt Line,” modeling a very interesting prototype area in Sacramento, the in-town trackage of Sacramento Northern and Central California Traction. One of the challenges in such a prototype is that it was electrified in the era Bill has chosen. Of course that’s also a wonderful opportunity for equipment like this:

Bill confronted the overhead-wire problem with what I consider a very nice choice: include the line poles and the span wires, but not the line wire. That way, one can do switching without having to work under the wire over the track all the time, just avoiding the span wires at intervals. You can see this below.

But the main reason I took this photo is to show how nicely Bill solved the perpetual problem of disguising streets that should continue into the distance, but necessarily have to end at a rather close backdrop. He framed the street with trees, then used a photo of a shady Sacramento street where the road meets the backdrop. Very nicely done!

Bill took a few photos during our session, and in the one below, you see Seth Neumann in the foreground, engineer at the time, with his steeple-cab locomotive by his left arm, with me as the conductor in the background. Switching with a steeple cab! It doesn’t get more fun than that.

This was an enjoyable convention, as is almost always the case at NMRA Regional events, and as I mentioned at the outset, if you’ve never been to one, I urge you to consider attending when your nearest one comes up on the calendar next.

Tony Thompson