Thursday, November 30, 2023

Stand-in head-end cars

In my layout operating sessions, I usually operate either a section of the Coast Division mail train, or a deadhead move of passenger equipment, as one of several through trains on the Southern Pacific main line. I like to vary the equipment in these consists, but not particularly being a passenger modeler, I sometimes find myself without many options. Accordingly, I have gradually accumulated some stand-in cars which look all right among their “betters.” 

One of these is a converted wartime military Pullman, modified to a baggage-express configuration, as was done by a number of railroads. It’s a model I inherited from my good friend, the late Richard Hendrickson (see my remembrance at: https://modelingthesp.blogspot.com/2014/07/in-memoriam-richard-hendrickson.html ), lettered for the Burlington. 

He modeled October of 1947, and at that time, the model’s Allied Full-Cushion trucks would still have been in service. But by my modeling year of 1953, these would have been gone. I nevertheless operate the car occasionally, just as Richard modeled it. It isn’t a stand-in for model accuracy (except for trucks), but is perhaps unlikely on the SP Coast Route, presumably representing a through load of mail or express.

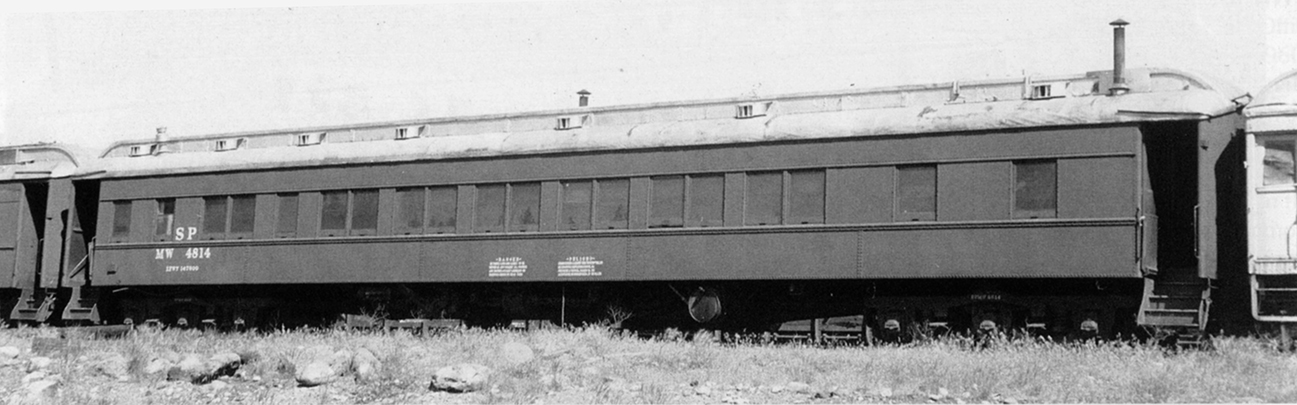
An RPO car is a natural in a mail train. I have a brass RPO, correct for SP, though its trucks roll so poorly that I dislike operating it. I could of course replace the trucks. But I have an alternative. Years ago, I bought one of the Rivarossi heavyweight RPO models (described by the importer, AHM, as a “1920 Baggage P.O.”), which was lettered for Santa Fe. 

Now it was unusual for RPO cars other than than the home railroad to be seen in trains, so I simply relettered it for Southern Pacific. Its clerestory roof would make it an unusual car  in the SP fleet, but there were a few, so I chose a number near the car numbers of similar SP cars. I relied on the information in the excellent reference source, the book “Head-End Equipment,” Volume 3 in the series Southern Pacific Passenger Cars (SPH&TS, 2007). But it’s definitely a stand-in, not accurately representing any SP car.

Still another car in the stand-in category is Rapido’s recent Dark Olive Green car, representing one of the Class B-50-15 box cars converted to head-end express box car service (AAR type BX). It was shown in my post about paint schemes as SP 9008, a 1936 conversion which returned to freight service in 1943 (here’s a link: https://modelingthesp.blogspot.com/2023/08/the-rapido-sp-box-cars-models.html ).

All 472 of the SP 9000-series cars, both BX cars and “Overnight” cars, were renumbered in the early days of World War II when special freight services were cancelled nationwide. Among those were 99 head-end cars renumbered to the 5800 or 5900 series, as shown in detail in Chapter 18 of Volume 3 in the SPH&TS passenger series, mentioned two paragraphs above.

As passenger traffic declined after the war, SP decided around the end of 1948 that these B-50-15 and -16 BX cars were no longer needed in head-end service, and all were either retired or returned to freight service by the spring of 1949,  in boxcar-red paint and with their original numbers. (I know this from the SP Car Ledgers, now at CSRM.) Since I model 1953, strictly this would rule out using one of these cars on my layout.

But since I have the model, I decided to treat it as an unexpected hold-over and give it one of the 5800-series numbers. From the SPH&TS book, I chose one of the numbers in the group of BX cars assigned to the Northwestern Pacific, and knew I could use Dulux Gold car numbers from the very nice Thin Film decal set, HO 160. First, I painted out the original car number, 9008, using Star Brand Dark Olive Green (STR-29), as you see below; then I painted out most of the other small lettering on the side. 

But the car remains an anomaly historically, so the car will definitely be a stand-in. I have weathered it to get a faded look consistent with its over-long survival, and hiding paint scheme problems. Here is the car, as I occasionally operate it:

These cars, though stand-ins in various senses of the term, do add variety to my various mail and extra passenger trains. As such, they essentially expand my fleet. That was the reason to explore them in the first place.

Tony Thompson


Monday, November 27, 2023

Modeling an SP Class O-50-9 tank car, Part 3

In the previous post in this series (see: http://modelingthesp.blogspot.com/2016/02/modeling-sp-o-50-9-tank-car-part-2.html ), I described my completion of the dome hardware and addition of the circumferential tank sheets to the tank body. As with a number of my models of Southern Pacific 12,500-gallon tank cars, the starting point was the Athearn “42-foot tank car,” as Athearn calls it. That model is virtually exact in overall dimensions to the SP prototype. 

Much of the work being done follows that in my original article of some years ago, giving details of this conversion of the Athearn model to an SP prototype, and thus I will only briefly mention the aspects already shown. Here is a link to that article: https://modelingthesp.blogspot.com/2011/05/modeling-sp-tank-cars.html .

It’s been awhile since I posted about this project, so let me show the degree of progress. The noteworthy addition here is the dual-safety valve “elbow” housing on the side of the dome, a brass part from Owl Mountain Models (possibly shown more clearly in the previous post, see link in top paragraph, above). 

Since one safety valve was required for each 6500 gallons in a tank car compartment, a 12,500-gallon tank car like these SP cars required two safety valves. The dome-side mounting was superseded (though not prohibited) in the mid-1920s, replaced by the more familiar dome-top location. SP’s Class O-50-9, built in 1924, would be the last SP tank car class with elbow safety valves.

Note also the removal of the rivet rows along the top of the tank, since this tank is assembled with circumferential, not longitudinal steel sheets; and the lack of safety valves on the dome top, since they are located on the dome side in this car class. If you look closely (you can enlarge the image by clicking on it), you can see the overlay sheets of transparent plastic, added to represent the circumferential sheets.

The next step was to add Archer rivets along the edges of the circumferential sheets, as I mentioned in the post cited in the first paragraph, above. These were from Archer Fine Transfers set AR88031, double rivet rows suitable for tank cars like this (the set is based on data I supplied to Archer, as noted at the bottom of the decal sheet). To see the Archer line, you can visit their website at: http://www.archertransfers.com/SurfaceDetailsMain.html

(Unfortunately, Archer went out of business two years ago. But the business is being revived, with new people having acquired the line. The link in the previous paragraph shows the materials.)

I applied them as one would apply any decal, finishing up with Walthers Solvaset. They were then protected with an overcoat of gloss. In the photo below, you can see how nicely they are spaced. At left are the extraneous Athearn rivet rows that were removed, obviously more widely spaced than the new ones. At photo center is the scar of the removed Athearn handrail support. As I did with my diesel fuel tank car in a recent post (here’s a link: https://modelingthesp.blogspot.com/2023/06/sp-diesel-fuel-tank-car-conclusion.html ), that support will be replaced later.

Next came completion of the grab irons on the car ends, postponed until now. The molded-on grab irons are carefully sliced off, preserving the rivets at each end, and the new wire grabs are curved to match what was originally there. As I usually do, I made these from 0.015-inch wire ( Tichy Trains product) and attached them with canopy glue. Here is one end of the car.

The next job is to fabricate the new handrail. I have shown the process of making such a handrail in several places, most recently with a diesel-fuel tank car (here’s a repeat of that link: https://modelingthesp.blogspot.com/2023/06/sp-diesel-fuel-tank-car-conclusion.html ). The K&S 0.020-inch brass wire is a pleasure to work with, being fairly soft and easy to form to fit. As you can see, the 12-inch length doesn’t go all the way around the tank, so another piece will be added.

The single grab iron on the dome (barely visible above)  is on the side with the dome walkway; obviously the other side, with no walkway, needs no grab iron on the dome.

The project will continue with finishing the new handrail, and preparing the underframe, followed by painting and lettering. I will describe those steps in a future post.

Tony Thompson

Friday, November 24, 2023

Small project, SP Boarding Bunk car, Pt. 2

In Part 1, I showed both the model that inspired me to this project (made by Todd Osterberg) and also a prototype photo of a Pullman 12-1 sleeper re-purposed by SP as a bunk car for maintenance-of-way (MOW) crews. This primarily was a task of repainting and lettering. To see that part of the project, you may visit this post: https://modelingthesp.blogspot.com/2023/11/small-project-sp-boarding-bunk-car.html .

I might add a definitional point: SP divided many of its MOW cars into Roadway cars, meaning cars that carried materials, equipment and supplies, and Boarding cars, meaning cars that were used by personnel, such as bunk, dining, foreman, engineering, and similar cars. There’s much more on this and related topics in the superb book by Ken Harrison (Southern Pacific Maintenance of Way Equipment, SPH&TS, 2022).

As I mentioned at the conclusion of Part 1, there still remained some modeling tasks. First among these was to add internal view blocks where the interior partitions were in the Pullman car, since one ought not to be able to see through the car in those areas. 

I built them my usual way, with 0.020-inch styrene about 1 inch tall inside the car, and 1/8-inch square styrene strip glued into the corners. I then painted the inside of these a dark gray, and the outside a pale gray, and glued them to the floor with canopy glue. The floor still needs to be painted black. Note also that I added four 1/2-inch steel nuts, painted black, for weight (about half an ounce each). Otherwise these cars are quite light.

Second, these cars often had the window shades pulled down by crews using the car, and left down — there was no porter to restore them. I used a pale tan paper for the shades, setting them at different heights in the various windows, and gluing them in place with canopy glue. This looks odd when you look at the window glazing alone. (The shades are, of course, on the inside of the glazing.)

But of course the roof + glazing part, when inserted into the car body, brings these shade representations into a correct-looking location in the car side

Next I weathered the car, including the roof. I used a brownish acrylic wash, primarily Raw Umber, with a little Neutral Gray to lighten it and give a faded look, and a deeper Burnt Umber in places.

I decided to body-mount the couplers on this car, though that can be limiting in some switching moves with an 80-foot car. The car will mostly reside on the “outfit track,” as SP would have called it, in my layout town of Ballard, along with other maintenance equipment. I also made sure that the trucks, painted boxcar red with the rest of the car at the repaint, were suitably grimy.

That completes the car. Thanks again to Todd Osterberg, for the inspiration for this small project, and to Jason Hill, for the excellent MOW decals. As an SP modeler, I have to say we’ve needed those decals for years, and I look forward to using them on other projects!

Tony Thompson

Tuesday, November 21, 2023

More amazing 3-D printing

 At this year’s meeting of the Southern Pacific Historical & Technical Society, I met again with Andrew “AJ” Chier, who has been creating some impressive 3-D printed HO models of a variety of SP prototypes. I wrote about this SPH&TS meeting in a recent blog post, which you can read here: https://modelingthesp.blogspot.com/2023/10/the-2023-sph-annual-meeting.html . And I showed some of AJ’s fine models in my write-up of the 2022 SPH&TS meeting (here’s a link: https://modelingthesp.blogspot.com/2022/09/sph-modesto-2022.html ).

At that 2022 meeting in Modesto, AJ showed a beautiful model of Pacific Motor Trucking (PMT) trailers on the original SP flat car arrangements, and I repeat below my photo of those models. They were entirely 3-D printed by AJ, and when I enthusiastically admired them, he offered to make me a set. But problems with his printer intervened, and I hadn’t heard from him in awhile.

Well, at the recent 2023 meeting in Bakersfield, AJ handed me a box with trailer and flat car models in it! What a delightful thing to receive! I show below two of the trailers, one still as-printed with all its supports, and on the left, the trailer that is revealed with the supports removed.

The body as you see it above is quite nice, but more impressive is what is underneath the trailer: a full frame, the spare tire, the landing gear, the springs and rigging on the rear wheels, and even the wheel chocks for use on the flat car.

Also in the box was AJ’s clever design for the flat car. Underneath the car is a pocket in which lead sheet or other weight material can be inserted. You can see the edges of this pocket in the upper part of the view below. The “cover plate” for the weight pocket, shown at the bottom of the photo, is the remainder of the underframe.

 When the two parts are assembled, covering the weight, it looks like the view below, naturally with some three-dimensionality of the brake gear being sacrificed.

But the real triumph of the 3-D printing process is the top of the flat car. The “stands” that SP used to support the front and back of each trailer are there, along with the rub rails on the sides and the bridge plates at each end, along with the cable binders that attached the trailers to the car.

Even simply placing the trailer model onto the flat car immediately shows what this model can be like. Of course it needs to be painted, and the tie-downs attached, as I will describe in forthcoming posts, but already you can see the potential. Thank you, AJ!

This is a wonderful gift from AJ Chier, and I am already working toward getting the models painted, the trailer tied down, and so on. But for now I think it’s a superb illustration of something I’ve been saying for some time: the 3-D printing we are seeing today is just the thin edge of the wedge, of what we will see in future years in the hobby. Even what we can dimly see today, looking into the future, is most inspiring.

Tony Thompson


Saturday, November 18, 2023

Route cards, Part 29: more on grading

This  post may be the last (at least for awhile) about the cards that prototype railroads attached to route card boards on freight cars. This post, like several previous ones, is about the cards used to record the result of an inspection of the car’s interior, and its suitability for various grades of cargo. 

Almost all of the cards I have been showing in the last ten or so posts in this series are from a striking collection belonging to Michael Litant. He personally removed many of them from freight cars in the 1965–1968 period (cars that had arrived at destination, so presumably removing the cards did not compromise car operation). I appreciate his generosity in sharing this collection.

The first example I want to show is from the Soo Line, both sides of a square card (4 inches on a side). It has no letter or number grades, just descriptions of appropriate cargoes. On the left is the filled-out portion, identifying ATSF 27860 as the car, apparently for grain. If I am reading the car identity right, it was a 40-foot stock car. Such a car, coopered inside with plywood, could accept bulk grain as a cargo. I believe the diagonal stamp is for Superior, Wisconsin.

Second is another example of a square, two-side grading card, this one from the Chicago Great Western. It is 5 inches square and appears not to be filled out. It’s especially interesting in that on the side with grades 1–4, door widths are also called out.

My third example is from my own collection of cards like this, included here because although it is a one-sided card, it does have four sections with different grades. It’s a Southern Pacific card, 5 inches square, stamped at Calexico, California, near the Mexican border, on January 6, 1956. The car was EJ&E 60890, which was a 40-foot steel box car, perhaps seeming like an odd choice for the cargo, plasterboard; but this car had 8-foot doors, making loading much easier. Note that plasterboard was a “special” commodity that had to be written in. Considerable plasterboard was produced in the Imperial Valley, which contains Calexico.

Next is an example of a single-sided card that looks like it’s a grading card for only one grade (B), from the Norfolk & Western. But as was pointed out to me by John Barry, it is more likely a route card. It was issued at Buffalo (perhaps for local switching), thus obviously after the 1964 acquisition by N&W of the Wabash and the Nickel Plate. It is 3 x 5 inches, and was made for UP 166458. This was a 50-foot double-door box car with cushion underframe.

I also want to show a small tag, just 2 x 2.5 inches, used by the DT&I to indicate that a car had been inspected, and that is was “OK,” meaning either that it was “OK to load” or simply that it had been inspected. Something was written at the top, but I can’t read it through the dirt acquired in its journey.

Last, many roads required car inspectors to record their evaluations, car by car, so that a record remained at the terminal where inspection was carried out. These were of course ephemeral records, but here is a blank one, from the New York Central, showing what this might look like. It’s 4 x 8.5 inches in size. When new, doubtless this was a lighter color, perhaps manila or white. (You can click on the image to enlarge the lettering.)

Again, as I keep saying, I find these cards interesting, both as a snapshot of how cars were managed, and a fascinating insight into individual roads’ choices in designing these non-standard cards and papers for identifying each loading grade or route for a car to follow. And I am still preparing some comments on how all this visual information could be used in modeling.

Tony Thompson

Wednesday, November 15, 2023

The 2023 Great Lakes Getaway

For a number of years, the Detroit-area prototype operating folks have held a fall event called the “Great Lakes Getaway” or GLG, usually in odd-numbered years. I’ve just returned from this year’s edition of the GLG. As always, there were excellent layouts and an equally excellent cast of visiting operators, many of them highly experienced and very competent. This is among the small number of operating weekends that I enjoy enough to want to return as often as I can.  

Our first layout (an “extra” outside the GLG schedule) was Andy Keeney’s Nashville Road, an amalgam of several mid-fifties railroads across Tennessee. It’s a very large layout, with some striking scenes and a number of areas still under development. We moved a lot of trains and really enjoyed the layout.

One thing I especially admired was the simple but quite effective backdrops. There is always that balance to be struck between “generic” and “specific.” You can see in the photo below the painting techniques, and how effective it is to include a few appropriately-sized photos of structures.

One of the great pleasures for me in this event was another visit to Bill Neale’s superb PRR layout, set in 1939 on the Panhandle Division west of Pittsburgh (I described it extensively in a post about ProRail in 2021, at: https://modelingthesp.blogspot.com/2021/11/attending-prorail-2021.html ). I had earlier shown a few scenes from the layout taken at the GLG in 2017, as you can see here: https://modelingthesp.blogspot.com/2017/12/layouts-at-great-lakes-getaway-part-2.html

This time around, I was yardmaster at Weirton Yard, where I’ve been assistant yardmaster but never yardmaster. With the able assistance of Travers Stavac as assistant, the job went smoothly. I’ve shown the yard in both those previous posts, so won’t show it again, but here’s a nice view of a westward train coming off the Panhandle Bridge across the Ohio River into Steubenville, Ohio.

The following day I had drawn Scott Kremer’s excellent Great Northern layout. The scenery here is really impressive, capturing the look of the Cascades in Washington state, with the GN climbing over them, from Wenatchee in the east, to Skykomish on the west. (I was yardmaster at Skykomish.) As I said to Scott as we were leaving, “Thanks for letting us spend a few hours in the Cascades.” One feature I liked was the ice deck at Wenatchee, large enough to show that it means business.

Scott has put a lot of effort into waybills for the layout, and he credits my own ideas for helping him get to his attractive system. Below are shown typical empty and loaded bills to show how they look. Both have “overlay” parts so they can convey what’s needed. Each has a letter code to help operators know where they are destined.

Another favorite layout is Doug Tagsold’s outstanding Colorado & Southern, effectively in 1:72 scale (using HO scale track to represent 3-foot gauge). As with Bill Neale’s layout, I’ve operated here before (see, for example, an earlier post about GLG: https://modelingthesp.blogspot.com/2017/11/layouts-at-great-lakes-getaway.html ) and looked forward to another visit. 

The layout is even bigger than before, a new sunroom added to the house making possible a new part of the basement. Here’s just one example of things Doug does really well, managing a street scene headed right into the backdrop. It’s in the layout’s Georgetown, Colorado. Click on the image to enlarge it, and you’ll see how well done it is. And note the actual Colorado mountain photograph used as a backdrop.

Finally, on Sunday we had another “extra” layout, John DePauw’s immense EJ&E, set in 1973, if I remember correctly. I was in charge of the (working!) hump at Kirk Yard in Gary, toward the east end of the EJ&E. As throughout the layout, photo backdrops have been used very effectively. Below is an overall view of this yard, with the hump in the distance.

Overall, a great set of layouts and thus a great five days of operation. A bit of a long haul, but very much worth it. Thanks to all the layout hosts for their efforts, and especially to Doug Tagsold, who managed the overall program. Another fine GLG in the books.

Tony Thompson

Sunday, November 12, 2023

Layout origins: Shumala

Some time back, I wrote a series of blog posts about the origins of my layout. I began with a summary of what had survived from the original layout in Pittsburgh, PA to be moved to California, much of it drawn from a cover story in Railroad Model Craftsman (RMC) magazine (June 1990). That brief account can be found at this link: https://modelingthesp.blogspot.com/2012/03/survival-from-my-old-layout.html

I then decided to show more about the origins of my major town of Ballard. There were several of these, beginning with some ancient history (see:  https://modelingthesp.blogspot.com/2022/06/more-on-layout-origins.html ) and following that up with some specifics about Ballard (you can see it here: https://modelingthesp.blogspot.com/2022/08/layout-origins-part-2.html ) . 

With that history out of the way, I went on to describe the process of rebuilding some major layout areas touching Ballard, after the move to California. There were several of these, and I won’t mention all the posts, but the beginning one might be of interest (it is located at this link: https://modelingthesp.blogspot.com/2022/12/layout-origins-part-3.html ). 

What I haven’t shown is the comparable origin story for what is now the town of Shumala. As it happens, that was the locale for my cover shot on the June 1990 RMC. At that time, instead of the imaginary SP branch that it is today, the railroad was the imaginary short line, Lompoc & Cuyama. The RMC designers even included the L&C emblem on the cover.

There in the distance you can see what looks like a tower. Indeed it is. It’s a modified Campbell kit for the prototype Santa Fe tower-plus-depot that they called Kiowa Junction. And at that time, this layout town was named Jalama, for a real place on the California coast (in fact, there is a California State Beach there — and a hamburger stand that I wanted to model). 

But when I decided the layout really ought to model the SP, this Santa Fe-prototype structure really had to go. I replaced it with a scratchbuilt depot, closely following the SP prototype plans for the Sylmar, California depot (for more, see: https://modelingthesp.blogspot.com/2012/09/a-new-depot-for-shumala.html ).

But this is after the area had been developed. I have very few photos of this town in the earliest days, but here is one. You can see at center left that trackwork is underway, toward what would become the engine terminal. Also at left, the corner of Coastal Citrus is just visible, an industry now relocated to Santa Rosalia. And the ice deck and ice house at photo center are just a couple of mock-ups. And in the upper right background, only two of today’s structures, the general store and the snack bar, are present.

A nice view onto the layout from just beyond the depot, a different version of which was in the RMC article, shows the features just discussed, but now the ice house and ice deck have been built. Coastal Citrus is still back there.

Another big difference: though I had built a Diamond Scale turntable in Pittsburgh and installed it, there was nothing else. I had long intended that an engine house or roundhouse would accompany the turntable. Finally in 2013 I began to build it, beginning stages shown below (for more, see: https://modelingthesp.blogspot.com/2013/12/a-roundhouse-for-shumala.html ).

These glimpses of what used to be at Jalama (as it then was) and at Shumala (as it is now named) are interesting to me, if for no other reason because they show how far parts of the layout have come. I will continue with additional looks into the past in future posts.

Tony Thompson

Thursday, November 9, 2023

Small project: an SP Boarding Bunk car

Among the interesting and, frankly, inspiring models I saw at the Southern Pacific Historical & Technical Society meet in Bakersfield at the end of October was a pair of ex-Pullman passenger cars, painted and lettered for service as maintenance-of-way bunk cars. (For more on that meeting, see my post at: https://modelingthesp.blogspot.com/2023/10/the-2023-sph-annual-meeting.html .) And for a connected series of posts on MOW modeling, see: https://modelingthesp.blogspot.com/2015/08/modeling-sp-mow-cars-part-4.html .

A little background. As the traveling public gravitated increasingly to room accommodations in sleeping cars, in place of open sections, the very numerous Pullman 12-1 cars (12 sections, 1 drawing room) began to be less needed. Many were converted to other floor plans having rooms (taking advantage of the highly modular design of Pullman heavyweights).

Many others, however, were converted to “tourist sleepers,” as they were known, cars intended for economy travel. The drawing-room toilet compartment was sealed off, and the rest of that room converted to a 13th section. Pullman then gave these cars numbers in place of their previous names.

In 1948, a number of railroads, including SP, purchased a lot of these cars for use as maintenance-of-way bunk cars, in SP’s case, 78 cars. (As MOW cars, these were numbered SPMW 4800–4877.) The majority of these 13-section cars had never been air-conditioned, and most SP cars remained that way. Over time, many were modified and cut up in a variety of ways, making them look less and less like the original Pullmans, but in 1953, my modeling year, most cars like this would still have looked quite original.

Below is an example, SPMW 4814, an L..L. Bonney photo (Arnold Menke collection) taken at Truckee in July 1963. It’s from the superb book by Ken Harrison (Southern Pacific Maintenance of Way Equipment, SPH&TS, 2022). Ken refers to these Pullmans as the “third generation” of SP equipment like this, as all the ancient passenger cars and modified box cars previously used were wearing out and had to be replaced. That helps explain the SP purchase of 78 cars like this. On this car, the car number is not centered, but on many cars it was located at car center.

As mentioned at the top of this post, a model in the display at Bakersfield inspired me to pursue this project; it was by Todd Osterberg. It’s simply a Rivarossi 12-1 Pullman model, repainted with the body entirely in boxcar red, and the roof aluminum (though rather dirty, as no doubt happened rapidly). Here is Todd’s model. Having lots of window shades pulled down disguises the lack of interior.

My own project began with a Rivarossi (AHM) Pullman from my stash, bought years ago when these were on sale. It happened to be a model decorated for C&O, as you see here.

I removed the roof (which was black), masked the window glazing, and gave it a coat of gray primer. I then did the same to the car body. This avoids having to strip the paint, and adequately conceals the original paint and lettering.

With that paint well dried, I painted the roof with Tamiya “Gloss Aluminum” (TS-17), and the body and trucks with Tamiya “Fine Surface Primer (Oxide Red).” This latter color is a little more red than conventional boxcar red, but SPMW cars often looked a little that way, so in my view it’s a good choice. Note below that I’ve removed the “Talgo” couplers from the trucks. I will body-mount the couplers on this car.

Next comes lettering. As is evident in the Bonney photo at the top of the post, lettering was extremely simple. We SP modelers of the transition era have long used (and often cursed) Microscale set 87-155, as it has little of the correct size or style that we can use for MW cars. But now Owl Mountain Models has several very useful and accurate sets of MW decals (see them at: https://owlmtmodels.square.site/shop/1200-series-ho-decal-sets/5?page=1&limit=60&sort_by=category_order&sort_order=asc ). 

The new Owl Mountain set include very nice, clear versions of the iconic SPMW “Danger” warnings, which were in English and Spanish by the time I model. (For completeness, I will supply the English text of these warnings: “As these cars are liable to be moved at any moment, all parties are warned against lounging or sleeping under or near them.”) You can see these warnings to the right of center on the model below, and in the prototype photo at the top of this post.

One nice modeling challenge that isn’t necessary is diaphragms, as these were removed for MOW service. But still to come, the interior needs to be dealt with, and  I need to weather the car, hopefully as nicely as Jason Hill’s model shown above. Those issues will be presented in a future post.

Tony Thompson

Monday, November 6, 2023

Route cards, Part 28: ice refrigeration

In roughly ten immediately previous posts in this series about route cards (or other cards typically affixed to the route card board on the side of a freight car), I have shown routing cards, directing a car to some destination; grading cards, reflecting an inspection of the car interior for suitability for various kinds of loads; and other cards, directing other car needs, such as cleaning out. But there are still more kinds of cards that might be seen. This post is about cards for ice refrigeration.  

Most of what I show today is again from Michael Litant’s collection. I greatly appreciate his generosity in loaning these to me and giving permission for me to post them in this blog.

I will begin with a real clear legend on a card directing service for a car with a particular need. It’s from the Santa Fe and is 3.5 inches square. No car identification is needed on a card like this.

Another card reflecting icing is this Pacific Fruit Express card identifying that the car is set up for half-stage icing. It is 4 x 6 inches in size. Essentially the same card, provided by Ralph Heiss, was shown in an earlier post on this topic (located here: http://modelingthesp.blogspot.com/2016/07/route-cards-part-12-more-examples.html ). Like the card above, it is likely that this card would have been placed on what was called the “commodity card board,” not on the route card board.

Some readers no doubt are mumbling to themselves, “what the heck is a commodity card board?” These are visible on steel reefers after about 1950, as I show for PFE Class R-40-26 below (PFE photo, courtesy CSRM ). The large, upper board to the left of the door is the placard board, the smaller one below it is the commodity card board. (These boards have sometimes been called “auxiliary placard boards.”) The route card board is just visible on the left bolster, below and to the left of the fan plate. You can click on the image to enlarge it.

I’ve described modeling these boards in an earlier blog post (you can see it at: http://modelingthesp.blogspot.com/2013/09/a-classic-ho-scale-car-kit-one-more-time.html ).

For another example of a card that might well be located on the commodity card board, below is another stage icing card, this one not identified as to issuing railroad or car owner. It is only 1 x 4 inches.

I should perhaps mention what “stage icing” or “half-stage icing” was. The ice grates at the bottom of the ice bunker supported the ice while allowing meltwater to drain. In a car equipped for half-stage icing, the grates could be moved upwards to rest on a support on the wall between the bunker and the car interior. Then the standard icing process, filling the bunker to the top, used less ice.

For more on stage icing, use of salt, and other operational matters, see the PFE book (Pacific Fruit Express, 2nd edition, Signature Press, 2000), particularly Chapters 8, 14 and 15.

Another consequence of conventional ice refrigeration was that in cold weather, heating was needed instead of cooling. This was accomplished by placing heaters in the ice bunkers, originally charcoal burning, later kerosene or propane. But combustion in a sealed enclosure like a reefer meant that carbon monoxide would be generated. Thus placards like this were placed on placard boards, and sometimes also on ice hatch covers. It’s 7 x 9 inches in size.

Finally, an interesting card directing the addition of salt to a reefer (REX 7499, a 54-foot express reefer); it calls for 3% salt. This is a Railway Express Agency card, interesting in itself. It is 4 x 6 inches, and was issued at Yakima, Washington on June 17, 1966. The cargo is identified as cherries, consistent with that date. I like the seemingly redundant instruction, “If no salt is to be used, do not attach salt card.”

All these cards reflect what was called “protective services” in the tariff books, both icing arrangements and additions of salt. Since I’m something of a reefer enthusiast myself, these are especially interesting to me, and I am contemplating how and when to model some of these for operations on my layout.

Tony Thompson

Friday, November 3, 2023

The new SP Berkshire locomotive models

As I’m sure was the case for many Southern Pacific modelers, the recent announcement by Broadway Limited Imports (BLI) of new HO scale locomotive models of the Boston & Maine Berkshires was of interest. These engines ran for almost 20 years on the B&M, their original purchaser, but in the summer of 1945, both SP and Santa Fe each bought ten of these locomotives from the B&M.  

Why did the two roads make these purchases? The War Department had warned both railroads that with the concluding of the war in Europe, there would be heavy traffic across the U.S., transferring men, supplies and equipment from the European Theater to the Pacific, in preparation for what was expected to be a major campaign invading the home islands of Japan. Thus both railroads went out to acquire additional locomotives. That the atomic bomb would end World War II was, of course, not yet known.

The BLI announcement includes locomotives decorated for both SP and Santa Fe, two engine numbers for each railroad. Below I show the BLI artwork for the SP models. They included the smaller “Southern Pacific Lines” lettering on one engine because when the engines arrived on SP rails in August 1945, that was the official paint scheme. SP changed to the larger lettering and eliminated “Lines” in June 1946. 

Both tenders shown by BLI are the original B&M coal tenders, and indeed the SP locomotives were initially operated with those tenders, exclusively on the Rio Grande Division, SP’s only coal-fired division at that time. But in subsequent years, all ten engines were converted to oil fuel and migrated to California in the spring and summer of 1950. So my first thought was, could I use one of these distinctive locomotives on my layout?

Below I will describe some of the research I did to answer that question. In doing so, I don’t intend to praise or criticize the models themselves, and my goal is only to show the kind(s) of research that is possible with the sources we have. I certainly don’t wish to suggest what anyone else’s purchasing decision should be.

First, it’s worth remembering that these B&M Berkshires were part of the “Superpower” revolution at Lima Locomotive, brainchild of designer Will Woodard, and were capable of impressive horsepower in freight service. Built in 1928, perhaps the main criticism of them would be their retention of Lima’s articulated trailing truck design, something that found favor with few buyers of Lima power.

Second, let’s look at one of these Berkshires soon after SP arrival. (Allan Youell photo at El Paso, 1947, courtesy Guy Dunscomb). Here the very distinctive Coffin feedwater heater on the boiler front stands out (standard SP practice was to paint the entire boiler front aluminum, which is obvious here). The locomotive also still has its B&M trailing truck booster, alligator crosshead, and Baker valve gear. SP had applied train indicators, which BLI has included on the SP models, and blowdown spreaders, which I don’t see in the BLI artwork.

All ten engines remained pretty much like this on the Rio Grande Division from their arrival in August 1945 until the fall of 1949, when they began to be converted to oil fuel and of course given oil tenders. Exact dates and locations of these changes can be found in the Steam Locomotive Compendium (Timothy Diebert and Joe Strapac, Shade Tree Books, 1987).

So the first conclusion about using one of the BLI models is that until the fall of 1949, they ran only on the Rio Grande Division on account of being coal fired. It wasn’t merely unlikely that they would be seen elsewhere on the SP in that period, it was effectively impossible.

So how did these engines look when they had oil tenders? Below I show SP 3500, in a G.M. Best photo at Los Angeles in late 1949. The engine had its oil conversion at El Paso in September, and here it is in California, looking freshly painted. SP preferred multiple-bearing crossheads and Walschaerts valve gear, and any engine not already so equipped was modified. Those two big cylindrical things on the pilot beam are shields over the air pumps. And notice the dry pipe along the top of the boiler, from the superheater in the smokebox to the turret. Booster has been removed.

The tender tank, the upper part of the tender body, is from a retired 4000-series articulated, but it was placed on the original B&M tender frame, and the B&M trucks retained. The reason was to preserve the original arrangement of the drawbar between the engine’s articulated trailing truck, and the tender. For more on this, see Southern Pacific Steam Pictorial, Volume II (Guy L. Dunscomb, Donald K. Dunscomb, and Robert A. Pecotich, Dunscomb Publishing, 1999).

At this point, a second conclusion about the BLI models is that if you want to operate them on a California layout, they need to have oil tenders. It would be an interesting and not impossibly difficult project to built a semi-cylindrical or “whaleback” tender body and put it on the frame and trucks of the BLI models. But this would be getting far beyond an out-of-the-box model, and replacing crossheads and valve gear for the low-numbered engines offered by BLI, even more so.

Apparently records aren’t clear about which engines lost their boosters and when, but at least three did (boosters were out of favor at SP by this time, and many SP locomotives that had been built with boosters lost them in late steam days). Eventually all the engines also lost the prominent Coffin feedwater heaters, which very dramatically changed their appearance (Santa Fe also replaced those heaters.) Below is shown SP 3504, photographed by Guy Dunscomb at Modesto, California in April 1950.

Where did these engines operate after they came to California in 1950? I happen to have an SP Locomotives Assigned pamphlet for March 31, 1950. At that time, all ten of the Berkshires remained in service, but only two were still on Rio Grande Division, SP 3506 and 3509. All the others had been assigned to the San Joaquin Division.

So a third point to be made is that the Berkshires were assigned to Jan Joaquin Division, and we know they remained there until they began to be scrapped. The strict meaning of this is that you would only want one of these engines if you model San Joaquin Division, but in fact engines did sometimes run through on other divisions, or have break-in runs after shopping on other than their home division, so one could stretch the geographic restriction to some extent. Since I model Coast Division, some rationale like that would have to be applied.

Lastly, as batch after batch of EMD F units continued to arrive on SP in 1950 and beyond, more and more steam freight power became surplus, especially “oddballs” like the Berkshires. All the Berkshires were vacated from the roster between the late fall of 1950 and mid-summer 1951 (individual dates are in Diebert & Strapac).

Thus my fourth and final point is that these distinctive locomotives were gone from the SP by August 1951. I model 1953, so it would require more than a small time warp for me to operate a BLI Berkshire. I’m still kind of tempted, but I would certainly have to face up to removing the Coffin feedwater heater and buying or building a tender, not trivial projects. 

But as I already remarked, I am not trying to tell anyone else what to think about these models. Particularly those with the “collector” itch  (something I suffer from myself) may find these hard to resist. 

Tony Thompson