The subject of this post is pretty broad, and I don’t want to address every ramification of it. I just want to comment about a couple of aspects. I would start by saying that what I see among modelers I’ve known, as well as my own orientation, is a strong collecting instinct, regardless of the degree of interest in model operation. This isn’t meant as a criticism, just a description.
The collecting part, I believe, is that wish to have, for example, a model of each wheel arrangement of your favorite railroad’s steam power in the era you model. Those locomotives may not have all operated in the place or region you are modeling, and some might have been quite rare, but your collecting side would be happy to have at least one of each. The operator side of you wants a group of locomotives that is representative of the time and place you model, and is suited to whether you emphasize freight or passenger trains, whether or not such a group would be a good collection in any other sense.
I have a friend who has assembled passenger trains of quite different eras so that they can operate over his 1950s layout, just because he finds all of them interesting, and wants to have those trains in his collection. He doesn’t attempt to operate other aspects of any of those “other” eras, but simply runs the various passenger trains over the layout when the impulse strikes. That’s the collecting instinct.
In my own case, I often find myself thinking about freight cars from a collecting perspective rather than operations. I may wish to acquire a particular “signature” freight car of a railroad, whether or not it is likely to have been seen in my California layout’s time and place. Or I may wish to have one of each of three large box car classes of some railroad, just to have one of each. That’s my collecting side, and I certainly don’t feel there’s anything wrong with it.
I balance the collecting side, however, with an effort to think about operating needs. That’s where actual train data, for example from conductor time books, comes into play, and where ideas like Tim Gilbert and Dave Nelson’s hypothesis about distribution of free-running cars become important. So on this side of the fence, so to speak, I might forego that “signature” box car in favor of a more mundane but much more numerous box car owned by the same railroad.
I certainly don’t mean to suggest that either one of these two instincts is somehow wrong, only that I personally try to maintain a balance between them. Collecting is fun, and the research to know what a “good” collection would include is fun too. But I’m still striving toward the goal of fun operation, which for me has to mean realistic operations, and thus a realistic fleet of locomotives and freight cars.
I became aware once again of the tension between collecting and operation recently when analyzing my freight car fleet on a railroad-by-railroad basis. I realized that in a number of cases, the freight cars I had, or wanted to have, were definitely in part the realization of a collection for each railroad. Again, it’s not that such a situation is bad, only that I want to separate clearly in my mind which instinct is coming to the fore when I decide whether to retain (or to acquire) some particular car.
Of course, as is true of any hobby, the goal is to have fun, however one does it, and I am unquestionably having fun. I just want the fun to remain balanced between collecting and operating.
Tony Thompson
Saturday, August 27, 2011
Thursday, August 25, 2011
San Luis Obispo operations-4
In this post, I will offer another section of my interview with Malcolm “Mac” Gaddis. He worked at San Luis Obispo in the early 1950s and had many recollections of how things were done. I taped my 1992 interview with him, and have transcribed the entire recording.
“Now Jimmy Jordan, he was Superintendent on the Coast for many years, he liked to go up and down the division on his business car, you know, see how work was being done. He often came down from the Bay Area with his car on 72. Then he would stay overnight, usually with the car up there by the freight house.
“One of the interesting things I did, Jimmy’s car might be set different places, but he never wanted to be down by the roundhouse, it was too noisy. We had a steam pipe that went up there to the freight house to supply his car, but we usually didn’t have enough pressure in it. He wanted his car kept quite warm, especially in the wintertime or if it was good and foggy in the summer, so I remember putting a 4300 up there for him. It worked out fine, we had the extra engine available, and with a spot fire in it, it was fine for heating the Old Man’s car.
“One time we had an incident with Jimmy right there. That was when the E units were new. They often came up on 75, the Lark, and went back on 76, and they would pull them off 75 and hold them up near the depot, on the storage track up by the freight house. The track had derails at both ends, that we would just never set, you know, we never used the derails except when Jimmy Jordan was around. Well, that time when Jimmy was in there, the E units came off 75 and a steam engine took the Lark north. They shoved the units in there and lined the derails. Then 76 comes in and the other crew, going to move the E units out onto the main to get out of there, they forgot all about the derails because normally nobody ever used them. Of course the engines went right on the ground.
“They had to put a 4-8-4 on 76 to go south, and they left the rerailing exercise till morning. I got a few photos of that. Yeah, Jimmy raised hell about the whole thing, his car was right there, and he knew all about it. I’m glad I wasn’t the one who had to explain why nobody checked for open derails. But I’m sure Jimmy knew exactly what the situation was.
[Mac’s photos of rerailing the E units are in the book by Thompson and Signor, Coast Line Pictorial (Signature Press, 2000), pages 154 and 155, along with an edited version of this story.]
“The conductor always had the same caboose, you know, assigned. They would sleep in there on runs like the King City turn. Some of them had special beds, shelves, all kinds of things fixed up in there for their own use, however they wanted it. We had this one guy, Luster, I think his name was, and his brakeman was Lee Pilot, called “Starchy” because of his starched overalls. He had linoleum in there, a beautiful caboose, 1256, I think it was, and Starchy’s job was to swab it out before and after every run. Luster was always elegantly dressed, parked his Cadillac at the end of the depot. Luster was really the crabbiest old guy I ever worked with. I don’t remember his first name, but he was called “Turdhead,” which tells you something.
“I recall Starchy came to me to complain that his trucks were running rough. He did that about three times. So finally I called Rogani, the master car repairer at Bayshore, and had the caboose shipped up there. They changed out the trucks and the draft gear and sent it back. Starchy had it about a month, and I asked him if it was okay. He says, ‘Aw, they didn’t do anything for it.’ I said, ‘Well, they put rubber draft gear in it, and they put those new trucks in it.’ But he wasn’t happy at all.
“Next thing I know, he files an accident report, claims he hurt his back with the rough ride. So I had to fill out all this paperwork, then I had to report to Robinson, the assistant super, and I was in all kinds of trouble since I hadn’t taken care of this caboose. When he filed a second accident report, I sent the caboose back to Bayshore. The caboose came back again, and I called Starchy on the phone. ‘Oh, it’s great,’ he says, ‘they finally fixed it,’ but he wouldn’t be more specific.
“I was curious, so I took my keys and went to look at the caboose. They all had private locks on the cars, but I had to have a set of keys. I was in there looking, and Starchy happened by. ‘Starchy,’ I said, ‘just what did they finally fix on this caboose?’ ‘Well,’ he says, ‘they painted it. I wanted it painted.’ ‘Why didn’t you just tell me that? You’ve filed accident reports, gotten me into trouble, and you could have just told me you wanted paint.’ ‘Well,’ he says, ‘I thought if I got it sent to Bayshore, they would just paint it. And they finally did.’
“I remember this guy Hinterman, one of the grouchiest old engineeers I ever knew. Sometimes he wouldn’t even speak to his fireman. One time I had to go down to Santa Barbara, because there was a problem with Jimmy Jordan’s car. He had gotten air conditioning put on it, and he couldn’t stand the noise. It had a Waukesha ice machine and a Waukesha engine generator, so this Jack Pauley, his clerk down there, told me Jimmy finally said, ‘Just turn the goddam thing off.’ So he turns it all off, leaving the fan running. By morning, everything was completely dead. I came down on 98 and brought a set of jumper cables and my electrical tools. Jordan’s old lady had gotten a table and chairs off the car and was sitting in the shade of that big fig tree there at the depot.
“Jordan was so damn mad, with his old lady over there in the shade. He didn’t usually have her along, but this time he did. I had to get the diesel switch engine over there, since it had a battery I could jumper with, and then I sealed it all up so he couldn’t turn it off, and got everything going good. His wife was so delighted. She wanted to know what I wanted, this was about 4:30 or so. I got a really big steak, and I was in there eating it, when he came in. He basically liked me, but he had been saving this steak, so he was fairly mad. He didn’t have much to say.
“I went down to the depot to see what I could catch coming back, and it looked like I could get 95. So Hinterman comes in and says ‘What are you doing here?’ I said, ‘I was down to fix the Old Man’s car, and I’m going back on 95.’ He says, ‘I’m going back light with a 2-10-2 in about twenty minutes. Come back with me and you won’t have to wait.’ I asked who his fireman was, and he really didn’t answer, but I went along to the roundhouse with him. The engine had a spot fire in it, and I didn’t see the fireman around anywhere, so I got up in the engine with him and got the atomizer going and put some fuel in it, and we backed out and I put the water in it myself.
“Then we picked up the fireman, and he got up in the cab, looked at us and never said a word. I had about 200 pounds of steam in it and water about where it belonged, and I said, ‘Here, this is your seat.’ ‘Naw,’ he says, ‘you’re doing fine.’ So he sits on that little rear seat, for the brakeman, you know, and as we went along, I’d show him what I was doing and he’d nod at me. Finally, I guess we were all the way to the top of Shuman hill, and he was paying a little more attention, so I got him to sit on the seat, and showed him where I had everything set. Meanwhile, Hinterman sat over there and never said a word. When we got going down the hill, I explained to him to be sure and keep the water up. He got it pretty full and going down the hill, Hinterman really opened up and it was just like a percolator, there was water everywhere. By the time we took the siding at Guadalupe, the whole engine was soaking wet, and Hinterman was cussing us both.
“I turned to this guy, and said, ‘I guess we’ve never met.’ The fireman says,
‘Yeah, I’m new. I’m off the Florida East Coast.’ It was all diesel, you know. I asked, ‘What? How did you draw a steam engine?’ ‘Beats me,’ the guy says, ‘I never fired one in my life.’
There are a few more segments of the interview which I’ll post later.
Tony Thompson
Monday, August 22, 2011
Modeling SP tank cars-update
In May of this year, I posted a description of how I model SP tank cars in HO scale from the Athearn models. Here’s a link to that earlier post: http://modelingthesp.blogspot.com/2011/05/modeling-sp-tank-cars.html.
I have since been asked about Athearn parts and availability of them. (I assume from those who don’t want to buy an assembled car at a swap meet, or one of Athearn’s contemporary ready-to-run cars, as sacrifice bodies to obtain dome tops.) I can offer the following information: first, Athearn parts for the tank car are entirely available and should continue to be, into the foreseeable future. Second, here are some part numbers and prices:
Three-dome tank car body, part 14990, 1 piece, $4.98
Manways for tank car domes, part 15511, 6 pieces, $3.98
Placard boards for tank cars, part 15506, 12 pieces, $3.98
All other parts of an Athearn tank car kit, whether three-dome or single-dome, are also available at comparable prices. The three-dome body, of course, is your source for dome tops to extend the height of the single-dome model to its correct size.
Athearn recommends that you buy these through your local hobby shop if possible. But if need be, you can order them direct from Athearn, and a $10 shipping and handling fee will be imposed regardless of order size (for domestic U.S. shipments). Shipments outside the U.S. will be priced at actual shipping cost. You can order by mail, e-mail (to parts@athearn.com) or phone to (310) 763-7140, extension 122. More on their parts list can be found on their web site: http://www.athearn.com/Products/Parts/Default.aspx .
A second question I’ve been asked is to show a better photo of my models of the “aluminum end stripe” fuel scheme, and the “liquid sugar” scheme. Here is a possible improvement on the photos previously provided, showing a better view of the end lettering on the aluminum end stripe. The sugar service car really has little of note as far as lettering, and is visible pretty well in this view. Click on it to enlarge.

That said, I expect to show fairly soon some photos of the Archer rivet versions I’m now working on, including Class O-50-9, which had the elbow safety valves on the dome side. The new detail part for this use, long needed in HO scale, is from Jason Hill. I have only a sample, but expect that the part will become commercially available in the near future. Jason expects his concern will be called Owl Mountain Models.
Tony Thompson
Thursday, August 18, 2011
Small modeling project: PFE R-30-16 reefer
Some years back, Terry Wegmann did the die work for parts to convert the Red Caboose model of a PFE R-30-9 car into the R-30-16 class. Briefly, the prototype -16 rebuild was characterized by a solid-steel (straight-panel) roof instead of the outside metal roof correctly modeled on the original kit of the R-30-9. Terry’s conversion kit included the new roof and all roof hardware, a set of correctly shaped cross-bearers for the underframe of the rebuilds, and a piece of styrene to fill the gap above the car ends and below the roof molding. Otherwise, the kit was to be assembled stock.
There were 3554 cars rebuild to R-30-16 standards during 1940-42, which means I need at least two and probably three of these. I do have a few of Terry’s kits, so decided to build one to see what techniques might be involved.
The first thing the modeler is advised to do is to cut down the interior end sheets on the Red Caboose car body, in order to clear the new roof molding. It doesn’t have to be lowered very far, and this could probably be done by a little filing. I chose to use a razor saw to make cuts about 1/8-inch deep along each side, then I scribed across the width, and snapped off the top section. Here is a photo of an original body on the left, and a cut-down interior end sheet on the right, with the removed slice balanced on my finger. I removed more than is really needed, but there is no harm done by this.

This is a very easy and quick job, and took me considerably longer to type the description than to do it.
Next I assembled the underframe with the new cross-bearers. The photo below shows it mostly complete, and the characteristic diagonal end profile of the new parts is evident. All parts visible here are stock kit parts except the cross-bearers.

As can be seen, I used the K brakes provided, which PFE also did in the first 1200 cars rebuilt. The remainder of the class was rebuilt with new AB brakes. In the late 1940s and early 1950s, replacement of the K brakes with AB brakes continued on all PFE car classes, but a fair number of the rebuild cars still had K brakes as the AAR deadline for their replacement approached.
At this point, the directions recommend assembling the rest of the kit according to kit directions, so I did so. This is one of those pleasurable kits to assemble, in that all parts fit and drop into place as they should. I did take the precaution of drilling out mounting holes for most parts with a #75 drill, but I’m not sure that was necessary.
After assembling ends and underframe to the body, I installed Kadee #58 couplers and the kit trucks (I used Reboxx wheelsets in the Red Caboose T-section trucks). The screw hole in the bolster is not a clearance hole for the screws provided. I cleared the truck bolster holes with a #40 drill, and then the trucks could rotate freely. I’ve never been an enthusiast of the “equalized” Red Caboose trucks, because I’ve sometimes found that the “equalization” of these trucks can get sticky, and when that happens, I just replace the trucks.
Next, I added weights inside the car before attaching the roof. I like to use large steel nuts as weights because they are compact and inexpensive. For this car they are 5/8-inch nuts, which weigh one ounce each, and are attached with airplane canopy cement (I use Wilhold R/C-56, now out of production, but Zap, Pacer and others make the equivalent adhesive). The glue dries clear, so is not visible on the car floor.

After this photo was taken, I painted the inside of the car sides with black acrylic paint. The translucent orange styrene sides can take on an odd appearance in some lighting if the back of them is not painted a dark color. (An alternative is to paint the body exterior Daylight Orange before beginning any assembly.)
Next comes the roof. The Wegmann steel roof has a very thin section over the ends, to permit a filler strip to fit between the top of the kit end and the bottom of the roof. The Wegmann conversion kit provides for this purpose a strip of 0.040 x 0.080-inch styrene. On my car, this is about right at the A end, but is a little too thick at the B end. Some light filing of the top of both kit ends made everything drop into place. As it says in the Wegmann directions, “cut and fit” the styrene. Here’s how mine looked.

After attaching the roof to the car body, I added the roof parts to the roof. I prefer to add these kinds of details to a firmly-fixed surface, rather than detail the roof before attaching it to the car.
There are a variety of decals available which can letter this car. I used a Champ set (“Super Set” SHS-190) which was included in one of my Wegmann conversion kits. I also used the railroad medallions from Microscale set 87-414 (as revised in 1995; this set is to be re-issued one of these days with even more complete data and somewhat better detailed lettering and emblems). The Champ set does have the 7-inch end lettering used for a time by PFE. Here’s the car at this point:

This photo shows the model with decals applied but side ladders and grab irons are not yet added (so model can be set on its side for decal application), nor are hinges and door hardware painted black yet. Once those jobs are done, the car will be weathered and receive fresh reweigh and repack data.
Here’s a photo of a prototype R-30-16 car, a print that came to me via PFE on the way to CSRM (taken at UP’s Albina Yard in Portland, 1948). Note the appearance of the roof edge on both sides and ends, faithfully captured in the Wegmann roof design (you may have to click to enlarge the image to see that detail). The 7-inch end lettering is also obvious.

The car pictured, PFE 74781, was rebuilt with AB brakes. My car number is chosen to fall into the first 1200 cars of the class, which had K brakes when rebuilt.
With all these techniques and approaches worked out, my next job is to build two more of these cars to fill out my fleet of PFE Class R-30-16.
Tony Thompson
Wednesday, August 17, 2011
San Luis Obispo operations-3
In this post I’d like to present another segment of my interview with Malcolm (Mac) Gaddis, who was electrical supervisor at San Luis Obispo in the early 1950s. Here he adds some anecdotes about a slightly later period in addition to some San Luis stories. Previous posts with parts of this interview were Part 2 of this thread, at http://modelingthesp.blogspot.com/2011/06/san-luis-obispo-operations-2.html, and in Part 1 of the thread, at http://modelingthesp.blogspot.com/2011/05/san-luis-obispo-operations.html. The first segment I posted was in the thread on “Modeling freight traffic: Coast Line 1953,” which can be viewed at: http://modelingthesp.blogspot.com/2011/01/modeling-freight-traffic-coast-line_19.html.
Here are Mac’s comments.
“After I left San Luis Obispo, I was a test engineer for awhile, mostly working on the dynamometer car, then I went from that to being traveling locomotive supervisor. On that job, I covered the entire system. One of the early things I did on the dynamometer, I had made several Ogden trips in it, and it had a Krumbeller heater in it, which circulated heated salt brine around the car. But it was terrible. We could be burning up at one end, and at the forward end, where the recording table was, you could have two inches of ice on the floor. We got tired of that, and you had to stoke that thing, as well as a great big cast iron stove to heat water for the shower. You needed a shower regularly, it was filthy dirty there, as you were right behind the locomotive and collected all the exhaust and plenty of dust from the roadbed.
“Anyway, we got the car into the Los Angeles General Shops in 1957 or ’58, and I got rid of the Krumbeller heater and the big cast iron stove both. I got one of those little mobile home stoves put in it, and a 30-gallon water heater which I bought myself, and then we had the icebox changed around so we could put dry ice in it. I got a pot-bellied caboose stove put up in the front end, which was the only thing I could get at the time, and I got the car painted two-tone gray at that time, it had been dark green, you know.
“The only trouble was, we had a fellow named Ben Hinchman who was Superintendent in Los Angeles. I knew him remotely, I had been a supervisor
for him years before, so he knew who I was. We’d been in there a week or so, the car was about finished, and he came by to see what I’d done to the car. Well, I showed him I’d had it painted, had these four propane tanks added, which I’d gotten from the general car foreman as surplus, I’d paid for the water heater myself, and I don’t remember how we got the little stove but it wasn’t charged to the car bill. So really all that was done was painting and cleanup and a few repairs.
“He said, ‘That’s impossible. There’s forty thousand dollars of work charged to this car.’ And I thought, something is really phony here. I had to figure out who was coming out on the long end if I’m on the short end, because I would have to answer for this charge. I found this Bill Kershaw, who I’d known for years, and he was overhauling the business car Los Angeles, and he’d overspent his budget by just about forty thousand dollars. He happened to see No. 137 [the dynamometer car] come into the shop, and he got his excess charged to me. As far as I know, that charge never got off of there.
“That kind of thing was fairly common on the railroad. At the San Luis
roundhouse, there was always some locomotive in the house, stored unserviceable, like the 1629, and they’d sit there dead for six months, you know. Then perishable season would come around, then they’d move them out. But meanwhile, roundhouse employees had to charge time to engine numbers, and the 1629 was right there by the time clock, so we finally moved those engines outside and made sure we rotated engines through those stalls by the time cards.
“In the yard at San Luis, there was a south-end job, and a north-end yard job, and they would usually use the Consolidations for those jobs. We also had a Twelve-wheeler, 2918. I remember being up at Bayshore when 2918 was on the scrap line. It had a nice big number plate up front, and I went over to the store department foreman and asked how I could obtain it. He said, ‘Well, if it’s scrap, help yourself,’ and I think he even loaned me a wrench. I’ve still got the number plate in my garage. What floored me was three months later, into town comes the 2918, and for front numbers they used some mail box numbers. It bothered me, but not enough to put the plate back on.
“About 1954 or ’55, we got some strange engines in from Arizona, 3300s I think, then we had an Alco diesel switcher, then some more steam engines. We even had a GE 70-ton engine, I think it had come from Tucson, but it didn’t do very well on that grade in the San Luis yard. When I first went there, we always had a full painted Daylight engine, either to change out or to help 99, but that changed and we mostly had black ones. When we had the Alco RSD-5 engines, they were too slow for the hill, but I remember them trying to help the 4400s up the hill. There was probably about one mile where they actually helped instead of the 4400 pulling them.
“Normally engines were changed on all trains, but there was water for both directions at the depot, and water and oil on the main line down by the roundhouse. Engines could have run through, but usually changed. The oil was always good and hot down by the roundhouse where the steam lines were close to the boiler.
“When they started putting Baldwin diesels on for local service, we had a lot of trouble. You would think the diesel with two trucks would be much less rigid than an 8-driver Mike, but those Baldwins, with those six-wheel trucks, they were turning over rails practically every day. We had all kinds of problems with them, especially on those old sidings. I guess they probably tried the RSD-5 engines on that duty too, but they weren’t around too long. Pretty soon we got SD9s instead.
“A few years later, I was over at Bakersfield, where they used those same Alcos on Tehachapi. While I was there, they got in a whole new batch of Alcos. I saw Carl Meyer there, and was complaining to him about the 7000s I had gotten, 6-motor Alcos with a 251 engine [rebuilt RSD-5s into an RSD-12 carbody], greatly improved over those RSDs, 5300s we called the RSD-5s, which had the old 244 engine. Meyer says, ‘You’re lucky.’ I asked why, and he says, ‘All the time I had the 5300s, they were so bad, they wouldn’t accept them for trade-in, so I had to keep running them.’ They were actually reasonably successful on Tehachapi, but the engineers didn’t like them. They were a little rigid, and they rode rough, which is what the engineers really disliked. Then they would make up stories that the engines couldn’t keep up. Finally they sent all those RSD-5s that weren’t rebuilt to Texas.”
There is more to the interview, and I’ll post additional segments as time permits.
Tony Thompson
Sunday, August 14, 2011
Modeling freight traffic: Coast Line, 1953-Part 11
I have recently reviewed photos in my collection which have a bearing on the freight traffic I should model on the Coast Line in 1953. In addition, I’ve looked through two recent books which contain good photos of the central part of the Coast Line (near San Luis Obispo). The books are Dallas Gilbertson’s California Rails 1950s (Four Ways West, 2008) and Rod Crossley’s Chasing the SP in California, 1953-1956 (SP Historical & Technical Society, 2011).
Both books contain a number of interesting views. Pages 37 to 50 of Gilbertson’s book include photos of local trains south of San Luis Obispo. He does not seem to make the distinction Mac Gaddis always emphasized to me, that SP terminology called the trains operating to midway between division points “turns,” and trains operating over shorter territory were “locals.” Thus south of San Luis, there was a Surf turn and a Guadalupe local (in the early 1950s, two Guadalope locals operated each day in summer and fall).
Here is one of Gilbertson’s photos, one which I obtained from Dallas as a copy slide while he was still alive. It shows the Guadalupe local returning to San Luis Obispo with ten reefers in tow. The location is Callender and the date is May 1954. (The same image is on page 44 of his book.)

In his book caption, Gilbertson stated that these were empty cars, which I suppose he believed because hatches are open, but it was emphasized to me in no uncertain terms by PFE people I interviewed that PFE cars were not operated with hatches open unless they were in vent (ventilation) service. I would therefore think it much more likely that these are loaded cars, perhaps from Guadalupe packing sheds or picked up in interchange from the Santa Maria Valley at Guadalupe.
Gilbertson also states in the caption that this is the Surf train, and perhaps it was, though in normal operation the Surf turn would only have picked up and set out cars beyond Guadalupe, leaving Guadalupe and westward switching for the Guadalupe local (or locals).
The ten refrigerator cars seen here comprise eight PFE cars and two ART cars (third and ninth from the head end). I discussed the impressive proportion of ART cars on the Coast Line in a previous post (at: http://modelingthesp.blogspot.com/2011/02/modeling-freight-traffic-coast-line.html). Note also in this photo how varied is the degree of weathering on these cars. This is a common theme in photos of transition-era reefers, as I illustrated with additional photos in an earlier post (see: http://modelingthesp.blogspot.com/2011/03/modeling-pfe-reefers-in-1953-2.html).
Here is another example of a local near Guadalupe, a detail of one of Richard Steinheimer’s fine photos at the DeGolyer Library. (It was included in Signor’s and my book, Coast Line Pictorial). It’s from a later time, February 1956, so steam has been superseded by a Baldwin road switcher, The consist happens to be ten cars, just like the Gilbertson photo above, and nine of them are reefers: one FGEX car at the front of the string, followed by a BREX car, while the third car ahead of the caboose (barely visible at the edge of the image) is an ART car. The other six reefers are PFE. At the head end, of course, is a battered GS gondola. Since so many photos of these locals show trains as short or shorter than the ones in these two photos, I can safely model them that way--a good thing since I don’t have layout space for long trains!

Rod Crossley’s book contains more photos than Gilbertson’s, particularly at San Luis Obispo, and is an essential resource for anyone interested in that area at that time. The photos are black and white, in contrast to Gilbertson’s all-color book, but the information in them is invaluable. He documents the steam power assigned at San Luis as well as anyone could, and provides numerous views of the King City and Surf turns, as well as the Guadalupe local. His photos of the locals, however, are scattered through the book, so some diligence is required to find them all.
These two books not only provide modeling information, but for me are also a great source of sheer inspiration. These are wonderful photos of the place and time I’m trying to model, and I never get tired of paging through these collections of images.
Tony Thompson
Friday, August 12, 2011
Choosing a model car fleet-SP automobile cars
In a prior post, available at http://modelingthesp.blogspot.com/2011/02/choosing-model-car-fleet-4-automobile.html, I discussed my overall layout fleet of automobile cars (defined by the AAR until 1954 as house cars essentially like box cars but with double doors). In this post I discuss the SP part of my auto car fleet.
As with prior evaluations of fleet size, I proportion my SP automobile cars at one model per 1000 cars in the prototype fleet. The simplified table below provides the size of car classes in order to indicate model fleet needs. Details of built dates, service, and car specialties are available in my book which describes these cars, Southern Pacific Freight Cars, Volume 3: Automobile Cars and Flat Cars (Signature Press, 2004). I have omitted classes which by 1953 were well below 1000 cars, with exceptions as noted.

Classes A-50-17 and -18 were built after 1950, so the “1950 cars” column simply contains the total number of cars built. Many classes prior to the 1936-37-built Class A-50-12 were well under 500 cars, and whenever T&NO received part of a class of auto cars, it was an even smaller number; after 1925, no more auto cars were built for T&NO. Thus I don’t intend to model any T&NO automobile cars.
The numbers of cars needed are small throughout and in most cases are in excess of a strict 1:1000 ratio. I already have too many of some earlier classes and will be thinning that part of the fleet in favor of the better models.
The big challenge is the postwar 50-foot cars, classes A-50-15, -17 and -18, which cannot be readily modeled at present because of SP’s continued use of the 4+6 side-sheet pattern (typical of prewar cars) into the postwar construction. Available models with postwar characteristics such as Improved Dreadnaught ends and diagonal-panel roofs do not have the correct pattern of panels. It may be possible to revise the panel pattern using Archer rivets, as I described for the 50-foot box car class B-50-30 (see http://modelingthesp.blogspot.com/2011/08/choosing-model-car-fleet-sp-50-ft-box.html), and if so I will attempt the same for the large postwar automobile classes.
My best models from among these classes which are in service at the moment are probably the Proto 2000 models which represent SP’s Class A-50-14. I do have two of them and will keep them in service. This car is entirely stock except for some light weathering.

Photos of two other classes were shown in my overall discussion of automobile car needs, at http://modelingthesp.blogspot.com/2011/02/choosing-model-car-fleet-4-automobile.html.
I mentioned that the “needs” listed in the table above are somewhat in excess of the usual proportion. My reason for so listing the auto car models beyond a strict proportion of the SP fleet is that there was traffic on the Coast Line in both assembled automobiles and auto parts, and these cars will be used to represent that traffic.
Tony Thompson
Thursday, August 11, 2011
Waybills, Part 11
I mentioned in the two previous posts (named “Waybills-9” and “Waybills-10”) that I have been working on upgrading waybill design for Otis McGee’s layout. This project has a requirement that the final product will fit in his existing waybill filing slots, which are cut into the layout fascia and thus not terribly flexible as to changing sizes of paperwork.
The problems I alluded to in previous posts are not solved as yet, particularly how to handle free-running cars like box cars in a fashion which is both easy to manage and also prototypical. But here I want to report a couple of things which we have decided to do as “progress” items.
First, we will introduce some of the new waybill designs among the population of existing “mini-bills” as a transitional measure. Second, we will concentrate these bills on the car types and load types which lend themselves to repetitive movement cycles, or simple cycles, or both. Third, we will experiment with a narrow color stripe for load direction (more on this in a moment).
Let me explain what’s meant by (prototypical) repetitive and simple cycles. Cars which are privately owned move at the direction of their owner or lessee, and are not confiscated out of their movement cycles for loading by others. Often a particular car, let’s say a tank car carrying anhydrous ammonia, will not only be restricted to that cargo, but will move repeatedly between a loading point and an unloading point, say from a chemical company to a consumer such as a fertilizer maker. This means a single waybill for that loaded movement, and a corresponding document for empty movement back to the originating point, is a realistic amount of paperwork. (Recall that empty privately-owned tank cars normally moved on regular freight waybills, not on Empty Car Bills.)
I will illustrate my tank car example with a load of anhydrous ammonia from the Olin Mathieson plant in Lake Charles, Louisiana. Here is the inbound load:

The waybill carries the name of T&NO, the originating railroad. When the car is empty, it will move over the reverse route on an SP waybill like this with its former cargo identified for safety (L/C = last contained):

These two bills complete a realistic repeating cycle.
Now let me move on to an example of what I mean by a simple cycle. An on-line producer of cement may ship to a variety of destinations which are also on line. The cars would likely be railroad-owned and would of course be restricted to cement service; they would very probably also cycle as empties back to that same cement producer. That means that the car can move with a single waybill, which carries the name of railroad in question, and “short bills” can be used to vary the destinations (I showed examples of “short bills” in the previous post on this topic, at: http://modelingthesp.blogspot.com/2011/08/waybills-10.html).
An example might be like the following, using an actual on-line producer on the SP. First, the “full size” bill, which I also showed in the “Waybills-9” post:

This is an off-layout destination for McGee’s layout, and its destination during operation would be in Weed staging. Here is a “short bill” which can overlay the bottom part of the bill just shown:

This is also off-layout but the car’s destination now would be Klamath Falls staging, the other “eastward” destination. The Empty Car Bill for this car was also shown previously, in “Waybills-9,” and can be viewed at: http://modelingthesp.blogspot.com/2011/07/waybills-9.html. These three bills, then, can reside in a single sleeve and create reasonable car movements. If the variety seems insufficient, more “short bills” can be added. The goal would be to maintain the car movements as entirely within the SP, thus validating the waybill railroad name at the top of the full-size waybill.
I mentioned use of color stripes as helpful guides to switchmen, regarding routing of cars. The prototype, of course, has no such stripe, nor does it have other codes of that type. Otis now uses a mini-bill which is striped and also labeled for the direction of the car movement, thus:
To replace this, we are going to experiment with a different stripe, also yellow to indicate movement to Redding staging. (We know from experience that visiting crews may hardly know whether Oregon is north or south of California, let alone where particular western cities are located. You may insert here the rant of your choice about modern education in geography.) Here is a lumber load waybill, which would replace the one shown above:

If crews seem to need stripes or other codes as “training wheels,” this can be an interim measure. If the need seems to be ongoing, they can be retained. But whether a stripe is retained or not, it should be evident in any case that there is a considerable increase in prototypical appearance from the mini-bill to the new bill, not to mention far more information.
As I said at the outset of this post, there are other experiments in progress, including ways of handling free-running cars like box cars. More on those later.
Tony Thompson
The problems I alluded to in previous posts are not solved as yet, particularly how to handle free-running cars like box cars in a fashion which is both easy to manage and also prototypical. But here I want to report a couple of things which we have decided to do as “progress” items.
First, we will introduce some of the new waybill designs among the population of existing “mini-bills” as a transitional measure. Second, we will concentrate these bills on the car types and load types which lend themselves to repetitive movement cycles, or simple cycles, or both. Third, we will experiment with a narrow color stripe for load direction (more on this in a moment).
Let me explain what’s meant by (prototypical) repetitive and simple cycles. Cars which are privately owned move at the direction of their owner or lessee, and are not confiscated out of their movement cycles for loading by others. Often a particular car, let’s say a tank car carrying anhydrous ammonia, will not only be restricted to that cargo, but will move repeatedly between a loading point and an unloading point, say from a chemical company to a consumer such as a fertilizer maker. This means a single waybill for that loaded movement, and a corresponding document for empty movement back to the originating point, is a realistic amount of paperwork. (Recall that empty privately-owned tank cars normally moved on regular freight waybills, not on Empty Car Bills.)
I will illustrate my tank car example with a load of anhydrous ammonia from the Olin Mathieson plant in Lake Charles, Louisiana. Here is the inbound load:

The waybill carries the name of T&NO, the originating railroad. When the car is empty, it will move over the reverse route on an SP waybill like this with its former cargo identified for safety (L/C = last contained):

Now let me move on to an example of what I mean by a simple cycle. An on-line producer of cement may ship to a variety of destinations which are also on line. The cars would likely be railroad-owned and would of course be restricted to cement service; they would very probably also cycle as empties back to that same cement producer. That means that the car can move with a single waybill, which carries the name of railroad in question, and “short bills” can be used to vary the destinations (I showed examples of “short bills” in the previous post on this topic, at: http://modelingthesp.blogspot.com/2011/08/waybills-10.html).
An example might be like the following, using an actual on-line producer on the SP. First, the “full size” bill, which I also showed in the “Waybills-9” post:

This is an off-layout destination for McGee’s layout, and its destination during operation would be in Weed staging. Here is a “short bill” which can overlay the bottom part of the bill just shown:

This is also off-layout but the car’s destination now would be Klamath Falls staging, the other “eastward” destination. The Empty Car Bill for this car was also shown previously, in “Waybills-9,” and can be viewed at: http://modelingthesp.blogspot.com/2011/07/waybills-9.html. These three bills, then, can reside in a single sleeve and create reasonable car movements. If the variety seems insufficient, more “short bills” can be added. The goal would be to maintain the car movements as entirely within the SP, thus validating the waybill railroad name at the top of the full-size waybill.
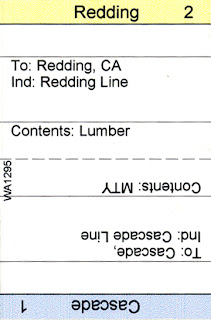
I mentioned use of color stripes as helpful guides to switchmen, regarding routing of cars. The prototype, of course, has no such stripe, nor does it have other codes of that type. Otis now uses a mini-bill which is striped and also labeled for the direction of the car movement, thus:

To replace this, we are going to experiment with a different stripe, also yellow to indicate movement to Redding staging. (We know from experience that visiting crews may hardly know whether Oregon is north or south of California, let alone where particular western cities are located. You may insert here the rant of your choice about modern education in geography.) Here is a lumber load waybill, which would replace the one shown above:

If crews seem to need stripes or other codes as “training wheels,” this can be an interim measure. If the need seems to be ongoing, they can be retained. But whether a stripe is retained or not, it should be evident in any case that there is a considerable increase in prototypical appearance from the mini-bill to the new bill, not to mention far more information.
As I said at the outset of this post, there are other experiments in progress, including ways of handling free-running cars like box cars. More on those later.
Tony Thompson
Thursday, August 4, 2011
A few words on packing houses and produce shipping-4
This post should wrap up this topic on packing houses and produce shipping. I want to emphasize some vital details in understanding produce shipping: transit temperatures and crop seasons. Both are discussed in the book, Pacific Fruit Express (Anthony W. Thompson, Robert J. Church and Bruce H. Jones, Signature Press, 2nd edition, 2000).
In a previous post in this thread (see: http://modelingthesp.blogspot.com/2011/07/few-words-on-packing-houses-and-produce.html) I discussed precooling and pre-icing, the topics relating to cooling of produce before shipment, whether by shipper’s cooling (precooling) or by loading into a cold car (pre-iced). These can of course be combined. Either way, the purpose is to remove field heat and get the produce close to or at shipping temperature. Whether that occurs before departure of the loaded reefer, or occurs during the first day of transit, may make a big difference in quality of the produce on arrival at its destination.
How vital precooling might be to a particular crop might be difficult to guess, but one helpful piece of information is the “desired transit temperature” table provided by the U.S. Department of Agriculture. Here is the version of that table from USDA Handbook 195 (1961), which is also in the PFE book, Chapter 14. (You will probably have to click on the image below to enlarge it to readable size.)

A number of vegetable crops, such as broccoli, cauliflower, and celery, are desirably shipped at 32 degrees, while some crops, like lemons, are usually shipped at 50 to 55 degrees--quite a range. And in fact, lemons were usually “conditioned” prior to shipment by storage at more or less ambient temperature, which along the California coast in summer is not terribly warm, with a cool marine breeze most days.
Today in the Santa Maria Valley and north of the Santa Maria River towards Nipomo and Oceano, field crops continue to be dominated by, for example, broccoli, and there are extensive precooling facilities to be seen. In fact, right in my modeling area at Nipomo is the Guadalupe Cooling Company facility, to which several packers bring their field boxes of produce, to precool before shipment. Today, those shipments are by truck, but a similar requirement would have existed for rail shipments in the 1950s, when I’m modeling this area. I may well model the Cooling Company instead of a traditional packing house, because multiple crops can be shipped from it.
My second point for this post is to emphasize seasons for particular crops. The second edition of the PFE book contains a very detailed table of crop seasons on pages 442 to 447. I have cut and pasted parts of the table (only a small fraction of those six pages!) to show some crops from the Santa Maria-Guadalupe District, as it was called. Again, you may have to click on this to enlarge it for perusal.

At the top, I’ve shown a complete entry for cauliflower, showing all the districts listed, to give a sense of how extensive the complete table is. The other crops only show the district of interest and a couple of adjoining entries. The black bar is the peak season, the gray bar indicates lower intensity shipping.
You can note right away that among just these four crops, seasons vary widely in the Santa Maria-Guadalupe District. For cauliflower, the peak is January through May, with lesser shipping June through August. Celery ships all year except April and May, while broccoli ships year-round (peak season December through May). For cabbage, the entire and peak season is April to June.
These same kind of summaries could be made for other crops which are grown in the Nipomo area, such as strawberries, citrus, and stone fruits, as well as vegetables such as artichokes, lettuce, tomatoes, peas, and potatoes.
My intention, not really implemented yet, is to model the entire year of 1953, and to operate perishable shipments appropriate for the current season in which the operation takes place. Thus in an operating session in August, as it is today, I would be moving broccoli and cauliflower at low levels, and more celery, but no cabbage, just to pick among the four vegetable crops presented in the crop season table above. To that end, I’ve created waybills for all these crops, and would select the appropriate ones for any month.
Tony Thompson
Wednesday, August 3, 2011
Choosing a model car fleet-SP 50-ft. box cars
Concluding my posts about the SP box car part of my model fleet, in this post I discuss the 50-foot cars. These are single-door box cars. In the period I model, the AAR defined double-door cars, whether or not 50 feet long, as automobile cars. Those are accordingly a separate subject in my planning.
Southern Pacific had just two classes of 50-ft. single-door box cars, classes B-50-22 and B-50-30, by 1953. The B-50-22 cars were built in October and November, 1941, to essentially the AAR 1937 car design, stretched to 50 feet. The AAR would adopt a “standard” design for this type of car in February 1942, but the SP box car was not of the AAR design. The design SP used had six panels on each side of the door, panels which looked much like those on the 1937-design 40-foot cars. The new AAR design, however, had eight narrower side sheets on each side of the door. Many railroads in the late 1930s also used the 6+6 panel design, so SP was far from alone. But there were just 500 of these cars built by SP (numbers 81490-81989), so I only need a single one in my fleet. The SP attempted to buy 500 more cars at the beginning of World War II but the order was never fulfilled.
This class is fairly simple to model. The Proto2000 model (now Walthers) is very close to exact for the SP cars, having the 6+6 panel design, a straight-panel roof, and W-corner-post ends. Here’s the one I already have (there’s a kit for another one, gathering dust in my stash).

What about the old Athearn version? Is it usable? It’s certainly a stand-in with about the right look. But correct? Nope. It’s got sharp-corner Dreadnaught ends, not the correct W-corner-post ends; and it has the curious Athearn 50-foot car roof, which Athearn’s double-door automobile car also has--a roof with 12 panels instead of the correct 13. (Hard to know how this happened.) And it has an odd 6-and-a-half panel side design.
The second class of SP 50-foot single-door cars was B-50-30, built in late 1952 and early 1953, just under the wire for my modeling year, 1953. This time there were 1000 cars built (SP 109100-110099), so again, at my ratio of approximately one model car per each 1000 cars in SP’s fleet, I need one model. But now the problem is that SP continued to build 6+6 panel cars, while nearly all other railroads were building 8+8 panel designs. There is a fine model available for that 8+8 car, the Branchline kit with correct Improved Dreadnaught end, diagonal panel roof, and 8-foot Youngstown door. You can do two things here: either use the Branchline car as it is, and never notice the number of side panels whenever you spot the model on the layout (for me, kind of like not thinking about the elephant in the room), or you can fix it.
I plan to fix it. Here’s a photo of the Branchline car (from their web site), and my intention is to slice off all the rivets, sand off the panel seams, scribe new seams to make a 6+6 panel car, and replace the rivets with Archer rivets. (And one more detail: I will re-letter it too.) I’m willing to do all this mostly because I only need one car. But it also looks (so far) like an interesting and fun project.

So far I’ve only gotten as far as slicing off rivets. More later as I make progress.
This model fleet discussion, like several others I’ve posted, has served as much to tell me what cars I don’t need, as to tell me what I do need. I find such discoveries both illuminating and very useful.
Tony Thompson
Waybills, Part 10
Having shown a brief selection of the waybills being designed for Otis McGee in the previous post on this topic (see: http://modelingthesp.blogspot.com/2011/07/waybills-9.html ), I want to expand on that to show some of the specialized ideas we are exploring. Before doing so, I want to clarify my previous comment, that the vinyl sleeves Otis is considering are the ones Tony Koester uses. That’s true, but Tony wanted me to explain that Ted Pamperin had discovered the particular sleeve design and the source for them. Ted has done a lot of fascinating research on prototype waybills and other car movement paperwork, and I’m happy to give him the credit on this point.
The AAR standard waybill was used by just about every railroad, conveniently for modelers who want to create a modified form for model use. In addition to the waybill used for most cargo, AAR Form 98, there were specialized waybills for several purposes. These included perishables (which the AAR stated should be “printed on pink stock”), livestock, “astray” cargoes (meaning waybill lost), and some kinds of LCL. In later years, there was a waybill for TOFC cargo, though later still that got integrated into Form 98.
Here is an example of the new waybill design for perishables. Like practically all perishable loads on Otis’s layout, it does not have an origin or destination on the layout, but is bridge traffic.

This is a PFE car, the dominant produce car owner on Otis’s SP layout. Much of his perishable traffic moves in the “North Coast Perishable” train, or NCP, a prototype train code from the 1950s, and this car is likely in that consist during most operating sessions. When it returns southward empty, it will move on an Empty Car Bill like the one shown in the previous post.
But some of the traffic may be Santa Fe reefers. In the 1950s, PFE and SFRD were vigorous competitors, and neither wanted one of their customers to be loading cargo into a car of the other line. PFE retirees assured me that this would almost never have happened, that PFE and Santa Fe would return each other’s empties to the owner even in times of car shortage. But if a shipper located on the Santa Fe routed a load in an SFRD car via SP to the northwest, it would show up in the NCP. Here’s a waybill to create that movement:

Note that this is, of course, a Santa Fe waybill, routed via Santa Fe as far as Fresno. This must be a shipper routing; if the Santa Fe had its way, the car would likely move up the Inside Gateway, handed off by Santa Fe to Western Pacific and then to Great Northern. But shippers had, and often exercised, the right to choose routing (subject to “approved routing” agreements).
Either of these bills can be readily modified by a “short bill.” That’s a bill which overlays waybills of the kind just shown, at the bottom, and provides different origins, destinations, or both, and possibly different loads as well. Here’s an example, for a PFE car (it is of course the same width as the taller waybill):

This would sit inside the sleeve atop another waybill having a car number.
Like the other PFE waybill, the origin on this load happens to be on my layout.
OF course, “short bills” can be used with regular waybills, not just with perishables. Here is an example:

Such a short bill could fit with about any box car which might be moving on the layout. But of course it can only be added to a waybill from a Kansas City railroad. More on this below.
The other commonly used special waybill was the livestock waybill. It has a number of locations on it for specialized entries not relevant to non-livestock freight movements. Here is an example (filled out with a Teletype font):

This is an off-layout destination, and note the entries to the right of the box for routing. Here again, this car would subsequently move homeward on an Empty Car Bill.
It is tempting in making the larger bill which include car initials and number, to always make them with railroad names of their owners. But of course that isn’t always what happens. Free-running cars like box cars could and did move in all directions all the time. Here’s an illustration:

This waybill illustrates the biggest problem with this waybill system: that it is not simple to implement the behavior of free-running cars. An overlay “short bill” does not work for a different load, unless it also originates on the EJ&E (not a railroad with an immense number of shippers). The same point was made above with the short bill for a furniture load. What this point means is that full-height waybills need to be made for all loads which one anticipates a particular box car carrying. Or to put it another way, a particular boxcar load, whether inbound or outbound, has to have a waybill made for it with all eligible box cars, possibly a couple of hundred cars on many layouts, and that is for each load.
It is this problem, in fact, which drove Doug Smith and others to invent car cards in the first place. Systems like my baseball-card sleeves are just a refinement of that idea.
How will we get around this on Otis’s layout? We’re still working on that. The obvious solution, which I’m hoping to avoid, is to just create a few waybills for each car and forget flexibility. That’s essentially the old “four-cycle waybill dance,” and it does get things moving without excessive paperwork or waybill handling. Whether we will finally decide to go that way for efficiency’s sake, remains to be seen.
Tony Thompson
The AAR standard waybill was used by just about every railroad, conveniently for modelers who want to create a modified form for model use. In addition to the waybill used for most cargo, AAR Form 98, there were specialized waybills for several purposes. These included perishables (which the AAR stated should be “printed on pink stock”), livestock, “astray” cargoes (meaning waybill lost), and some kinds of LCL. In later years, there was a waybill for TOFC cargo, though later still that got integrated into Form 98.
Here is an example of the new waybill design for perishables. Like practically all perishable loads on Otis’s layout, it does not have an origin or destination on the layout, but is bridge traffic.

This is a PFE car, the dominant produce car owner on Otis’s SP layout. Much of his perishable traffic moves in the “North Coast Perishable” train, or NCP, a prototype train code from the 1950s, and this car is likely in that consist during most operating sessions. When it returns southward empty, it will move on an Empty Car Bill like the one shown in the previous post.
But some of the traffic may be Santa Fe reefers. In the 1950s, PFE and SFRD were vigorous competitors, and neither wanted one of their customers to be loading cargo into a car of the other line. PFE retirees assured me that this would almost never have happened, that PFE and Santa Fe would return each other’s empties to the owner even in times of car shortage. But if a shipper located on the Santa Fe routed a load in an SFRD car via SP to the northwest, it would show up in the NCP. Here’s a waybill to create that movement:

Note that this is, of course, a Santa Fe waybill, routed via Santa Fe as far as Fresno. This must be a shipper routing; if the Santa Fe had its way, the car would likely move up the Inside Gateway, handed off by Santa Fe to Western Pacific and then to Great Northern. But shippers had, and often exercised, the right to choose routing (subject to “approved routing” agreements).
Either of these bills can be readily modified by a “short bill.” That’s a bill which overlays waybills of the kind just shown, at the bottom, and provides different origins, destinations, or both, and possibly different loads as well. Here’s an example, for a PFE car (it is of course the same width as the taller waybill):

This would sit inside the sleeve atop another waybill having a car number.
Like the other PFE waybill, the origin on this load happens to be on my layout.
OF course, “short bills” can be used with regular waybills, not just with perishables. Here is an example:

Such a short bill could fit with about any box car which might be moving on the layout. But of course it can only be added to a waybill from a Kansas City railroad. More on this below.
The other commonly used special waybill was the livestock waybill. It has a number of locations on it for specialized entries not relevant to non-livestock freight movements. Here is an example (filled out with a Teletype font):

It is tempting in making the larger bill which include car initials and number, to always make them with railroad names of their owners. But of course that isn’t always what happens. Free-running cars like box cars could and did move in all directions all the time. Here’s an illustration:

This waybill illustrates the biggest problem with this waybill system: that it is not simple to implement the behavior of free-running cars. An overlay “short bill” does not work for a different load, unless it also originates on the EJ&E (not a railroad with an immense number of shippers). The same point was made above with the short bill for a furniture load. What this point means is that full-height waybills need to be made for all loads which one anticipates a particular box car carrying. Or to put it another way, a particular boxcar load, whether inbound or outbound, has to have a waybill made for it with all eligible box cars, possibly a couple of hundred cars on many layouts, and that is for each load.
It is this problem, in fact, which drove Doug Smith and others to invent car cards in the first place. Systems like my baseball-card sleeves are just a refinement of that idea.
How will we get around this on Otis’s layout? We’re still working on that. The obvious solution, which I’m hoping to avoid, is to just create a few waybills for each car and forget flexibility. That’s essentially the old “four-cycle waybill dance,” and it does get things moving without excessive paperwork or waybill handling. Whether we will finally decide to go that way for efficiency’s sake, remains to be seen.
Tony Thompson
Subscribe to:
Posts (Atom)