Reference pages

Friday, December 30, 2022

Full-width diaphragms, Part 4

In the preceding post in this series about full-width diaphragms, I spent some space showing the distinctive Pullman-Standard face plates used on many Southern Pacific lightweight passenger cars, especially after World War II. I also showed the making of a model version of such a face plate (you can see that post here: https://modelingthesp.blogspot.com/2021/08/full-width-diaphragms-part-3.html ).

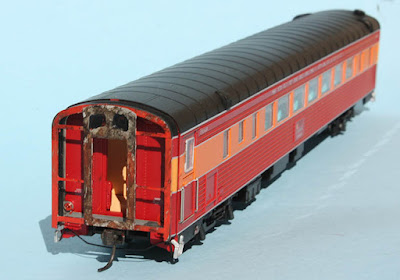
To illustrate such diaphragms on a Daylight-decorated Broadway Limited coach, see this post: https://modelingthesp.blogspot.com/2021/08/full-width-diaphragms-part-2.html . Adding one of the so-called “opera window” face plates to one of those cars looks like this (with added grease and rust on the face plate):

Now this car could operate at the end of a train and look correct. Note that as usual, the color stripes on the car side carry onto the diaphragm. The one shortcoming here is that the folded-bellows of the inner diaphragm itself is absent. That’s fine in a complete consist, in which one only sees the sides of cars, but not really okay in the final car in a train. I will add something here.

The Broadway Limited cars are beautifully decorated for Daylight use, but other trains, including the Lark equipment that I operate, obviously need different paint. 

Let me spend a few sentences on the Lark. Until the summer of 1956, the Lark remained essentially the all-Pullman train it had become when it was streamlined in 1941, and it still had its round-end observation cars. It did have some new postwar sleepers but primarily retained its 1941 equipment.

Conveniently, I model the early 1950s, when striping on Lark cars had been decreased to just the boundary between light gray and dark gray, omitting the earlier stripes at the top and bottom of the car side.  Below you see an AHM 10-6 sleeper (what AHM called a “1930 Sleeper”) painted for Lark.

Note above that the dark window band doesn’t extend across the door. This was how the Lark cars were delivered, and well into the 1950s the majority of the cars continued in that appearance.

The car above clearly needs to have a representation of a full-width diaphragm added. The diaphragms had the same striping as the car side, as noted above (for a photo, see: https://modelingthesp.blogspot.com/2021/07/the-challenge-of-full-width-diaphragms.html ). 

One can readily add the needed Dark Gray and Light Gray with a brush. In my modeling, I have used Floquil “Lark Dark Gray” as it came from the bottle, but lightened the Floquil “Lark Light Gray” to the shade you see above, to look more like prototype photos in sunlight.

As I’ve mentioned before, a complication with these AHM cars is that they have a heavy “lip” around the end doors but no actual diaphragm. I decided to use the outer “shell” of the American Limited diaphragm kit (that kit is discussed in the post linked in the second paragraph of the present post). Below, it’s shown installed, but inside-out to fit the AHM car end, because of the heavy door surround.

Next the interior of the extended end (the light gray plastic, above) is painted Lark Dark Gray, along with the window stripe on the outside:

Then the top of the extension is painted black, to match the roof, and the lighter side areas (Lark Light Gray) are painted. The separation stripes were left in the very light gray original plastic color, which looked much like the color of my decal “white” stripes.

Finally, the American Limited part contains quite a good striker plate. I separated it from the door shape of the part, and painted it medium gray (rust and grease marks were added with artist’s pencils).

This car is now suited for operation at the end of a passenger train. I will continue to explore ways to use the various commercial diaphragm parts, for both full-width and conventional diaphragms, to improve my passenger equipment.

Tony Thompson
Tuesday, December 27, 2022

Adding storage tanks

 For while now, I have realized, in surveying things that may be missing on my layout, that I could use some more storage tanks. My chemical industry, Pacific Chemical Repackaging, handles a wide variety of chemical substances, most in liquid form (thus helpfully requiring an equally wide variety of tank cars and car owners to deliver all the products). In addition, I still haven’t provided a storage tank for diesel fuel in my engine terminal.

Luckily, in digging through my stash of unbuilt kits of all kinds, I found what I was sure I remembered was there: a Walthers set of miscellaneous tanks. This is called “Storage Tanks,” part 933-3197. This product happens to be on sale at the moment. See: https://www.walthers.com/industrial-tanks-detail-set-cornerstone-kit .

You can see on the label the variety of tank sizes and shapes that can be made: two horizontal on concrete supports, two vertical ones, and two vertical ones elevated on steel pedestals, six altogether.

I decided to build a few of these, very quick and easy with styrene cement. Some clean-up of individual parts with a small file is all that is needed. And as soon as I surveyed possible uses on the layout for the various sizes and shapes, I decided to build all six tanks. Here they are, completed.

Next I decided what color each tank should be, largely based on where it would be placed, so that it would fit in with its surroundings. As one example, I chose a warm gray for the tank that I decided to install alongside Channel Islands Kelp Products (for a description of that project, see: https://modelingthesp.blogspot.com/2022/07/my-article-in-july-2022-mrh.html ). This is the smaller of the two pedestal tanks in the photo above.

Another example is the one mentioned at the top of the present post, a diesel fuel tank for the Southern Pacific fuel area at the Shumala engine terminal. This one I painted aluminum, like a number of relatively modern SP tanks I have seen in photographs. I also rummaged around in my collection of various partly-used decals and found lettering for “diesel fuel” that I could add to the tank, again reflecting an actual SP tank at West Oakland.

Here is the tank, placed alongside the spur track identified as the fuel spot. At left is an SP tank car delivering Bunker C fuel for steam locomotives (stored in the large black tank). The turntable pit is in the foreground, the sand house at right. And at photo center is the oil and lubricant storage building, built of brick as were many such SP buildings. At far right is a car of propane being unloaded at Associated Oil.

One of the attractions of installing this tank (aside from answering the question, “how does the diesel switcher assigned to Shumala get fuel?” is that I can now spot loads of diesel fuel in SP’s distinctive tank car paint scheme for such cars. 

Below is shown such a car, SP 58704, on spot. Its placard shows that it has already been unloaded and is empty. (For more about this paint scheme, and availability of decals, see: https://modelingthesp.blogspot.com/2016/08/sp-tank-car-decals-are-back.html ).

With these two storage tanks placed, I needed to decide where the others should go, but I will return to that topic in a future post.

Tony Thompson

Saturday, December 24, 2022

Express traffic on the SP

 Modelers don’t always include the ideas of express shipments in their operating schemes. By “express,” in railroad terms, is primarily meant Railway Express Agency traffic, but also includes various expedited traffic, mostly LCL (Less than Car Load) in character, moved by the railroad. I want to say a little about the Southern Pacific aspects of this.

The majority of this traffic naturally moved in baggage cars, actually termed “baggage-express” or BE types by AAR. And most such traffic visible on a particular railroad would be in the cars of that railroad. But longer-distance movements did cause the movement of off-road baggage cars onto neighboring or even far-away railroads. So modeled head-end consists can certainly include foreign baggage cars.

I remember as a boy, viewing the Postal Annex and REA buildings at Los Angeles Union Passenger Terminal (LAUPT), with plenty of cars belonging to the three railroads that used LAUPT, SP, Santa Fe, and Union Pacific, but there were almost always some Missouri Pacific or Texas & Pacific cars in blue and light gray, often Burlington and Rock Island cars, and sometimes New York Central and Pennsylvania cars. All but the last two were, of course, connections of the SP and UP, and Santa Fe connected with all of them, the last two in Chicago.

This means that both baggage cars, and head-end express box cars, of connecting roads would show up occasionally in SP trains, such as the ones I operate on the Coast Route main line on my layout. I can show a few examples. Below is a train with SP express box 5749 (Beaver Creek brass) at the head end, followed by CB&Q 8796, a wartime troop car converted to baggage service (made from a Walthers car by Richard Hendrickson). On the head end is Class P-10 Pacific 2485 (Precision Scale brass).

Another example would be a consist like the one below, again with Pacific 2485, this time with an older SP express box, SP 5857 (Sunshine resin), Class BX-50-15, followed by Rock Island 20062, one of the aluminum box cars Rock Island bought for this kind of service (Sunshine resin). The two box cars are followed by SP 6448, kitbashed from Athearn cars, to represent Class 70-B-9.

The 70-B-9 car project was described in some detail for Prototype Modeler magazine (Vol. 7, No. 6, March-April 1984, pages 39–44). What I obtained was a car with correct windows and reasonable looking doors and other details. I used the Utility vents typical of SP classes 70-B-9 and -10 for the model.

I have occasionally been asked whether SP used “LCL cars” to pick up and deliver local package freight. Many railroads did this; Tony Koester’s Nickel Plate Road layout famously does so in its local trains, with such a car behind the power. The photo below (Tony Koester) shows an example.

But SP owned a trucking subsidiary, Pacific Motor Trucking or PMT, that did this kind of local pick up and delivery. So trains didn’t carry LCL cars, and instead an SP layout from the transition era ought to show traffic like this on its roads, in this case Pismo Dunes Road on my layout (model painted by Jim Elliott). I’ve discussed this before (see an example at: https://modelingthesp.blogspot.com/2022/01/overnight-box-cars-part-2.html ).

What about the famous SP “Overnight” cars? They were certainly in LCL service, and intended for high-speed operation. Both the famous post-World War II paint scheme of black with a red and yellow “overnight” symbol, and the pre-war schemes were described in an earlier post (you can find that post at: https://modelingthesp.blogspot.com/2022/01/the-overnight-box-cars.html ). 

Very occasionally, these cars did have local destinations, instead of their usual Los Angeles-San Francisco routing. This one, SP 97954, built from a Sunshine resin kit, is spotted on the house track in my layout town of Ballard (and note the PMT truck on Bromela Road in the background).

Recognizing express and LCL traffic should definitely be part of any layout operating scheme, and research may be needed to understand the patterns of any particular railroad and locale.

Tony Thompson

Thursday, December 22, 2022

Era and locale

 I have always felt that every layout benefits from a clear indication of its era and, if possible, its locale. I realize that some free-lanced layouts are vague as to location, exact era, or both, but I think the overall credibility of the modeling is helped if it frames or locates the layout in time and space. And viewers respond to that, if only viscerally.

I realized, in thinking about a recent email sent to me privately, that though I have written a number of times about these issues for my own layout, it was mostly piecemeal, not everything together. So this post tries to tie all the aspects about era together, with links to posts about the details.

When visitors arrive in the layout room, I often point out something hanging on the wall: an original 1951 California vehicle license plate. As was common in that day, the plates remained on vehicles for several following years, with only a small corner tag covering up the last two digits of the year 1951, and showing the current year of registration.

 As I have shown before, this kind of plate is on all the model vehicles on my layout, most with the white corner tag issued in 1953. New cars got the same design of plate, but with “53” in the lower right corner instead of the 51 you see above. See this post: https://modelingthesp.blogspot.com/2012/11/vehicle-license-plates-in-ho-scale.html .

The vehicle theme is supported by making sure I have no post-1954 vehicles on the layout. Of course I do have a few 1953 models, such as the Chevrolet shown below. It’s a Magnuson Models resin kit (for more, you could read this post: https://modelingthesp.blogspot.com/2015/07/automobiles-in-ho-scale.html ). The color scheme is the same as a car my Dad owned, I believe the first car he had bought new. The car has paused at the boulevard stop before entering Chamisal Road, in my layout town of Shumala.

Automobiles, of course, are something for which many people have specific memories of makes and models through the years. For that reason, I often include in my “interchangeable” billboard (see, for example, this post: https://modelingthesp.blogspot.com/2015/04/interchangeable-billboards.html ), ads like the following, alongside Nipomo Street in my town of Ballard. You can click on the image to enlarge it if you wish.

Continuing with what I suppose is a kind of automotive theme, in the one gas station I have on the layout, a City Classics kit cut down to fit my space, I was careful to use the era-appropriate sign advertising the price of regular gas. Yep, the sign really does say that it was 23.9 cents a gallon. I wrote a series of posts about building this model; here is a link to the concluding post: https://modelingthesp.blogspot.com/2019/03/union-oil-gas-station-conclusion.html .

For a more literal date identity, I have used a Southern Pacific Coast Division timetable for 1953 as my foundation for operating session timetables (though shown as a “Supplement,” since the contents differ from the actual Timetable No. 164). Crews use this document in every session. 

Here’s a post on the topic ( https://modelingthesp.blogspot.com/2013/10/setting-up-operating-session-creating.html ), and I also did an article for Model Railroad Hobbyist back in October 2014 on the topic (you can download or read on-line this or many other issues of MRH, for free, at their website, www.mrhmag.com ). The blog post I wrote about that article is here: https://modelingthesp.blogspot.com/2014/10/my-column-on-timetable-construction.html .

These are, perhaps, kind of subtle signals, individually, yet together I think they help solidify the impression in viewer’s minds that it really is 1953 that is being modeled. More on the locale aspect of this topic in a future post.

Tony Thompson

Monday, December 19, 2022

Layout improvements

 I’ve written a number of times about the process I use to identify and work through the many small items that need doing on the layout, whether repairs, upgrades of existing arrangements, or newly recognized needs. In some instances I’ve done this through discussion of my “tool” for the process, my “walking-around” list (for a post about it, you might look at: https://modelingthesp.blogspot.com/2022/10/my-walking-around-list.html ).

In the post just mentioned, there were two pairs of small projects that I had noticed were needed. One of them was to create grade crossing representations where two subsidiary roadways crossed an industrial lead track, at the back of my town of Ballard, and that’s been done (see the post at: https://modelingthesp.blogspot.com/2022/12/small-project-grade-crossings.html ). The other pair of projects comprised minor upgrades to scenery, in trackside ditches.

One of those ditches was the one alongside the Southern Pacific’s Coast Division main line, as it exits from the tunnel at the west end of the Shumala siding. Here is a repeat of the view I showed before, which I concluded had too few fallen rocks from the cliff face above the track. This area of the SP is characterized by the rather frangible rocks of the Franciscan Formation, and it would be likely that a cliff like this would be shedding pieces.

Luckily I had saved some scenic materials from when these rocks were first done (proof that sometimes “packrat-ism” does pay off). I was able to about double the number of rock fragments in the ditch alongside the track.

This photo, though from a lower angle than the one above, does show the “speed sign” to the right of the track, and on the telegraph pole in the distance, the mile marker for Mile 270 on the division (such poles were painted white up to the height of the mile marker, as you see here). I discussed speed signs in a previous post (which can be found here: https://modelingthesp.blogspot.com/2014/03/speed-signs.html ).

The other ditch mentioned is alongside the main track at Ballard. I showed just part of it in the previous post. Here’s that photo again: you can see that it is almost entirely dry and free of plants.

The ditch of course really could be dry. But if there is local ground water that could accumulate in the ditch, then plants benefiting from that occasional water would certainly grow there. I decided to add some Woodland Scenics “Medium Green” coarse turf to the ditch, installing it with matte medium. This material does look like clumps of plants, so is suitable for this ditch. 

Here is how the clumps look on the majority of the ditch, with the additions. It’s only a detail, of course, but I think adds to the visibility of the ditch, which ought to be noticeable.

I also added some vegetation around the culvert under Nipomo Street and in the area where the ditch joins Cienega Creek, at left. You can see the creek passing under the tracks just to the left of the street.

These are not very visible changes, to be sure, but they add to the overall impression. I have a growing list of more of these kinds of upgrades to pursue in coming months.

Tony Thompson

Friday, December 16, 2022

Small project: upgrading couplers

 I have written several times in this blog on the topic of modeling standards, for everything from locomotives to freight cars to scenery to track and electrical aspects. My topic today happens to be couplers (for freight cars), and as everyone knows, these are essential to dependable operation (for an early statement of my ideas about standards, you could read this post: https://modelingthesp.blogspot.com/2011/03/model-freight-car-standards.html ).

A long-standing pet peeve of mine is the so-called “ready to run” or RTR freight cars with fake Kadee couplers. The Kadee patent for the No. 5 coupler ran out in the 1990s, and since then, several Chinese manufacturers have produced a “Kadee-like” design which simply falls short when operated. I can’t identify the Chinese entity behind any particular freight car, so can’t name the culprits directly. But the importers are certainly known.

The plain fact is that these couplers really do not play well with real Kadee couplers, though probably they work all right with each other. Sometimes a RTR freight car will get into layout service without my having gotten around to changing out the couplers, and inevitably that doesn’t go well.

In my most recent operating session, things mostly went quite smoothly (here’s a link to a summary: https://modelingthesp.blogspot.com/2022/12/my-fourth-2022-operating-weekend.html ), but I did have the embarrassment of discovering not one but two of these “renegade” coupler installations. Here is one example, in this case an Atlas tank car:

Anyone familiar with the Kadee design, as nearly all of us are, can immediately see that this is not the shape we all know. That is no doubt the reason for the imperfect operation. In addition, the coupler is even bigger than the oversize Kadee No. 5. At least the Atlas coupler box has a lid with a screw attachment, so it was easy to replace this thing

I might mention that with installations like this, I really have learned to prefer the Kadee whisker couplers, either No. 148 or No. 158. The off-brand couplers being replaced often have coupler boxes that are not quite the correct Kadee dimensions to use the sheet-metal spring (often a bit too narrow), so the whisker design is a better choice.

Another example is an older Walthers freight car, again with a coupler that looks like a Kadee at a cursory glance, but putting it into an operating session quickly reveals that, whatever it looks like, it sure doesn’t operate like a Kadee. Here’s a top view:

Here again, I used a whisker-style Kadee for replacement, and things then went smoothly.

I don’t want to suggest that only the two manufacturers named above are the guilty parties. Some runs of imported freight cars from InterMountain have had these sorts of fake-Kadee designs too, though thankfully not recently. I seem to recall some Broadway Limited cars in the past, also with fakes.

I suppose I should mention that the foregoing comments are entirely personal observations. I have no connection with the Kadee people other than as a satisfied customer, and an operator of pretty long standing.

I have been meaning to update my thoughts on operating standards, and these two coupler replacements (among others) have brought that intention to the forefront. I will be thinking through my current practices, and writing a post with updates, in the near future.

Tony Thompson

Tuesday, December 13, 2022

My fourth 2022 operating weekend

 Usually I hesitate to try and schedule an operating weekend between Thanksgiving and New Years, but this year I felt I should try, given that the local San Francisco Bay Area will host a “BayRails” event next March. This is the usual timing, March in an odd-numbered year, and since we naturally missed out on 2021, this will be the first one for awhile. Many of us, including me, are trying to get the layouts into as good a shape as possible.

Of course one should always take the time occasionally to walk the layout and scrutinize the condition of everything, preferably taking notes the while (I call such notes a ‘walking-around list,” as I have described before; see for example this post: https://modelingthesp.blogspot.com/2022/10/my-walking-around-list.html ). But perhaps an at least equally informative test is to hold an operating session, thus the scheduling of mine this past weekend.

Slightly to my surprise, I was able to sign up full crews for both Saturday and Sunday (I had thought I  might have to hold just a single session, because people tend to have full calendars for the holidays). The first day, the crews were Seth Neumann, Dave Falkenburg, John Rodgers, and Jim Radkey. Below you see Jim (at left) and John, working at Shumala; Jim was the conductor here, and you can see a batch of waybills in his hand. He is, of course, wearing season-appropriate headgear.

Meanwhile, Seth and Dave were hard at work switching Ballard. In the view below, that’s Seth at right. I think Seth was conductor on this shift, and you can see his clipboard, and switch list, in front of him. He seems to be marveling at the move his engineer, Dave, has just made with a freight car.

One change in this session is that the Guadalupe Local was pulled, not by its usual Southern Pacific Consolidation, but by a Baldwin road-switcher. By the year I model, 1953, these Baldwins had about worn out their welcome on this part of the SP, and would soon migrate into the urban areas of southern and northern California, and the Oregon branches, but here is one of them, still in use in this area.

Then on Sunday the essentially identical session was run, that is, with the same switching assignments, but different crews. Below you can see Lisa Gorrell (at left) and Richard Brennan working Shumala. Lisa was enjoying the conductor’s job here, and it looks like she and Richard are discussing their next move.

On the other side of the layout, Tom Swearingen (left) and Ed Merrin were switching at Ballard. In this location, I think Ed was the engineer; you can just see the top of the throttle he’s holding.

The sessions went pretty smoothly (and of course the layout gremlins discovered on Saturday were mostly excised before the Sunday session — a standard experience for a layout owner). The crews had fun, and I had fun watching all the new and original approaches to switching challenges. And I found a few things that need improvement before BayRails. That met all my desires and druthers for these sessions!

Tony Thompson

Saturday, December 10, 2022

A fine history of the EP&SW

 In 1924, the Southern Pacific absorbed a New Mexico-based railroad, the El Paso & Southwestern, along with its locomotives, rolling stock, depots, shops, and everything else. Practically all the EP&SW trackage continued to be operated by SP. Those of us interested in SP history have long needed a good history of this significant predecessor, and now there is one.

The book, entitled El Paso and Southwestern Railroad System, and written by Vernon J. Glover, was published by the SP Historical & Historical Society in 2021. The first printing sold out, and the SPH&TS has now reprinted the book, so it is again available (if you're interested, you can purchase it at: https://sphts.org/product/el-paso-and-southwestern-railroad-system/ ). At its peak, the EP&SW was an L-shaped railroad, from Tucson to El Paso, and northward from there to Tucumcari, New Mexico.

In 1901, the Bisbee copper interests (eventually the Phelps Dodge company) tried to interest the Southern Pacific in serving their territory, but when that broke down, they built the El Paso & Southwestern Railroad to connect the Bisbee mines and smelters of Arizona Territory to the SP in El Paso, Texas. From there, crude copper was shipped east for refining. In the meantime, another railroad, the El Paso & Northeastern was building northward from El Paso, up through the Territory of New Mexico, creating new towns as it went along. In 1905, the two railroads were joined and their operations merged into a single system, taking the name EP&SW.

Author Vernon Glover was greatly helped by the extensive records of the SP Rio Grande Division and the EP&SW and its predecessors that are preserved at the University of Texas at El Paso (UTEP),in the C.L. Sonnichsen Special Collections Library, and a number of other sources contributed information and photographs. It resulted in a 216-page book, in landscape format as you can see from the cover above, expertly designed by John and Jonathan Signor and nicely printed and hardbound.

Though nearly all the rolling stock of the EP&SW that came to SP differed extensively in mechanical arrangements, compared to SP’s own Common Standards, it was nevertheless put to use for the most part. Cars and locomotives were renumbered to fit into the Pacific Lines existing rosters. I remember a retired SP engineer complaining about the EP&SW Mountain types, which he said had good power, but not the acceleration of SP’s own Mountains, and, he said, rode really rough. Below is an Alco builder photo. On the SP, the six engines were assigned to Class Mt-2.

In addition to major rolling stock like locomotives, lots of freight and passenger cars came to SP also. Many, like this steel gondola built in 1918, were sturdy and useful, and served quite a few years under SP ownership. The car shown, part of the series EP&SW 7550–7999, became SP 45462–45903, and most served through World War II.

With the SP takeover in 1924, many of the facilities of the EP&SW continued in their previous roles. A noteworthy example is the large, modern locomotive shop at El Paso, which became SP’s El Paso General Shops. Before 1924, the SP Pacific Lines in El Paso had a separate engine house from the Texas & New Orleans, or Atlantic Lines, but both railroads subsequently used this facility. Below is an interior view of the shop when it was new.

I always enjoy a railroad history that covers the gamut of the life of it as a railroad (as opposed to, say, a device for paying off bond issues). This one certainly fills that requirement, and it’s readable and well illustrated. I believe it will take its place among the fine histories of the railroads of the West.

Tony Thompson

Wednesday, December 7, 2022

Twelfth anniversary of this blog!

 Today, December 7, 2022, completes 12 years of this blog, because my first post was on December 8, 2010. I certainly never envisioned anything like what has transpired between then and now. I am closing in on a total of 1500 posts, a number I can barely even start to comprehend — shows what happens when you just “show up for work” about every three days for 12 years!

Equally amazing, as it has been practically from the beginning, is the number of page views (not counting my own), which is now just a little short of two and a quarter million, in these 12 years. And I continue to value the many comments and questions regarding particular posts, both those posted as comments to blogger.com and those sent to me separately. They often illuminate something I did not clearly explain or describe. 

In this past year I posted the 100th segment of my ongoing descriptions of topics relating to waybills for freight operation. (It was in fact a “guide” to all the preceding posts, actually more than 99, on the topic; here’s a link: https://modelingthesp.blogspot.com/2022/11/waybills-part-100-guide.html ). My interest in this topic continues and doubtless will result in more posts in the upcoming year. 

An important focus of my model railroading has been and continues to be my layout. Many of the projects or research pursuits I have described are for the layout, directly or indirectly. The layout is largely complete by now, but there do remain a fair number of small projects still to do, along with a couple of lagging bigger ones.

Here are a couple of photos of different parts of the layout, as they are today. First, I’ll show the Chamisal Road grade crossing in my layout town of Shumala, leading to the underpass under the beginning of the Santa Rosalia Branch. This is one of the oldest parts of the layout, and has gradually received upgrades to current standards, including the scratchbuilt depot at left. The track nearest the camera is the main line of Southern Pacific’s Coast Route.

Another area I have enjoyed working on is the large winery in the town of Ballard. It is a repurposed Magnuson power house kit with a tile roof, along with many added details. This photo shows the tank car loading rack for bulk wine. That’s Nipomo Street in the foreground.

Another topic to which I often return in the blog is the various regional conventions and operating weekends than I attend. This is not intended as showing off my personal life; one of the last things I would want to do is provide a personal-diary kind of blog. Instead, I hope it may encourage someone who hasn’t tried conventions or op weekends to try one. I really enjoy them, and hope someone who doesn’t quite realize what they offer might be inspired to give one a try. 

A great aspect of 2022 was the decline of the pandemic, to where we could again gather for these conventions and operating events. This fall, for example, I greatly enjoyed the 2022 Prairie Rail event in Kansas City, especially John Breau’s superb layout (you can see my description at: https://modelingthesp.blogspot.com/2022/11/prairie-rails-2022.html ). I show below his town of Dutton, Montana, with its array of grain elevators (all of which are switched, of course). Really a great experience.

So the blog continues. I still enjoy it and certainly find it fun to research and compile many of the posts. As long as that’s true, I will keep on doing it.

Tony Thompson

Sunday, December 4, 2022

Small project: grade crossings

 Awhile back, I posted an update to my “walking-around list,” as I call my notes on things that need to be done on the layout. In it, I identified several specific projects that were needed, including a pair of grade crossings for minor roadways. You can read it at: https://modelingthesp.blogspot.com/2022/10/my-walking-around-list.html .

I decided to have a go at the grade crossings. First step, measure how wide the roadways are at each location. This will then determine how big of a between-rails “filler” to make. Since these are not important roads that cross the tracks, I assume the likeliest material would be timber for the crossings. This is not a particularly durable material, but in light use can last a long time, and is quick and inexpensive to install and to replace.

I made the same decision on the layout when designing the grade crossings where Laguna Street in my town of Santa Rosalia, near the end of my Santa Rosalia Branch, enters the team-track area, as I showed in an earlier post (it is here: https://modelingthesp.blogspot.com/2017/08/modeling-grade-crossings-part-2.html ).

Here again, I chose to use scale 1 x 8-inch Evergreen styrene strip. This is of course much too thin, compared to prototype crossing timbers, but I like to ensure that the crossings will be absolutely below the rail head, to make future track cleaning easy. I simply cut enough strips to length, placed them on a length of masking tape (attached to a kit box lid), and painted them with Tamiya Red-Brown (TS-1).

In an effort to give some texture to these strips, particularly with the idea in mind that such timbers often crack with age and use, and may also take on a gray tone, I made some shading and strokes with a Prismacolor pencil, 30% warm grey.  This is something I often use for freight car running boards and other uses of that kind.

Since the strips are already cut to the necessary length for the grade crossings, and all sides were painted with the rattle can, these are ready to install. I used canopy glue to attach the boards, both inside and outside the rails. The location, as I showed in the previous post (link in first paragraph, above), was along Bromela Road in my town of Ballard. Here’s how one of them looked then:

Once I had installed the styrene strips that I showed above, this looked a lot more like a grade crossing (below). The dirt road still needs some texture, but otherwise this is how it ought to look.

Now, I would be the last to describe this as a good model of a grade crossing. But it’s located over two and a half feet from the layout edge and accordingly is not easy to examine from the aisle. As such, it’s a representation of a grade crossing, something that should be where it is, even if it’s not a fine model. It fills the need.

In my description of a preliminary “walk-around,” as described in the original post (you can find the link to it in the top paragraph of the present post), these two grade crossings were only part of the topic, which was small layout improvements. I will return to some of the others in future posts.

Tony Thompson

Thursday, December 1, 2022

Layout origins, Part 3

Over the years of this blog, I have posted any number of reports on layout progress, and projects of various kinds, some in considerable detail. But the older ones naturally are not well remembered, even by those who read them when they were first posted. Accordingly, because I am often asked questions about the background of the layout, I have decided to provide summaries of some of the bigger projects. To read the preceding post in the series, go to: https://modelingthesp.blogspot.com/2022/08/layout-origins-part-2.html .

To follow up on that previous post, giving some of the earliest work on my town of Ballard, I will focus on the large hill at one end of the layout. Moving the layout sections from Pennsylvania to California basically went well, but the scenery did suffer. To show just how that hill had survived the move, the view below, looking down into that hill, perhaps shows the dimensions of the challenge I faced to restore it.

You can see in the view above that the top of the hill, and nearly all of the near side (which I call the “back” of the hill) was missing. At right center in the photo is a piece of the bottom of this hillside, though it is not in correct location. The tunnel portal is just resting in place, and has not actually been installed.

The hilltop is missing above, but I did save the piece that was cut off. Problem was, it was just hardshell without support. I decided to install a new support of screen wire, as is visible below.

I then stiffened and smoothed the screen with a couple of layers of the Woodland Scenics product Plaster Cloth. When that had set, I added contours using Sculptamold paper mache, as seen in the photo below. The tool here is a putty knife.

While the Sculptamold was still soft, I enlisted my younger son Sylvan to help me in setting the old hilltop piece in place. That’s him at right. You can see that it pretty much fit where it had originally been. I was then able to patch all around the perimeter of the old hilltop and restore the contour.

There is a more detailed description of this entire process, which you can see at: http://modelingthesp.blogspot.com/2013/12/repairing-ballard-hill-part-3.html .
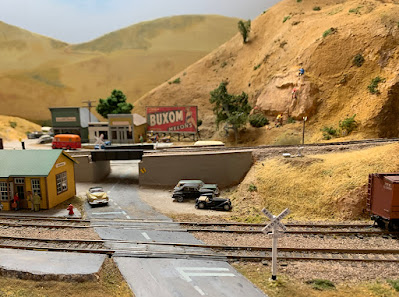
But this nice progress was only in relation to the hilltop, and the “front” of the hill, which visitors first see when entering the train room. The back of the hill, on the other hand, was really missing a lot of its original contour, as is evident below. A start has been made on the upper parts of this hillside, using the screen support of the hilltop, and the Plaster Cloth shell has been started.

The piece of lower hillside, visible in the top photo of the present post, has been installed at the hillside bottom, but a great deal of hillside shape remains to be created, along with the entire tunnel portal area; the portal rests in the foreground. 

For completion of this hill, and its role on the layout, I will return to description of the project work in a future post.

Tony Thompson