A couple of years ago, I posted a description of the yard entry signal that I installed on my layout, at the yard limit on my branch line as it approaches the yard at Shumala, California. It is a dwarf signal, and is aimed into a tunnel, where approaching locomotive crews can see it before exiting the tunnel, but of course this means that operators on the layout cannot possibly see the signal indication from the aisle. That post can be consulted at this link: https://modelingthesp.blogspot.com/2019/04/a-yard-entry-signal.html .
To repeat a view of that model signal, since it’s been a few years since I showed it, below is a view looking toward the yard, with the yard limit sign at right.

The way I decided that a signal indication could be conveyed to operators in the layout aisle is a repeater installation, which can show the color displayed (supposedly) by the dwarf signal. In this case, the indication would either be “stop,” red, or “proceed at reduced speed,” yellow.
My first job for such an installation is to make a panel for the color lights, along with a switch for manual control of the signal indication. This should be recessed into the fascia so that a passer-by cannot bump the switch. I decided it should look like the nearby panel for layout power and throttles. That panel is shown below, with a yellow face for visibility.

I simply cut a rectangular hole in the existing fascia (well to the left in the view above), and added a yellow-painted piece of Masonite behind it, recessed with pieces of 1 x 2-inch lumber, as in the other panel.

At this point, the edges of the opening still need to be cleaned up, and the screw heads need to be painted to match the surrounding Masonite.
What I wanted to install here is a “signal repeater” from Model Railroad Control Systems, in the form of their “simple low-cost signal,” the low-head “dwarf” style since that is what my layout model signal is (you can visit their site to see this item at: https://www.modelrailroadcontrolsystems.com/simple-signaling-and-accessories/ ).
This repeater signal contains LED illumination. To power the LEDs, I provided 12 volts DC. The circuits for LEDs are not complicated; for those in need of a refresher or a first look, the Wikipedia article is a good resource: https://en.wikipedia.org/wiki/LED_circuit .
In my case, though, my friend Seth Neumann (of Model Railroad Control Systems) installed the parts for me, with his expertise in both the circuits and the methodology of installation. When it was done, the panel looked like this (label not yet applied, edges of opening not cleaned up, and screw heads unpainted):
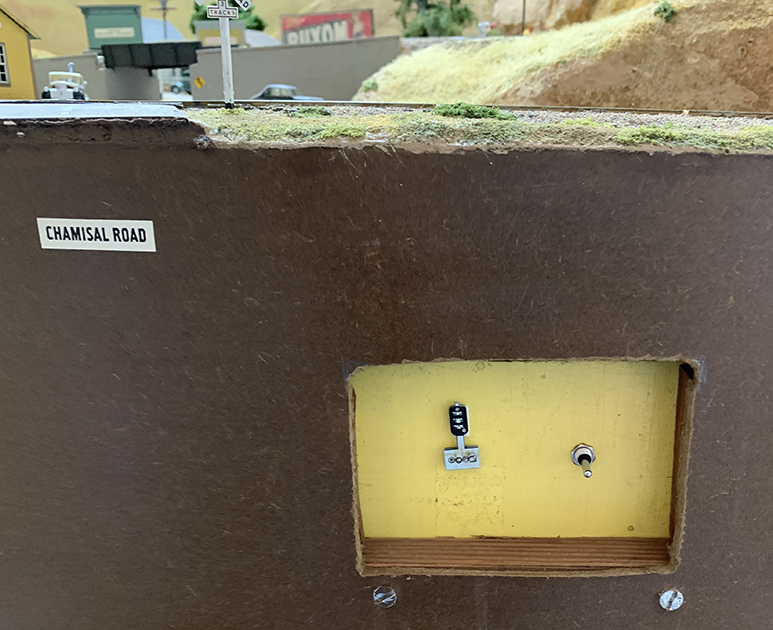
The toggle switch is center-off (double throw), so the repeater can be illuminated, either yellow or red, at the times desired by the yardmaster, or left un-illuminated. I made a label with black lettering on yellow, printed it on paper, cut it out and attached it with canopy glue.

Above is the final version, with the yellow LED lit. This panel will provide future yardmasters control over local freights arriving from the branch — provided I can train the local freight crews to watch for and obey the signal!
Tony Thompson
No comments:
Post a Comment