I have from time to time described relatively simple kits and car projects in this blog. My interest in and work on model freight cars is not limited in that way, however, and I want now to describe the work in building a resin car, specifically a Sunshine kit, no. 17.5, for a Southern Pacific Class B-50-14 box car.
As it happens, I already have two of these on the layout, not an excessive number since SP built 3300 of these (and 3700 of the very similar Class B-50-13 cars), all in 1924, and all by Standard Steel Car. But for this last Class B-50-14 model, I wanted to represent one of the cars that SP included as part of its sale of the Southern Pacific of Mexico railroad to the government of Mexico. Most cars of this type in that sale were from Class B-50-13, but some B-50-14s were included too.
These two classes of cars had single-sheathed sides and ends as built, but in the 1930s, nearly all of the Class B-50-14 cars were given Dreadnaught steel ends. This class, like B-50-13, had a range of roofs, including Chicago-Cleveland early “Viking,” Murphy radial, and Hutchins. All cars seem to have kept their wooden Camel doors all their lives. For more on class history, see my Volume 4, “Box Cars,” in the series Southern Pacific Freight Cars (Signature Press, revised edition, 2014).
The photo above, taken at Ithaca, New York in 1950, shows a 26-year old car, still with its vertical-staff handbrake; note it has one T-section truck and one U-section truck (photographer unknown; Arnold Menke collection). Nearly all the cars got AB brakes during 1947–48 but only a minority were ever equipped with vertical-wheel geared handbrake equipment. These cars survived well until about 1950, but scrapping became extensive after that year.
The first step in a house car model like this is to assemble the basic box. Careful checking to make sure the sides are same length is essential, and dry-fitting of the roof to sides and ends, and likewise of the floor to sides and ends, is equally important so that the box will fit tightly. I assembled mine with CA, and here is is how it looked at this point.
The next step is to apply details to the box. I chose to use parts other than the kit parts. I began with A-Line “Style A” sill steps and Westerfield scale 18-inch wire grab irons. I drilled holes and attached the grabs with CA, while the sill steps were attached with canopy glue — an adhesive that remains tough and flexible.
Next I applied brake gear to the underbody. I didn’t apply a train line, as that is invisible on the completed model, and only installed brake rodding, since piping also would be all but invisible. The K brake would have only survived on a minimum of cars by the sale of SP de M in 1951, but was exactly the kind of car that SP would have made surplus. Note that I have excessively angled the brake rods toward the trucks to avoid interference with truck rotation.
Very visible here are the “interim truck support blocks” which are installed until the car is painted.
Since nearly all these cars kept their vertical-staff handbrakes to the end, I decided to model the B end of the car that way. I had in my parts box a nice brake platform in brass (likely Cal-Scale), and I attached it to the proper end of the model. I then soldered a brass brake wheel to a length of 0.019-inch brass wire, and inserted the assembly into the brake platform parts and to a Tichy bottom stirrup Here is what the prototype looked like, shown at Car Shop 9, Sacramento General Shops, September 1934 (SP photo).
The car shown above has had a geared arrangement added at the end sill of the handbrake shaft, making it a power brake. Many cars, however, never received this upgrade. Shown below is the B end of my model, which can be compared to the photo above, but without the geared detail. Obviously I still need to add the retainer and ladder.
Completing the sides and ends with the ladders, installing coupleers, and building the running boards will be the next steps. I will address them in a following post.
Tony Thompson
Monday, August 31, 2020
Friday, August 28, 2020
Restoring a Devore kit, Part 2
Only the older readers of this blog will have personal memory of the kit line from Devore, which were cast metal kits of various kinds. I showed an example of their distinctive kit box in my prior pjost about a Devore model of a depressed-center flat car that I have been working on ( here’s a link: https://modelingthesp.blogspot.com/2019/11/repairing-ancient-devore-kit.html ). Dating as they do to the early 1950s, these models certainly qualify as classics.
When I last reported, I had cleaned up the car body, replaced the grab irons, and added sill steps. Next I needed to figure out how to install couplers. The Devore body has small molded holes as might suit escutcheon pins, and aside from the undesirability of such an attachment, they are not located so that they would attach a Kadee coupler box.
To install a Kadee box, I simply used canopy glue to attach Evergreen scale 6 x 10-inch styrene strip to serve as an attachment pads between the center sills, then drilled the pads. Finally, I used a bottoming tap (sometimes called a “gun tap”) to tap the blind holes for 2-56 screws. Here you can see the white pads at each end.
I next added the Kadee boxes but not the couplers, so that the boxes would be painted along with the rest of the body. I also added a Tichy brake wheel on a brass wire staff. Then I applied Tamiya “Fine Surface Primer,” to serve both as a witness coat and an undercoat for the final color.
Note here that the model is resting on what I have called “Interim Truck Support Blocks,” for painting and other work prior to adding the final trucks that the car will have in service. I have shown what these look like in a prior post: https://modelingthesp.blogspot.com/2014/11/interim-truck-support-blocks.html .
For the final color, I chose Tamiya “Red Brown,” TS-1, which although more brown than most boxcar red shades, will not be very noticeable after weathering. Once that paint was dry, I added Kadee no. 158 couplers, pretty much my standard for new coupler installations. In fact, I buy them in the 25-pair “bulk packs” because I also use them steadily for replacing off-brand Kadee copies on RTR models as well as sometimes replacing Kadee no. 5 couplers on a car in the shop for other work.
I should mention that I feel no particular need to replace no. 5s in my fleet, because in my experience at least, they play perfectly well with no. 58s. But I do prefer the smaller heads of the no. 58 style, and gradually that type is coming to dominate my fleet.
One of the railroads that owned a 40-foot depressed-center flat car like this was Milwaukee Road. By the time I model, most Milwaukee heavy-duty cars had been renumbered with six-digit numbers, but I will use the original number on this car, MILW 67025 (later 601025). I used a mixture of old Champ sets for the lettering, then added paint patches for reweigh and repack stencils.
Lastly, I chose a pair of Tahoe Model Works trucks, 70-ton capacity (TMW-110) for the car, since I know from the Equipment Register that it was a 70-ton car. After attaching the trucks, the model was then weathered, using my usual combinations of acrylic washes (for more on that technique, see the “Reference Pages” at the top right of this blog post). Note that the car decks at each end are wood planked, and accordingly are weathered differently.
Although I don’t want to address it in the present post, I bought a load for this car back when I first owned it (never mind exactly when that was!). It is a transformer load by Cliff Line, and it has suffered a little wear and tear over the years, so it too will need some restoration. More on that later.
With these steps completed, the Devore flat car is ready for service. I had stored this model in a somewhat derelict condition, still with the Varney dummy couplers on it that I had used as a teenager, and have finally gotten to the restoration, It was fun to work on, and satisfying to complete.
Tony Thompson
Tuesday, August 25, 2020
Another family operating session
Though for obvious reasons few if any operating sessions are taking place on most layouts, and haven’t taken place for some months, I did devise a way to do at least a little operating on my layout. That took place because our granddaughter was visiting for two weeks in mid-July. I wrote about those sessions in an earlier post (see it at: https://modelingthesp.blogspot.com/2020/07/pandemic-operating-sessions.html ).
After a few weeks back at home, the granddaughter returned for two more weeks with us (also providing a change of scene for her parents, both of whom are working). Once again, as we did in the first round, the goal of the operating sessions in part was to include one of the Accurail models I had helped her build, a Santa Fe box car, that naturally she was delighted to see in service.
The model, of course, is very much a stand-in, having almost nothing in common with the prototype Santa Fe Class FE-15 “whalebelly” cars for which it’s lettered, except double doors and 40-foot length. But naturally that’s not of interest to the owner.
I mentioned in my previous post about operating with her, that though she is eight and a half, she is pretty skillful with an NCE throttle, so it was natural to assign her as the engineer for a session. But she had paid close attention in that previous pair of sessions, and was clearly beginning to understand switching and waybills.
So once again, I devised a simplified, cut-down range of work for a session, just as I had done before, but now I added a little complexity. In fact, the two of them, my wife Mary (as conductor), along with the young engineer, were both getting better, so further challenge should be a good addition.
This went well in the first new session, taking place entirely on the side of the layout where the town of Shumala is located. They had more run-around moves to figure out and carry out, but handled them pretty well. Here you see the engineer (standing on a step-stool) and Mary at work.
This all went so well, in fact, that I proposed we have a further session a few days later, and that we promote the engineer to conductor. (I think Mary did not love the conductor’s job, though I tried to offer constructive suggestions.) So once again, I set up a simplified session, this time on the other side of the layout at Ballard, but with distinctly more switching than the first time they had worked there, including running around and some car-sorting challenges. Looks like the engineer is still getting the hang of that throttle.
This went well, but I think the newly promoted conductor found that doing the entire job of planning the switching was a little bigger than she expected. But she very clearly understood what she was doing, and rarely made a false move.
Again, as before, I believe fun was had by all. I found it interesting to work through what was needed for an interesting but not too complex session, and Mary and I helped our granddaughter have fun on the layout (and of course seeing and switching her own box car in service). Maybe this fall we will do more of these sessions!
Tony Thompson
Saturday, August 22, 2020
Handouts: Tank car waybills
This post serves the purpose of a handout for a talk. Virtual handouts have the advantage that they can include live internet links and are thus much more convenient to use. This particular post relates to the “Hindsight 20/20” virtual RPM meeting of today, August 22, during which my talk was entitled “Tank Car Operations with Realistic Waybills.”
This talk topic is interesting in that it combines two complex topics, tank cars and tank car operations in the prototype, and waybills, as they are specifically used for tank car traffic. Both topics readily provide material for full-hour talks or more, and in fact I have given such talks. This particular presentation was an effort to talk about the two topics together, necessarily briefly. Here are the further resources:
For the tank car portion of the talk, there is a fairly complete tank car handout, containing the drawings shown and other images, at this post, linked to Google Drive.
https://modelingthesp.blogspot.com/2013/01/new-tank-car-handout.html
In addition, I wrote a two-part article for Model Railroad Hobbyist (MRH), which appeared in the issues for February and March, 2016. These are still available for free, to read online or to download for your own use, at their web site, www.mrhmag.com . The first article is about prototype tank cars, the second article is about tank car modeling.
Lastly on tank cars, I have written blog posts about any number of model tank car projects, and they can most easily be found by using the blog search box at upper right, using such search terms as “tank cars” or perhaps “tank car models.” Below is shown one of my favorite photos from the clinic, a Stauffer acid tank car (Richard Hendrickson collection), clearly showing the distinctive dome of such cars.
The waybill part of the talk has even more background. I have written several articles for publication, two of the most recent being one in MRH, the issue for January 2018 and still available, like the articles mentioned above about tank cars, and one for The Dispatcher’s Office (magazine of the Operations SIG on NMRA), in the issue for October 2016.
More significantly for the present moment, there are some on-line resources. These are in two forms: first, handouts for talks, and second, collected batches of posts, which may also be helpful. Here is a link to a recent handout, likewise available on Google Drive.
https://modelingthesp.blogspot.com/2020/01/handout-for-new-waybill-talk.html
This above link also provides links to an earlier handout, with somewhat different material.
Secondly, as I mentioned, there are some collected sets of waybill posts. Mike White collected my first 26 posts on the topic, as available at this link: https://modelingthesp.blogspot.com/2013/02/waybills-27-collected-posts.html . Subsequently Mike also collected the next 20 posts, along with some related posts about operations which touched on waybills, and that set is available here:
https://modelingthesp.blogspot.com/2015/12/waybill-posts-collected.html
Since those posts, I have slowly added perhaps 20 more beyond what Mike collected.These are readily found in the blog archive by using the search box at upper right of this post, and using a search term such as "waybills," or better yet, using the series title, “Waybills, Part,” which is how I have named each numbered Part.
Included in the talk was a brief mention of the larger (5 x 7 inches) waybills I have recently assembled for a friend’s layout, and no, I am not heading that direction myself; below I show one of the small waybills (2.5 x 3.5 inches) that remains standard on my layout, at left, and at right the larger format. Both bills were chosen to be for tank cars. (Development of the larger form was described in a previous blog post; you can find it here: https://modelingthesp.blogspot.com/2020/06/waybills-part-69-another-approach.html .)
Beyond this, if there are still questions, please contact me directly and I will be happy to try and answer or clarify any issues.
Tony Thompson
Wednesday, August 19, 2020
Railroad crossings, Part 3
In a previous post, I mentioned my article in the July 2020 issue of Model Railroad Hobbyist or MRH, which was about railroad crossing signs, known as crossbucks. In that post, I included a photo of one of the three railroad crossings that I described in the article (you can see that post here: https://modelingthesp.blogspot.com/2020/07/my-latest-mrh-column-crossbucks.html ). I followed that up by describing two railroad crossings in my town of Santa Rosalia, different in that they required less complete crossing protection (read that post at: https://modelingthesp.blogspot.com/2020/08/more-crossbuck-installations.html ).
But the layout has still other railroad crossings, beyond what I have already shown, and some have challenges in design. This post presents one of them, chosen because it involves a little more than just installing a pair of crossbucks.
One of those additional crossings is Alder Street in East Shumala on my layout. Alder St. passes between two industries, Caslon Printing and Phelan & Taylor Packing, and heads out of town. The two tracks that are crossed are sidings, and sometimes such crossings don’t receive crossbucks, but if Alder St. has much traffic, they should certainly be there. I will add them.
As you see below, Alder St. has an intersection with Pismo Dunes Road at the gas station (note street sign at corner). As you can see, the complication here is that the crossing is only a short distance from the intersection
This short distance means that motorists don’t have much warning after turning the corner from Pismo Dunes Road. A crossing like this would be marked with an Advance Warning Sign if there were sufficient distance (100 feet minimum), but there is considerably less distance here than that.
The signage solution to this problem is a sign on Pismo Dunes to provide this warning. For an example of the prototype signage of this type, here is a sign alongside U.S. Highway 101, just north of Willits, California, and the railroad near the highway that is being protected is the Northwestern Pacific.
Such signs, of course, are made in both left-handed and right-handed versions. The one that I am going to use is right-handed (meaning protecting a right turn), as shown below.
This sign was reduced to HO scale, printed out on a color laser printer, cut out and attached to a white post and placed on Pismo Dunes Road, visible as drivers would approach the intersection, though at a distance considerably compressed relative to what the prototype would do. This post looks kind of oversize, so may be replaced.
Then of course a pair of crossbucks, one each side of the tracks, is added on Alder Street. This street is imagined to extend some ways beyond the tracks, so both sides need warnings. Stop lines were also added on the pavement. (You can click on the image to enlarge it if you wish.)
With these installations, my Alder Street crossing is properly protected. I have found it interesting to try and search out how the prototype handled situations like the ones we find on our layouts, and then to try and implement them. I have a couple more yet to do, and will touch on them in future posts.
Tony Thompson
Sunday, August 16, 2020
Freight car guy stuff, Part 5
I have been writing a series of posts on related topics, all subsumed under one title. These topics stem from having once been asked at a model railroad club, “Are you the freight car guy?” I have explored what various things that description might mean (for my original post with the history, you can use this link: https://modelingthesp.blogspot.com/2019/10/whats-freight-car-guy.html ).
Most recently, I showed the Northern Pacific reefer that is part of a group I am repainting and relettering for Paul Weiss’s Central Vermont layout, replacing some ancient paint schemes that could not have existed in his modeling year of 1956 (that post is at: https://modelingthesp.blogspot.com/2020/07/freight-car-guy-stuff-part-4.html ).
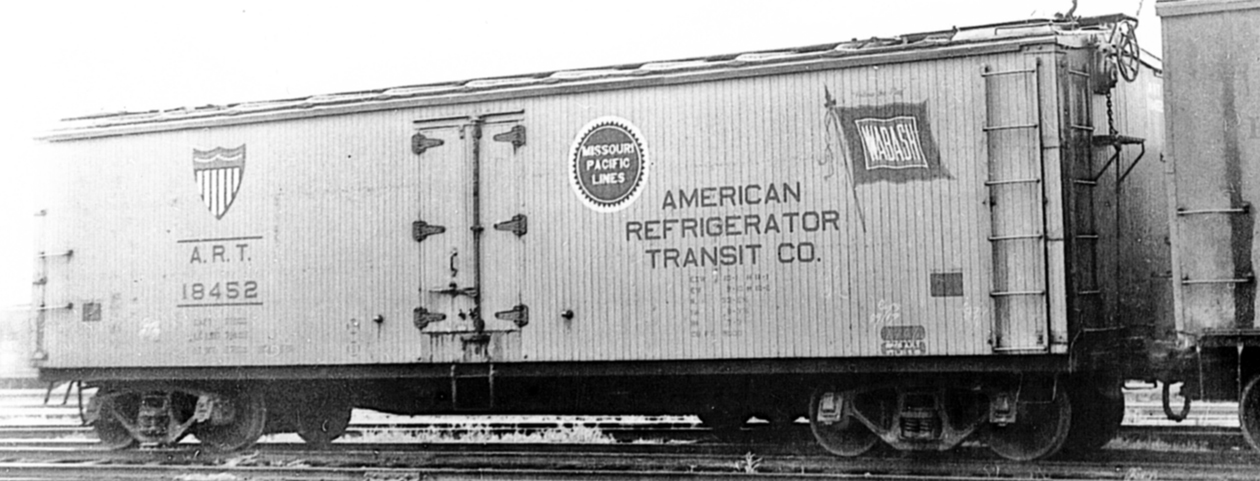
As I mentioned in that Part 4 post, the remaining four of the five total reefers being refinished were to be two each of American Refrigerator Transit (ART) and Pacific Fruit Express (PFE). For PFE, the post-1953 scheme with all-orange sides was chosen. For the ART cars, it seemed reasonable to letter both in the post-1951 scheme that had the emblems of both railroad owners, Wabash and Missouri Pacific, on each side.
As was shown in the recent book about ART (American Refrigerator Transit, S.T. Maher, G.J. Michels and Gene Semon, Signature Press, 2017), this scheme was supposed to have the MoPac emblem toward the B end of the car on both sides of wood-sheathed cars, but many photographs show the reverse.Here’s one example (Gene Semon collection):
Note that grab irons and ladders are yellow, but door hardware is still black. In the middle 1950s, the door hardware became yellow, and stripes around reporting marks were discontinued.
Many of the older ART cars were rebuilt during 1953–58 and renumbered into the 50000 series, such as this car, with “correct” emblem placement (John Maxwell photo at Denver, 1958, Dick Kuelbs collection); note that the deep center sill was retained. Side sills and steps are black.
With that prototype background, here are the two models I painted and lettered. I chose two slightly different lettering schemes (you can click on the image to enlarge it if you wish), with the newer one being a little less weathered. Decals were the Mask Island product sold by the Missouri Pacific Historical Society.
For the PFE cars, I chose the post-1953 scheme. The prototype photo below of a Class R-30-9 car (Charles Winters collection) clearly shows the body appearance of this class, which I was choosing to represent on the Accurail body. Note that side hardware is all orange.
The photo , however, actually shows the 1950 paint scheme, with the emblems identically placed on both sides. In 1953, the SP emblem moved so that it was always placed toward the B end, and stripes and periods in reporting marks were dropped. In addition, side sills and steps became orange.
(For extensive information on PFE paint schemes, see the Dick Harley’s PFE section of the Southern Pacific Freight Car Painting and Lettering Guide, Dick Harley and Anthony W. Thompson, SP Historical & Technical Society, Upland, CA, 2016.)
The changes to the original Accurail models were to replace the fishbelly center sills with straight styrene strips, and to add geared vertical-wheel handbrakes in place of the original staff handbrakes. The cars were then lettered with the modern version of Microscale 87-501, incorporating Dick Harley’s artwork (do not use old versions of this set!). Shown below are the left side of the car at left, and the right side of the car at right.
This has been a fun and interesting project, making useful layout freight cars out of models that were totally unsuitable for a 1956 layout. (And I’ll admit it, I do enjoy applying decals.) May these cars have long and glorious careers on the Central Vermont!
Tony Thompson
Thursday, August 13, 2020
Layout models and all that
There are a few on-line email discussion groups that I’ve belonged to for over 20 years. And one topic that comes up again and again is that of “layout models,” meaning something well short of museum quality, but still . . . kind of good . . . whatever that means. I’ve been reflecting on the topic recently, thus this post.
One aspect of this topic is the “freight car guy” perspective that I’ve written about in a pair of posts. Those posts are mostly about some car conversions for my friend Bill Kaufman’s layout, but they have a more general background than that one car fleet. Here are links to a couple of those posts:
https://modelingthesp.blogspot.com/2019/10/whats-freight-car-guy.html
https://modelingthesp.blogspot.com/2020/05/yet-more-freight-car-guy-stuff.html
But now I am turning to a somewhat more general topic, though referring back to those prior posts. The models I showed in those posts are not “totally accurate,” each falling short in some way. Each has some degree of compromise from strict prototype correctness.
Now I hasten to say that I have built competition models and entered them in the NMRA model contests, at both regional and national levels, and won some awards; I have judged in the NMRA contest at national and regional levels; and I was Contest Chair in Pacific Coast Region of NMRA for five years, supervising contests, recruiting and training judges, and overseeing judging at conventions. I think I have a fairly clear idea of what is meant by a “contest” model.
And even in that regime, there are models and there are models. Some years ago, my Pittsburgh friend, the late Larry Kline, scratchbuilt a War Emergency B&O hopper car in O scale, with all the wood sheathing parts made of wood and all other parts made of metal; and it had working hand brakes, so that rotating the brake wheel applied the brakes. It was a superb model, and it placed First in the Freight Car category at that year’s NMRA National Convention. Not every winning contest model goes that far, of course, but let’s not neglect that end of the spectrum.
Larry did have an extensive O scale layout, and would have been the first to tell you that he built no other models, zero, to the standard of that hopper car. It was a contest model, built mostly to prove to himself that he could do it. It was far beyond what even a craftsman like Larry would call a “layout model.”
That brings me to a point of contrast. Let’s imagine a layout operating session. I show below part of the cover photo from the July 1960 issue of Model Railroader magazine, showing Terry Walsh signaling to the engineer who is switching that reefer on Terry’s layout. (I used Terry’s track plan for his town of West Agony, shown in that issue, as the basis for the town of Ballard on my own layout.)
Now let’s consider rolling stock. Instead of thinking about Larry’s contest-winning B&O hopper car, let us imagine instead an Athearn 40-foot box car, unaltered, unweathered, and in fact right out of the “Blue Box,” lettered for, perhaps, Chicago & North Western. And further, imagine that this car is in an operating session, part of a local freight switching job. Does the conductor on the job examine the box car as a model? does he look at details such as the door “claws” or molded-on ladders or clunky running board?
Of course he does not (even if perchance he’s a “freight car guy”) — he has a job to do. He looks at the car number, 77216, and the CNW reporting marks, notes that they match his switch list, and starts planning how to maneuver the car into the loading dock at Mammoth Manufacturing. That the car body represents a pre-war box car, and is numbered for a post-war car, matters not in the least, any more than the details did, or any more than the era-correctness of the lettering scheme on the model. He knows where that car is supposed to go, and he will get it there. As others have observed, the individual car in an operating session often plays very much the role of a player’s token in a board game.
So for our operating sessions, might we just as well run out-of-the-box Athearn rolling stock and call it a day? As with so many things in modeling, I would repeat one of the oldest mantras in the hobby: every modeler does every part of the hobby to his own satisfaction.
I have indeed operated on beautifully scenicked layouts, on which the rolling stock was in fact totally out-of-the-box; and I have operated contest-quality rolling stock on “Plywood Pacific” layouts. Leaving aside the likely response of either layout owner, that “I haven’t gotten to that part yet,” these and many other levels of layout modeling can definitely yield a great deal of operating fun — regardless of freight car model quality.
The same amount of fun can be enjoyed, of course, by those building models just as individual models, with only the vaguest intention to populate a layout with them. So I guess my point would be this. Modeling of anything, from scenery to locomotives to structures to highway vehicles to freight cars, is always going to span a spectrum of results. Decide where you want to be, and do your best to get there. More on this later.
Tony Thompson
Subscribe to:
Posts (Atom)