But all three of the versions just mentioned are all the same class, SP’s G-50-23. This is a quite reasonable choice to model; there were 1000 cars in this class, built by General American in 1949 and numbered 150000–150999. Nothing wrong with this class. But the previous year, Pressed Steel Car Company built an even bigger class, Class G-50-20, numbering 1500 cars (cars 56330–57829). There have been no models of this class.
Are they very different? They had many similarities. All were Enterprise Railway Equipment Company designs, with respect to their drop doors and door operating mechanisms. They had the same underframe design and the same composite sides. Indeed, at a glance they look essentially identical. But they are not, because the ends were different. The familiar models of Class G-50-23 had the Improved Dreadnaught ends of their era, and look like many other freight cars of that time. But the Class G-50-20 cars had reverse Dreadnaught ends, that is, with the main or large ribs facing inward into the car.
Let me illustrate this difference in car ends with SP’s Class G-50-13, a 48-foot tight-bottom gondola built in SP shops in 1929. First, the exterior of the car end, which is a reverse Dreadnaught (SP photo).

As stated, this end has the major or large ribs facing inward. That is demonstrated by an interior view looking toward the far end of the car, where the inside of the end looks like a Dreadnaught end usually looks from the outside (SP photo).

The reason for reversing the end is that the inside, in this arrangement, is the stiffer of the two possibilities, thus better resists impacts from the load inside.
How much does this matter? I know of a couple of modelers who have simply numbered a few of the Class G-50-23 models with numbers from the G-50-20 series, assuming that few would notice or recognize the ends being slightly wrong.
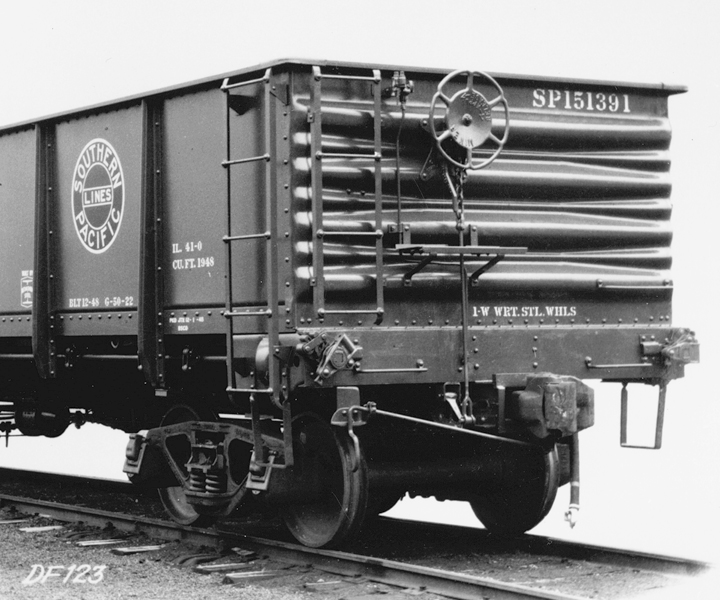
But a person who wants to really get the models right would prefer to try and find a way produce the correct ends for G-50-20, and add them to one of the G-50-23 kits. And from the right angle, the reverse Dreadnaught ends are very prominent. The photo below, a detail of one taken at Cooper, California in 1948 by an SP photographer (it’s SP image N-1672-15, from the John R. Signor collection) shows this clearly.

The car is being loaded with sugar beets at a Union Sugar Company loader.
Our problem here is that the commercial ends from either Red Caboose or Detail Associates are accurate Improved Dreadnaught ends, and thus have minor ribs between the major ribs, and also are designed to be facing outward. That of course is the correct end for SP Class G-50-23, and is shown well in this Bethlehem Steel photo of an all-steel G-50-22 gondola with that same end:
So how can the correct reverse-Dreadnaught gondola end be produced? Lacking a good, two-sided end of this type, so that both the interior and exterior would look right, I decided to see if I could modify the Improved Dreadnaught ends produced by either Detail Associates or Red Caboose. I chose the Detail Associates end, part no. 6221, for reasons that will become clear later.
I simply used Tamiya putty to fill the narrow valley on top of each rib on the former “inside,” then cleaned up the excess putty with a file. Once this all seemed far enough along, but hard to judge on the black plastic, I applied a light “witness coat” of light gray to assess progress. Shown below is an original Detail Associates end at left, showing what is molded as the inside of the end, while at right is the end as I modified it, to become the outside of the end.

On the other side of the end, the problem is the minor rib running all the way across between the major ribs, as in the prototype photo above of SP 151391. Here, I used a curved file, sometimes called a “riffler” file, to file away the offending minor rib. This went surprisingly easily, and again, with a “witness coat,” it can be compared to the Detail Associates original at left. The new appearance is most easily seen at the right edge of the gray end:

With the modification technique seeming to work, I now need to modify the second end, add the A and B end details, and paint. Then I can join the assembly process of the rest of the kit. But I will describe all that in a future post.
Tony Thompson
No comments:
Post a Comment