Wednesday, August 8, 2018

Union Oil gas station, Part 2

In Part 1 of this topic, I described some of the corporate background and history of the Union Oil Company and its marketing look (see that post at: http://modelingthesp.blogspot.com/2015/12/modeling-gas-station.html ). In that post, I identified the City Classics kit, the “Crafton Avenue Gas Station,” as the starting point I wanted to use. I have also delved into Union Oil in connection with the Union bulk oil dealership that I modeled on my layout (such as: http://modelingthesp.blogspot.com/2015/09/modeling-union-oil-dealer-part-2.html ).
     Shown below is the kit as one would purchase it (this one is the upgraded version with more oil company signs — the red notice at mid-package announces this). The previous post showed the earlier kit package without the red notice.


     The first problem I encountered in preparing to use the kit is that the footprint of the building only just fits my space on the layout, without adequate (or realistic) space for the gas pump island and parking by the restrooms. Shown below is the actual layout space, between my stock pen at right, and Alder Street at the left. This street corner between Alder St. and Pismo Dunes Road, foreground, would be a classic location for a service station, so I will have to adjust the structure to fit.


     I decided I could readily kitbash the structure to fit. In particular, I decided I could cut down the two service bays to one. The way to do this is to use the panel lines already molded into the kit walls as guides. You can just discern these below (you may wish to click on the image to enlarge it). The critical wall piece is at top left of the photo, where the middle service door would be cut so as to match it up wit the end of the building, in effect cutting away the outer door.


 The two arrows show the selected panel line, which happens to lie at the midpoint of the leftmost windows in each door.
     This cutting deserves care and that means slow, attentive work, but it is not difficult. I used a razor saw. Note that the only critical part is the front wall, shown above. The back wall also needs to be shortened, of course, but is a plain brick wall and any trace of a cut will not be prominent. Here are my cuts:


I cleaned up the cut surfaces with a file before joining, but minimally so, as the saw kerf has already removed material. The main point is to make sure the cut surfaces are perpendicular to the front of the building. Then I make sure the edges to be glued are well softened with the glue, so that they can be pressed together to squeeze out any irregularities and make a good “welded” joint. Here is my assembled front wall:


     At this point, following the kit directions would mean assembling the building. But since stations like this usually had some kind of color trim, this would be a good time to plan for that. Searching on the Internet for photos of Union 76 gas stations does yield plenty of images, but the decoration scheme varied widely.
     Here are the general patterns as I read them. First, I have never found a vintage 76 station with any color trim around the bottom of the building (though many oil companies did paint this area with a company color). The mid-1950s photo below shows an example. This photo is from at least 1954, since that’s a 1954 model Chevrolet. It’s surprising that “new gasoline” is still being touted, as Union decided to call its “high-test" gasoline Union 7600 in 1947. Note also that the pumps are white, with a color halfway up the sides. Color photos show that this side color was always blue.


When color accents are seen on vintage 76 stations at all, they are an orange stripe high on the building (including the canopy, if one is present, as in the image above). A fine public-domain 76 image from the early 1950s was used by Wikipedia as an illustration of a gas station (see: https://en.wikipedia.org/wiki/76_(gas_station ); the tower is a feature of some stations built before World War II, but clearly the building is white, with a high orange stripe.


Noteworthy here is the “semaphore” traffic signal, classically associated with the City of Los Angeles in this era.
      I will figure on a high, orange stripe around my gas station, and will arrange it before assembling my structure.
Tony Thompson
Sunday, August 5, 2018

Adding 40-foot flat cars, Part 3

I began this thread with a description of parts of my fleet of flat cars, and the desire to add some 40-foot flat cars with fishbelly side sills. One example is the USRA flat car design, which I had in the form of a very nice kit by Red Caboose. (My assembly of this straightforward kit is not being described, only the changes or extensions I have made, relative to the kit directions.) Then I followed that first, introductory post with discussion of several additional considerations on prototype details. You can read that second post at this link: http://modelingthesp.blogspot.com/2018/07/adding-40-foot-flat-cars-part-2.html .
     Before I begin this post, let me address an interesting question I received, that deserves a response. How many of the issues I am raising with kits for this car, would be relevant in a ready-to-run version (currently about all there is)? Obviously the issue of inadequate weight is the same — and has the same solutions. Whether one wishes to address the various detail questions, especially brake gear, is an individual choice, but the same changes certainly could be made to the RTR models.
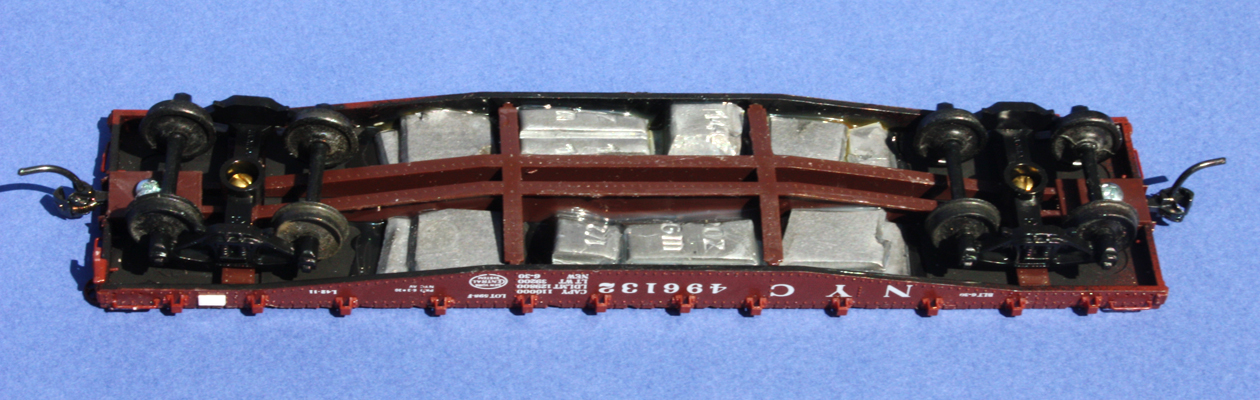
     An important point in any freight car assembly, including these Red Caboose flat cars, is how you intend to install trucks and couplers. I really prefer machine screws for truck attachment, instead of the self-tapping screws in the kit. and accordingly tapped the truck screw hole 2-56, using a “bottoming tap” to get threads nearly to the bottom of the hole. I also dislike (based on experience) coupler boxes with press-fit lids, as this kit provides. I used the kit’s self-tapping screws for this job, after drilling out the lids, but this is not a great solution. (Whenever I do find myself having to use a press-fit lid, I generally use a Kadee whisker coupler.) Here you can see the 3/16-inch brass 2-56 screws in the trucks.


Personally, I do not run plastic wheels on my layout, so the wheelsets have been changed out to Kadee. These are not great fits with the kit truck frames and may be replaced with Reboxx.
     One point I should make before continuing is that Red Caboose, like so many manufacturers, has not only decorated this kit for actual owners of the USRA 42-foot design, but has added a whole bunch of popular railroads which never owned this car. That’s okay, it is just the reality of commercial products, but one should always check appropriate sources to know whether a particular railroad really did buy these cars. The best source I know of is a comprehensive article by Richard Hendrickson and published in Railmodel Journal (“USRA-Design 42-foot Flat Cars,” Vol. 8, No. 8, pp. 53–59, January 1997). The article includes an extensive roster of roads that owned these cars, as well as cars very close to the USRA design.
     One railroad for which Red Caboose decorated kits is Southern Pacific. But SP most certainly did not own any cars close to this USRA design. Accordingly any of the Red Caboose SP-decorated kits is just plain bogus. I bought one, mainly to save someone else from perhaps believing it was an accurate kit, and I will be repainting part or all of the sides. Here is how it looks, in stock form:


As I said, not close at all. And this car number,  42718, would actually be a member of Class F-50-9, a design which had straight side sills:


This actual car class is very accurately modeled by the Owl Mountain kit, cited in the first post in this thread. Obviously it is not remotely like the Red Caboose model. Well, that’s a little strong. After all, it is about 40 feet long.
     The Red Caboose car is also lettered as Class F-50-4, of class of not at all the same appearance, and an entirely different number series to boot. So this lettering is totally imaginary. Like I said, understandable as a commercial strategy, but no connection to prototype modeling.
     I simply painted out the Southern Pacific road name and number, and other SP specifics, such as the class identification. Then, as I mentioned in Part 2, I chose to letter the car for Chicago & North Western, a road that owned 1200 or so of these cars. I had some old Champ decal road name sets on hand, and chose a car number from the 1925-built series of 500 CNW cars, numbers 41501–42499 (odd numbers only). Here’s my ex-SP model, prior to weathering the deck.


Note that I have added a brass (Precision Scale) brake wheel, soldered to brass wire, to make a durable vertical-staff handbrake.
     Last came weathering. I have expounded elsewhere about flat car deck weathering, and that discussion will provide background if you like (that post is at: http://modelingthesp.blogspot.com/2011/05/weathering-flat-car-decks.html ). I used the same method here. One point to recognize: many prototype photos show that although flat car decks were not painted, the deck edges often did get painted when cars were repainted. So feel free to leave the kit paint on the plank ends above the car side. The two cars with decks weathered are shown below.


     At this point, reweigh and repack data need to be added, but there is nothing noteworthy about those well-documented details, so I will leave the project here. I now have the two additional flat cars I wanted, to diversify further my fleet of flat cars.
Tony Thompson

Thursday, August 2, 2018

Terrific new book on freight cars

I have just received my copy of Steve Hile’s new book on UTLX tank cars. It is a superb collection of information and photos, and anyone interested at all in steam era and transition era freight cars will find it both interesting and most informative. The publisher is Speedwitch Media and the cover price is $85. The cover is shown below. You can purchase the book online at the Speedwitch site, www.speedwitchmedia.com .


This is an 8.6 x 11-inch hardbound book, with 278 photos and 36 drawings (complete cars and car details) in its 246 pages. It covers the span of time from the beginning of the 20th century, to 1952.
     Why is this book important? For one thing, in 1950 the UTLX fleet was the largest group of tank cars in North America, with about 38,700 cars. General American, then the predominant leasing company, was right behind at 37,500 cars, with Shippers Car Line (the leasing arm of American Car & Foundry) a distant third at 7,500 cars. (The largest railroad fleet at that time, Santa Fe, was a mere 3,570 cars.) Within the UTLX fleet, one design type, the Class X-3, comprised about 18,000 cars, nearly half the fleet, though these cars were of several different sizes. A car fleet like this simply begs to be described and understood.
     Union Tank Line, as most readers know, was an important component of the Standard Oil trust before its breakup in 1911. Thereafter, Union continued as an independent company, but like many of the “baby Standards” after the breakup, retained very cordial relations with its former Standard brethren. For decades after 1911, many refineries of Standard Oil descendants continued to be served almost exclusively by UTL tank cars.
     Steve Hile explains in the book that he did get some research assistance from Union Tank Car Company, still in business today, though most of their older records are long gone. They did provide a substantial number of excellent photos, nearly all of which are previously unpublished. The roster information in the book, a great assist to the prototype modeler, had to be pieced together from a variety of sources, because the original UTL data no longer exist. But the rosters are a great addition to our knowledge, even if a few gaps remain in the information.
     The book has only a limited amount of color photography, though for subject matter which was painted black, this is not a serious limitation. Photographs in the book are printed at a size which is very helpful for studying details. I show below a sample spread across two pages (pages 86 and 87), and you can see the point I am making.


     There are so many things that a tank car enthusiast can learn in this book, more than I could begin to present here. But I will show one example of a favorite photo in the book, taken at Frankfort, Michigan about 1950. It shows a workman placing the sump pipe into a tank car for top unloading at an oil dealer, using the standpipe behind him. Note that the standpipe has a red pipe and a green pipe, presumably for different products. In the foreground is a 1947 Ford truck, lettered for Standard Oil of Indiana, which may have brought the workman to the site. (The photo is from the UTLX Collection.)


     In his acknowledgements, author Steve Hile credits the late Richard Hendrickson with getting him started on an interest in UTLX cars, as well as supplying information and photos for the book. The result of Steve’s work is a book that Richard would have been delighted to see. It is exactly what he believed the hobby needed: complete and accurate information on the prototype.
     This is a great book for freight car people, and I cannot recommend it highly enough. Publisher Ted Culotta of Speedwitch, along with author Hile, deserves great credit for bringing this book to us all. Warm thanks to you both.
Tony Thompson

Tuesday, July 31, 2018

More on road signs

Some time back, I posted a pair of commentaries entitled “Streets, Roads and All That,” covering a number of aspects of modeling streets and roads. This included signage. I began with an overview of street-related topics (see that post at: http://modelingthesp.blogspot.com/2013/03/streets-roads-and-all-that.html ), and then went into more detail on the specific subject of railroad grade crossings and the various required signage for them (see this post at: http://modelingthesp.blogspot.com/2013/03/streets-roads-and-all-that-part-2.html ).
     In the present post, my subject is warning signs (a topic introduced in the first of the two posts cited in the paragraph above), and in particular how road ends are identified in signs. I  mentioned in a recent post that I have on my layout some road endings that are unmarked and without barriers, and that I wanted to correct this.  (That post, including an appropriate photo, is at this link: http://modelingthesp.blogspot.com/2018/07/management-by-walking-around.html .) The first requirement for correcting these omissions is, obviously, signage, so I researched the topic on the internet.
     There are a great many variations on “end of road” signs, including such warnings as  “Not A Through Street” and “No Outlet,” but I wanted something to mark the actual street end, not a warning to motorists entering such a street. Here again, there are a bunch of available legends (the choice here can be up to state highway authorities or in some cases to local jurisdictions as well). Below are a few of the ones I considered using.


     Anyone who does highway design or specification will likely be thinking that there are, after all, national sign standards, but in my modeling year of 1953, this was far less pervasive. Today the guiding document is the Manual on Uniform Traffic Control Devices, or MUTCD, though only a minority of states use it even today without modification or extension. The first edition of the MUTCD was in 1935, but widespread federal compliance did not come about until the Interstate highway system was included in the 1961 edition. Warning signs of the type shown above are in the W or “warning” series 14 in the current MUTCD; it observes that local jurisdictions often have variant versions to fit local conditions. (If this subject is interesting to you, feel free to Google a topic like “history of MUTCD” and you will get a great deal more information.)
     Signs like these, of course, are in common use today. One of them that is familiar to me is at the Pier 15 bar and restaurant in San Rafael, California, where a group of friends meets monthly for lunch. Anyone who managed to pass the “End” sign would hit the water!


     Images of signs like the ones shown above, and many, many more, are readily available on the internet, and can be downloaded, then converted down to HO size while increasing resolution so they will print all right. The usual size of yellow warning signs is 24 inches on a side, though larger sizes are used if needed in a particular situation. They are normally placed at least seven feet above the ground.
     I chose different signs for my two road-end situations, matching each to how I perceive each case. For the end of Nipomo Street in my layout town of Ballard (I showed this in the post cited in the second paragraph from the top of the present post) I simply used posts as the barrier, and placed the “End” sign on a pole. (You can click on the image to enlarge it if you wish.)


     For the end of Corralitos Lane in my layout town of Santa Rosalia, a street passing between a Richfield bulk oil dealer (at left in the photo below) and the shipping warehouse of the Coastal Citrus Association, I made a barrier with a horizontal board, and attached the “Road Ends” sign to the barrier. Beyond the barrier are the tracks of the SP branch into Santa Rosalia.


     Adding these signs and barriers fulfills one of the visual shortcomings I recognized on my layout, and I’m happy to have corrected the problem. And it was also interesting to have learned more about road signs and sign history!
Tony Thompson

Saturday, July 28, 2018

My latest column in MRH

My turn in the series of “Getting Real” columns in Model Railroad Hobbyist has come around again. There are five of us doing these columns in rotation, and my latest one is in the new August 2018 issue. (Probably most readers of this blog know by now, but if not: you can read on-line, or download any time, for free, any issue of MRH at their website, www.mrhmag.com .)
     I have been researching rail traffic in recent months, and one very important source of traffic, both for loading and unloading freight cars, is the team track. It may not compete with a giant industry for car volume, but steadily hosts a wide variety of car types and loads. Whether in a small town or big city, team tracks are a kind of “universal industry,” with practically any imaginable cargo being loaded or unloaded there. That was the starting point for my column this time.
     What is interesting to me, beyond the “universal industry” aspect, is that sometimes a small freight shed (far, far less significant than a freight house) would be placed at team tracks where some of the cargo handled might need shelter. Of course, if the team track adjoins a depot, that depot can have a freight room and serve the same purpose. But if a depot is not nearby, a shed may serve the purpose.
     My article is based on a couple of small, prototype Southern Pacific sheds, which are shown in the column. My model shed was very simply built from scratch with styrene strip and sheet of various kinds, amply illustrated in the column, and the shed’s loading dock was built in a similar way. The shed was painted the usual SP color scheme of Colonial Yellow, Light Brown, and Moss Green shingle roof, applied to structures used by or readily visible to the public. Here is a view of my model shed, an image that is different from what was used for the column.


You can see that the sliding door is modeled as slightly open This building is only 10 x 12 scale feet.
     In use, a shed like this is simply located conveniently along a segment of team track. Many cargoes may be unloaded or loaded directly between highway trucks and freight cars, but when the cargo needs temporary protection, a shed like this can serve. Here is a view of my completed shed in service at East Shumala on my layout, again a slightly different photo from what I used in MRH.


     This was an interesting though not difficult project. I can now offer better service to shippers and consignees who use the team track at East Shumala.
Tony Thompson

Wednesday, July 25, 2018

Adding 40-foot flat cars, Part 2

I began this thread by describing needs of my freight car fleet for additional 40-foot flat cars with fishbelly side sills, such as the USRA flat car design, available in a very nice kit by Red Caboose. This is a straightforward kit, so my assembly of it was not described, except to point out where I deviated from the standard assembly process. You can read that first post at this link: http://modelingthesp.blogspot.com/2018/07/adding-some-40-foot-flat-cars.html .
     There are some interesting details to this kit, which offer an opportunity for the modeler to make a variety of changes in its appearance. For example, during the kit assembly, once the stake pockets are installed but before details like grab irons and sill steps are attached, it is worth deciding about a couple of common prototype details that you can add. One of these, that is pretty visible on a flat car, is the brake wheel and staff. We are accustomed to vertical brake staffs, and model flat cars are usually modeled with the brake staff fully extended. But most railroads purchased a drop-staff mechanism for these cars, permitting the brake staff to be dropped down out of the way of long loads.
     Shown below is one example of such a mechanism, this one from Universal Draft Gear Attachment Company. It has a simple locking device which permits the brake staff to be at full height, or for the wheel to be down onto the platform of the flat car, with the shaft still clear of the rail head.


This photo is from the 1928 Car Builders’ Cyclopedia, page 1129.
     This particular drop-shaft arrangement does not have a pocket in the car decking so the wheel can lie flush with the deck top, but the wheel simply rests atop the planking. But a car purchaser could specify that such a pocket be built on the car, if flush placement was desired. For the modeler, it is the work of a few minutes to cut a semi-circular pocket in the end decking.
     It might be noticed by the experienced modeler, that the Red Caboose flat car is designed so the brake staff is near the outside edge of the car end. This was indeed the arrangement on the New York Central flat cars, which are effectively the prototype for this kit. Shown below is a NYC photo of one of the cars of Lot 598-F, when the 300 cars were new in 1930, and the brake staff location is evident.


The photo is a NYC company image, from the John C. LaRue collection, courtesy Richard Hendrickson. (The car was black when built, with an “S” preceding the car number, but by the 1940s both features were gone, and these cars became boxcar red.)
     Most flat cars, however, had the brake gear near the car centerline, as was true on most other freight cars, too. Shown below is an example for a flat car (it happens to be an SP photo of Class F-70-5, and the brake shaft is a drop type). If the railroad you are modeling located its brake gear this way, you may want to modify your Red Caboose kit accordingly. Note also that here the end grab irons are farther from the coupler pocket than on the Red Caboose USRA kit.


I am modeling one New York Central car, for which I will place the brake staff as the kit directs, and one car for Chicago & North Western, for which I will move the staff to the location you see above.
     Freight cars almost always had route card boards. Red Caboose supplies none, perhaps a wise choice, since every railroad seemed to have its own standard location. Prototype photos are your friend in finding out where your model should have these. The NYC cars had them either between the right-hand pair of stake pockets, or between the third and fourth pockets (see photo above). I just used a piece of scale 2 x 6-inch styrene strip.


     Another feature commonly seen but not included in the Red Caboose kit (nor in the USRA design drawings) is end stake pockets. Most railroads specified these for most of the flat cars they purchased or built in home shops. They are readily added by drilling a no. 55 hole, then squaring its shape with a square needle file. It just takes a minute.
     When both the end stake pockets, and also the recess for the dropped brake wheel, are added, you can achieve an appearance like the photo below. And you may recognize that modeling the lowered brake wheel, in addition to being a fairly common prototype sight, also removes the vulnerable tall brake staff from your model. (Note, too, the easily achieved irregular plank ends on the decking.) The lowered brake staff is just visible below the brake wheel. The end grab irons are in the kit location.


     With these details taken care of, I can move on to final decoration of the model. That will be presented in a following post.
Tony Thompson

Sunday, July 22, 2018

Management by walking around

My title for this blog is an old management saying (and not just in industry; a friend who was a petty officer in the Navy said they used it too). But in this post, I’m not addressing that kind of management. Instead, I am going to explain how I use the idea around my layout.
     I always have a short (usually mental) list of layout work that needs to be done. And mostly that’s fine, because as I slowly work through such lists, things do get done. But there is a risk of focusing on a couple of things that happened to have occurred to you, without being systematic about needs. Those “couple of things” may absolutely be needed, but what else are you missing that is lurking out there?
     That’s where the “walking around” part come in. A couple of times a year, I grab a pad of paper or a clipboard, and literally walk around the layout (slowly). Anything needed or desirable or missing or fun that occurs to me gets written down. This is a process just like the classic “brainstorming” directions: any and all ideas that occur to you are to be written down. No ranking of importance, no thinking about how hard or complicated a task might be, just write down all the ideas that pop into your head.
     This of course ought to be a leisurely process, allowing lots of time to look at different features and get ideas about what could be improved or completed, and beyond that, of course, as I said, what’s missing. I make every effort to enjoy one of these walk-arounds. Here I’m “on patrol” with a clipboard at Shumala.


     I often fill a couple of 8.5 x 11 sheets of paper with these ideas. Sometimes I go back around to each one with a clean sheet of paper, and write down more ideas about how a task might get done, or exactly what the desired outcome would be, or whether the task interacts with or has to follow other tasks, and so forth and so on. This fleshes out that first spontaneous list of ideas.
     Often I will take photos (cell phones make this so easy) to make sure I will remember the issue in any particular area. For example, I recently noticed that Cienega Creek in my town of Ballard has had the water surface (made with Gloss Medium) get so dull that the creek looks dry (see below).


This will be easy to fix with another coat of Gloss Medium. As it happens, I have noticed on any number of layout visits that older modeled waterways have become dull and flat on the surface, which certainly changes the look for the worse. I will fix mine.
     Another example is the end of Nipomo Street in Ballard, which has long needed to have one of those “end of street” signs or barriers. I once imagined using the formed sheet steel barriers familiar as guard rails on highways, but realized for my modeling year of 1953, that a plain wooden barrier was more likely, or, in this case where there is an embankment at the end of the street, maybe just a sign. But to illustrate, here is the area I mean, with the street in the center foreground, and you can readily see that something is needed.


     One more example, one that is probably familiar to everyone with a layout more than a couple of years old. It is inescapable that operators’ hands, along with tools, throttles, and paperwork contact the layout in various places, especially at the edges. This is essentially a kind of “wear,” and though one may try to ignore it, looking with a fresh eye shows it immediately. Here’s just one example from my layout, next to the Chamisal Road crossing in Shumala. This was once lush vegetation! (well, kind of). But it needs renewal.


     Usually my next step after writing a list, and (perhaps) taking photos, is to put this material aside, because I know from experience that the ideas will kind of “marinate” in my subconscious, and will gain solidity and detail by the time I come back to them in a few days. I may or may not write down the expanded or “marinated” versions, and in fact the marinating process usually will identify some of the tasks as unnecessary or too complex or not compatible with other tasks. That’s fine, they are easy to cross off the list.
     But most of the ideas usually are indeed worth pursuing, and so I would now try to rank them in terms of importance and urgency. I may also make a list of the various steps that would need to be done to accomplish the tasks of greatest importance. This can lead to a shopping list for the next hobby shop visit, or, failing that, perhaps going on-line to buy what I need — I always try to support hobby shops when I can. (Or someday that hobby shop won’t be there.)
     My final result is usually a three-part list: short-term projects, many of which can be done in an hour or so; medium-term projects, where there may be several hours needed  or some preliminary work has to be done first; and a long-term list, mostly fairly big projects or ones which I am not sure yet how to do. Of course, figuring out how to do one of the latter may move it higher in the list.
     I will confess that one of these “walking around” exercises tends to happen when a layout-oriented event is upcoming, such as a regional NMRA convention where there will be open houses and sign-up operating sessions, and I want the layout to be at its best for that. But I have noticed that if the layout feels a little stale, motivation to work on it is low, other things seem to intervene, then a walking-around exercise often gets me interested again in making more progress.  And inspiration, of course, is how you get from benchwork to trackwork to scenery to operating.
     It works for me. If you ever feel “out of sync” with your layout, you might give it a try. I’d bet you will find a pretty good list of things large and small that would repay some work sessions.
Tony Thompson