Showing posts sorted by relevance for query Route cards. Sort by date Show all posts

Wednesday, December 27, 2023

Route cards, Part 30: modeling

As the post title tells you, I have written a substantial series of posts about route cards. These were initially posts about the prototype size and shape (for example, see this post: http://modelingthesp.blogspot.com/2012/01/route-cards-7.html ). A more recent series of posts has shown a wide variety of prototype route cards (an example can be found at this link: https://modelingthesp.blogspot.com/2023/11/route-cards-part-29-more-on-grading.html ). 

At the risk of repeating earlier material (admittedly, material from several years ago), I often add route card boards to models that don’t already have them, by simply gluing a short length of HO-scale 2 x 6-inch styrene to the car in the appropriate location. This is usually near or above the left-hand truck on each side of the car, or on boxcar doors.

But prototype photos should be always consulted, because sometimes the boards are located in other places on the car side. Here’s an example (SP photo, my collection),  one of the thousands of Enterprise General Service gondolas purchased by Southern Pacific. Obviously the route card is in the far right panel, with a route card on it.

SP modelers for decades have had a serviceable model of this car, in the form of the Ulrich white-metal model. But it was manufactured with no route card board. Most of my Ulrich cars have received one, but I spotted one still needing a board. Here I applied my usual method, small piece of styrene 2 x 6, attached with canopy glue:

Then of course the new board is painted body color. Now we need to put a card on the board.

The modeling approach for route cards has for many modelers, including me, primarily meant adding small squares or rectangles of paper to the route card boards. That looks fine in most situations. But some prototype route cards do have lettering on them big enough to read. Here’s an SP example, from a previous post (this card, and its meaning, were at: https://modelingthesp.blogspot.com/2023/08/route-cards-part-22-additional-examples.html ).

It would sure be nice to be able to have some of our route cards look like the one above. And now, an  alternative has actually emerged.  Owl Mountain Models now offers a small decal sheet, only 2 inches square, but it has plenty of card images: 124, by my count.

You can purchase these on the Owl Mountain website, and as you see above, this is set #1220. Scroll down the page at this address: https://owlmtmodels.square.site/shop/1200-series-ho-decal-sets/5?page=1&limit=60&sort_by=category_order&sort_order=asc . This sheet, that would do 62 cars, is only $2.00! I’d say these are way underpriced.

Applying these is, of course, like any decal. In fact, I like that you don’t have to trim them exactly to size; the clear film around them allows you to simply cut close to the printed image. I’ve been putting these on a variety of cars, and totally enjoying the look that is achieved. First, one end of the Ulrich gondola that I showed above:

I also chose one of my freight cars that had no route card on it, which happens to be a car I inherited from Richard Hendrickson. We know that the Santa Fe, like SP, used route cards with large, bold numbers (coded, of course, for a range of destinations). I showed examples in an earlier post (see it at: https://modelingthesp.blogspot.com/2018/11/route-cards-part-17.html ).

Finally, I used one of the route cards on a wood-sheathed car. These of course could be tacked anywhere on the car side by a clerk, but the most common location was above the left-hand truck, at a convenient height for the clerk.

I really like these new Owl Mountain decals for route cards. It’s true that you can’t really read them when they are on a model. But they beautifully fulfill one of Richard Hendrickson’s lettering principles: that “there should be something there” that looks like lettering. Mission accomplished.

Tony Thompson

Thursday, February 26, 2015

Route cards — 9

Around three years ago, I posted a discussion about route cards, and about the “routing card boards” on which they were supposed to be fastened, on freight cars (those comments began with the post at the following link: http://modelingthesp.blogspot.com/2011/11/chalk-marks-and-route-cards.html ). A second post showed examples of prototype route cards themselves (at: http://modelingthesp.blogspot.com/2011/11/route-cards-2.html ), and so did the eighth post in the series (you can read it at: http://modelingthesp.blogspot.com/2013/12/route-cards-8.html ). Post 2 was followed by several descriptions of how I have modeled these cards. Finally, I showed the prototype AAR rules for these boards, and a prototype drawing of the recommended size and shape (see this latter post on the prototype at: http://modelingthesp.blogspot.com/2012/01/route-cards-7.html ).
     You can readily find those posts (and more) by using the search box in the upper right corner of the blog page, and using the term Route Cards; there have been altogether eight of them. (You will also turn up several other posts in which route cards are alluded to, but I mean the ones titled like the present post.)
     One thing often noted in photos of older wood-sheathed cars, is that car clerks obviously placed route cards or switching cards wherever it seemed convenient to them. Usually low on the car, so other switchmen on the ground could read them, and often placed near the left bolster, or just left of the car door. In the ’teens and 1920s, many car owners painted a black rectangle in one of these areas, and added a legend such as “tack cards here,” though clerks evidently took such notations as a challenge to their independence, and tended to place the cards anywhere but on the black rectangle.
     For flat cars and tank cars, there was far less scope to place route cards. On tank cars, they were often tacked to the edge of the wood running board. You can see that near both ends of GATX 66674, in an undated photograph at Milwaukee (Richard Hendrickson collection):


Newer tank cars might have an actual routing card board on the side sill near one of the bolsters.
     For flat cars there might be a routing card board attached somewhere, especially on newer steel cars, but older cars had no such board, and clerks had to tack to the edge of the wooden deck. This Depression-era image shows a card tacked to the wooden blocking under the deck edge, in a Library of Congress photo taken at Sacramento.


Note that the switching card is oblong and appears pre-printed, so that a clerk could simply circle or check off the appropriate destination symbol or code. This is an SP Class F-50-5 “Harriman” flat car with overhanging deck, and typical Vulcan trucks of that period.
     These locations for route cards are readily modeled. I cut small squares or rectangles of paper (no need to write on them) and attach with canopy glue. These are indeed very small details, but their light colors make them really stand out on the side of a freight car (equally true in model form, as it is in prototype photos). And they do add an additional touch of detail that you can enjoy.
Tony Thompson

Monday, July 4, 2016

Route cards, Part 11 — examples

I have recently received a number of most interesting examples of prototype route cards, the small cards attached to freight cars by car clerks as an aid to yard crews or local train crews in clearly identifying destinations of cars. As I showed earlier (a post at: http://modelingthesp.blogspot.com/2012/01/route-cards-7.html ), the board on which route cards were placed was recommended to be no less than 5-1/2 x 9 inches and made of wood, so that route cards could be tacked or stapled to the board. These could be located on the side sill of open-top cars, on the door of box cars, and elsewhere as convenient. To repeat a photo used in a prior post about route cards, here is a clerk using a hammer stapler to attach a route card to a placard board (Cotton Belt photo). There is also a route card board on this car door, just visible behind the clerk’s face.


Just to illustrate in model form that route card boards could be located as railroads chose (as long as convenient for clerks), this SP GS gondola (an Ulrich model) has its route card board in the rightmost panel on the car side. This is known from photographs to be the prototype location on cars like this; to view an example of such a photo, see my previous post at: http://modelingthesp.blogspot.com/2011/11/route-cards-3.html .


     Ralph Heiss was kind enough to send me a selection from his collection of route cards. As might be expected, these are immensely variable. They were not standardized, and each railroad or shipper made up whatever suited them. Moreover, railroad codes for yard tracks, switching districts, industrial spurs or door spots, interchange tracks, or outgoing trains were entirely at each road’s discretion.
     Here are a number of examples, all with code numbers which might be outbound tracks, particular switching areas, or train identities. The one at upper right carries the Cotton Belt emblem, but none of the others are specifically identified. The other three do look like Santa Fe formats, as illustrated in a previous post describing Keith Jordan’s use of similar documents. (You can read that post at: http://modelingthesp.blogspot.com/2013/12/route-cards-8.html .) All are roughly 3-1/2 inches square, a common size for such cards. The upper left card was attached to UP 196136; the lower left card to PFE 60469; and the lower right to PFE 63387.


Note here, as on most route cards, that the car clerk has written with pencil the car reporting marks and number and sometimes other information (date, tonnage, contents, etc.)
     Here is another group of these cards, also seeming to designate destination only by a code, though the one at far right is evidently for a particular train or class of train; on its “destination” line is stamped “Peoria-53.” The two at left are both Union Pacific tags, and the left card was attached to WAB 84162. The rightmost one was on M 25699.


The two UP cards are interesting in that the codes are in such bold type. Even in HO scale, it might be possible to reproduce lettering like this, or at least suggest it.
     Finally, here are three additional interesting cards, The left one was attached to Southern 11990; the middle one is a Great Northern form and was on SAL 56524; and the right one, a UP form, to SL-SF 1313, obviously destined to Los Angeles. Use of other than black type is interesting, too.


     To me, these are a fascinating insight into what car clerks did, and what switch crews had to work with. There are a bunch more of these which Ralph was kind enough to share. I will be showing examples of them in future posts.
Tony Thompson

Sunday, August 14, 2016

Route cards, Part 15 — additional examples

Recently I wrote four posts to present prototype examples of freight car route cards; the most recent contains links to the prior series. It is at this link: http://modelingthesp.blogspot.com/2016/07/route-cards-part-14-still-more-examples.html . The present post contains additional examples, cards sent to me by John Holmes. I appreciate John’s generosity in making these available.
     I want to begin with an interesting pair of cards, as they are from the same freight car, Milwaukee 14304, and are destined to a Cadillac dealer in Santa Ana, California, named McLean Motors (they unloaded at a team track).  The card on the left is a New York Central card, Northern District, originating in Detroit, Michigan. It shows routing as Rock Island–Southern Pacific beyond NYC rails, which leads me to believe the second card, on the right, is an SP card, likely switching job or district no. 44. MILW 14304 was a 50-foot automobile car (double doors) equipped with auto racks, AAR Class XAR.


These two cards are exactly the same size, 3 x 4 inches.
    Another interesting pair is shown below, The card at left is evidently a Milwaukee Road card and directs the car, MHLX 80093, from Milwaukee to AT&SF, which would take the car to California (again, destination Santa Ana). MHLX is a leased Miller High Life car, and the cargo, as the card shows, was beer. On the right is another New York Central card from Detroit, this one coded 5A instead of code 2 as in the above case. The card is preprinted for the line “billed to” as Joliet, Ill., but that has been overwritten with pencil and the word Streator (Illinois?) written in.


For these next two cards, we again have an interesting pair from the same car. The one on the left is a Missouri Pacific card, applied in St. Louis, to an SP box car, no. 129281, carrying merchandise. It identifies the destination as Pueblo, Colorado. The card at right is a Denver & Rio Grande Western card, interesting with a "red ball" printed in green, probably identifying a priority load. Unfortunately, we don’t have a consignee or cargo description. This larger card is 4.5 x 6 inches in size.


All six of these cards are interesting in and of themselves, and give us additional windows into prototype route card practice, when viewed in combination with the several prior posts that showed cards from the Ralph Heiss collection.
     I recently received another question via email, relating to route cards, as to whether old cards were left on the route card boards, and new cards simply nailed or stapled over them. The answer, from men who worked in yards, is “yes.” As one put it, there was no time to mess around with old cards. This makes, then, an interesting modeling opportunity, to place visibly overlapping or torn cards. The following example is built from a C&BT Shops kit, modified to represent Santa Fe Class Bx-44. You can click to enlarge and see the two route cards on the door’s route card board.


The route cards are just small paper rectangles.
     Here is another model example, a wood-sheathed GS gondola. On cars like this, car clerks did not have to locate the cards they were  placing, on a particular route board, but could attach them anywhere on the wood sheathing. A location near the left bolster was common. Here one of the cards is represented as being partially torn off and thus not rectangular.


     I continue to put representations of route cards on most of my freight cars, based on the observation by both Richard Hendrickson and me that at least 90 percent of freight cars in prototype photos do have the cards (except, of course, brand-new or freshly outshopped cars). I think they add both an interesting detail and a touch of realism.
Tony Thompson

Sunday, December 1, 2013

Route cards — 8

In my various route card postings, I began with some prototype photos and information, in the post entitled “Chalk marks and route cards,” available through this link: http://modelingthesp.blogspot.com/2011/11/chalk-marks-and-route-cards.html . I posted additional information on locations and size of route card boards in my third post, “Route cards-3,” which can be viewed here: http://modelingthesp.blogspot.com/2011/11/route-cards-3.html . The most recent in the series was a post describing the physical size of route card boards (at: http://modelingthesp.blogspot.com/2012/01/route-cards-7.html ).
     I do get questions from time to time, asking whether my model route cards have anything written on them. Given that they are three or four inches in size, roughly square, on the prototype, no! I don’t want to make up HO scale paperwork that size with lettering on it. But sometimes I add a pencil line on one of my cards if it is on the large side. You don’t have to be able to read it, only to perceive that there is something on it.
     Readers of this blog may be familiar with the “Patch” switching layout of Keith Jordan, set in downtown Los Angeles. Among the places it has been described is in GMR (Great Model Railroads), 2012, Kalmbach, page 34. Keith not only located some collected examples of route cards used in that area, but managed to interview someone who knew a lot about the switching process. Here are three of his tags, two denoting transfers (to PE and SP), one indicating a switching district.


Keith doesn’t apply these to cars as such, but uses them as switching aids while operating the layout. That is, he uses them full size (see the GMR article for more details on his system). But since they are based on prototype cards, they are informative.
     Recently Doug Harding in Iowa sent me several route cards from his area, all from the Minneapolis & St. Louis Railway (M&StL), and they are a different type than the ones Keith Jordan uses. A very interesting one is a directional one, presumably for drag freights, but possibly also for some priority named “B”:


Doug also sent several M&StL route cards for cars to be interchanged with other railroads. This is a common switching situation and I would think most roads used tags like these.


It is intriguing that these three cards each show a different type face for the destination road, maybe a deliberate choice but more likely reflecting design of individual cards at different times.
     These card examples are only to illustrate what might be on a route card, though in HO scale they would be pretty hard to read—except maybe the M&StL “B” card. Remember, they are only about three or four inches square. For that reason, I will probably continue to use blank squares of paper on my models.
Tony Thompson


Thursday, May 19, 2016

Route Cards — 10: Southern Pacific

This post is connected with, but not about, waybills, so I have not treated it as a segment in my ongoing posts on waybill subjects. Instead, it is about routing cards.That’s a topic I introduced some time back, in a general post about these cards (see that post at: http://modelingthesp.blogspot.com/2011/11/chalk-marks-and-route-cards.html ). Once introduced, I went on to provide more history and details as I discovered them; here are  links to two of the nine previous posts in the series. Others can be found using the search box at the right of this text, key words “route cards.”

http://modelingthesp.blogspot.com/2011/11/route-cards-2.html
http://modelingthesp.blogspot.com/2013/12/route-cards-8.html

     Most if not all railroads had a system of using route cards in major and many minor yards, to facilitate switching and train make-up. I have wondered for some years if I could find out anything about the Southern Pacific system, though for a long time I could turn up nothing. Finally a friend sent me a photo of a switchman’s pocket card, summarizing routing numbers for various destinations out of West Oakland Yard. It appears to be a 1936 document. I still don’t know what the route cards themselves looked like (see post no. 8, link above, for some examples from other roads), but at least I know some codes. Here is the photo I received:


You can see that it is folded to make four pages, and is pocket-size. Visible here, though hard to read, are page 1 on the right, and 4 on the left. Below is shown one of the interior pages, page 2. (You can click on the image to enlarge it.)


     This page is more readable than most of this document, so I have transcribed the entire list, shown below as a jpeg (I can send you a PDF if you like). Some readers may be surprised at the railroad place names in a few cases, but a careful study of a Western Division map, such as the one on the end sheet of John R. Signor’s book, Southern Pacific’s Western Division (Signature Press, 2003) will locate them. A few locations, like Tie Pile for destination 77, are located in West Oakland Yard (see the map on page 95 of the book just cited). The “Desert” in destination 44 refers to Desert Yard. You can click to enlarge, or download to enlarge as you wish.


     I don’t know what these SP route cards may have looked like, but a reasonable guess, from a very simple perspective, might be something like that shown below, adopted from one of Keith Jordan’s cards shown in Part 8 of this series (link near top of the present post).


     I would love to find information from more terminals, or actual SP route cards, and will continue to look for examples.
Ton Thompson

Saturday, October 7, 2023

Route cards, Part 26: car movement

 In a lengthening series of posts, I have been showing the fascinating (at least to me) variety in grading cards and route cards used by different railroads, all from the Michael Litant collection. Grading cards were used after an empty freight car had been inspected, and the card identified what class of loading could be put into that car. Route cards directed car movement, usually to an interchange or specific yard track. But some cards, as seen in the present post, directed other movements.

[Previous posts about grading cards or route cards can easily be found by using “route cards” or “grading cards” in the search box at right.]

I will begin with a couple of straightforward cards, intended to direct cars for repairs. The first, a New York Central card, is interesting in that one side directs a car to be moved to a shop for repairs when empty; while the other side directs immediate repair, probably for cases where the car could not or should not be moved. It is 3.5 x 8 inches in size and has not been filled out.

A similar card from the Denver & Rio Grande Western is 4 x 8.5 inches, and is dated June 4, 1968. Here one may assume that the red-color side is the equivalent of the “Shop at Once” side of the NYC car above. That is also the side filled out. The car number indicated is 3481 but no initial is shown. That may, of course, indicate that it was a Rio Grande car, but at that time D&RW had no cars with that number. It may be an abbreviation.

A second type of these “directed movement” cards directs something like a car needing inspection, as with this example from the Chicago & Northwestern.It is 3.5 x 5.5 inches in size, and the back is simply a stamp, “40 St.,”, probably a destination to which the car should go next. It is not filled out.

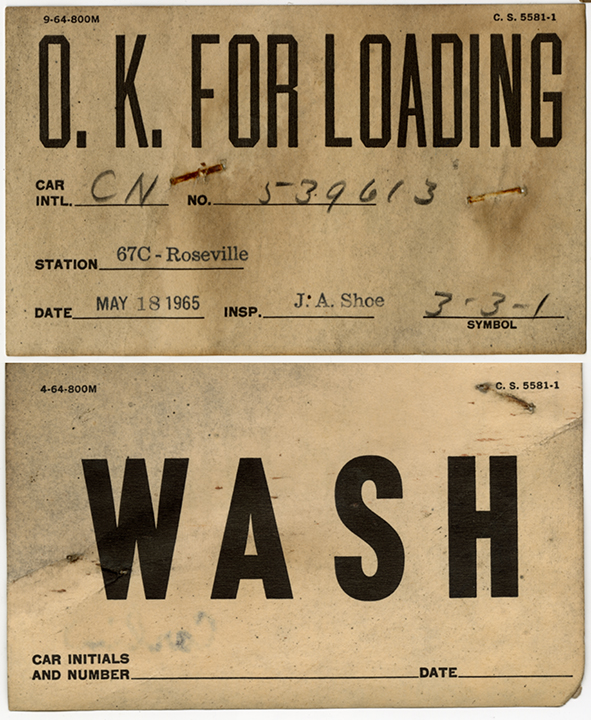
We can go further with this, in the case of a Southern Pacific card filled out at Roseville on May 18, 1965. Though it states the car can be loaded, no grade is given. The other side would direct a car to be washed out inside. It is a 3 x 5-inch card. The car is CN 539613, a 40-foot, 65-ton box car. I don’t know the meaning of the “symbol,’ 3-3-1, but could be a block of cars in the yard.

A similar card is this from the Milwaukee Road, directing a car to be weighed. It is 3 x 4 inches. The interesting side, though, is the reverse, originally blank but stamped “Miller Brewing Co. 4101.” The car identity isn’t clear (U 27013) but the logical inference is that this is a URTX 27013, a 50-foot refrigerator car, an RBLcar (bunkerless and insulated, with loader equipment).

Finally, a pair of placards obviously intended for the placard board, not the route card board, and the two car sides would probably get one of each. Each is 4.25 x 7 inches in size. The source is the Hoerner-Waldorf Corporation of Montana, and the cards are dated Jan. 2, 1973. A good example of a shipper-supplied cards instead of cards supplied by the railroad.

These cards are a kind of variation in the typical route cards, in that they direct movement in a somewhat different way. They certainly add to the wide variety of card types and designs that were in use.

Tony Thompson

Saturday, July 16, 2016

Route cards, Part 13 — other examples

The previous two posts in this series contain examples of the prototype route cards in the collection of Ralph Heiss. (You can read the most recent one at this link: http://modelingthesp.blogspot.com/2016/07/route-cards-part-12-more-examples.html .) Many are from the 1950s and 1960s. Most were retrieved from freight cars in service, often on route card boards which had a number of cards stapled to them. According to folks who have worked in yards, there was no reason and usually no time to remove old route cards when adding new ones; the new card would simply be stapled atop the accumulation, or alongside it.
     Before I show more cards, I want to address a question I received via email. The questioner wondered whether flat cars had route card boards, and if so, where. As with many open-top cars, a common location was near the left bolster, as you see on this SP car (between the second and third stake pockets from the left). The photo was taken April 16, 1950 at Ithaca, New York (Arnold Menke collection).


But as always, clerks did things as they liked, and with any car having wood parts, they might well staple that route card anywhere convenient. That's shown in this photo of a route card simply affixed to the end of the deck planking of the car (which is a Class F-70-2 car of the SP, in an SP photo). You can click on the photo to enlarge it.


     Returning to prototype route cards themselves, one particular type of card directs a car to be switched to interchange with another railroad. I showed a number of such cards in an earlier post (which you can peruse at this link: http://modelingthesp.blogspot.com/2013/12/route-cards-8.html ), and the Ralph Heiss collection includes more of them, too. Here I show a few of them. The one on the left is a Peoria & Pekin Union card, and is directed to the Nickel Plate (the initials “NKP” are underneath the large numeral 8; you can click to enlarge). The middle card is especially interesting, as it is round instead of rectangular; it is an Alton & Southern card directing a car to the Cotton Belt interchange. The one on the right is probably a card to move cars to an SP interchange, though no additional information can be discerned on the card itself.

     Another group of this card type is shown below. The one on the left is quite clearly an interchange card, moving a car from the Burlington to the Chicago Great Western. The one on the right is less clear, with the symbol “CRI” possibly referring to the Rock Island under its old mark of CRIP, but is probably some other symbol. It is for Great Northern car 43955 at Proviso Yard, and the destination is shown as Elmira, New York via the Erie. Thus CRI is likely an interchange symbol to the Erie. It is an unusual card in one other respect: it is dated and includes the year, Oct. 28, 1955.


     A third group of these kinds of cards is shown next. The left-most card clearly is an assignment to a “Fast Freight” though the railroad or train symbol are not shown. The center one is a Union Pacific card directing a car, UP 188952, to the Southern Pacific. The card at right directs an empty SP car home to the SP, evidently at an interchange point or directly connected to one.


     Lastly, two more interesting examples. The left-most is a Rock Island card directing car ATSF 17184 to a “Red Ball” train destined to Council Bluffs, Iowa, perhaps as symbol Q37A, or maybe that is a classification track. The round yard stamp is for Burr Oak Yard, Rock Island’s yard in Blue Island (Chicago area) which mostly made up westward trains. The card on the right, dated Feb. 11, 1956, is another Proviso Yard (Chicago) card, and the symbol “FRD” is likely a train symbol, though it could mean “forward.” The car identified is SP automobile car 64782.


     As in the previous posts in this series, the format and appearance of these route cards varies greatly from one example to the next. In O or G scale, it would be possible to try and reproduce some of these “looks,” but in HO only the fattest lettering would be discernible. I really have enjoyed examining and trying to learn from these cards, so once again, my warm thanks to Ralph Heiss for sharing them.
Tony Thompson

Saturday, September 16, 2023

Route cards, Part 24: examples of route cards

 In my recent posts that are part of a series about route cards, I have been including grading cards also, as Michael Litant’s collection includes both (both can be found on route card boards and on placard boards). To see any of those previous posts, the easiest way is to use “Route cards” as the search term in the search box at right. In the present post, I continue with route cards only. 

My first example is from the Akron, Canton & Youngstown. It identifies the car as SSW 46322, a 40-foot double-door automobile car, as apparently containing plywood, and is destined to Erie, PA. The card is 4 inches square.

A second one is a card identifying a car as either just cleaned, or needing to be cleaned, at Sanford, Florida. The card isn’t identified as to issuer, and though it may be an Atlantic Coast Line card, it could also be a Fruit Growers card for servicing refrigerator cars. The card is 3 x 7.5 inches, it’s dated May 13, 1967, and the car is FGEX 38970, a 40-foot ice refrigerator car.

Third, an interesting card is this Santa Fe example, labeled as a Switch Order Card, something I haven’t seen so identified before, though many route cards are exactly that. The car is ATSF 151490 , a 50-foot single-sheathed, single-door box car (abbreviated “AT” as was common on the Santa Fe), carried sugar, and it is stamped with what appears to be a destination — it looks like “933-R,” though I don’t know what that refers to. The card is 4 inches square.

I have shown some Burlington cards before. This one evidently is an urgent card, as I would interpret the word “TIME,” and it was made out at St. Joe (presumably Missouri) for RBBX 79106. That was a 50-foot insulated box car owned by Burlington Refrigerator Express. The card’s designation  may involve a switching group (“Group Number 115”) and is headed for a junction at Sioux City. It’s 3 x 4 inches.

This larger card (3.5 x 8.5 inches) would just barely fit on a route card board, and is a transfer slip for the Central of Georgia. The car was IC 118743, a 40-foot, 50-ton box car. Much of the writing is rather faded and hard to read, but it’s intriguing that it contains considerable waybill-like information about the destination and contents of the car.

Last, I will show a small Cotton Belt card, with the railroad emblem included. It’s 3.5 inches square, and isn’t filled out, except for the number 27107 at upper right, which could be a car number. It might be logical to assume that with no reporting mark listed, it was a Cotton Belt car, but as late as 1970, there was no such car number in Official Railway Equipment Register (ORER) listings for the Cotton Belt.

Like all the prior examples of prototype route cards, I find the variety of these to be interesting and instructive about the different ways individual railroads went about routing and directing car movements. I hope to include more route cards in a future post.

Tony Thompson

Friday, November 11, 2011

Chalk marks and route cards

Among the minor details which add to the realistic appearance of freight cars are chalk marks and route cards (and sometimes placards). This topic was touched on in the clinic handout for the joint weathering clinic by Richard Hendrickson and me, and you can read it through this link: http://modelingthesp.blogspot.com/2011/10/weathering-clinic-handout.html
     In this post I want to expand on the subject a bit. First, route cards. Many railroads, in at least some of their terminals, used small cards, roughly 4 to 6 inches square or nearly square, to help switchmen correctly route cars. These were tacked or stapled to what was called a route card board on a steel car, or simply to the sheathing on a wood-sheathed car. Prototype photos show that most cars carried these cards, though not all.
     Here is a photo of a clerk attaching a route card to the placard board on the car door. This lowered location for door tack boards was adopted in 1954. Just visible at left, behind the clerk’s head, is the actual route card board. The photo was taken by a Cotton Belt company photographer at Pine Bluff, Arkansas.


The clerk is using a “hammer stapler,” which can be swung like a hammer to deliver a staple on impact. The staple sticks out a little, so the route card can be impaled on the staple ends before stapling, as you see here. Note that some older cards remain on both boards.
     These cards are easily added to any freight car with small squares or rectangles of paper. The most common color was manila, but color photos do show white, blue, yellow and pink cards in some cases.
     Here are two model freight cars with route cards. The foreground Boston & Maine car also has visible paint patches for reweigh and repack data, as I’ve discussed elsewhere (for example, the corrected version of my article in Railroad Model Craftsman, available here: http://modelingthesp.blogspot.com/2011/03/reweigh-article-from-rmc.html ), and has chalk marks, which I will discuss in a moment.


There is also a placard on the placard board of the box car, high on the car door, which is a decal from a Sunshine decal set for placards. This B&M car is from a Sunshine kit, while the PFE car is from InterMountain.
     That same box car can be compared to the box car adjoining it, in this additional view. Here the SP box car has a route card board on the car door, while the B&M car has had a route card applied to its sheathing in a convenient place for the car clerk.


The SP car is a Challenger brass model.
     These cards were of course applied to all types of cars, not just house cars. Here is an example for a gondola:


The location, near the lower left corner of the car side, was a common one for route card boards on open-top cars. The gondola is a recent Tangent model.
     I have commented in earlier posts on chalk marks. Modelers sometimes call them “graffiti,” but nearly all of them were in fact no such thing. Most were notations applied by car clerks about the track to which the car should be switched, or its outgoing train number, or the industry and car spot to which it was destined, or any of a great number of other bits of information needed by switch crews. The codes varied from yard to yard and railroad to railroad (and likely era to era), and today would be nearly impossible to decode, so simply copying what you see in prototype photos is probably the best way to select these.
     Here is a photo of a car clerk, armed with the usual one-inch diameter “railroad chalk,” noting something on a car side. This is a T&NO company photo, taken at the road’s large Englewood yard at Houston, Texas.


     In model form, these can be added with Clover House dry transfers, or with any of several Sunshine decal sets (available in white, gray and yellow). They can also be readily added with a colored pencil, with as sharp a point as you can make, in white, gray, or yellow. Most of mine in these photos were done with a pencil. My own preference is for the Prismacolor brand of these pencils, available in any art supply store, as they seem to perform best for me.
     Here is another freight car, with reweigh and repack data, as well as a route card, and with added chalk marks. They are a mixture of Clover House transfers and the white pencil technique.


The model is from a Sunshine kit of a C&NW rebuild of that road’s USRA double-sheathed box cars.
     The route cards and chalk marks are minor details but I believe they add greatly to the realistic appearance of model freight cars, following what one sees in prototype photos.
Tony Thompson