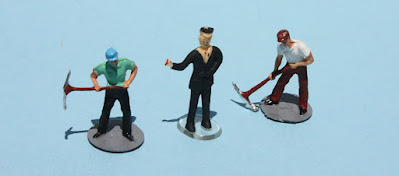
By figures, of course, I mean HO scale people, not columns of numbers. I’ve obviously written nine previous posts about this general topic; probably the easiest way to find them is to use “Figures” in the search box at right. For today’s post, my Part 2 (at: https://modelingthesp.blogspot.com/2017/05/figures-part-2-modifications.html ), would be the most relevant one. It’s about adding an invisible (or very low visibility) base to figures.
Do you have a few figures like the ones below? The two track workers are from a Merten set, no. 870, but I don’t remember the source of the center figure, with the transparent but very thick base. I really don’t want figures like this on the layout; so few people in the real world stand on little discs. And obviously the center figure is very poorly rendered, but can serve on the layout if well away from the aisle.
The first step is to remove these bases. I use a small side cutter, and simply clip next to the feet around the entire figure. Here’s a first cut:
The disadvantage of these gray bases is that they are part of the figure, so clipping away the base leaves that additional thickness at the bottom of the feet. At one time, I extremely carefully removed that added thickness. But in fact, if painted black to match the shoes, it becomes invisible on a base, so I no longer worry about that thickness. You can see it below, unpainted.
I use clear styrene sheet from Evergreen, of 0.010-inch thickness, for bases for figures like these. I just cut a square or rectangle big enough to accommodate each figure’s width and stance. Exact dimensions not at all critical, as long as the base is big enough.
Next comes attaching the bases. I use a dab of canopy glue on each foot, then stand up the figure on its clear base with a steel block for support. Then let dry for a hour or so. In the photo below, you can see the white of the recently applied glue. The glue will dry clear, and is surprisingly strong.
The figures shown above were only part of a larger project to ready additional figures for use on the layout. Below I show several of them together, with a photo angle intended to make the clear base visible, though of course in use the opposite visibility is intended. (The man holding the box at right is from the excellent series of figures from June’s Small World, of Edmonds, WA.)
Another couple of points to recognize: first, clothing for men is fairly ageless, but for women, visible aspects such as skirt length need to fit your era. Second, plenty of figures that may be included in an otherwise-useful set that don’t seem to have any use on your layout. Sometimes you can make changes. Both are touched on in discussing the photo below.
Notice how different the skirt lengths are on the two women. They do look like women of quite different ages, so the different lengths may be okay; but the shorter skirt, about knee length, was probably not very common in 1953. I will place her farther back in the layout.
Second, the two men apparently are holding shovels (of quite different and perhaps odd shapes). I don’t have extensive need for gentlemen shovel-wielders, but both can be re-purposed by painting the apparent shovels as brooms. I used Tamiya “Desert Yellow” (XF-59) for this. And both of these somewhat clunky figures will be farther from the aisle.
These procedures can be used for a wide variety of figures, and most importantly for me, has successfully minimized the size and visibility of bases for figures. I don’t like to glue them in place on the layout, but instead can and do move figures around from time to time, so scenes don’t remain static.
Tony Thompson


No comments:
Post a Comment