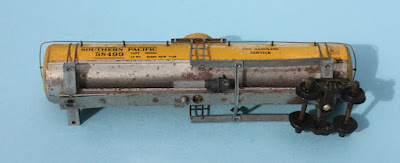
Some years ago at a swap meet, I happened to spot a derelict Athearn metal tank car, with a badly broken underframe. But it looked fairly good in the surviving parts, and it was a Southern Pacific lettering scheme. I knew that this Athearn model had been designed exactly from the SP prototype cars, and I was intrigued with the challenge, so after some hesitation, I bought it (the seller, seeing me hesitate, said “You can have it for four bucks”).
Here are a couple of views of the car as I received it. First, a top view, showing the overall model, and the two broken-off ends of the underframe. This reveals a weakness in this Athearn kit design: the coupler boxes are only attached to the rest of the car by the running boards, which in this case have broken. Note the nice two-rung sill steps at each corner. These should be salvaged and re-used.
The modeler who had done the assembly to this point had done a good job, including painting the tank ends and dome the correct Colonial Yellow color (available in model form; see: https://modelingthesp.blogspot.com/2012/10/modeling-sp-structure-colors.html ), but the dome walks and tank bands should have been this color too, as should the bottom course of the tank (a separate, unpainted part in the Athearn kit). Here is a view from below.
As it happens, I had earlier acquired a copy of the original Athearn instructions for assembly of this model, so could readily see how to proceed in repairing and/or rebuilding it. These instructions are shown below, dated 1950. You can click on the image to enlarge it, if it’s hard to read.
In addition, I inherited from Richard Hendrickson a whole box of Athearn metal tank car underframe parts, most of them for the 10,000-gallon car that Athearn in those days called a “Shorty,” but also a few of the full-size frames for the SP cars. Shown below are a few of these parts. At top are the two cast metal bolster-tank saddle parts, and between them, a sheet-metal channel for the center sill. The bolsters slide onto this sill. Below that is a one-piece running board-end sill-coupler box casting, and below it, a center anchor casting at left, and a pair of cross-ties at right. Below that is an assembled but badly damaged complete underframe, showing the weakness of the cast running-board part.
The next challenge was to decide how to “rescue” this model, or whether that was even possible. Since I had a full set of underframe parts, I could just replace the broken underframe of the model that came to me. But if you consult the assembly directions above, Step 3, you will see that the tank assembly process includes screwing the tank end shells to the underframe. I didn’t really want to disassemble the entire model, then have to repeat that.
A second possibility was to re-attach the broken-off underframe parts, and replace any missing segments. Since these would be butt joints, they wouldn’t come close to being strong enough. But I could overlay the entire running board with thin sheet brass (K&S Engineering offers 0.005-inch sheet, item #250), glued down with canopy glue. Certainly it would be strong enough in tension., when pulled by the couplers in a train.
But other problems with the brittleness of the old, broken underframe led me to choose replacing just the running board-end sill-coupler box part (second from the top in the view above). But since the bolster-saddle parts were riveted to the running board, the replacement running board needs to be divided to fit around the bolsters. The cuts could then by spliced by that sheet brass, glued underneath.
I decided to pursue the latter procedure, and preparatory to doing so, removed all of the remnants of the original running-board-end sill-coupler box parts. This also had the advantage of fully exposing the tank’s bottom sheet, which should be the body color, Colonial Yellow.
It has been interesting to examine one of these Athearn metal tank cars, along with its kit directions, and understand how they were made, as well as discovering how I could “rescue” this model. I will pursue re-assembly and painting in a future post.
Tony Thompson


No comments:
Post a Comment