Showing posts with label Traffic. Show all posts

Tuesday, December 30, 2025

Southern Pacific’s “Circular 4”

A core document of the Southern Pacific for many years was the Accounting Department’s Circular 4. I realize that isn't an informative name, but its actual title was List of Officers, Agencies Stations, Etc. It was re-issued every few years as things changed. Shown below is the cover of the one that was issued in 1952, the one relevant for my modeling year of 1953. Its size is 4-3/4 by 6-3/4 inches and it contains 214 pages.  

It’s a minor point, but its issuance by the Accounting Department fits with many other Circulars about rules, regulations and procedures of the railroad.  (I’ve written previously about Circular 39-1, Instructions to Station Agents; see: https://modelingthesp.blogspot.com/2016/11/sps-instructions-to-station-agents-part.html .)

What can we learn from a Circular 4? I might begin with an important division in the railroad organization, between what most of us think of as the “real railroad,” the Operating Department, and the other big segment, the Traffic Department. I show below pages 20 and 21, containing the last page of the Operating Dept. at top left, followed by three small departments, Purchasing, Real Estate, and Tax, and on the facing page, Traffic. Note also that these are revised pages, issued January 1, 1953, doubtless to reflect changes in officer positions.

I don’t have an SP organization chart. But I do know that a lot of what we model in fact stems from the work of the Traffic Dept. Most notable were the station agents. SP rarely combined the jobs of agent and operator, but instead almost always required one of each. An operator had to pass a Rule Book exam and be familiar with operating procedures; an agent, not at all, though of course agents came to know a lot of operating detail from being around it every day in smaller stations.

If you click on the image above to enlarge it, you’ll see that there was a Vice-President for System Freight Traffic (W.W. Hale), along with freight traffic managers, managers of such categories as perishable freight and merchandise traffic, General Freight Agents, and so on. This was a large and complex organization entirely separate from the Operating Department.

There was also a separate part of the Traffic Dept., System Passenger Traffic, again with a hierarchy of officials throughout the system, listed on later pages of Circular 4.

The majority of the book, 164 of the 214 pages, is taken up with a list of all stations. First they are listed in order by division. Shown below is the page of the Coast Division listing, page 119, that covers the Guadalupe Subdivision which is where my layout is located.  This is one of eight pages for this Division.

All stations are also all separately listed alphabetically by station name, so you don’t have to know on which division a station of interest may be located. And helpfully, if you had only the number of a station, you can look to see which division it is on, using a page like this, again choosing Coast Division: 

There are only some of the many tidbits of information in a Circular 4. I have often referred to the one shown above. I also consult a few others I own, with earlier or later dates, to see how things changed over time. Most railroads had publications like this, so they are worth hunting for, whatever your favorite prototype might be.

Tony Thompson 

Saturday, April 2, 2022

Evaluating the car fleet, Part 2: automobile cars

As I mentioned in the preceding post, back in 2011 I updated all my car fleet plans by car type. Some of them have changed little, despite adding more cars (I think mostly in accord with plans).  I gave the example of gondolas (see that post at: https://modelingthesp.blogspot.com/2022/03/evaluating-car-fleet-anew-gondolas.html ). But there are exceptions. This post is about one car type that is an exception: automobile cars.

For many years after the 1920s, the ARA and then the AAR classified all box cars with double doors as “automobile cars,” regardless of actual assignment, intended use, or the presence of special equipment such as auto loaders. It just meant a double-door box car, nothing more.

This is well illustrated by Southern Pacific, which classified all its double-door box cars in Class A (automobile), even though only a minority of the fleet was equipped for or assigned to automobile traffic. That includes auto parts as well as assembled automobiles. This was just as AAR intended.

My post in 2011 about automobile cars described the balance I believed needed at that time. Here is a link to that post: http://modelingthesp.blogspot.com/2011/02/choosing-model-car-fleet-4-automobile.html ). I did discuss auto parts and assembled automobile routing in some detail.

To summarize, one indication of the cars that would be needed in any automobile car fleet is the route(s) cars would follow, from the upper Midwest, particularly Michigan, where so many auto parts, as well as assembled automobiles, were manufactured, to the railroad you model.  For Southern Pacific modelers, that means primarily the Overland and Golden State Routes. 

For the Overland Route, there exists a very helpful magazine article by Mark Amfahr, “Bay Area Auto Shipments in the Postwar Years,”which appeared in the Spring 2016 issue of the The Streamliner magazine (UP Historical Society), pages 6–13. It contains fascinating data, as shown below.

The reason for these various railroads’ cars, of course, is that most railroads joined into pooling arrangements, usually on the basis that each railroad contributed  the same proportion of the needed number of cars, as their proportion of the total miles distance in the route. 

To illustrate one aspect of this traffic, the 1950s photo below (UP Museum, courtesy Mark Amfahr) shows yard clerks at Council Bluffs attaching a route card to an Erie 40-foot double-door box car containing assembled automobiles. Note that the route card reads “1B,” a UP blocking code indicating priority transfer to SP at Ogden. 

Returning to the graph above, it shows that I certainly need DT&I, Wabash, New York Central, PRR, GTW, and SP cars, all of which are in my auto car fleet. In the previous post on automobile car planning (link shown in the fourth paragraph of the present post), I showed a number of my SP auto car models. I’d like also to show models for some of the other railroads shown in the above chart. Below is the tail end of a Los Angeles-bound auto-parts train, about to arrive at Shumala on my layout.

The models shown above are DT&I 13167, an ancient Athearn metal model, obviously similar to the familiar Pennsylvania X32 cars, and Wabash  45218, an Overland brass model. Note the caboose, incidentally, with its vermilion ends: all of of SP’s pre-1960 bay-window cabooses were built that way (for some background, see: https://modelingthesp.blogspot.com/2022/02/modeling-sp-cabooses-part-4.html ). 

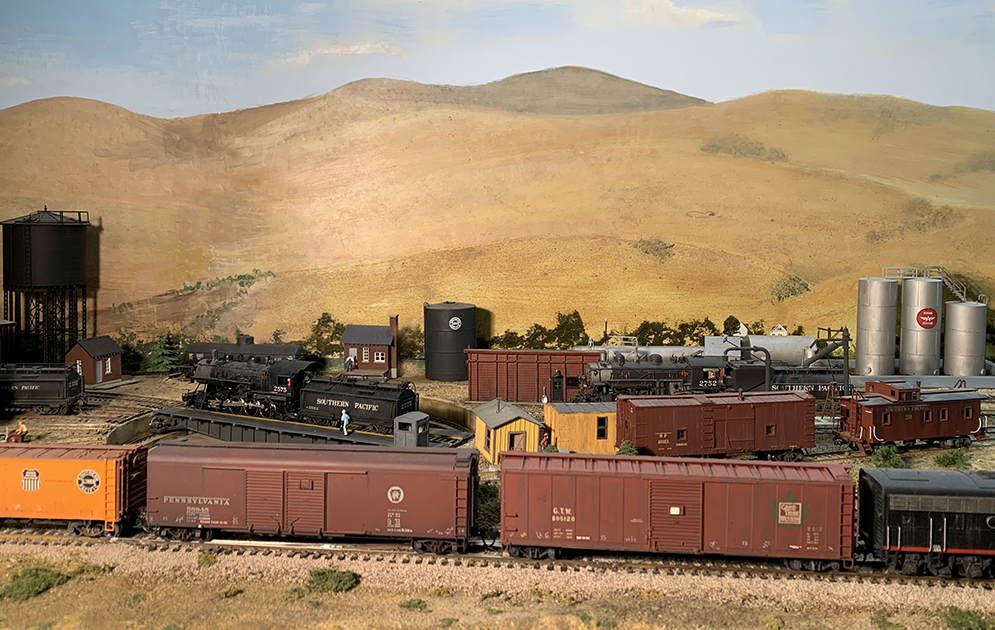
Some additional cars are shown below. Here we see two cars right behind the power on today’s Golden Gate Manifest (GGM), passing the engine terminal at Shumala. The cars are Grand Trunk 595128 (a Proto2000 model) and PRR 58845, Class X32A (a Railworks brass model). Both are in auto parts service, and are returning empty westward from Southern California auto plants, heading for the Overland Route.


I mentioned the specific mainline trains in the foregoing photo descriptions to emphasize that I try to maintain a connection to SP’s Coast Route traffic, even though I can only do so with passing trains, moving from staging onto the layout, and back to staging. For me, this is part of the interest in including the SP main line in my layout.

I have not mentioned Union Pacific automobile cars in the foregoing, but the graph above clearly shows that I need UP cars as part of the auto car traffic to and from the Overland Route. As it happens, my fleet currently only contains a 40-foot auto car.  Obviously a 50-foot car should be added, since the graph shows approximately equal numbers of 40-foot and 50-foot cars in the traffic.

I will return to the creation of a UP 50-foot automobile car model to be part of this traffic in a future post.

Tony Thompson


Friday, September 17, 2021

My latest column in Model Railroad Hobbyist

 My continuing column in Model Railroad Hobbyist or MRH, part of a series entitled “Getting Real.” is intended to provide information and examples of prototype modeling. The latest installment by me appears in the September 2021 issue, just released (see it at: http://mrhmag.com/ ), part of the magazine portion called “Running Extra.”

This column is called “Modeling Traffic on a Layout,” and of course by “traffic” I don’t mean automobile congestion. I refer instead to the work of the railroad, the freight it carries. I divided this topic into two parts, the industries that a modeler may include on a layout, and the industries in the rest of North America that may be sending loads to, or receiving them from, a layout.

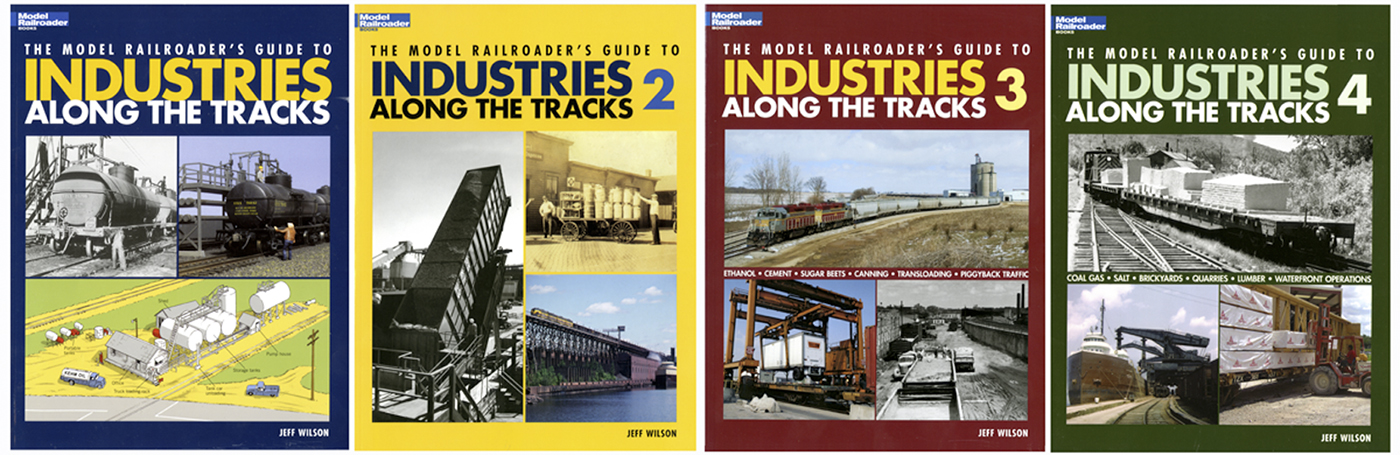
One point I tried to make forcefully in the article is that there are really excellent resources out there to understand industries, and I provided a fair list in the article. I particularly emphasized the Kalmbach Books series by Jeff Wilson, entitled “Industries Along the Tracks.” I reviewed these books in a previous post (you can see it here: https://modelingthesp.blogspot.com/2018/01/handout-for-traffic-talk.html ), but just for a reminder, below are the covers of all four of these books. Some are out of print, but all are readily available from on-line sellers.

Another point I made in the article is that understanding your layout industries allows more realistic car movement to and from each industry on the layout. For simplicity, I used several of my own layout industries to illustrate these points. For example, I showed one of my rather small businesses, a marine engine service (Martinez & Sons), that only occasionally receives an inbound load. (You can click on the image to enlarge it if you wish.)

The structure here was built from KingMill flats, and the car is a Westerfield model.

By contrast, some of my packing houses typically have three or four cars spotted at them, and two or three of these are likely to be switched in every operating session. One of these, a modified Showcase Miniatures kit, is named Phelan & Taylor for a real packing house in the area I model. I’ve moved the usual string of PFE cars so that the building can be seen.

And I always like to emphasize the immense flexibility of the “universal industries,” house tracks and team tracks. These were often near a town’s depot, and I showed an example from my layout, in the town of Ballard, where the foreground track is the team track, and right behind it is the house track, with a box car spotted. The depot and loading dock are scratchbuilt.

The crate on the flat car is also scratchbuilt, as are some of the crates on the loading dock and in the truck. These are easy details to add, and create  a sense that switching cars on the layout accomplishes something.

I personally enjoy learning things about railroad operations and activity, so for me, it is always fun to learn more about industries that are rail-served. But for any layout, I think traffic can be made more realistic with even a modicum of this kind of information. If you haven’t tried it, I recommend you consider it. And one starting point is my current column in MRH.

Tony Thompson

Saturday, August 7, 2021

Western Maryland hopper cars

 West Coast modelers like me have minimal needs for hopper cars, at least for carrying coal. There certainly was some traffic of that kind, as I showed in a post awhile back, but not a great deal of it. (That post can be seen here: https://modelingthesp.blogspot.com/2018/02/coal-in-california.html .) And in fact, I had written more about that topic in an earlier post about coal traffic, and here is that link also: https://modelingthesp.blogspot.com/2016/06/coal-traffic-on-my-layout.html . This latter post in particular goes into the reasons that eastern coal hoppers may appear on my layout.

One can of course choose whatever eastern coal roads one wishes, but in fact some coal roads had far more off-line traffic than others, generally through brokers, compared to the roads whose coal traffic was heavily slanted to export coal piers. One of the roads with significant off-line traffic was the Western Maryland. 

Now in one sense, the WM was just another small railroad, but to many, it was a railroad that stood out beyond its size. One reason in steam days was the pride of WM employees, revealed in so many ways, perhaps most visibly in the clean locomotives and tenders. Roundhouse employees wiped down engine jackets and tenders with kerosene between runs. 

Innumerable photos show this appearance, though the WM was a hard-working railroad hauling mostly coal. I show just a single example below, one of a great many superb Bill Price photos from his book, Western Maryland Steam Album (published by the Potomac chapter, NRHS, 1985).

This photo shows Class H9 Consolidation 821 at Thomas, West Virginia,  in the fall of 1953 (BTW, these were big locomotives). Who would expect gold striping and a color emblem (called a “fireball”) on steam tenders, and invariably kept clean like this? Note also the distinctive WM channel-side hoppers behind the engine.

Years ago, I wanted to model one of these channel-side hoppers, representing some 1500 cars that had 7 channel-section side posts. They were built new this way by Bethlehem Steel in 1927. As it happened, I wrote a piece about my model for Model Railroader’s then-monthly column, called “Paint Shop,” conducted by Jim Hediger, in the June 1983 issue, on page 122. Here’s a photo of my model.

The model is an Athearn “blue box” twin hopper, with ribs carved and sanded off and replaced with Plastruct channel. I also replaced the brake wheel and trucks. I used Champ’s HN-60 WM decal set, and weathered the car, especially the interior. The Athearn body is a little larger than the WM prototype but has close to the same proportions, so looks all right in use.

The other distinctive WM hoppers were often called “drop side” cars, with side sheets extending below the side sill. Cars of this design were not widely owned — the Lehigh Valley, Atlantic Coast Line, and the Reading had some, and the N&W had a lot — but they do stand out on the WM, totalling 4400 cars. That’s a lot on a 13,000-car railroad. Bethlehem Steel built these cars for the WM and the LV. (I should emphasize that the enormous majority of hopper cars in North America had straight side sills.) Here’s an example of the WM drop-side car.

This photo is by Robert Collins, showing a mid-train helper, Class I-2 Decapod 1124, on the Mount Savage grade near Frostburg, Maryland. Note that a channel-side car is visible here also, thus showing both kinds of distinctive 7-rib WM hoppers. Incidentally, this photo is from a book with the wonderful title, The Western Maryland Railway: Fireballs and Black Diamonds, by Roger Cook and Karl Zimmerman, Howell-North, 1981.

Stewart Hobbies years ago produced a styrene model of this drop-side hopper, and I had one in my stash. I decided I should assemble it to keep my channel-side car company. It does have separate ladders, helping the appearance, and I replaced the brake wheel and the wheelsets, while installing Kadee #158 couplers in the kit boxes. It of course needs weathering, which will be applied in an upcoming session for multiple cars from the “paint shop.”

And there is one other point to  make, in addition to the distinctive WM locomotive appearance in its heyday. That would be my own experience, when I lived in Pittsburgh, visiting former WM sites like Elkins, West Virginia, during Chessie days (and talking to employees, who would immediately tell you if they had started on the WM). That very much makes it fun to model a bit of the WM. So when I enjoy occasionally spotting a car of eastern “met” coal (metallurgical) at my Jupiter Pump & Compressor industry, it’s especially nice that these two WM hoppers can be among them. But this isn’t the end of the story. More to come.

Tony Thompson

Friday, April 19, 2019

Waybills, Part 63: filling out

In previous posts, I have explored many aspects of what waybills are and how they are used, always with the goal of informing model operations. Many of these prior posts can be found by using the word "Waybills" as a search term in the search box at the right. If you have particular interests within this topic, add one or more appropriate words to the search term you use.
     The present post goes back to a very basic point, and one about which I am often asked: how does a model waybill get filled out? It was stimulated in particular by a recent layout visitor, who shall remain nameless, and who phrased it this way: “How do you dream up these waybills?” Overcoming  a faint instinct of outrage at the word “dream,” I realized he really meant to ask, “where does the information come from?” That’s certainly a legitimate question.
     The first issue to recognize is that of how cars are chosen for loading. Modelers often imagine all on-line loading to be in home-road cars. If this had been done on the prototype, obviously half of all car miles would have been empty car-miles, since all arriving foreign cars would be unloaded and sent home empty, while home-road cars were loaded exclusively. It was to reduce this problem that Car Service Rule 1 was written to say, in essence: “Do not load a home-line car if suitable foreign car is available or can reasonably be obtained.”
     (For a full quotation of all six of the primary Car Service Rules, along with the necessary map of destination zones, you may wish to read my post at: https://modelingthesp.blogspot.com/2011/09/waybills-12.html . But do we need to try and follow these Rules? In the decade after World War II, AAR data showed that around 70 percent of all carloadings did follow the Rules, so it seems to me that we should strive to do the same.)
     Thus, if you model, say, Seattle and are envisioning a load arriving from somewhere in Ohio, you might think it would surely be carried in a local railroad’s car, the New York Central or Erie or perhaps the B&O. But in fact that yardmaster in Ohio would have Rule 1 in mind, and would prefer to put that Seattle-bound load into a car of a northwestern road, say Milwaukee, NP or GN, or even a railroad with nearby connections such as SP or UP.
     So if you are choosing a load of Ohio origin, say automobile tires from Akron, how do you go  about it? First, you  need to know which railroads served Akron, so that you can choose a blank waybill for one of those railroads. I like to use the Kalmbach-reprinted 1928 “Railroad Atlas” that I described in a previous post (see it at: https://modelingthesp.blogspot.com/2012/05/waybills-24-routing.html ).
     In the Ohio map in that book, you will discover that Akron was served by the Erie, Pennsylvania, B&O, and of course the Akron, Canton and Youngstown. I have blank waybills for all four. But I like to check at this point about specific industries and whether there was a switching district. I do have the Pennsylvania Railroad “List of Stations and Sidings,” effectively a Shippers Guide, reprinted by Rails Unlimited (see their website at: http://railsunlimited.ribbonrail.com/Books/shippers.html ). That document shows that both B.F. Goodrich and Firestone each had two plants served by the PRR. So one option is a PRR waybill for that load of auto tires.
     As it happens, B.F. Goodrich maintained a warehouse in Seattle, served by the NP. That information comes from the Great Northern Shipper Guide, also from Rails Unlimited. So that’s a logical destination for a carload of auto tires. We could well use an AC&Y waybill for an  interesting look, but I think the PRR choice makes sense too.
     Next let’s imagine that you have a freight car needing work in your yard or in staging, such as the car shown below. This would be a good fit to the waybill we are designing, that is, to load the shipment of tires into this Union Pacific car. That is true, even though the routing will not take the car via UP (Car Service Rule 2), because the empty can readily be returned to UP in the Seattle area.


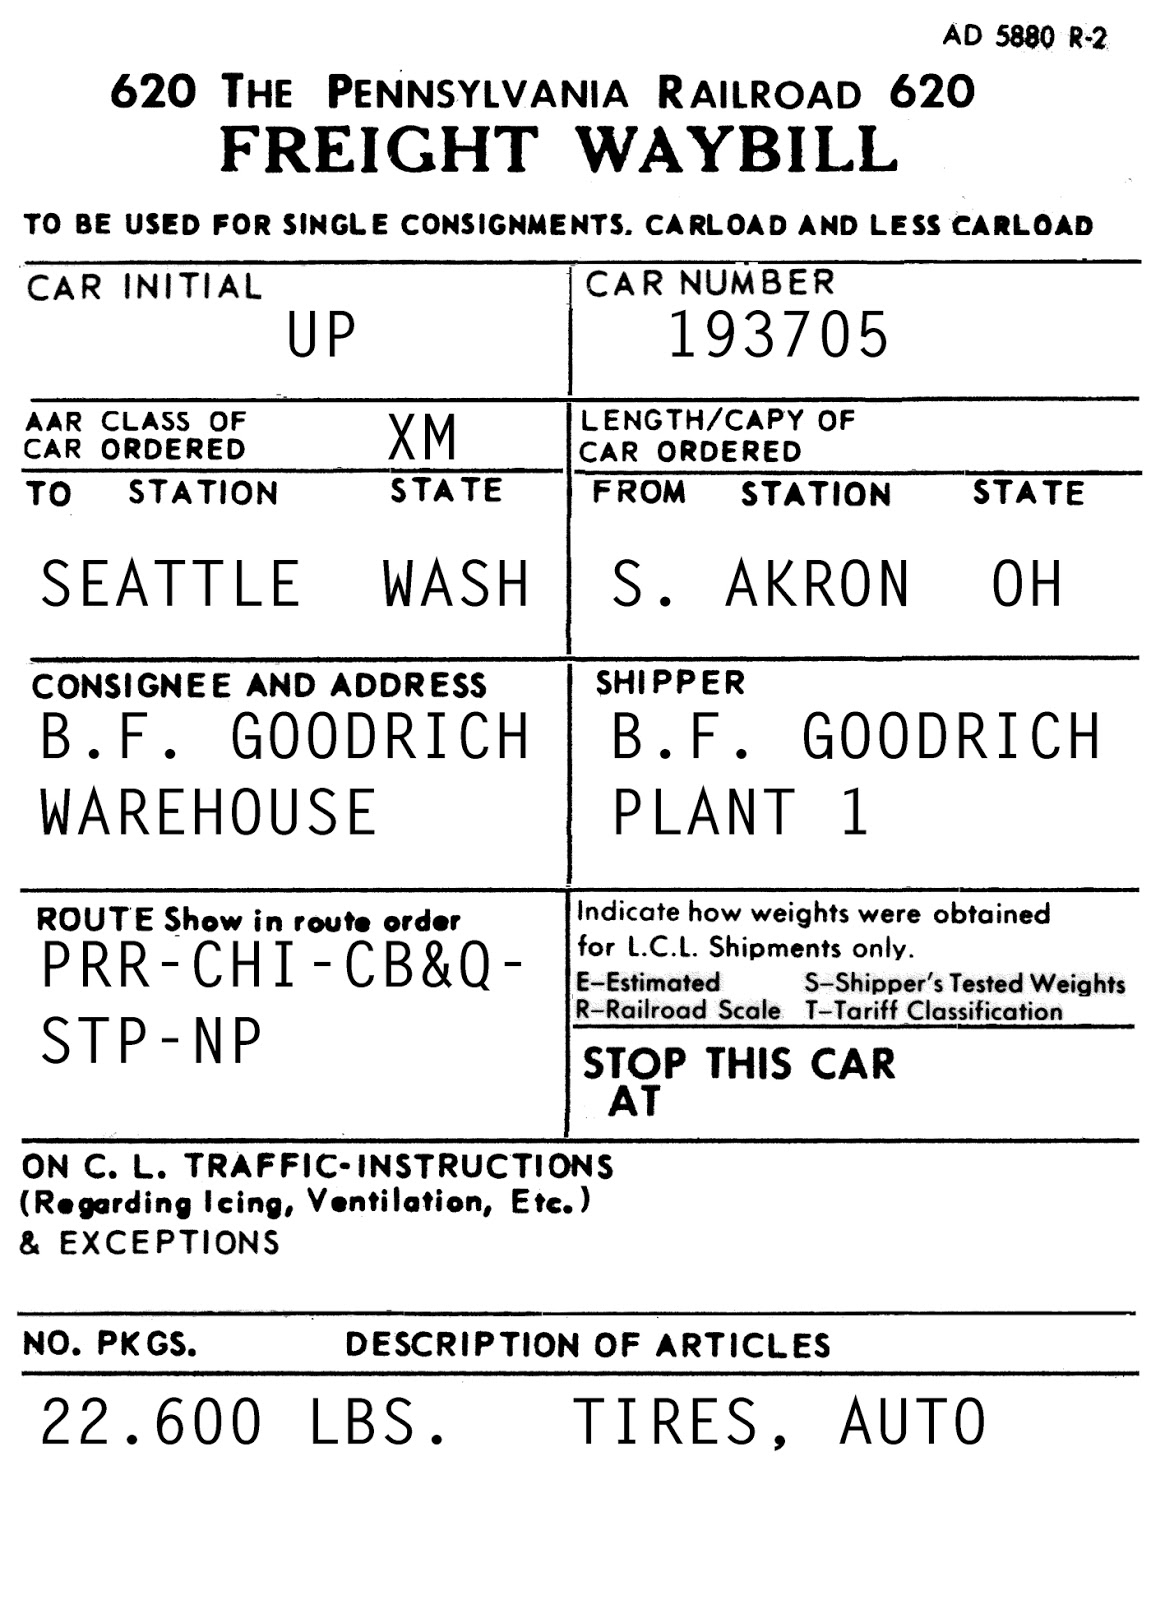
     Another interesting aspect is routing. This is potentially a very complex and sometimes arcane topic, but I simplify the problem by choosing a direct route via major railroad lines (which are indicated in the 1928 Atlas). Putting all this together, we might arrive at something like the following:


My blank waybills are Photoshop tiff files, and they are filled out using the Type tool in Photoshop.
     There are of course many options that go into a final result like the above waybill, as I have tried to indicate in describing the preparation process, but few of them are “wrong” and the modeler can, within limits, please his or her personal preferences. Obviously a great many railroad car ownerships could be chosen in place of the UP car in this bill, and other routings could be chosen. And as indicated, one of the other railroads serving Akron could be the source of the blank waybill.
     You may notice in particular that I used two Shipper Guides in this process. I have copies of these most helpful documents for 12 railroads, most of them obtained from Rails Unlimited. There are other sources of information about industries in different locations, but I find these the most convenient. The real point is seek out and use such information for waybill purposes. 
     This post describes a fairly typical example of the process by which I make up my waybills. The information sources are ones that are readily available to anyone who wishes to follow a similar process, and the guiding principles, such as Car Service Rules, are well documented. But I should emphasize that no “dreaming” need be involved.
Tony Thompson

Thursday, April 4, 2019

Patterns of SP train operation

My title today is perhaps over-general, as I am only going to discuss Southern Pacific operation in the 1950s. And not only that, but I am only going to talk about SP’s Coast Division. Within those restrictions, though, the title is accurate.
     Veteran SP employees, mostly from West-Coast operating backgrounds, and particularly Malcolm “Mac” Gaddis, who worked at San Luis Obispo in the early 1950s, have told me that the patterns I describe below were pretty universal on SP in the West, but I don’t know whether they would have extended elsewhere on SP, or on subsidiaries such as Texas & New Orleans.
     (I have reproduced the text of parts of my interviews with Mac in posts to this blog in prior years. You can readily find them by using “Gaddis” as a search term in the search box on the upper right-hand side of the present post.)
     I am presenting this summary for a simple reason. I have found through repeated instances of descriptions in oral talks about SP operations, that many do not grasp the patterns I am trying to convey. So I decided to take a shot at putting the description(s) into written form, in this post.
     That said, let me begin with a 1906 SP map of Coast Division. I use it here for illustration even though track details will not match the 1950s, because it’s an admirably clear map (you can click to enlarge it if you wish).


On the map, I have emphasized in red the two intermediate “division points,” Watsonville Junction and San Luis Obispo, as well as the southern end of the division, Santa Barbara, with the discussion to center on San Luis, the operational midpoint of the Coast Route (beyond Santa Barbara, the trackage was part of Los Angeles Division). Crews changed at each of these points.
     It was emphasized to me in my interviews with Mac Gaddis, that SP freight operations on the Coast were centered on scheduled freight trains. That meant that additional sections of through trains, and extra through trains between division points, were unusual, with the schedule set up so that freight traffic could be moved with those scheduled trains.
     The point about these scheduled trains is that they were through trains, that is, they ran between division points and ordinarily did no switching en route. The schematic below shows this kind of operation, for trains between the points of San Luis Obispo, Watsonville Junction and Santa Barbara.

To repeat what is important here, all of these were timetable trains.
     So if these through trains did no en-route switching, how were local industries served? They were switched by “turns,” trains running from a division point, to a location about halfway to the next division point, and returning, thus the name "turn.” They switched all the local industries along their route (except for certain cases described in a moment). This is shown schematically below, along with the identity of the two points at which these trains turned in this area, King City and Surf.


Thus there was a “King City Turn” out of both Watsonville Junction and San Luis Obispo, and a “Surf Turn” out of both San Luis Obispo and Santa Barbara.
     The key thing to appreciate about this system of operation is that the turns brought everything back to the division point to be organized and blocked for appropriate through trains. So the King City Turn might pick up a car at Paso Robles, north of San Luis, that was destined to, say, Seattle. But it would be brought back south to San Luis Obispo to be put into a northbound (railroad westward) train to move it toward Seattle.
     When a turn did not have too much switching to do, it could go out and return in a day. But if there was a lot of work, the crew and locomotive would lay over at the turning point overnight, and return the next day. These turns were not scheduled trains and were not in the timetable. They were extra trains.
     Of course, the idea of a turn to handle all local switching may readily run afoul of heavy traffic for individual locations, such as interchange, or seasonal traffic at packing houses. For those situations, a local train was operated in addition to the turns. In effect, such a local supplemented the turn, and took care of excess traffic beyond what the turn could handle conveniently. I can mention two, the Guadalupe Local out of San Luis Obispo, handling all the local perishable traffic as well as interchange with the Santa Maria Valley Railroad, and the Goleta Local out of Santa Barbara, handling all the packing houses at Goleta.


The locals, though having names and regular operation, were not scheduled and were operated as extras.
     Finally, there were times, such as during harvest season, when traffic locally might exceed even the capability of a local freight. For example, at Salinas there were dozens of packing houses, and in season, entire trains of empty reefers needed to be moved there for loading, and entire trains of loads would need to be brought back to Watsonville Junction. Trains of this kind were called “haulers” by SP, and they were almost always seasonal. They too were extra trains and not in the timetable.


     Thus operation on a layout like mine, with a segment of Coast Route mainline track that is situated a little south of San Luis Obispo, might move any of five kinds of freight trains on that segment: scheduled through trains, extra through trains, and three other kinds of extras: turns, locals, and haulers. Note that everything is built around the idea of bringing all switched cars back to a division point for inclusion in a through train to move toward its eventual destination. That is the pattern of switching work on my layout, and it is designed to follow SP prototype practice.
Tony Thompson

Friday, January 4, 2019

Lumber on flat cars

A very common load for flat cars in the transition era was lumber. Usually, lumber so loaded was rough lumber, while finished lumber was shipped in box or automobile cars. Of course there were exceptions, when shippers used whatever car they could get to move their lumber to market. Thus gondolas were used when there were not enough flat cars, though gondolas are less convenient to load and to unload. I have described the loading of lumber in gondolas (see it at: https://modelingthesp.blogspot.com/2012/03/open-car-loads-lumber-in-gondolas.html ).
     I have also commented on the wide range of forest product loads seen on flat cars (that post can be found at: https://modelingthesp.blogspot.com/2012/07/open-car-loads-forest-products.html ). One particular excellent lumber load is the Owl Mountain kit, that was reviewed earlier (find it at: https://modelingthesp.blogspot.com/2014/08/open-car-loads-lumber-from-owl-mountain.html ). My late friend Richard Hendrickson built a variety of lumber loads for flat cars, and I showed those models in a previous post (you can find it here; https://modelingthesp.blogspot.com/2015/06/richard-hendricksons-lumber-loads.html ).
     Although I continue to advocate for the Owl Mountain kit as the best lumber load out there, it is only fair to mention a couple of others that exist. One is the set of cast resin lumber stacks from Fine N Scale Products (yes, they make this load in HO scale as well as in N scale). The “Loads” page on their website shows the HO kit (no. FNL-1008) if you scroll down to lumber loads (see the page at: https://www.finenscale.com/loads.html ). The kit package is shown below.


These are nice castings and look realistic, but they have one feature that can be a drawback: the stacks are a little narrow for flat cars. They do happen to be just right for gondola loads, and as I mentioned in the previous post on lumber in gondolas (link provided in the top paragraph above), this was fairly common in the transition era.
     The fundamentals of lumber loading, whether using flat cars or gondolas, were the same. Shown below is a 1926 ARA Loading Rules diagram for such loading, repeated from the gondola post cited in the top paragraph. You can click to enlarge if you wish.


     So how about if you want to use these FNSP loads on flat cars anyway? The simplest answer is to use a wider center spacing than was usual on prototype loads, wide enough to bring the outer edge of the stacks to the inside of the stake pockets. This is about a scale 10-inch or 12-inch timber. How does it lookk that way? Shown below are a set of these stacks, double high, with a 10-inch vertical spacer.


This really looks okay on a passing flat car, even if the spacer is actually too big for typical practice. Then of course you need to add stakes and cross-ties. You can use scale 2 x 4-inch lumber for this, though stakes were often 4 x 4 and cross-ties sometimes 1 x 4 instead of 2 x 4. For my first set of stacks, I used 3 x 4-inch stakes and 1 x 4-inch cross-ties. Note that the Loading Rules diagram calls for three sets of side stakes per lumber stack.


The spacing of the stakes is matched to the stake pocket spacing on the Red Caboose (now SPH&S) 53'6" flat cars that I use for lumber loads, most of them decorated for SP.
     Thus the use of these “too narrow” FNSP load stacks can be practical, if a little compromise on the center stickers is accepted. As you can see with the stack above, this is not terribly evident. I will return to other uses for these FNSP resin lumber stacks in a future post, along with additional comments on these stacks for flat cars.
Tony Thompson

Sunday, December 23, 2018

An excellent NP shipper’s guide

In a growing series of Shipper Guide reprints, Ted Schnepf’s Rails Unlimited has released another of these railroad-produced documents, this time for the Northern Pacific, dated 1954. As always, these guides are an absolute gold mine of information for those interested in freight traffic. I have reviewed a number of Ted’s previous releases (see, for example, the earlier post at this link: https://modelingthesp.blogspot.com/2018/01/another-good-shipper-guide.html ), and they are invariably superb sources for those of us interested in freight cars and what freight cars carried.
     The release of this NP “Industrial Guide” is a great addition to the series, not only because it is a railroad not previously covered explicitly in this series (Ted’s  GN guide includes some NP information), but also because it is a guide with excellent detail. To begin, here is the cover of this new guide:


Like all of these, this particular guide can be purchased on-line from Rails Unlimited (which can be found at: http://railsunlimited.ribbonrail.com/ ), though I don’t know that the website has been updated yet for this new guide. If it hasn’t, it soon will be.
     You may be thinking, “Well, sure, but I don’t model the NP.” Actually, like all the guides, this one is really more productive for those who model other roads. Why? Because you need to find out shippers and receivers of cargoes all over the country, to and from your railroad, and this NP guide covers a whole bunch of states. Ideally, your bookshelf would contain guides like this from every corner of the country, so you could devise shipping patterns in all directions.
     I will give just a couple of examples of the richness of material included in this guide. Many towns are identified as to whether they are, to use the railroad term, “non-competitive,” meaning only NP-served, or jointly switched with one or more other railroads, or have a “reciprocal switching” agreement. (I discussed this kind of switching agreement in a previous post, which is at; https://modelingthesp.blogspot.com/2017/08/whats-switching-district.html .) Just to illustrate, here is the listing for Forest River, North Dakota:


The footnote below the listing identifies this a a reciprocal-switching location with the Soo Line. (You can click on the image to enlarge it if you wish)
     Many town listings, of course, contain fascinating bits of local industrial and business history and intriguing regional and local names of various businesses. Also of considerable interest for anyone interested in operation are the many footnotes at the back of this guide. For example, this one describes a situation of a shipper (Pope & Talbot Lumber) not on a direct rail connection, located across Puget Sound:


     Another couple of interesting examples, especially footnote 32 for several British Columbia industrial sidings served by boat:


     Last example, a description of several switching districts within the city of Seattle, including the meaning of some terms seen in the city listings in the Guide:


     This kind of information is simply invaluable for development of waybill and traffic patterns. I highly recommend this or any of the guides available from Rails Unlimited. If you haven’t ever gotten one, choose a railroad of interest, splurge on the modest investment, and see how much rich information one of them contains. You may find yourself buying more . . . I do!
Tony Thompson

Monday, October 22, 2018

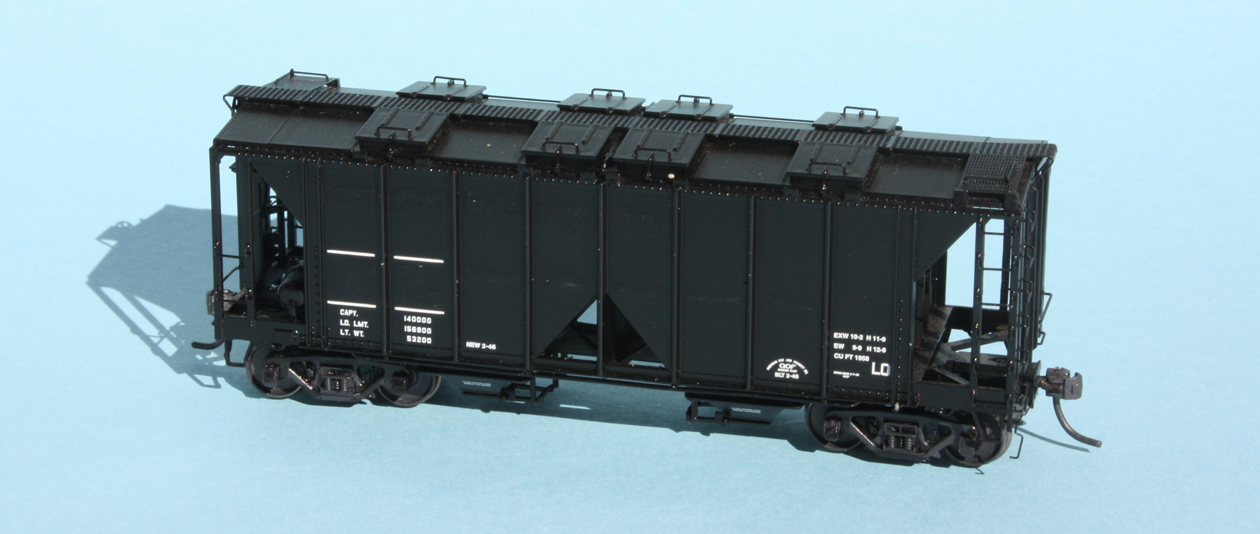
Small project: repurposing a covered hopper

I have purchased a number of the superb covered hoppers in HO scale produced by InterMountain Railway Company, or IM, and really enjoy the level of detail and the distinctive look of these square-hatch cars. They are essential parts of not only my Southern Pacific car fleet, but other western railroads as well, including Santa Fe and Union Pacific. Even the leased cars are interesting, and IM has produced a number of paint schemes for those cars too.
     But one of my purchases, admittedly probably an impulse event, was the leased SHPX car for the Sherwin-Williams Company. This particular leased car is a fine notion, but not one I can readily see a use for, beyond my mainline trains. Still, it’s one of the terrific IM models, and as a black car, I thought that likely I would figure out some other use for the car, either relettering it, or a full repaint.
     Deciding that if possible, I would like to keep all the dimensional and capacity data already on the car, I painted out the reporting marks (SHPX 25195) and the information about the Sherwin-Williams lease. That gave the appearance below.


     Next I had to choose a prototype. There are a number of railroads that painted their covered hoppers black, but most are eastern, and in my era, covered hoppers like this were mostly used for cement, and accordingly did not travel far. (Cement is cheap to produce, and heavy, thus costly to ship, so most travels only short distances.) But a leased car might be in almost any service. In particular, certain industrial lessees shipped dry chemicals in these cars. Since I have destinations on my layout which can receive chemicals, I decided to look for possibilities.
     Most leased cars of this type, like most covered hoppers generally, were painted light gray. But I did find a few General American leased covered hoppers that were black. Shown below is one example, from a group of five cars (GACX 40218–40222).


Photo is from General American, and appeared in Vol. 28 of Railway Prototype Cyclopedia in an article by Ed Hawkins.
     I quickly found that none of the alphabet decal sets I have were really the right size and style to match what is in the photo above. But an old Walthers alphabet set came close enough. I decided to go ahead and live with somewhat oversize lettering. In the photo below, you can see the AC&F builder stencil (visible in the photo at the top of this post, toward the right of the car side) has now been painted out.


     Next the car needed to be weathered, and acquire some reweigh and repack stencils. As is my usual procedure, I weathered first. Then rectangles of black decal were applied where the new stencils were located, and appropriate decals added. Here is a photo of the car in service, spotted over the unloading auger at Pacific Chemical on my layout (for more on the modeling of the unloading auger, you might wish to read my post at: https://modelingthesp.blogspot.com/2018/08/unloading-covered-hoppers-part-2.html ).


     This has been an enjoyable small project, turning a black covered hopper model that was kind of surplus, into something that can operate regularly on my layout.
Tony Thompson
Saturday, July 28, 2018

My latest column in MRH

My turn in the series of “Getting Real” columns in Model Railroad Hobbyist has come around again. There are five of us doing these columns in rotation, and my latest one is in the new August 2018 issue. (Probably most readers of this blog know by now, but if not: you can read on-line, or download any time, for free, any issue of MRH at their website, www.mrhmag.com .)
     I have been researching rail traffic in recent months, and one very important source of traffic, both for loading and unloading freight cars, is the team track. It may not compete with a giant industry for car volume, but steadily hosts a wide variety of car types and loads. Whether in a small town or big city, team tracks are a kind of “universal industry,” with practically any imaginable cargo being loaded or unloaded there. That was the starting point for my column this time.
     What is interesting to me, beyond the “universal industry” aspect, is that sometimes a small freight shed (far, far less significant than a freight house) would be placed at team tracks where some of the cargo handled might need shelter. Of course, if the team track adjoins a depot, that depot can have a freight room and serve the same purpose. But if a depot is not nearby, a shed may serve the purpose.
     My article is based on a couple of small, prototype Southern Pacific sheds, which are shown in the column. My model shed was very simply built from scratch with styrene strip and sheet of various kinds, amply illustrated in the column, and the shed’s loading dock was built in a similar way. The shed was painted the usual SP color scheme of Colonial Yellow, Light Brown, and Moss Green shingle roof, applied to structures used by or readily visible to the public. Here is a view of my model shed, an image that is different from what was used for the column.


You can see that the sliding door is modeled as slightly open This building is only 10 x 12 scale feet.
     In use, a shed like this is simply located conveniently along a segment of team track. Many cargoes may be unloaded or loaded directly between highway trucks and freight cars, but when the cargo needs temporary protection, a shed like this can serve. Here is a view of my completed shed in service at East Shumala on my layout, again a slightly different photo from what I used in MRH.


     This was an interesting though not difficult project. I can now offer better service to shippers and consignees who use the team track at East Shumala.
Tony Thompson

Thursday, June 14, 2018

Sugar beet loads, Part 2

In much of the Far West in the transition era, sugar beets were an important and lucrative crop. This was certainly true in the area I model, the Southern Pacific Coast Route, along which sugar beets moved in both directions, due to sugar factories in both northern and southern parts of California. So although the particular mythical branch line I model does not lie in beet-growing country, it certainly does see mainline traffic in beets. (I touched on some of these traffic aspects in one of my posts that presented parts of an interview with Malcolm “Mac” Gaddis. That post is here: http://modelingthesp.blogspot.com/2011/01/modeling-freight-traffic-coast-line_19.html ).
     In accord with the idea to include sugar beet loads in my mainline trains, I devoted some thought and effort to making my own removable beet loads, using fenugreek seeds. My results were not quite as successful as I’d like, but they wee all described in an earlier post (if you like, you can find it at this link: http://modelingthesp.blogspot.com/2014/08/modeling-sugar-beet-loads.html ).
    Recently I came into possession of some of the old Chooch molded-resin loads which represent sugar beets. They show a reasonable size of the model beets, though they are not quite as irregular as real sugar beets, and overall have a good look. They came two to a package, and as noted on the label, part 7241 is for Red Caboose HO gondolas.


These loads are indeed sized for the Red Caboose cars, but in a way which is not realistic. Namely, they are made to sit on top of the car, representing a car loaded so high that beets lie on the top chords. Beets in such a location would, of course, soon vibrate off the car. Here is a look at the stock load, and you can see the ledge or offset that sits on top of the car side. (You can click on the image to enlarge it.)


When you put this load into a Red Caboose gondola, sure enough, the load looks significantly too high.


     The image below shows the look we are striving for: fully loaded but not onto the car sides. This is a Southern Pacific photo, taken in 1948 near Salinas, California (John R. Signor collection). The loads of beets await unloading at the Spreckels Sugar plant in the background. Though some of the cars are the obsolescent beet racks, many are the new composite GS gondolas (like the model car shown above). The loads stand above the car side, but are nevertheless are entirely inside the car sides.


     It seemed to me that I needed to remove the protruding edges of the Chooch load and allow the load to sit down inside the gondola. I used a heavy rasp to remove the excess resin at the edges of the casting. This gave a better fit (as I show below) but did expose white resin along the sides. Since I want these sides inside the car, however, they may not even need to be touched up.


But when the trimmed load is set into the car, it sits down too far. Some cars may have been partially loaded like this, but usually they were quite full, as you see in the Spreckels photo above. The photo below illustrates the problem, though at least it is realistic to have the load entirely inside the car.


So I used a couple of shott lengths of scale 10 x 10-inch lumber to glue spacers onto the bottom of the load. The height of these spacers could have been a little higher or lower, but this size does give a reasonable look.


     With the spacers shown above, I was pleased with how the car looks when the load is put into the car. This corresponds, to my eye, with most prototype photos from the days of the beet gondolas without side extensions, such as the photo at Spreckels, above.


     With these adjustments, I will go ahead and produce a set of beet loads for my layout. As I mentioned, these only pass by on the SP main line, but they are a characteristic part of Coast Route traffic, and I want to include them.
Tony Thompson

Wednesday, April 25, 2018

Stauffer Chemical in the Bay Area

I have long been interested in the Stauffer Chemical Company, in part because they owned a fleet of tank cars to transport various chemicals, and also because they had West Coast operations, and even identified each location with separate reporting marks for assigned cars. In the 1953 Official Railroad Equipment Register, there were six different reporting marks for Stauffer component companies: SCHX, for the Eastern Branch (66 cars); STLX for the Southern California Branch (49 cars); STAX for the Northern California Branch (45 cars); STIX for the branch in Indiana (14 cars); STNX for the branch headquartered in New York (7 cars); and STHX for the Henderson, Nevada branch (41 cars). That’s a total of 222 cars
     A few years ago I corresponded with Decker McAllister Jr., a Professional Engineer who had worked for them, and he was kind enough to send me an account of their inbound and outbound traffic. This kind of information, of course is absolute gold for those of us interested in traffic and waybills. Below is his account, sent to me in writing.
     “I used to work at Stauffer (the boric acid plant in San Francisco, circa 1950) and at Stege (Richmond, with five plants). I have been kicking myself that I didn't get photographs or draw plans. For the most part, these were multi-story, steel-reinforced brick buildings, built right out to the clearance limits of adjoining track. They had been built around the turn of the century.  Many walls curved to follow the track shape. These buildings had character — they were ‘hung’ with Redler conveyoers, pneumatic conveyors, piping, Cyclone dust collectors, loading platforms, etc.
     “The boric acid plant received borax ore in covered hoppers and sulfuric acid in tank cars (STAX). Boric acid was loaded out in 100-pound sacks and in barrels into box cars (2-3 cars per day). Soda ash (Na2SO4) was loaded out in 100-pound sacks. (I worked most jobs, including freight car loading.)
     “The Stege works included a bunch of activities. One plant was the only carbon disulfide (CS2) plant west of the Mississippi (plant was called Wheeler, Reynolds & Stauffer, WR&S). Charcoal was received in box cars (from Tennessee). Liquid sulfur was received in insulated tank cars equipped with steam heating coils. Also, WR&S owned 4 tank cars (WRSX) and also shipped CS2 in drums in box cars. (The CS2 was used in mining operations to make xanthate flotation agents, and in agriculture [strawberries] to disinfect fields on a yearly basis.) Storage tanks were located under water in big ‘swimming pools.’ The CS2 was ‘water pumped’ since it was toxic, flammable, and heavier than water.
     “There were two sulfuric acid plants at Stege. One, the wet process, burned pyrites (delivered in gondolas) with Herreschoff roasters. Cinder was shipped out in the scroungiest, most beat-up hoppers and gondolas the railroad could find. The sulfuric acid was shipped out by drum or carboys in box cars, and in tank cars. The other plant, a Leonard-Monsanto (vanadium catalyst) plant, burned elemental sulfur that was received by box car (frozen solid, from Canada), truck and tank car.
     “The superphosphate fertilizer plant received phosphate ore from the San Francisco Chemical Company at Garfield, Utah, in covered hoppers. The fertilizer was shipped out in 100-pound bags by truck and box car. Cars were switched and spotted at night. We also received those special flat cars with the 1-ton cylindrical containers of chlorine. I dare say that we had 20 to 30 cars per day, all types.
     “Also produced at Stege were alum, ferric sulfate, vapam (metam sodium, a soil fumigant), and insecticides.”
       Over the years, a variety of Stauffer tank cars have been photographed, including SCHX cars with home points such as Roanoke, VA and Chester, PA. Shown below is an STLX acid car from the Bob’s Photo collection (used with permission), photographed at Los Angeles in February 1954.


The car is gray with a black band and underframe. The lettering scheme you see here, it must be said, is one that had many variations, and the various elements seen here appeared in a range of combinations, sometimes with white lettering on black, as is evident in different images. Very noteworthy in this photo is the stenciling on the center sill, which reads “built 11-29” and under that, “rebuilt 1-54.” (You can click on the photo to enlarge, if you wish.) Since the underframe is obviously riveted. this “rebuild” almost certainly involved a new, welded tank on an old underframe, a very common procedure with tank cars.
     A paint scheme of this general kind was used by Broadway Limited on their nice ICC 105A chlorine tank cars, recently released and still available many places. This represents a car leased by Stauffer from Shippers Car Line. (Photos demonstrate that Stauffer also leased cars from General American.)


This  model is “out of the box” and needs weathering, placards, route cards, chalk marks, etc.
     In a post a couple of years ago, I also showed Tangent’s acid tank car model, with decoration for Stauffer (that post can be found at this link: http://modelingthesp.blogspot.com/2014/11/a-terrific-new-tank-car-model.html ). And to round out the story, even earlier I built a scratchbuilt tank to go on a modified Tichy underframe; that project was described in Railroad Model Craftsman, in the issue for January 2012, pages 61–66. Here is that model:


     Having Decker McAllister’s recollections enables me to understand some of Stauffer’s traffic and accordingly, to make a few waybills for my own layout, using the various Stauffer tank cars I have. I wish I had this kind of information for more industries!
Tony Thompson

Wednesday, February 21, 2018

Coal in California?

The title quotes the question I’m often asked, usually by non-Californians. And many times, when I’ve mentioned coal loads on my layout (that is set on the Central California coast in 1953), I get expressions ranging from amusement to incredulity. Now of course, some of that response is quite sensible. California is not a coal state. Very, very little coal was ever mined in California, and most of it was terrible quality, disappointingly high-ash coal (lower BTU, more ashes to clean up). So the traditional kind of railroad coal traffic, outbound loads from coal mines, was indeed all but non-existent in California by 1953.
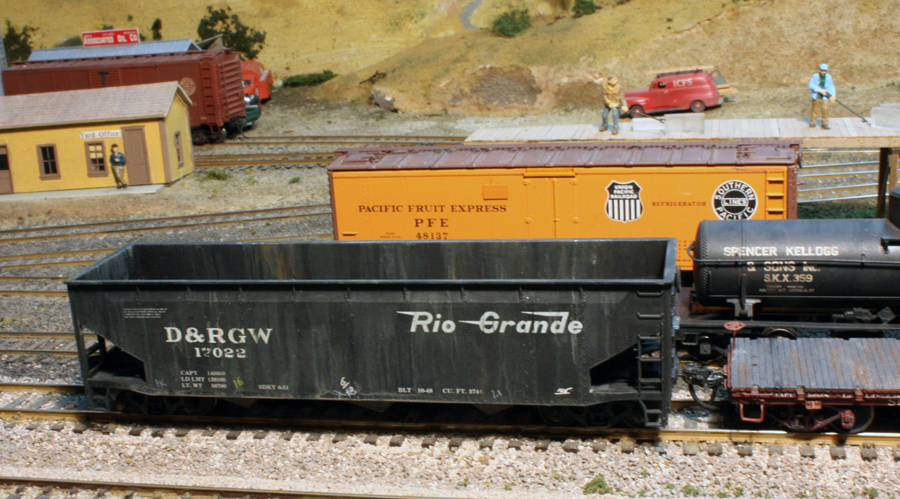
     But the other end of coal traffic, coal arriving to consumers, is another story altogether. Coal did arrive from several places outside California, and was used primarily in industrial settings. The biggest user of this coal was the Kaiser steel mill at Fontana in southern California. Most arriving coal in California came from the coal fields in eastern Utah/western Colorado. Carriers were D&RGW, UP, and the Utah Coal Route. For years, this traffic moved predominantly in GS gondolas. In 1952, D&RGW began to buy conventional 70-ton triple hoppers, and I can model those in addition to the GS gons. Here is an example on my layout, using an old Roundhouse offset-side model for the hopper.


But any knowledgeable D&RGW modeler will realize at once that this is a stand-in model at best. The only Rio Grande offset-side hoppers I know of were ballast cars, with longitudinal-dump doors.  The number series of the Roundhouse models, 17000–17199, would represents car built in 1957, although Roundhouse has lettered the model with a 10-48 built date, an entirely imaginary data item. Moreover, the 1957 cars were not offset-side cars. I will eventually replace this model, but it serves for now as an alternative to the familiar GS gondolas in D&RGW coal service.
     Those D&RGW gondolas have long been a modeling challenge, because instead of the very common 40-foot length of such cars on nearly all railroads, D&RGW built most of them 46 feet long. In addition, most of the cars also had distinctive side sheets and trucks. This challenge was met by W&R Enterprises with a brass model, including the right trucks, and I do use one of these cars as part of my coal traffic. It’s shown below.


     The Utah-Colorado coal fields are not the whole story of California coal traffic. There are very interesting published accounts relating to California coal and coke use during miners’ strikes in Utah/Colorado, with coal coming from the southern Illinois coal fields and even from as far away as the Pennsylvania/West Virginia/Virginia area. I will probably model this by occasionally operating C&O or WM or N&W hoppers which are in my fleet; all three roads did have substantial off-road customers for coal, much of it marketed through fuel brokers.
     As I have indicated in previous posts, one important destination for coal on my layout is the facilities of the Southern Pacific itself (this is discussed here: http://modelingthesp.blogspot.com/2016/06/coal-traffic-on-my-layout.html ). Well into the 1950s, SP still relied on coal for fuel in section houses, depots, roundhouses and other on-line structures, as well as for use in caboose stoves. Accordingly, I will model some coal deliveries. This is the other part of the traffic discussed in the post on my plan for hopper cars ( http://modelingthesp.blogspot.com/2011/03/choosing-model-car-fleet-7-hoppers.html ).
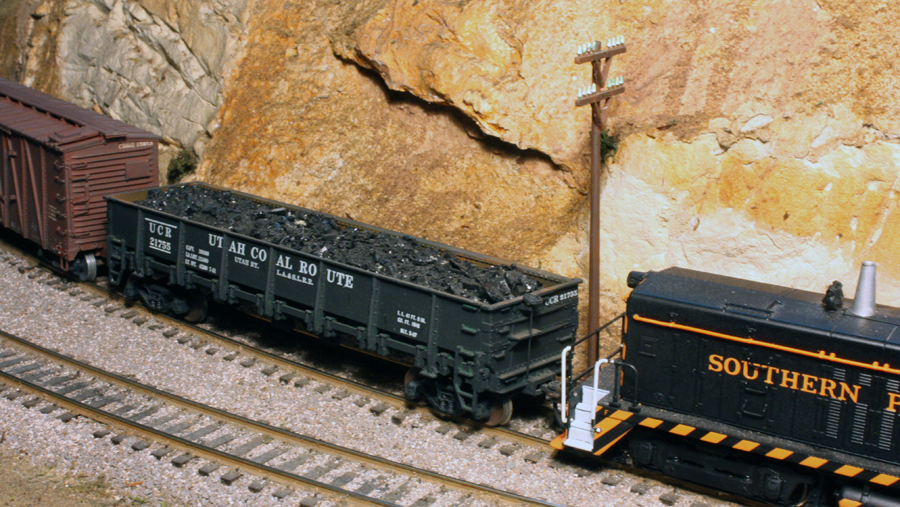
     So my coal deliveries are primarily in GS gondolas, and one interesting example is one of the old Ulrich white-metal models, lettered for the Utah Coal Route (a joint operation of the Utah Railway and the Los Angeles & Salt Lake subsidiary of Union Pacific). This model does not accurately model the prototype, but is similar in appearance. It’s shown here during a run-around move at Shumala on my layout, fully loaded with coal.


      This is my background for a certain amount of coal traffic on my layout, even though the layout is set in coastal California. It’s a far cry from Appalachian railroading, but it suits my locale.
Tony Thompson