An important sign for safety is the sign indicating that a track does not have enough clearance for a man on the side of a car. Of course a local train crew, working practically every day in the same area, would know well where there were clearance problems. Nevertheless, signs were often posted.
(Anyone wanting some background on what it’s like to switch in an urban or congested district, and would also enjoy a very informative and detail-filled book, should obtain a copy of Westsider, by Dan Rehwalt (Grizzly Press, Oakridge, OR, 2004). The title refers to the Southern Pacific’s West Side lines and branches in Oregon, and the various jobs switching them were called the “West Sider.”
(Dan writes about all of that in the book, but the really interesting part for me was his chapter about the switching district, the Jefferson Street Branch, on the west side of the Willamette River in Portland, an industrial area when Dan worked there as a brakeman.)
My clearance signs are from Microscale decal set 87-206, called “Railroad Way Signs.” I simply apply the decals to 0.010-inch styrene sheet, give it a coat of flat finish, and cut out. These can then be applied to structures or to something like a 4 x 4-scale inch styrene post.
One place this is certainly needed is at the ice deck in my layout town of Shumala. The photo below shows the clearance (incidentally, most prototype ice platforms would be farther from the rail than this; that is why they used those little portable ice bridges — like the one you see near the end of the platform in this photo).

For this situation, I used one of the vertical-lettered signs in the Microscale 206 set, and attached it with canopy glue.

Another place I could use a vertical sign like this is at the Western Packing house in my town of Ballard. (This industry was described in the August 2019 issue of Model Railroad Hobbyist and summarized in a blog post, which you can find at this link: https://modelingthesp.blogspot.com/2019/08/my-article-in-new-mrh.html ). In this case, the building itself is set back from the track, but a brakeman riding the sill step would not clear the loading platform. Here is the sign, again applied with canopy glue, at the far right edge of this photo.

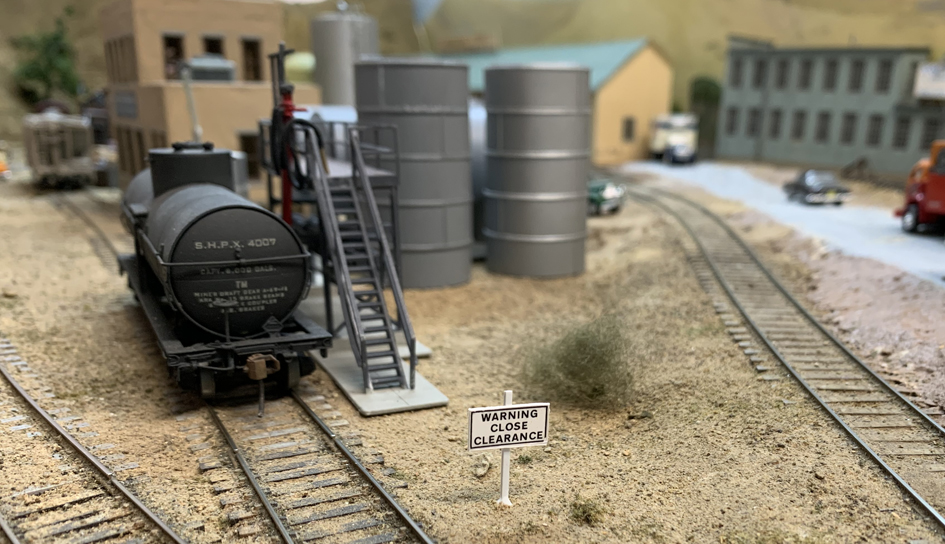
One additional place that side clearances are tight is along Track 3 in Ballard, where both loading docks and tank car unloading platforms are close to the track. For this case, I made the kind of sign that is on a post. The decal sign, applied to the styrene sheet, was simply glued to a 4 x 4 styrene post.
These instances of clearance signs are part of the realistic signage that you can have in support of layout trckage. I am looking for more possibilities for sign applications along my own tracks.
Tony Thompson
Perfect timing as I am about to add details to my recently built icing dock. Rather than use decals, I use Power Point. I glue the printout onto thin styrene sheets too. Can you provide font & point size and dimensions of your two clearance signs? Thanx for your article and requested info.
ReplyDeleteLou, the vertical sign I used from the Microscale decal set is (actual inches) 3/32 inch wide by 13/16 high. I obviously didn't use a font, just the decal. The rectangular sign is 1/2 inch wide and 1/4 inch tall.
ReplyDeleteTony Thompson