Well, the fine editorial staff at The Dispatcher’s Office magazine has done it again. Pleased as I was that my article appeared in the October 2011 issue of the magazine (pages 28-31), it is even more screwed up than the previous article of mine that they printed. The last time around, I posted a PDF version of the correct article (see it at: http://modelingthesp.blogspot.com/2011/01/waybills-2.html)
Now it’s obviously time to repeat the exercise. (If you’re wondering why I keep slamming my head against this particular wall, be assured that I can’t figure it out either.) So here is a link to Google Docs for those interested in reading what I actually wrote, and the graphics that I actually supplied.
https://docs.google.com/viewer?a=v&pid=explorer&chrome=true&srcid=0Bz_ctrHrDz4wYjIzN2FhOGItOTE3OC00YmMxLWE0N2MtZjEzMWE5MGY5YjBm&hl=en_US
This will provide all the parts of the article, including those omitted in the editorial process (mistakenly or otherwise), has captions to the photos, shows the waybills in the correct color, and contains all the references at the end of the article, as originally provided.
I have the greatest respect for OpSIG in general and for The Dispatcher’s Office magazine in particular, but obviously they have not served this particular author very well. Whether I will ever submit anything to them in the future remains to be seen.
Tony Thompson
Thursday, September 29, 2011
Wednesday, September 28, 2011
AAR car types
I freely use the AAR car classification to describe car types, and a recent e-mail made me aware that there are those who either don’t know about them, or don’t entirely understand them. Accordingly, in this post I provide a brief summary. It is understandable if a modeler says “I can tell a box car from a tank car, so why on earth would I bother with all this complication?” I’ll try and answer that after describing the AAR classes (or, as they are sometimes called, AAR mechanical designations).
In the back of most issues of the Official Railway Equipment Register or ORER are the definitions of all classes, with sketches to clarify the more complicated ones, so you can always look there to get the idea or to check a code you don’t recognize. This post is only intended as an overview.
Most cars in general service had a terminal letter “M” as in XM, TM, SM, FM, etc. (supposedly M = merchandise). So in the absence of other information, I would guess one of the “M” categories for a particular car. But there are exceptions. Gondola classes had a bunch of complications but the most common classes are GS for drop-bottom cars and GB for tight-bottom mill gondolas. Here is an example of the ORER sketch definition for the GS cars (there are altogether 13 sketches of different gondola classes in my 1953 ORER copy, though many of them are fairly unusual cars.)

And here is part of the GB description:

Tank cars which were insulated with an outside jacket have an “I” after the code, such as TMI. Pressurized tank cars, with the distinctive bonnet instead of a dome, are TP and usually TPI. The ORER has a long table identifying these classes, along with the also-required ICC classifications. Thus for example, a tank car might be AAR Class TM, as well as class ICC 103, or AAR Class TPI and also class ICC 105A300. In addition to the information in the ORER, more about these tank car classifications and their cargoes is available in an appendix to Ed Kaminski’s book, Tank Cars, American Car & Foundry, 1865-1955 (Signature Press, 2003).
Hopper cars had even more variations than gondolas (there are 15 sketches in the 1953 ORER), but for many purposes one can rely on the two most common categories: twin cross-hoppers are HM, triples are HT. “Special” cars have codes beginning with “L” and that includes covered hoppers as class LO. Depressed-center flat cars are FD and TOFC cars are FC, while most other cars are FM, including heavy-duty cars, as long as they have flat decks.
There are a lot of box car classes. In the ORER, you will see box cars identified by a number of other codes than XM. The key to understanding these is to note whether there is an “M” in the class designation. When you see a class such as XAP for auto parts racks or XAR for automobile racks, that tells you that neither of these is usable for any other loading, which is why the “M” is missing. Also present are variations on XM, such as XMR and XME. These have “stowable” racks which can be secured out of the way and then can be used for other loading. Boxcar bodies with tanks for liquids inside are actually tank cars, and have the classification XT.
There are a lot of box car classes. In the ORER, you will see box cars identified by a number of other codes than XM. The key to understanding these is to note whether there is an “M” in the class designation. When you see a class such as XAP for auto parts racks or XAR for automobile racks, that tells you that neither of these is usable for any other loading, which is why the “M” is missing. Also present are variations on XM, such as XMR and XME. These have “stowable” racks which can be secured out of the way and then can be used for other loading. Boxcar bodies with tanks for liquids inside are actually tank cars, and have the classification XT.
And by the way, even though the AAR did define any house car with double side doors as an “automobile car” in 1953, all boxcar-type house cars were classified together as various X classes, without directly distinguishing box and auto cars. Indeed, most railroads in 1953 rostered part of their double-door cars in general service and classed as XM. This is one example of why you might want to know AAR classes for your models: is that double-door car in automobile service or not? The AAR class shown in the ORER will tell you.
I will illustrate this with an example entry from the Southern Pacific pages in the 1953 ORER. Here are lines 21 and 22 of page 442 (you may wish to click on the image to enlarge it):
This entry, like many in the ORER, shows a “main listing” with a following entry line for cars which are exceptions to the main listing. The main group here is shown as AAR class XML, cars with automobile loaders. As is commonly done, the exceptions are shown in a note at the end of the SP pages, in this case Note SS. Here it is:
The note identifies the seven cars cars in the number group which are AAR class XM and thus do not have loaders. This might affect how a model would be used, depending on which car number the model carries. So this aspect might affect your choice of car numbers when decaling a model: do you want an XM or an XML (to use this SP example) for your car fleet?
Ice bunker reefers were RS, and those were the most common refrigerator cars in the transition era. An RS car equipped with meat rails was Class RSM, and that would the classification of many though not all meat-packer cars. “Bunkerless” insulated cars were RB, which applies to some insulated box cars as well as to cars which carried beer or beverage cargoes. Mechanical refrigerator cars were class RP (apparently P = power generation on board).
In making out waybills or car sleeves, I always look up any car I’m not sure about. Since the codes were essential to car usage, they are present in the ORER for every car, and often you have to look at the notes at the end of a railroad entry to find out which cars had which class, as in the example above.
In making out waybills or car sleeves, I always look up any car I’m not sure about. Since the codes were essential to car usage, they are present in the ORER for every car, and often you have to look at the notes at the end of a railroad entry to find out which cars had which class, as in the example above.
So to address the question raised at the beginning of this post (which could be paraphrased as “Why should I care?”), I would say that this is another aspect of prototypical car usage and movement. Anyone wishing the car type to match the needs of a particular load or shipper on a waybill will want to use the ORER entries to find out the actual car type corresponding to a model car number. That simply enriches the prototypical quality of your freight car operations.
Small sideline note: I just realized that this is my 101st post. I never thought I would have very much to say, when I began this blog, and was even afraid it would be a lot of work. Instead, it’s been fun, and I’m surprised I’ve already posted 100 times. Yet another amazing facet of the Internet.
Small sideline note: I just realized that this is my 101st post. I never thought I would have very much to say, when I began this blog, and was even afraid it would be a lot of work. Instead, it’s been fun, and I’m surprised I’ve already posted 100 times. Yet another amazing facet of the Internet.
Tony Thompson
Railroad Prototype Modelers (RPM) meets
I’ve just returned from an RPM meet (in Salem, Oregon). The Salem event was the usual kind of interesting and enjoyable occasion, and while traveling to and from the meeting, I was thinking about the entire RPM idea.
As many know, RPM began 20 or so years ago as a kind of revolt by “modern” modelers, who felt excluded by the atmosphere of NMRA contests, not only in the sense that entries in that contest were primarily steam and transition era models, but also because prototype fidelity was not an important focus of those contests. This meant that kitbashing and redetailing, especially of diesel locomotives, would score relatively poorly under the NMRA contest system. That was a frustrating outcome, since far less prototypical models, sometimes of imaginary prototypes, could outscore a redetailed diesel model of considerable prototype accuracy.
The very name of Railroad Prototype Modelers obviously emphasized the goal of reproducing prototype equipment and structures, but the RPM concept also largely abandoned the idea of any contest whatsoever, substituting a display mode in which modelers were free to bring many models, including incomplete and in-progress ones, and to remain with their model display to talk to others. It was an immediate success.
As soon as the RPM idea was introduced for “modern” models, however, modelers of all eras responded enthusiastically, not only because of the importance of prototype fidelity in every era, but also because the RPM presentation involved a social dimension entirely missing, indeed explicitly discouraged, in the NMRA type of contest.
From the outset, it has been a core tenet of RPM that there is no “organization,” no membership, no dues, no magazine, no national headquarters, and no officers. Anyone and everyone can participate if they wish. An RPM meet is typically organized and conducted by a local volunteer (or several), and admission fees are modest, usually to cover costs of using a facility for the meet.
Today there are RPM meets all across the country, ranging from small to large. The “granddaddy” is the annual meeting at Naperville, Illinois (this year in the adjoining town of Lisle, Illinois, next month), closely followed in size and quality by the Cocoa Beach, Florida meeting in January. Both meetings attract 200 to 300 attendees. But in some ways the local, smaller meets are more important. They link up local modelers and naturally tend to present regional modeling, and of course involve far less travel for those in the locality. Many such local meets are announced on a web site, at http://railroadprototypemodelers.com/.
The Salem meet last weekend was a good example. There were clinic presentations, but the main action was in the large display room, where a good range of interesting models (and their builders) was available. As always, being able to talk to modelers and learn the techniques they use (and their sources of information!), while examining their models, is a benefit which would not be easily accomplished any other way. Some vendors also attended, always an additional benefit for those who need a specific product.
Many who read this will already know the entire story. But for anyone who does not, I would strongly recommend watching for announcements of an RPM meet near you. And don’t just attend, take along a few models and be prepared to both learn from others, and maybe, just maybe, provide a bit of inspiration to someone else. I’m sure you will enjoy it. I sure do.
Tony Thompson
Tuesday, September 27, 2011
Upgrading old models, Part 4
In three prior posts I discussed the pros and cons of upgrading old models, and showed a couple of examples of work I’ve done for such an upgrade. I introduced the subject in the first post of the thread, which can be viewed at: http://modelingthesp.blogspot.com/2010/12/upgrading-old-models.html.
In this post I present another example, this time a truly old model, an Athearn metal box car, which is well over 50 years of age. I bought it at a swap meet for a few bucks, in derelict condition, missing its running board and everything on the underbody except the center sill and cross-bearers. Side and end details were mostly intact, however, so I decided to see if the car could be resurrected.
I will be quick to observe three things. First, older models like this do have quality compromises, and simply cannot equal modern models for detail refinement and accuracy, and I’m implicitly accepting that fact. Second, the Athearn metal cars did have some strengths, including stamped metal ladders that approach the best of today’s molded plastic ladders, and had overall dimensions and principal features which are quite good in many cases, so this is a superior model to most of its 50-year old cohort. And third, yes, nostalgia plays a role, as I remember these models from the earliest days of my involvement in the hobby, and will enjoy operating one.
On the underbody, because I have a stash of the old Athearn metal sill steps, with their horizontal “attachment plates,” I simply added these with canopy cement (R/C-56). I also had some old white metal AB brake reservoirs and cylinders, and added those also, together with a Tichy styrene AB valve. Obsolete Northeastern wire grab irons make good brake lever retainer parts, and I used 1 x 6-inch styrene strip to fashion brake levers. Then with brass wire, the brake rigging was assembled with CA. For bolsters, I cut up one of a stash of old C&BT Shops underframes to get a pair of bolsters, and glued 2-56 brass nuts up inside them to accept 2-56 truck screws. I drilled and tapped holes through the wood car floor and Athearn metal floor pan and added Kadee No. 58 couplers.
Here is a photo of the underframe at this point, as yet unpainted. No brake piping has been added yet. I left off one of the couplers so the state of the original floor could be seen. The tan styrene bolsters stand out at this point.

I then painted the underframe Floquil Grimy Black.
The other repair area was the roof. The old Athearn cast metal running board was attached through sizable holes in the roof. That running board was missing, no loss since it was an over-thick and poorly rendered part, but the holes had to be repaired.

I used a paper punch to cut paper discs to glue into the holes, then used modeling putty to smooth the contours to match the roof. In my stash of freight car parts, I found some white metal Walthers running board saddles (part 925), to support a new running board. I attached them with R/C-56 canopy cement.
The B end of the car also needed a little work. The brake rod was missing and the brake wheel was the original cast-metal Athearn part, a credible Ajax brake wheel for its day but oversize in diameter as well as in thickness. I replaced it with an old Walthers white metal Ajax wheel, still a quite respectable version of this part. Here is how it looked when I got it:

I fabricated a new running board from scale 1 x 6 wood strip and attached it with canopy cement, then added some old lateral running board castings from the parts drawer. With corner grabs added, the roof work was complete.
This Athearn model box car was originally lettered for Illinois Central, car number 30025, with a 1947 built date. That postwar date and car number go together, but the model has prewar ends, so the car ought to be renumbered into a prewar series. The IC bought several series of all-steel box cars before World War II, following the 1937 AAR car design except in having a 10' 4" inside height instead of the AAR standard at the time of 10' inside. These were in the 18000-20999 series, all with 40-ton trucks and 80,000-pound nominal capacity, and a 28000-28999 series with 50 tons nominal capacity.
Here is the model as its sides originally looked (bolsters, underbody brake gear, trucks and couplers have been added, but the roof work hasn’t been done):

The capacity shown is 100,000 pounds, but since the pre-war cars had 80,000-pound capacity, both the car number and the capacity data need changing (along with the model’s 1947 lettering for the built date).
I will post photos of the completed car as soon as it’s finished, but wanted to provide a post at this point to describe the initial phases of the project.
Tony Thompson
The content of waybills
I have been asked about how the content of waybills is researched, both when I have given live clinics and also in the form of e-mail communications. Here, of course, we are referring to model waybills. Obviously one can invent shippers and receivers, and loads too, and that can work in many circumstances: the Acme coal mine ships a load of coal to the coal dealer on your layout. Here only the shipper was invented (and perhaps the coal dealer, if you freelance). But the questions to me have been about prototypical versions of the same thing.
Here I should mention parenthetically that there is a great deal of other information which qualifies as the “content” of waybills, and that was the subject of my article in The Dispatcher’s Office, a corrected version of which is provided in an earlier post in this blog (available here: http://modelingthesp.blogspot.com/2011/01/waybills-2.html). In the present post I am only discussing the content regarding shipper, receiver, and cargo.
The best sources of the information you want would be actual waybills, from the time and place you model. Unfortunately, modelers of the 1950s, like me, have to face the fact that very few waybills of any sort survive from that era. When found, they are likely to be from some entirely different part of the country. That may serve to identify interesting shippers, receivers, or cargoes, but in general cannot provide the whole story we want.
Second best is railroad “shipper directories” or “traffic guides.” These are lists of industries which were rail-served, not only with their own sidings but also via team or house tracks at stations. These are not commonly seen documents, but they have been reprinted for a number of railroads. An example I use is the D&RGW Freight Traffic Guide for 1951, reprinted by Tramway Press from D&RGW’s Traffic Department Circular 36-E. Others I own include reprinted ones for Milwaukee Road and Rock Island, and some specialized ones for Southern Pacific.
Probably the most generally useful source of the information, though certainly not complete, is the set of lists compiled by the Operations Special Interest Group (OpSIG) of NMRA. On their web site is a page for the Industries Database (here’s a link: http://www.opsig.org/reso/inddb/) from which you can download the four databases for, respectively, eastern, southern, midwestern and western states, each containing about 10,000 entries. They identify whether the industry is a shipper or receiver, provide a one or two-word description of the shipments, and list what railroad served that industry.
These entries in the OpSIG databases have been compiled from many sources, including railroad traffic guides, representing many different years, and the year of most entries is provided also, so that you can select entries appropriate to your era. Of course, a 1955 industry may have still existed in 1990, and a 1990 one may have been in business in 1955, so additional Internet research (another place where Google is your friend) may help you to learn more about the individual industry or its shipments.
Of course there will still be things we don’t know, and realistically can’t know. Did shipper XYZ actually ship to consignee ABC? How many pounds (or how many boxes or barrels or cartons) were in such a shipment? You have to make reasonable assumptions in creating waybills with such information. For example, low-value cargoes such as common brick could not economically be shipped large distances, so a brick maker in Georgia is not going to send carloads of common brick to Oregon. On the other hand, certain chemicals were shipped all over the country from a few producing locations. Likewise brand-name foods or clothing or home appliances or industrial machinery might well travel long distances.
The great majority of my waybills for my own layout and in the new waybills for Otis McGee’s layout have been created with prototype sources. They can be viewed in the several posts in this blog entitled “Waybills.” For my own layout, the on-layout industries are almost all imaginary, but the off-layout shippers and consignees are largely drawn from the prototype. In future posts on waybills, I will identify some of the sources so as to provide that additional information for those interested.
Tony Thompson
Tuesday, September 20, 2011
Waybills, Part 12: Car Service Rules
I am continuing to experiment with the waybill system for Otis McGee’s layout. I have given previous examples of what has been developed in posts entitled “Waybills,” from -9 through -11 (the last one is at: http://modelingthesp.blogspot.com/2011/08/waybills-11.html). In that last one, -11, I described what I call “simple cycles” and “repetitive cycles.” In this post I want to describe more complex cycles and in particular, work toward a realistic yet practical means of dealing with box cars.
Although box cars might be unloaded and sent homeward empty, they were free-running, which meant they could be confiscated by the host railroad and used for any suitable cargo. The intent was to reduce empty mileage on such cars and allow them to be loaded in many directions. The AAR Car Service Rules provided a guideline for choice of these cars, as summarized in the back of many issues of the Official Railway Equipment Register (ORER), in E.W. Coughlin’s fine book, Freight Car Distribution and Car Handling in the United States (AAR, 1956), and many other places. Here is a summary of those rules (click to enlarge):

The reference to districts is to “home territories,” in which a railroad would have facilities. Here’s the map:

The result of this approach was that unlike privately owned cars or cars with special equipment or special assignment (tank cars carrying a specific cargo), box cars might well carry a wide variety of cargoes in both directions over a particular line. From the modeling viewpoint, this would mean that some box cars would move loaded in both directions on a layout, with origins and destinations of all the cargoes off the layout, rather than simply returning empty in one direction.
Here’s one example of such a pair of loads, one northward (railroad east) and one southward (railroad west) on Otis’s layout. Note in the first instance that the Seaboard has properly loaded this UP box car to a destination in a home district:

This the second or westward load.

Thus on the layout, this box car will move loaded in both directions. As the base waybills are completed, it will be appropriate to add more waybills to the sleeve for this car (thus duplicating the “four-cycle waybill” approach) for variety. Here’s an example. Again, the SP has properly routed a UP box car to its home district.

Note that the car has an origin for this eastward move (on the Shasta Division) which is far from the previously-shown westward destination of Oakland, California, but all that matters is that the car moved westward to staging, and will return from staging in an eastward direction.
Of course either a fourth westward load, or a westward Empty Car Bill, would be needed to balance this third loaded waybill, if a strict rotation of sequenced bills were to be followed. But another option is for the person conducting the layout re-set between operating sessions to choose either westward bill whenever the car needs to move that direction. There could even be more than four cycles in a sleeve to make this process more flexible.
Another area of concern is open-top cars, which when loaded have visible loads (unlike house cars). Either the modeler glues loads to cars, and arranges waybills for these loads to serve in either direction (while “permanent” empties would likewise have Empty Car Bills to move them empty in both directions), or else one has removable loads, permitting the same car to operate loaded and empty. In the latter case, the inventory of removable loads at the staging locations has to be managed along with the waybills, but the approach certainly allows much more realistic car operation.
I will present more about both the box car issues, and about open-top cars, in a future post.
Tony Thompson
Thursday, September 15, 2011
The early SP bulkhead flat car
The Southern Pacific Historical and Technical Society now owns the dies for the former Red Caboose SP flat car, classes F-70-6 and F-70-7. Future releases of these flat cars will come from the Society, not from Red Caboose. The styrene kits for the early SP homemade bulkheads were also created for the Society, and have been available for some time from the Society. Now available are ready-to-run cars with those bulkheads installed. To purchase either the kits or the complete car, go to http://www.sphts.org/index.php, and use the navigation bar to visit the Company Store.
In September 1949, SP began to install these bulkheads on its own flat cars of Class F-70-6. They were converted specifically to carry plasterboard, which is why the bulkheads are not very tall: loading to the top of these bulkheads would be a 70-ton load of plasterboard. There were 10 or 12 cars converted per month until the spring of 1950. Some additional cars were converted in subsequent years, likely as plasterboard service needs dictated.
The Society’s bulkhead kit, and this RTR car, both make an outstanding representation of the somewhat complex end area of these cars. Here is a photo of a car I’ve repainted and weathered, shown being switched by a Baldwin AS-616.

The repainting I did is only of the deck and internal wood surfaces of the bulkheads. The model comes with those areas in body color, but in fact SP did not paint those parts of the car (they did paint the outer surface of the entire bulkhead). All this wood was pressure-treated but not with creosote, thus SP flat car decks were essentially wood color in appearance.
The weathering method I use for unpainted wood surfaces like these was described in an earlier post (see http://modelingthesp.blogspot.com/2011/05/weathering-flat-car-decks.html) and I won’t repeat that information here. Modelers need to darken these wood surfaces with a grayish brown color, to a degree appropriate for the number of years the car would have been in service by the time they are modeling.
The model is also a rather brown color, a factory error, but weathering it with a Burnt Sienna wash helps make it a bit more red. Burnt Sienna is a “terra cotta” color and as a wash atop the brown, does move the color in the right direction while also softening the stark white of new lettering.
This is a wonderful addition to the possibilities among SP freight cars, and we owe a debt of thanks to the SP Society and its president, Paul Lyons, for making this possible.
Tony Thompson
Tuesday, September 6, 2011
Small modeling project: PFE R-30-16 update
The PFE Class R-30-16 project, a kit modification described in a prior post (http://modelingthesp.blogspot.com/2011/08/small-modeling-project-pfe-r-30-16.html) and based on the Terry Wegmann parts and directions to convert the car from a Red Caboose Class R-30-9 car, has been completed. It seemed appropriate to show the result.
In the previous post, the construction steps were described, and a photo was provided of the car, freshly decaled but without all detail parts in place and with some detail painting remaining to be done. After completion of those minor additions, and careful checking of the decals to make sure all “bridging” of grooves between “boards” of the side sheathing had been eliminated, a coat of Testor’s Dullcote was sprayed on to protect the decals and also apply a uniform flat coating which would accept the acrylic wash weathering. This is a water-base system, and such washes must “wet” all parts of the model surfaces equally, and any glossy areas will fail that test: water will “bead up” on them, rather than making a uniform wetted surface. The result would be patchy weathering, an undesirable outcome, to say the least.
I won’t go into the weathering sequence here, except to say that I use the same mix of acrylic paint colors as I described for flat car decks (see: http://modelingthesp.blogspot.com/2011/05/weathering-flat-car-decks.html), which are Neutral Gray, Ivory Black, and Burnt Umber. I weather the roof first, leaving the sides dry and thus available for me to hold the model while working on the roof, then when the roof is dry, usually the next day, I weather the sides. By this time, I can hold the model by the dry roof and bottom edges of the sides, and keep fingers out of the weathering application. Since the paint scheme I’ve modeled is from the late 1940s, I did not weather too heavily. In those days, PFE was still washing its cars at two- to three-year intervals, so cars in many cases were not as dirty as the age of the paint might suggest.
Here is the car in service, being spotted at the ice deck in Shumala by the Baldwin roadswitcher on today’s Guadalupe local.

You can see the slight dirtiness around the door of the PFE car, but the brightness of the lights used for this photo have made the car overall look somewhat cleaner than it does under normal layout lighting.
With this car complete, I now just need to get cracking and do at least two more models to make a credible representation of Class R-40-16 in my reefer fleet!
Tony Thompson
Sunday, September 4, 2011
Ballard-2
The Ballard track board was installed yesterday, September 3, and a very welcome development it was for me. My son Campbell was in town for the weekend, and provided the second pair of hands.
Here is the track board, as it’s been stored for a couple of years, up on edge and very much in the way in the train room (eight-foot plywood slabs can be like that):

As I mentioned in my previous post (http://modelingthesp.blogspot.com/2011/09/ballard-1.html), all supports were ready to accept the track board, so we just had to lift it into place.

Here we are lifting the board above the staging and preparing to lower it onto the supports. Wiring had been pulled onto the board top as much as possible.
Next we had to maneuver it into correct position, in this view getting the east end aligned in place.

It was more difficult to align the west end, as the rails had to line up with the existing layout construction. The problem, of course, is that we had to work with arms extended, rather than under the load, as would have been far more natural and convenient.

But we got there. Here’s the happy workers after completion. By the way, Cam’s T-shirt, a souvenir of Alaska, says, “If you must smoke, smoke a salmon.”

I couldn’t wait to grab a couple of structures and put them into their places, here the winery (right) and the Peerless Foods wholesale warehouse. Both need some repair before they’re really ready, but it was still gratifying to finally see them in place in Ballard, even temporarily.

There’s some wiring revision and of course extensive scenery repair ahead, but it will be fun to progress toward switching Ballard, always a favorite part of the layout.
Tony Thompson
Thursday, September 1, 2011
Ballard-1
I’m getting ready to place my track board for Ballard on the layout. This town was partly completed on my layout in Pittsburgh, and has been used for a few setups as a photo backdrop in the interim, but has not been assembled into the current layout. (For a view of Ballard as it was, and will be again, see: http://modelingthesp.blogspot.com/2011/01/layout-design-ballard.html) But this important installation is now close. I want to begin with a couple of comments about how this is being done.
On the current layout, as on the one in Pittsburgh, active layout segments beneath the location of Ballard preclude supports except at the sides and back of the entire board, which is about 8 feet long and 34 inches wide. For that reason, it was built upon 3/4-inch plywood, the quality grade (ACX 7-ply) to provide maximum stiffness. A standard 1/2-inch Homosote sheet, well attached with carpenter’s glue, covers it. This structural approach worked well in the Pittsburgh layout and I could measure little deflection at the center of the front edge (farthest from supports) even with a 50-pound weight sitting in that area.
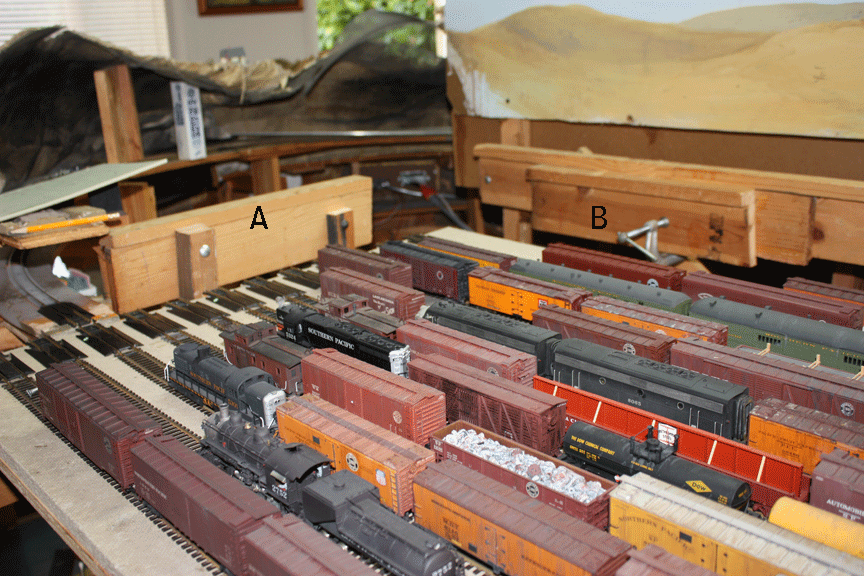
The problem I faced in the current arrangement is that the staging table (discussed in previous posts, such as: http://modelingthesp.blogspot.com/2011/02/staging-trackage-installation-4.html) is more than 7 feet long and lies directly beneath Ballard. Thus I designed three supports along the back, and two wide supports at each end. Here is an illustration of the west end:

Letters A (end support) and B (left back support) show support locations. Also evident is that only inches of clearance above the staging are possible, but of course the staging table slides in and out, so access to all tracks remains possible from the aisle even when this is covered.
Here is the east end, much the same approach:

Letters C (right back support) and D (end support) again identify locations. An overview of the entire staging area, with trains or rolling stock on most tracks, shows all the supports, most of which are only clamped only at this point to permit final fitting under a level Ballard track board before attachment with screws or bolts.

A problem emerged in preparing for installation, in that the distance from end support to end support in the current layout structure is greater by a few inches than in the Pittsburgh layout structure. Not a problem, I thought, until I realized that previously I had spliced the east-end joint by having the Homosote overlap the plywood by about 7 inches. Thus if I installed the board as it was, there would have to be a splice over the staging, undesirable in terms of clearances.
I chose to use a technique I had used in my Pittsburgh layout in a location of close vertical clearances. I used light 1-inch aluminum angle, available at most hardware stores, to act as bridge members. When in place, they are considerably more stiff than wood structures alone.
I simply cut two pieces, each a foot long, and drilled four holes in each. A pretty straightforward pair of parts to fabricate:

Then each angle was screwed to the supporting plywood at the edge, like this. Any tendency to bend this plywood assembly at the joint will be ably resisted by these 1-inch angles, but with virtually no loss in overhead clearance for the staging.

Here you can see the two plywood pieces, the new one on the right, and the edge of the Homosote top layer is just visible. Note it overlaps the joint by about 6 inches.
The Ballard track board was now ready to install. More later when it gets done, hopefully pretty soon! I can hardly wait to resume switching at a whole bunch of industries in Ballard.
Tony Thompson
On the current layout, as on the one in Pittsburgh, active layout segments beneath the location of Ballard preclude supports except at the sides and back of the entire board, which is about 8 feet long and 34 inches wide. For that reason, it was built upon 3/4-inch plywood, the quality grade (ACX 7-ply) to provide maximum stiffness. A standard 1/2-inch Homosote sheet, well attached with carpenter’s glue, covers it. This structural approach worked well in the Pittsburgh layout and I could measure little deflection at the center of the front edge (farthest from supports) even with a 50-pound weight sitting in that area.
The problem I faced in the current arrangement is that the staging table (discussed in previous posts, such as: http://modelingthesp.blogspot.com/2011/02/staging-trackage-installation-4.html) is more than 7 feet long and lies directly beneath Ballard. Thus I designed three supports along the back, and two wide supports at each end. Here is an illustration of the west end:
Letters A (end support) and B (left back support) show support locations. Also evident is that only inches of clearance above the staging are possible, but of course the staging table slides in and out, so access to all tracks remains possible from the aisle even when this is covered.
Here is the east end, much the same approach:

Letters C (right back support) and D (end support) again identify locations. An overview of the entire staging area, with trains or rolling stock on most tracks, shows all the supports, most of which are only clamped only at this point to permit final fitting under a level Ballard track board before attachment with screws or bolts.

A problem emerged in preparing for installation, in that the distance from end support to end support in the current layout structure is greater by a few inches than in the Pittsburgh layout structure. Not a problem, I thought, until I realized that previously I had spliced the east-end joint by having the Homosote overlap the plywood by about 7 inches. Thus if I installed the board as it was, there would have to be a splice over the staging, undesirable in terms of clearances.
I chose to use a technique I had used in my Pittsburgh layout in a location of close vertical clearances. I used light 1-inch aluminum angle, available at most hardware stores, to act as bridge members. When in place, they are considerably more stiff than wood structures alone.
I simply cut two pieces, each a foot long, and drilled four holes in each. A pretty straightforward pair of parts to fabricate:

Then each angle was screwed to the supporting plywood at the edge, like this. Any tendency to bend this plywood assembly at the joint will be ably resisted by these 1-inch angles, but with virtually no loss in overhead clearance for the staging.

Here you can see the two plywood pieces, the new one on the right, and the edge of the Homosote top layer is just visible. Note it overlaps the joint by about 6 inches.
The Ballard track board was now ready to install. More later when it gets done, hopefully pretty soon! I can hardly wait to resume switching at a whole bunch of industries in Ballard.
Tony Thompson
Subscribe to:
Posts (Atom)