Wednesday, March 30, 2022

SoundRail 2022

 Two years ago, in early March 2020, I and many others had plane reservations, hotel reservations, and a sign-up for the semi-annual Seattle-Tacoma area event, SoundRail. But of course the pandemic exploded, the event was cancelled, and we entered the long shut-down of most operating sessions. But now it’s 2022, an even-numbered year, normal schedule for SoundRail. This time, the event did take place, and I was delighted to be there.

The three-day event meant operating on three layouts, plus a “pre-event” event on the Thursday beforehand added a fourth layout. I was lucky enough to get signed up for Joe Green’s “Ryder Gap Subdivision” HO scale layout for the pre-event, a C&O layout set in 1974 in the mountains of Virginia. This is a beautiful layout, with superb structures, and everything ran very nicely.

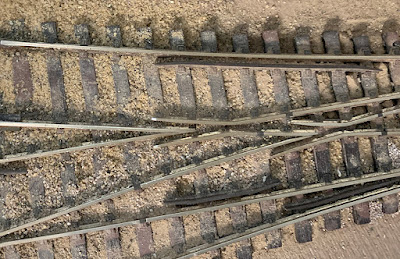
The job I had here was the Mill Gap Turn, and shown below is our train, starting switching at Mill Gap. This was very enjoyable because of the handsome structures, and also the extensive switching required. I admire a layout with industries modeled as big enough to justify the number of freight cars we send there.

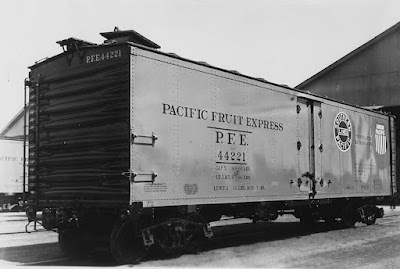
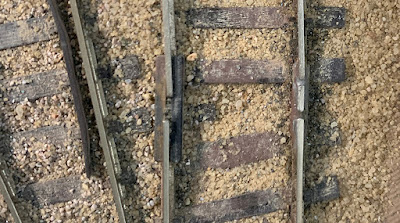
I should also mention the freight cars. I was struck by how much careful attention to weathering is evident in the entire freight car fleet. I will just show one example, clearly reflecting observation of the prototype, a C&O gondola with typical rust pattern inside: partway up the sides. Nicely done!

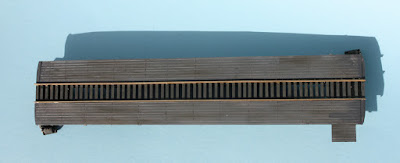
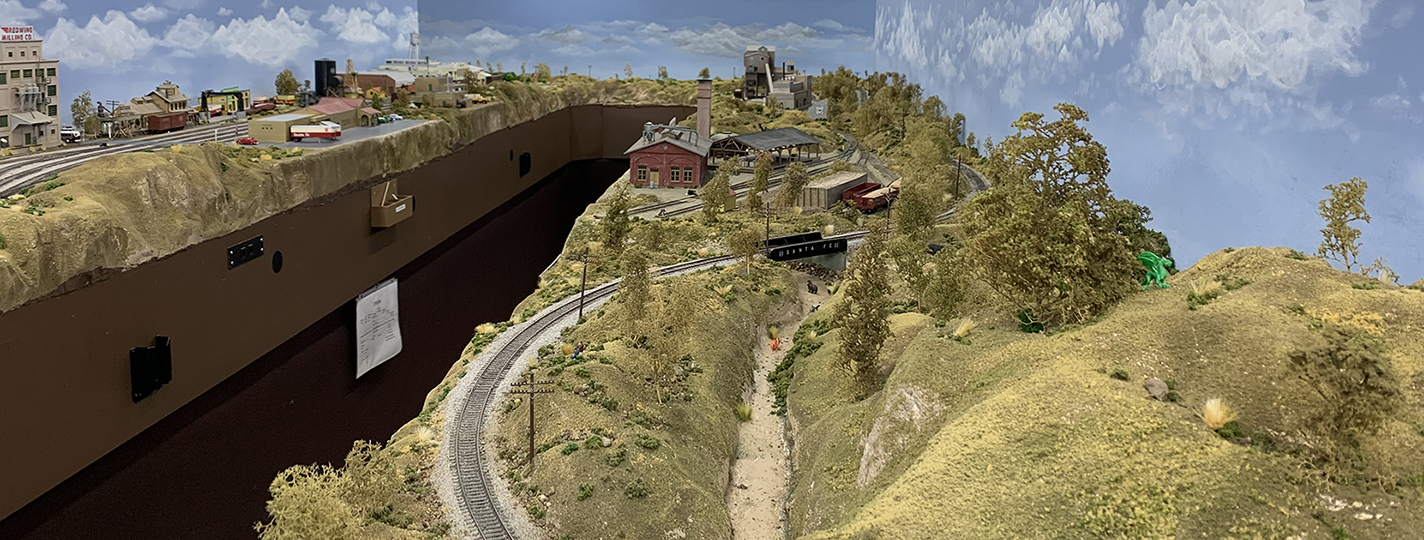
The following day, I operated at Bill Messecar’s HO scale Santa Fe 3rd Division layout, set in Los Angeles in the transition era. The job I drew was the Corona Turn, and the photo below shows the aisle that contained Corona (at left) and the Porphyry Branch (at right). This was interesting and fun, and I really liked this complete and well-detailed layout.

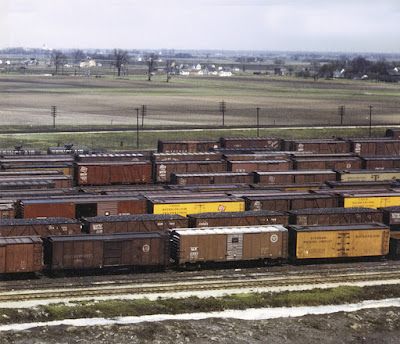
On Saturday, my assignment was Burr Stewart’s Burlington Northern layout, HO scale and set in the Seattle area in 1973. It’s a huge layout, and as Burr himself said, very completely filling the room and then some: “a couple of quarts in a pint pot.” But it ran well, and there was a heck of lot of yard switching (my own favorite), and I was kept busy — but not too busy — the entire day. Definitely a fun operation.

Below you see Stacy Street Yard (Seattle), my assignment, and above it, Burlington Yard, being switched by Dave Houston. He and I shared the aisle space the whole day, but managed to get all our work done anyway. You can see the long grain train just departing my yard, with the blue GN caboose.

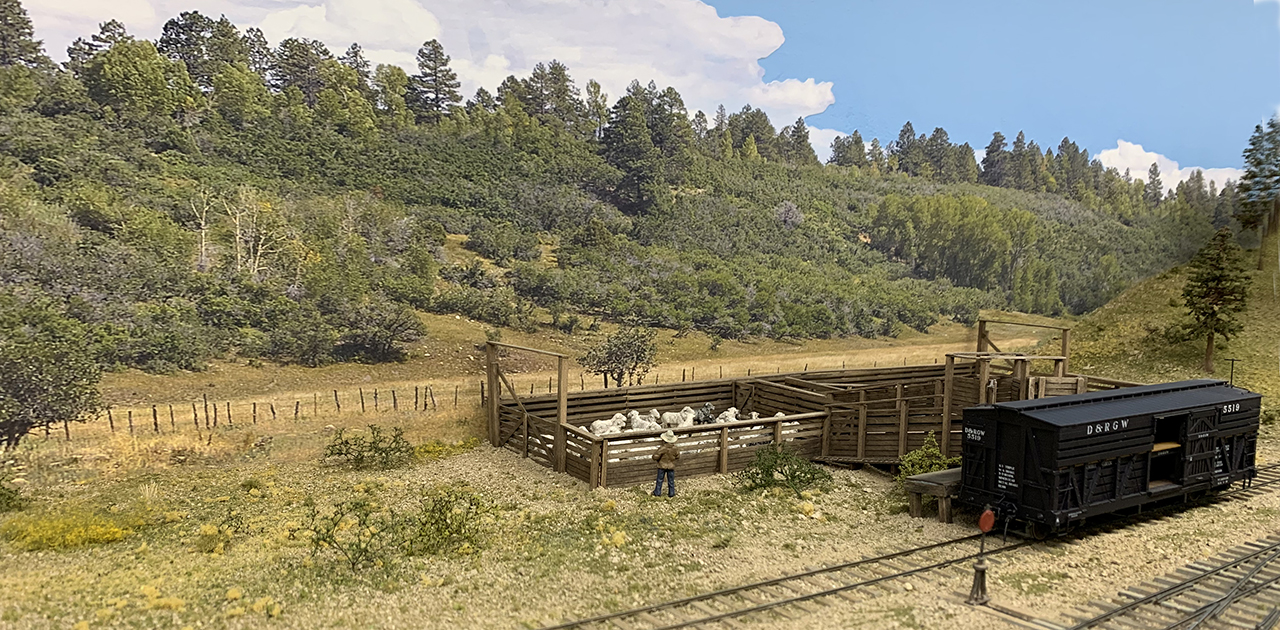
On the last day, I had drawn Dale Kreutzer’s Rio Grande Southern, an Sn3 layout set in the 1920s, when the railroad was active and successful. What a pleasure to operate, because it not only ran flawlessly, but had remarkably well-done photo backdrops and very nice structures. My job was the Mancos Turn, and below you see Mancos. As everywhere on the layout, the colors and scale of the backdrops merge seamlessly with the foreground.

One more example of Dale’s excellent blending of backdrop and foreground, the sheep pen at Hesperus. I’m not sure I have ever seen better backdrop incorporation.

This was a great weekend of operation, four outstanding layouts and a great deal of fun and fellowship. I couldn’t have asked for anything more. My heartfelt thanks to the organizers and all the layout owners. Well done.

Tony Thompson

Sunday, March 27, 2022

More on empties

I posted a discussion last month about the model railroading operation-cycle problem of confiscating empty cars, when a system of paired paperwork for loads and empties is in use. I included some ideas about how to “break” that empty-load cycle if already in existence. That post can be found here: https://modelingthesp.blogspot.com/2022/02/waybills-part-94-handling-confiscation.html

In the present post, I want to say a little more about empty cars in model layout operation, specifically the issue of car flow. As with that previous post, the issue arises if one has in use a car-card or waybill system that matches loaded and empty paperwork in one packet. 

Though that arrangement is convenient, and effective in moving a car to and from staging, one has to face the issue of car flow. How often does such a car movement cycle happen at each industry? This is the essence of car flow.

I have written several previous blog posts about car flow. One was a general one (which you can find at this link: https://modelingthesp.blogspot.com/2016/09/car-flow-for-operating-session.html ). Way back in 2011, I also wrote a more detailed account of a method I have used to formalize how car flow works (here’s a link to the second of the two posts about that topic: https://modelingthesp.blogspot.com/2011/11/operations-demand-based-car-flow-2.html ). 

The key point is to ensure that industries that receive empty cars for loading get a regular supply of them (and what “regular” means will vary from industry to industry). This is effectively the reverse of the familiar situation in which a load is delivered to an industry, and later the empty car is picked up and sent on its way.

Of course most of our model freight cars are not obviously empty, any more than are most prototype cars. I can make that point with this often-published 1943 photo from the Library of Congress, showing a Milwaukee Road yard in the Chicago area (I believe Bensenville). You can see two empty gondolas, several gondolas loaded with coal, and at least two box cars with doors ajar, thus likely empty. None of the rest of the cars give you any clue as to whether they are loaded or not. But our model paperwork can indeed tell us which cars are which.

The essential point to be made here is that any operating scheme for a layout has to manage the flow of empty cars as well as loads. On my layout nowadays, the primary tool is the Actions list, as I described in a post awhile back (see it at: https://modelingthesp.blogspot.com/2019/07/waybills-part-66-car-movement-system.html ). This list, an example of which is shown in that post, identifies all “actions” (car movements) in a session. But more important in the present context, a set of successive lists provides a record of previous sessions. 

With that in hand, and any kind of overall operating plan for car flow (for example the system described in the post already cited: https://modelingthesp.blogspot.com/2011/11/operations-demand-based-car-flow-2.html ), the layout owner can managed the car flow to the degree desired, and always has a reference point for any future session.

One situation I have long tried to deal with effectively is the industry that doesn’t ship very often, and thus doesn’t often get empty cars to load. Here’s an example, as Alco switcher SP 1389 in East Shumala is spotting a T&NO box car at C.J. Riley & Sons for loading. As the season is spring, the cargo is likely wool. But this small warehouse company doesn’t ship much by rail, so this is far from an event of every session.

As I asccumulate more and more operating sessions on my layout, issues like this continue to pose interesting challenges, in planning how to manage car flow. Of course, most visiting operators aren’t aware of this, because few of my operators even come to every session, and sessions are spaced out in time. But I know the patterns, and I want them to be realistic ones. That’s my purpose in worrying about car flow from session to session.

Tony Thompson

Thursday, March 24, 2022

Evaluating the car fleet anew: Gondolas

 Perhaps as many as 30 years ago, I began to try to rationally plan my fleet of freight cars for the layout. I did this by analyzing the cars of each type that I had (say, stock cars), and then determining what traffic they might be needed to carry, to and from what points, and how often. The latter aspects provided an idea of how many cars of that particular type I might need, and which ones.

There was a hiatus in layout activity following my move from Pittsburgh, PA to California, because I didn’t have suitable home layout space. But in 2005 we moved to a house with a fine space, though not overly large, and layout work resumed. I have written a bunch of blog posts about the rebuilding (“rebuilding layout” should be a good search term in the search box at right, if you’re interested), but one post that captures the transition activities is this one: https://modelingthesp.blogspot.com/2018/03/how-old-is-my-layout.html .

Once rebuilding was well underway, and I was beginning to actually do some switching on the layout, I re-opened the idea of analyzing the car fleet composition. The new layout would have different features and somewhat different goals, so the fleet would necessarily differ. In addition, many new (and much better) HO scale freight cars were coming on the market, so older cars could be replaced.

I found the old computer files of my fleet planning lists, and set about revising them. Several of the revisions led to blog posts in 2011 and 2012. One of the car fleet areas I summarized was gondolas (see the post about it here: https://modelingthesp.blogspot.com/2011/04/choosing-model-car-fleet-8-gondolas.html ). I recently realized that I needed to re-visit this car type.

The traffic analysis in the blog post just cited is fine, and I wouldn’t alter the thrust of it at all. But my emphasis today is a little different. I have begun to use more General Service (GS) gondolas in ballast service, taking advantage of building some more Red Caboose kits and acquiring some Challenger brass models. Now I can run divisional ballast trains like the one below (this was also discussed in my recent Model Railroad Hobbyist or MRH article, see https://modelingthesp.blogspot.com/2022/03/my-column-in-new-model-railroad.html ), seen here passing Shumala.

Of course these cars are not limited to ballast loads. One load needed regularly at Shumala on my layout is sand for the new sand house (construction described in an MRH article in the January 2021 issue ). Below you see one of my venerable Ulrich cast white-metal gondolas (produced in the 1950s), being switched to the sand house. They are a little oversize, but are prototypically correct in their details.

Turning away from GS gondolas, tight-bottom or GB gondola are also important, and nearly all the foreign-road gondolas in my fleet are GB types, along with representative Southern Pacific GB types. One of the great things about model gondolas, of course, is the interesting loads that can be carried in them. I show below just one of my own examples, a steel beam long enough that both drop ends needed to be lowered. It’s seen here at the end of a passing train on the Coast Division main line.

The model shown here, PRR 439197, Class G26, is a 65-foot car modified from an E&B Valley kit to match the Pennsylvania Railroad prototype. The large girder is made from Atlas bridge parts.

Another important aspect of car choice is to recognize the railroads that had substantial rosters of GB cars and thus would have some likelihood of showing up on my California layout (referencing, of course, the Gilbert-Nelson hypothesis — for more info, use that term in the search box at top right). 

A major example, in addition to the PRR and the Pennsy car shown above, would be New York Central and its subsidiaries, such as Pittsburgh and Lake Erie. Below I show a load of steel beams, on the way to a team track on my branch line, spotted here at Shumala en route to its destination.

Here the model, P&LE 40205, is from a Proto2000 kit, and the load is simply Evergreen beams. One of the nice things about these kits is the interior detail, rare on commercial gondola models until recent years.

I continue to refine my gondola fleet, occasionally selling off or adding a car, but for the most part, my fleet matches my updated goals for this car type, so this part of the fleet management job is substantially complete.

Tony Thompson


Monday, March 21, 2022

Getting the car you want

 As you can likely guess, I am of course referring to model railroad freight cars. Occasionally one sees a need for something that isn’t quite available. This may call for scratchbuilding or kitbashing in many cases, but in response to several previous requests from readers, I am going to illustrate a simple example. 

In 1936, Pacific Fruit Express was ready to build its first all-steel refrigerator cars. The design process had begun at least as early as 1932, since some of the parts drawings for these cars are dated that early. And PFE definitely needed new cars, with a long gap since the previous new ones, and still a lot of pre-World War I cars on the roster.

As Earl Hopkins, retired Chief Mechanical Officer of PFE told me in an interview, PFE had intended to buy 5000 cars, an order that would have been second only to the 6000-car order when PFE began in 1906. But prices had crept up, and the money authorized for these cars  by UP and SP wasn’t enough for the full 5000. PFE had to settle for 4700 cars, car numbers of which began a new 40,000-series. They were numbered 40001–44700, Class R-40-10.

Here is a photo of the original paint scheme on these cars, a Wilbur C. Whittaker photo on the Embarcadero at San Francisco on July 2, 1941. Note the low angle of the open hatch covers, open as far as the latches permit, and the hatch plugs underneath. The car is relatively clean, though five years old; this was in the era when PFE washed cars regularly.

(This history and more, as many of you know, can be found in the book, Pacific Fruit Express, 2nd edition, Thompson, Church and Jones, Signature Press, 2000. Chapter 8 is about PFE’s steel ice cars.)

InterMountain Railway Co. has produced an excellent HO scale model of these R-40-10 cars, and I already have several of them in my fleet.  Looking at my fleet balance, I could use one more car of this class, and I had a goal as to car number. But first, let me comment on paint and lettering.

In the 1940s, PFE standards for car painting called for repainting wood-sheathed cars every 4 to 8 years, and steel cars every 8 to 10 years. By 1946, when PFE adopted a new paint scheme with both railroad emblems on both sides of the car, the R-40-10 cars would have been due for repainting. Accordingly I wanted to model a later paint scheme on my car. Here is an an example of an R-40-10 car, freshly repainted into the 1946 paint scheme, shown at Roseville in the summer of 1946 (PFE photo). These hatches are also partly open, and the car still has the original wood running board.

I have a few InterMountain R-40-10 kits in my stash. Most of the cars produced are in the 42,000-series within the R-40-10 number group. I have renumbered several of my models to get outside that subset of the car numbers. But one I don’t have is an example of the last 700 cars, 44001–44700. I decided to renumber one of the 42,000-series kits accordingly.

I simply painted out the kit car number, using Star Brand STR-27, “S.P. / P.F.E. Daylight Orange” (the correct PFE orange). The remaining lettering is fine.

With this in hand, I can proceed to kit assembly, with most of it straightforward and not calling for any description here. But two issues do need addressing: trucks and hand brakes. The specialties on large PFE car orders were usually distributed among different suppliers, so if one wishes to assemble an accurate model, these parts have to correspond to the car number.

Luckily, these specialties are called out in some detail in the PFE book (cited above), in the table on pages 434 and 435.  I will return to this research and these modeling issues in a future post, as building of the kit progresses.

Tony Thompson

Friday, March 18, 2022

My column in the new Model Railroad Hobbyist issue

 Once again, my roughly semi-annual column in the “Getting Real” series (several columnists alternating) appears in the new issue of Model Railroad Hobbyist. This time, my topic was “Crew Communications,” and it is included in the “Running Extra” part of the March 2022 MRH. (That part of MRH can be purchased as a single issue, or they are much cheaper per issue if you subscribe). Get the details from their website, www.mrhmag.com .

What I covered in this article was the communication that train crews would have had (in most cases) in the pre-computer era of railroading. By that I meant waybills, switch lists (if any), agent messages, management bulletins, and line-ups. Each of those topics has been covered in various of my blog posts, but this article brings all the material together, and doesn’t directly duplicate any of the posts. 

The article described the work that railroad personnel did with waybills, though not describing model waybills per se, as that topic has been covered in other articles. Of course, the waybill enables a switch crew to know which cars to switch, and what to do with them. Here’s an example from my layout town of Santa Rosalia, a loaded PFE reefer at Coastal Citrus, ready to be picked, en route to Albany, New York.

I gave links in the article to the various blog posts which can be regarded as background on specific topics such as Car Distributors, Car Service Rules, bill boxes, agent messages, line-ups, and timetables. The MRH presentation touches on these topics in less detail than what is in the blog posts, in an effort to give a “big picture” overview of how these kinds of communications can be modeled.

I included a number of photos in the article, showing prototype railroad employees doing their jobs, from agents to switchmen to conductors. Here is one of them, an interesting 1952 photo at SP’s Alameda Street Yard in Los Angeles. The switch foreman (left) and a switchman are deciding on the blocking of a freight train. The foreman holds some waybills, folded the long way, and the switchman is writing something, likely a switch list. Most employee photos in this era show men in fedoras.  (Richard Steinheimer, DeGolyer Library)

All these communication methods really reflect the various jobs people did switching on the railroad, which are the job experiences I want to try and reproduce in model form in my operating sessions.

It was an interesting process to pull this article together, as it touched on the whole range of prototype communications that I have researched over the years, so that I could provide them in model form to switch crews in my layout operating sessions. I have enjoyed learning about these topics, and have equally enjoyed figuring out how to represent them in model form, and then of course seeing them in use, helping my layout come alive in operating sessions.

Tony Thompson

Tuesday, March 15, 2022

At last! Post-pandemic operating!

 I have really been looking forward to actually feeling like the pandemic is fading behind us (knock on wood), and returning to operating sessions on my layout. It seems like the time has come, so I invited a bunch of the usual suspects for the weekend days of March 12 and 13 (last weekend), reminding those coming on the 13th to please remember Daylight Saving time (!). 

You have likely already heard about this because of my previous “getting ready” post, entitled the “Long Snooze,” which is accessible at this link: https://modelingthesp.blogspot.com/2022/03/the-long-snooze.html . As I said there, I did have some maintenance issues to deal with, and as it happened, all of the fixes held up in the session. The only major in-session problem was failure of an ancient Caboose Industries ground throw, which will be easily replaced. 

The first day, I operated with the usual locomotives that I have  been using, a diesel switcher at Shumala and one of my several Southern Pacific Consolidations for the local. As is usual, each two-person crew begins on one side of the layout and, after completing the first round of work there, trades with the other crew so both get to work both sides of the layout, involving different work. At Shumala, it’s essentially yard switching, while at Ballard, it’s the Santa Rosalia Local doing road work.

The first day, I happened to get the best photographs of both crews at Ballard. Below, you see Chuck Hakkarinen (left) and Ed Merrin, working with Chuck as the conductor on the local. Chuck has several waybills in his hand. Ed was the engineer in this segment, and they switched jobs when they moved over to Shumala.

Later, after the two crews traded, I captured Jon Schmidt (at left) and John Sutkus doing their turn with the local at Ballard. In this view, Jon was the conductor (they also had traded jobs between the two sides of the layout).

The following day, we naturally had two new crews, but more importantly, Mark Schutzer brought two of his Southern Pacific steam locomotives, very fitting choices for my 1953 SP layout. One was SP 2799, a Consolidation. The other was SP 1284, an 0-6-0 of distinctive SP appearance. I don’t own a steam switcher myself, so this was the very first time Shumala had been switched with steam.

Mark provided me a good photo of the Consolidation, shown below. As you can see, it has an inherited tender from an early cab-forward, a very large tender, thus dramatic. This was common in later years with smaller SP steam, replacing their original smaller tenders.

Back to the session. Below are Richard Brennan (at left, conducting), and engineer Jim Radkey, switching with the 0-6-0 (though you can’t see it very well). This was fun to watch (and hear), and the crew operating this switcher really enjoyed it. This definitely makes me think about acquiring a switcher like this myself!

Meanwhile,  Mark (at left) and Pat LaTorres were working at Ballard, with Mark acting as conductor at this point. Both crews worked efficiently and not only got all the work done in good time, but made very few errors. Nice to see experienced and effective operators at work.

Referring back to my “getting ready” post (link in the second paragraph of the present post), this pair of sessions seemed like considerably more work than the usual preparation, only because so much accumulated waybill and car spot disorder had to be removed, and of course track and wheels cleaned as they had not been for some months. But it paid off in a relatively fault-free pair of sessions.

In making assessments like this, I am always mindful of the description by Paul Weiss of what he termed “Host Flaw Hysteria,” in which even the most minor difficulty is perceived by the host as towering above the many aspects of the layout which do work and work well. The visiting operator naturally sees it the other way around. Or so I hope.

Tony Thompson

Saturday, March 12, 2022

The long snooze

 Like most modelers during the pandemic of the last two years, I have had a relatively inactive layout. At least I did have a few operating sessions with my granddaughter (see for example: https://modelingthesp.blogspot.com/2021/12/more-family-ops.html ). But these did not exercise the layout very extensively, as they were all “reduced-length” sessions. At least some wheels turned — but still, much of the layout has had a long snooze.

An obvious point is cleaning. All track, every bit, including staging, needed to be cleaned, and wheels of locomotives needed cleaning also. I also checked track gauge in places where there have been issues in the past. Yes, track can shift with time, as I have certainly learned.

In addition, I now know to check the gauge of all my Peco switches. I have seven of them on the layout, and all operate perfectly — except for track gauge on two of them (for a report: https://modelingthesp.blogspot.com/2018/07/trackwwork-wars-part-2.html ). Once again one of them is acting up by apparently shrinking the plastic parts, because where the track gauge used to be fine, now it is tight. This is through one part of a 3-way switch.

The problem area is the diverging route at the top of this photo, just as it clears the frog area. I have simply had to file the rail head here to get it into gauge. The Peco people claim they have “never heard”of such a problem, but having observed it with more than one of their switches, I regard their denial with some scorn.

At another switch, I found a gauge problem also, as you can pretty clearly see below at photo center. Here the rails are no longer aligned, for what reason I cannot imagine. But by spreading the tight-gauge part (upper rail) slightly, I was able to correct this.

In addition, of course, there were electrical issues. Long-time readers of this blog will recall a number of installments of my series, “Electrical Wars” (you can use that term in the search box at the top right of this post, to find examples). And there were a few that had arisen during the snooze.

I recently was sent the cartoon below, which expresses my own feelings quite well. It’s by Hal Kattau, who did cartoons for Model Railroader for years, but I can’t find that this one appeared there, going through my CD archive of the magazine. My source couldn’t remember where he got it, so my apologies for not citing the source.

Next I had to address the “population” of freight cars on the layout. Normally, these cycle from operating session to session, and move through the normal steps: arrival on the branch, spotting at destination, and later being picked up to move off the layout in turn. But during the snooze, many cars were arbitrarily added or removed, mostly added, so this all had to be thinned out.

In addition, waybills were entirely out of order. Many remained from much earlier sessions; a fair number of cars that were on the layout had no waybills present; and so on. I simply had to make all of that rational with an intensive waybill re-think and re-work, to set up the upcoming session.

It was nice that the result was a “lean” layout appearance, no more excess cars everywhere, and ready for this weekend’s operating session. And right now, everything seems to be working (until the dreaded “guests present” glitches occur).

Tony Thompson

Wednesday, March 9, 2022

Empty reefers with car fans

I introduced the topic of managing empty refrigerator cars in a previous post, inspired in part by Mike Jordan’s layout operations, as I described in that post. If you’d like to read some of that background material, it is at this link: https://modelingthesp.blogspot.com/2021/12/distributing-ice-reefers.html

One of Mike’s layout procedures is to make sure that fan-equipped reefers are delivered to the shippers that need them. Cars with fans could maintain much more uniform temperature within the loaded car interior, obviously avoiding damage to produce in the warmest car areas (upper center of the car). There were two kinds of crops where this uniformity was especially important: dense produce, like melons or fruit; and leafy vegetables, such as cabbage or celery. 

Let me repeat below a drawing from Preco (Pacific Railway Equipment Company), showing fan installation with their equipment. It was included in the PFE book on page 175. (Pacific Fruit Express, 2nd edition, Thompson, Church and Jones, Signature Press, 2000). Air circulation is emphasized in the upper drawing, details of fan and heater installation in the four small drawings at bottom. (You can click on the image to enlarge it if you wish.)

As mentioned in the previous post (link in top paragraph, above), for more than 10 years, PFE painted fan shafts on the car side black, and when fan shafts were no longer needed (their use is shown at bottom left in the drawing above), and electric fans were installed, a round plate, the size of a fan shaft mounting, was added to the car side and painted black. The photo below, a Pullman photo of a Class R-40-23 car built in April 1947, illustrates how evident these black circles were.

What are the PFE cars that were built with fans? The first class of new cars with fans was Class R-40-23, built in 1946-47 (such as the one above), followed by all the subsequent steel ice cars. The first rebuilt cars that received fans were classes R-40-21 and -24. But matters are complicated by the fact that PFE retrofitted fans to cars of several early c lasses, including R-40-10 and R-40-20, from 1950 onward.

In peak harvest season, usually in September and October, even PFE’s immense fleet of over 40,000 cars (in this era) was not enough, and foreign cars were borrowed, either informally or under contract (one such contract was with BAR). 

One frequent source of borrowed cars was ART, which had declining traffic in the 1950s. It is interesting, though, that in the late 1950s, PFE did not want any foreigns unless they had fans. They supplied instructional photos to various junction yards so that yardmen would be able to recognize the “right” cars. Here is an example.

The topic of car fans overlaps with that of pre-cooling of loads. Shippers should ideally pre-cool their produce to shipping temperature themselves, as they then had control of the process and could cool quickly. For dense produce, chilling the individual fruit in a running stream of refrigerated water was fast and effective. For leafy vegetables, either storage in a cold room (slower) or vacuum-exposure of the produce after misting with water (causing rapid evaporation and cooling, thus quicker) was practiced. 

The shipper would of course order fan cars from the local agent, if those were needed, and the Car Distributor filling the order would ordinarily comply. But then what?

 [Some years back, I included part of the transcript of my interview with Pete Holst, long-time PFE Assistant General Manager for Car Service (meaning management of the car fleet). It gives a great many insights into PFE operations. You can read it here: https://modelingthesp.blogspot.com/2012/09/pfe-operations-from-pete-holst.html .]

For reefer operations on my layout, I have separated my outgoing waybills for produce loads, so that fan cars are preferentially used for the kinds of loads that would require fans. But that doesn’t help with inbound empties, because Empty Car Bills don’t specify the industry to which the car(s) may be destined. 

One possibility for directing spotting of fan cars is an agent’s message (see: https://modelingthesp.blogspot.com/2015/06/operating-with-agent-messages.html ) to deal with empty car spots, for example, “spot fan cars at Guadalupe Fruit,” and let the switch crew select out those cars. But the agent knows the incoming empty car numbers (the Car Distributor will have notified him), so this is an artificial arrangement. I am continuing to think about ways to do this better.

Tony Thompson

Sunday, March 6, 2022

The Ulrich “War Emergency” gondola

A couple of years ago, I wrote a blog post about the old Ulrich 52-ft., 6-in. gondola in HO scale, built to “War Emergency” standards during World War II with wood floor and sheathing to save steel. The model I discussed was one that I had acquired from Chuck Hitchcock, among the hobby’s leading lights, in my opinion. The post is at: http://modelingthesp.blogspot.com/2018/10/upgrading-another-old-model.html . That model is lettered for Santa Fe.

Though I didn’t mention it in that post, my late friend Richard Hendrickson wrote a very nice two-part article about this prototype in Railmodel Journal, in the issues for May and June, 2002. These articles were stimulated by the release of the very nice Tichy kit for these gondolas, and he showed modifications he made to the kit to create cars for New York Central, Pennsylvania, and Santa Fe.

But I had always wanted to do an Ulrich model myself. Not too long ago, I found a completed model at a swap meet, and bought it. I decided I had better look more carefully at the prototype before deciding what to upgrade, and how much. Here’s a builder photo of a New York Central car (NYC photo, Richard Hendrickson collection). The color is boxcar red, incidentally.

One distinctive feature of the NYC cars was the lever handbrake, made by Klasing. Here’s a NYC end view to show what it looked like (Hendrickson collection). Note also the wider end posts to provide structural strength when the drop end is lowered.

Turning to the model, I already had acquired a set of the excellent Greg Komar dry transfers for this car, set 325-B. So I could re-letter after probably needing to repaint. And in any case, the original Ulrich lettering wasn’t very crisp. Here is my model, as acquired, in Norfolk & Western paint. The paint-free areas at each end inside are where slabs of weight had been glued.

The interior of these models was simply a sheet of wood, as you see above; the prototype, of course was planked. I can add scribed styrene sheet inside to deal with that issue. 

The model ends are nice, in that they are stamped brass, and thus have the “reverse” of the outside-surface ribs visible inside, as they should. But the builder of this model had added a geared handbrake on the drop end, as shown below. The actual N&W cars had lever handbrakes on the end post, like the NYC photo above.

The model also obviously has Talgo-type trucks with horn-hook couplers. I will replace the trucks and add body-mounted Kadee couplers.

Lastly, these model only had the three elements of brake gear (reservoir, cylinder, valve), and these were not added in a correct arrangement — see below. The valve is placed so it would interfere with the cylinder, and the cylinder “points” to the wrong end (the builder put the handbrake housing on the other end). I would guess that the builder had no idea of what these parts do.

I have not found a good prototype image of the underbody arrangement, but I show below the way Richard Hendrickson arranged the brake rigging on his model. I will follow this general arrangement.

Now I am ready to proceed! More on this project in a future post.

Tony Thompson

Thursday, March 3, 2022

Completing a turntable, Part 3

 Last fall, I began a series of descriptions of the work underway to complete  my Diamond Scale 90-foot turntable. What remained to be done was to install walkways along each side, and, what had held me up, construct a durable yet prototypical handrail along both sides.

I showed the turntable as it then was, and several prototype Southern Pacific turntables with wood handrails — as the kit directed the builder to install —in my first post (see it at: https://modelingthesp.blogspot.com/2021/10/completing-turntable.html ).

In the second post on the topic, I showed the alternative to wood handrails, namely handrails evidently made of pipe, again in prototype SP photos. I also showed how I thought I could go about building these (see this post: https://modelingthesp.blogspot.com/2021/11/completing-turntable-part-2.html .

But before building, let alone installing, any model handrails, I needed to add walkways. In every SP photo I have seen that shows such walkways, they are wide planks. I decided to used V-groove styrene sheet, not because the grooves are prototypical, but because they delineate the planks. Judicious distressing of them, and intermediate joint grooves, will make them look all right.

I chose Evergreen styrene sheet no. 2100, meaning 20 mils thick and 0.100-inch groove spacing — which is 8.3 inches in HO scale. Word of warning: sheets aren’t necessarily square with respect to the grooves, but may be cut on a slight bias.

I cut two walks as wide as the tie extensions on each side, and added platform material at the end of one for the control cab. Normally I would prefer thicker styrene than 20 mils for almost any use, but here I wanted the walkways to lie well below the rail head, for ease in cleaning track.

Next I painted both sides of these walkways with Tamiya “German Grey” (no. TS-4). This is a dark gray, intended to represent some fading and weathering of an original black color. Once that was thoroughly dry, I applied some Pan Pastel colors, both Paynes Grey (no. 840.3) and some Raw Umber (no. 780.3), to break up the uniformity of color. The powder also gets into the board divisions I scribed, so that helps the appearance too. When satisfied, I added a protective coat of flat finish.

Once the finish was thoroughly dry, I attached each walkway with canopy glue. This is a very effective adhesive for dissimilar materials like the wood ties and the styrene walkway. At this point, I still  had to account for the curved edges of the end-most cross-ties, curved, of course, to accommodate the curvature of the turntable pit. 

I decided to make end boards, using styrene scale 1 x 10-inch strip, trimmed to match the curvature, attached with canopy glue and painted to match. Below is a view of the turntable with the walkways and these trim boards installed.

The walkways are a little wider than the kit maker intended, because I didn’t install the outside wooden posts as kit directions instructed (see the kit drawing in my first post on this topic; link in the second paragraph of the present post). But prototype photos of SP turntables show considerable variation in width of side walkways, so I decided not to worry about it.

Finally, I needed to add a roof to the operator’s cab (I assembled the walls in Part 2 of this series; see link in the third paragraph of the present post). I used 0.020-inch styrene sheet, and pre-curved the styrene so it conformed to the arched roof shape. I attached it with canopy glue, and when that was dry, painted it the same dark gray as the walkways. I then installed windows of clear styrene, also with canopy glue. Here’s the turntable at this point, in place on the layout.

The turntable still needs the pipe handrails, as I described in the previous post, but now the turntable is ready to receive them when they are fabricated. More on that in a concluding post.

Tony Thompson