Saturday, July 29, 2017

My latest column in MRH

As part of the ongoing series of columns with the series title “Getting Real,” by several columnists including me, in the on-line magazine Model Railroad Hobbyist, I have a contribution in the current issue for August 2017. Like all issues of MRH, you can read it on line or download it, for free, at any time at their website, www.mrhmag.com .
     This column is about engine-terminal details. Readers of this blog will realize I have been writing multiple posts on parts of this topic, for example on modeling of blue flags (see my concluding post in a short series at this link: http://modelingthesp.blogspot.com/2017/04/blue-flags-part-2-modeling.html ). I also wrote a longer series of posts about the  excellent kit produced by Banta Modelworks for the SP roundhouse at Port Costa, California (see for example: http://modelingthesp.blogspot.com/2014/02/a-roundhouse-for-shumala-part-5.html ).
     Perhaps a more interesting part of my MRH article was the coverage of work carts used by workmen at SP engine terminals. I included a whole bunch of prototype photos, and for flavor here is still another such photo, from the John W. Barriger National Railroad Library photo collection at the St. Louis Mercantile Library, image SP 1168a. It was taken at an SP roundhouse, which looks very much like the one at Taylor Yard in Los Angeles.


Note all the work carts lined up in the foreground, each slightly different from the next, with flat or rounded tops, different hand rails, some with hoses, and different in length. Here is a closer view of those same carts in the right foreground of the photo above.


     My blog posts about how I built a variety of carts are available via the concluding post in that series, which can be found at the following link: http://modelingthesp.blogspot.com/2017/04/building-work-carts.html . I am in the process of building more of these carts.
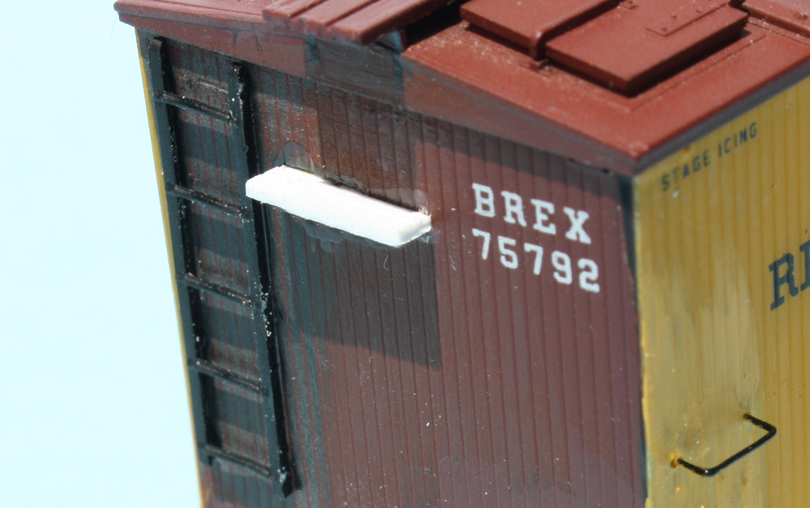
     I also enjoyed developing some of the other details described in the column. Some of these, as I mentioned above, have been covered in my blog posts (links are supplied in the article, to connect to those posts). Some other details, such as ladders, have not been addressed in the blog.
     But probably my favorite project, one I had been meaning to do for some time, was the fire equipment cabinet. I knew that SP attached these cabinets to many structures, and I had seen something similar in model form on Bill Darnaby’s Maumee Route layout. But preparation of the MRH column drove me to finally dig out some SP photos of this equipment, and of course build a model. I enjoyed building it, and I will probably need to do a second one for the forthcoming sand house at Shumala.
     Once again, the deadline for another column in the MRH series led me to pull together several ongoing and planned projects, and it was fun to get all those details completed. Once again, if you haven’t seen my column or even the August issue yet, I recommend it.
Tony Thompson

Wednesday, July 26, 2017

Waybills, Part 59: more on op session set-up

Setting up my layout for an operating (or “op”) session requires more time and effort than might be evident. Most action on my layout is switching, and I described how I identify industry needs for cars (inbound or outbound) in a post some time back, and I still use the schedules shown there (that post is at: http://modelingthesp.blogspot.com/2011/11/operations-demand-based-car-flow-2.html ). I have gone beyond that basic starting point to describe the general process by which I survey the layout prior to an operating session, and proceed to set it up for the next one (see that post at: http://modelingthesp.blogspot.com/2015/06/how-i-set-up-operating-session.html ). In this post I want to explain a little further.
     In the prior posts, I explained the generation of waybill needs, either from existing waybills on file, or newly created ones for specific needs. What I didn’t get into was the criteria for selection of cars to add to an operating session. The key to doing so is a document I maintain that I call the “Master Roster.” It lists all cars I own, including a few still in kit form or awaiting upgrades to enter service. Cars are listed alphabetically by reporting mark, and entries include the AAR car class for each car, the present storage location (these have to be updated periodically), prior op session use, and identity or source of the car, such as “Tangent ready-to-run” or “built from InterMountain kit,” or perhaps “Challenger brass.” I would also add any pertinent comments, such as car class when known, the slogan for railroads like Santa Fe with a range of car slogans, a lessee’s names on tank cars, or refrigerator cars set up for vent service, or any other relevant details.
     To illustrate, here are a few entries chosen from the document. The “location” is any one of several storage and retrieval locations in the layout room.  (You can click on the image to enlarge it.)


The abbreviation “RHH” identifies a car inherited from Richard Hendrickson. You can see that this kind of roster, provided it is kept up to date and current at all times, contains good information on the car fleet, and for the present topic, collects information on car use in operating sessions.
     So the use of the Master Roster is for locating cars in the place they are stored, as well as giving an idea of prior use. I like to spread the usage around, and see what role I can find for a car not previously used much, or at all. Knowing the inbound and outbound industry needs that have been selected for the upcoming session, I then need to fit cars and their waybills to those needs. Sometimes, of course, the assignment is uncomplicated (Richfield Oil Company tank cars to and from the Richfield dealer on the layout), but free-running cars like box cars are another story. For example, if I need an inbound empty to be loaded at Jupiter Pump and Compressor, and have a C&O box car I would like to work into the session, it may not have a waybill in existence for that industry.
     This is where “stub” or overlay waybills become a valuable part of set-up. (For an introductory discussion of this idea, you may wish to read my post at: http://modelingthesp.blogspot.com/2011/08/waybills-10.html .) If that C&O box car already has a pair of waybills in the system, one inbound from a foreign road somewhere, and one which is a Southern Pacific waybill, I can simply add an overlay to that SP waybill, turning a waybill for some other industry into a Jupiter Pump & Compressor outbound waybill. Here is the existing SP waybill for this car:


Obviously it’s an inbound load to the Ballard team track, but the important part is the SP header. Turning to my waybill file, I pull out an overlay for an outbound Jupiter load, one that is headed at least somewhere in the direction of home for the C&O box car:


There are some handwritten marks on this waybill, as on most of my bills; there is considerable evidence that prototype waybills typically contained this much handwriting or more. Now when the overlay is added to the sleeve, this is what it looks like to the local freight crew.


     I use this process most commonly with outbound refrigerator cars. That enables me to direct an outbound load from any of my packing houses, with a seasonally appropriate produce load, for any produce reefer in my fleet, because all have at least one Southern Pacific perishable waybill already. Seasonal produce shipping is something I have researched for my layout locale, and which I always make part of planning for any operating session. You can read my post giving background about that point at this link: http://modelingthesp.blogspot.com/2015/09/seasonality-of-crops-and-traffic.html . In fact, my most extensive previous discussion about my ways of employing overlay bills concentrated on reefer waybills (see the post at: http://modelingthesp.blogspot.com/2015/06/waybills-part-41-overlay-bills.html ).
     With the range of techniques and approaches presented in this post, I have a couple of kinds of flexibility as I set up each upcoming operating session. This adds to the fun for me as layout owner.
Tony Thompson

Sunday, July 23, 2017

Using Weathering Solutions decals

I have described previously some of the interesting products (new to me, if not entirely new to the hobby) that I saw at the St. Louis RPM meeting last month in Collinsville, Illinois. (The post about those products can be found at: http://modelingthesp.blogspot.com/2017/07/interesting-products-at-collinsville.html .) A very intriguing product I mentioned was the wide variety of weathering decals from Weathering Solutions. Although I show below some efforts using just one of their decal sets, there are many more to be seen at their website, which is at: http://www.weatheringsolutions.com/2-uncategorised . I show below the advertisement included with their decal sets, which illustrates the range and type of products.


     The set I decided to try out was set 1105-SLT, “small rust spots.” In my modeling era of the early 1950s, cars were rarely allowed to get seriously rusty and deteriorated, but instead were likely to be maintained before rusting could get too advanced. Thus I only wanted to experiment with moderate rust markings. Here is the decal set, shown here only to emphasize the really large amount of decal material even in this one set.


     After some thought, I decided that one of my covered hoppers in chemical service might well have suffered corrosion severe enough to have generated the kinds of rust streaks available in this set. Accordingly, I chose one to work on. The model represents a car owned by the General Chemical Division of Allied Chemical, and I described its creation in a post last year (you can see it at; http://modelingthesp.blogspot.com/2015/10/small-modeling-project-gcx-covered.html ). Here is how it looked at the outset.


     I thought it might be interesting to do the two sides of the car a little differently, partly to see how well I liked the effects. I put the streaks below the hatches, and on the roof alongside the hatches, and also tried to get some rust right at the base of the hatch. Here is one side of the car, the side with smaller rust streaks. (You can click on the image to enlarge it.)


The decals went on as neatly and simply as any good decal would.
     The other side was to have longer and thus more dramatic rust streaks, but similar rusting around the hatches on the roof (after all, whichever side of the car was toward the viewer during layout operation, the entire roof could always be seen). I used longer streaks, though far from the longest ones in this set, and tiny compared to some of the rust streaks in their other sets. Still, this seemed about as radical as I wanted to get on this car.


     This is a neat product, a clever idea and well implemented. It no doubt serves modern-era modelers better than modelers of the 1950s, like me, but still offers some interesting possibilities. I like these decals and will be using them on future projects.
Tony Thompson
     

Thursday, July 20, 2017

Interesting products at Collinsville

Last month, I attended the Railroad Prototype Modelers meet in Collinsville, Illinois (St. Louis area), as I described in a brief report. You can see that post at this link: http://modelingthesp.blogspot.com/2017/07/the-st-louis-rpm-meet.html . I mentioned in that post that I had seen some intriguing products at the meet, and in the present post I want to say more about them.
     I have already written a separate post about the “headline” new product displayed at Collinsville, which was the new insulated tank car from Tangent. It is the much needed 8000-gallon size, has the much-needed General American underframe, and is another of the superb models we have come to expect from Tangent. My post about those cars can be read here: http://modelingthesp.blogspot.com/2017/06/the-new-tangent-insulated-tank-car.html .) But there were three other noteworthy displays.
     First up was an exhibit of a new 3-D printed model, one that has received some discussion on the Yahoo group called Steam Era Freight Cars. (To join that list, you can visit http://groups.yahoo.com/group/STMFC ) This is an unusual prototype, the Denver & Rio Grande Western drop-bottom or GS gondola. The unusual part is that most of the D&RGW GS fleet was 46-foot cars, instead of the much more common 40-foot length, and the cars had a distinctive curved or “offset” side sheet. A model of this car was produced in HO scale brass for W&R Enterprises, but that car was imported in modest numbers, was fairly expensive, and is now hard to find. The new models from Bonsall Scale Carshops is most interesting. Offered are both a 42-foot car (D&RGW 45,000 series) and the 46-foot car (D&RGW 70,000 series), and a coke rack can be added to the car. Here is a photo of one of the models displayed.


I am not aware of a website where these are being sold, but Corey Bonsall has written about the development and printing of the models, at this link: https://forum.formlabs.com/t/ho-scale-d-rgw-gs-gondola-project-with-the-form-2/13293 . I did not manage to find anyone manning the display, but kit boxes were shown, and I believe they can be purchased directly from Corey. If you are interested, his email is coreybonsall@gmail.com .
     Another interesting product was a small motor to throw turnouts, a familiar product of course from several manufacturers, but this one includes a connection to also rotate a switch stand 90 degrees when the switch throws. It looked and worked beautifully. It’s called a “Mole II” and has a simple, effective, and small mounting cradle, and is available with the switch-stand rotation option. It is sold by Proto 87 Stores (visit them at: www.proto87.com and do watch the video of this device operating). The photo below, from Proto 87 stores, shows a cross-section of an installation, extending less than half as deep below the layout as a Tortoise machine.


The turnout with switch stand, used at Collinsville for demonstrating the operation of the Mole II machine, looked excellent and as I said, operated very smoothly. Price is reasonable too.


     The third product I found intriguing was a decal system for weathering, from Weathering Solutions (you can see much more of their product line at their website, http://www.weatheringsolutions.com/2-uncategorised ). These comprise a whole variety of rust streaks, along with gray and black streaking. The photo below shows part of their display, with a sample car with these decal streaks applied. You can see also the wide variety of sizes and types of streaking offered in this line of decals.


Another example, well suited for modern modeling, is the MoPac covered hopper below, with strikingly vivid rust streaking. (They also offer graffiti decals.)


I bought a couple of sets of these decals, and I am looking forward to experimenting with them on a couple of freight cars. Results will be shown in a future post.
     All these products were interesting to me, and the first time I had seen any of them (though some are not brand new to the hobby). I hope some of them may be of interest to you, too.
Tony Thompson

Monday, July 17, 2017

Upgrading an Accurail reefer, Part 3

This project began as an uncompleted model I inherited from Richard Hendrickson. He had stripped off the molded-on grab irons and ladders from the Accurail car body, along with removing the B-end brake gear, and all sill steps. He had built up most of the underbody brake gear. I showed prototype photos of a BREX car, as well as the original state of the model, in my first post on this topic (see it at: http://modelingthesp.blogspot.com/2016/07/upgrading-accurail-brex-reefer.html .
     In my second post, I showed the first of the additions I made to the car, including wire grab irons, InterMountain ladders, and A-Line sill steps, along with a new styrene brake step. That post is available at this link: http://modelingthesp.blogspot.com/2017/07/upgrading-accurail-reefer-part-2.html . My next step was to add the rest of the details for the B or brake end of the car. I used a retainer valve from a Tichy brake set and added 0.010-inch styrene rod as the retainer line. I used a brass Precision Scale brake wheel, which I soldered to 0.015-inch brass wire. This makes a durable version of this kind of brake wheel. The stirrup for the staff at the bottom of the car body was drilled to accept the wire, as was the brake step, and the brake staff was attached with CA. Lastly, scale 1 x 3-inch styrene strip was used for brake step braces.


     Next step was to paint all the remaining parts as needed, mostly boxcar red on the car ends, along with some touch-up elsewhere. Then I was ready to complete the lettering with decals. I had the remnants of a decal set, I think from Speedwitch Media, but had used part and cut off the top identifier, so am not sure. In any case, Speedwitch makes two different, excellent decal sets for WFEX / FGEX which include the parts I used, most visibly the ‘ventilator – refrigerator” lettering. (You can see the Speedwitch decal list here: http://speedwitchmedia.com/decals/ .) The photo below shows the model with all lettering added.


You can see I have installed Kadee #58 couplers. Because I dislike the Accurail friction-pin design of the coupler box, I simply tap the hole in the coupler box post, then make a new box cover from 0.030-inch sheet styrene, which can be screwed on with a 2-56 screw. This accomplishes solid installation and also easy future access.
     To compare the photo above to the prototype, see the photo in the first post in this series (link provided in the first paragraph of the present post). In that regard, I should repeat a comment from that first post, that this project only parallels a recent Accurail upgrade by Mont Switzer in some ways. His project was described in Model Railroader magazine (the issue for August 2016, page 36). The primary difference is that Richard and I had an objective different than Mont’s, in that we wanted to backdate the car to a prior era (originally, for Richard’s modeling time of October 1947). The most visible difference of the two eras is the lettering, along with the black side hardware.
     Last came trucks. The prototype photo just referred to reveals Andrews trucks, though by the 1950s many cars in the FGE fleet had received trucks with one-piece cast sideframes. Accurail makes a very nice Andrews truck, so I used that, with appropriate Reboxx wheelsets of semi-scale tread width. Lastly, of course, I weathered the model with my usual acrylic-wash method (see Reference Pages box at upper right of this post). Here’s the completed car in service:


This photo shows the reefer spotted at the Coastal Citrus warehouse in my layout town of Santa Rosalia. You can see field boxes of lemons in the open doorway (you can click to enlarge).
     With completion of this project, I am pleased to have finished something I hope Richard Hendrickson would have liked, and largely to his standards. It will join the other “foreign” reefers in my roster, which, like the prototypes, supplement the PFE fleet in the busiest harvest season (August to October).
Tony Thompson

Friday, July 14, 2017

More on the Kyoto (Japan) museum

As part of describing some interesting aspects of my recent trip to Japan, I wrote an appreciation of the Kyoto Railroad Museum, a superb facility well worth a visit by anyone with even a small interest in railroads (you can read my post here: http://modelingthesp.blogspot.com/2017/06/the-kyoto-japan-railway-museum.html ).
     The core of the Kyoto facility is a concrete roundhouse, which served the Kyoto engine terminal in steam days. I showed some views that included it in my prior post. Here is another photo from inside, and you can see the earthquake reinforcements added to the structure. (At photo center is a former JNR D50-140 locomotive of 2-8-2 wheel arrangement.)


      But also on display at the museum was a superb model of the facility as it once was, looking to me like HO scale (remember that Japanese track gauge in steam days was 42 inches). I want to show some images of that model, both because of the fine modelbuilding, and because it shows the similarities and differences of Japanese and American steam facilities. First, here is an overall view of the model, looking in a direction which on the prototype would be pretty nearly northward. The large number of garden tracks (used as ready tracks) is noteworthy.


Moving around to the left of the model view above, one sees a different perspective of the roundhouse and the shops to its west. Especially interesting here is the coaling facility at photo center, with overhead cranes to fill tenders from the elevated coal bunker and also to unload from coal cars, like the gondola shown to the left of the bunker.


Moving still farther left, the car shops are depicted, again easily oriented relative to the back of the roundhouse at photo top. Most cars shown are passenger cars, but a smaller freight car shop was also included.


This was really an interesting historical depiction of former uses of the facility we visit today.
     But before leaving the Kyoto Railroad Museum, I have to say that you cannot dislike a museum where you come upon items like this as you stroll from building to building.


     Now of course all this viewing of models whetted my appetite, and so on the way back to the hotel, we stopped by the main Kyoto train station, containing a great many shops in the associated building, and one of them was a Kato shop, with both N and HO scale models. (American modelers are familiar with Kato USA, an offshoot of this Japanese company.) I didn’t experience too much temptation to make a purchase, since the models on sale were entirely Japanese outline, but here is my wife posing at the entrance. It was fun to visit anyway, and of course anyone inspired by watching and riding Japanese trains could pick up a nice souvenir here.


     This wraps up what I wanted to say about a terrific visit to Japan. And I will repeat my previous suggestion: if you are anywhere in east Asia, try and fit in a visit to this superb museum.
Tony Thompson

Tuesday, July 11, 2017

Paint schemes, real and imaginary

This is an old topic in model railroading, where there seem always to have been paint schemes offered in decal form, and decorated on models, that were, to put the very best light on it, “improved” from reality. I’m not talking about the widespread practice of lettering a particular car body or locomotive with the names and emblems of every popular railroad. This too has been around from the dawn of the hobby, and admittedly can be confusing for beginners, because the paint scheme may be quite accurately rendered but simply is on the wrong car or engine. In many cases, that particular type of rolling stock is one that the prototype of the lettering never had.
     But that’s not my topic here. My reference is, instead, to paint schemes which may be difficult to assess if you don’t know much about the prototype referenced in the paint scheme. In my own case, I do make an effort to choose painted cars that are prototypically accurate. But if I haven’t had a chance to check reference material, you could certainly fool me with a bogus paint scheme on, say, an Atlantic Coast Line or Chicago & Eastern Illinois car. I simply don’t know those roads very well.
     This discussion is occasioned by the following model, using a tank car body produced some years ago by Walthers. Nowadays Walthers has a bit of a reputation for slap-dash models, not entirely fair since they also do some quite good ones. This particular car, somewhere between the extremes of Walthers’ accomplishments, has been relettered with old Walthers decals. Nearly all of the oldest Walthers decals, from the William K. Walthers era, were certainly derived from prototype observation, even if typefaces were usually only approximate. So what about this model?


     We know that the Richfield Oil Company did use large block lettering like this on some tank cars, and in the 1940s, many photographs support Richfield’s use of aluminum paint for lettering. But the Walthers decal set used for this car clearly has the block lettering in yellow. Given that the old Walthers decals were substantially based on prototype, one might wonder if this color could be right.
     Years ago, when I was frequently purchasing freight car photos from the late Wilbur (Will) Whittaker, I asked him about the yellow decals, and he replied that he could remember seeing occasional Richfield cars which did have the yellow block lettering. But there is no photo evidence of the yellow color which I’m aware.
     Some time after talking to Will, I asked my go-to tank car expert at the time, Richard Hendrickson, and he also said he knew of no photo evidence of yellow, but was not sure it was wrong, either. Bottom line? I guess I can keep the car with the yellow lettering.
     Incidentally, the most common Richfield lettering was a smaller spelled-out owner’s name, right above the reporting marks. I showed a prototype photo of this scheme in a post about asphalt tank cars. You can see it at this link: http://modelingthesp.blogspot.com/2016/09/asphalt-tank-cars-part-3.html .
     Now for a real “foobie” (a term derived from the World War II military slang word, “fubar,” standing for “fouled up beyond all recognition,” originally of course employing another f-word). As foobies go, you can’t beat the model shown below. This is a LifeLike box car from some years back, and of course was decorated to celebrate this brand of candy. And I happen to like it myself! I saw this car for sale cheap at the Bakersfield NMRA convention (see my post at: http://modelingthesp.blogspot.com/2017/05/pacific-coast-region-nmra-2017.html ), and could not resist.


And of course, for those who aren’t familiar with this candy, the model car paint really does mirror the actual package. I happen to have a current package handy.


Now what? There’s no basis whatever for this car in the real world. Then again, I really do like the candy, so there is a temptation to slip it into an operating session. Maybe it could just be “stationary scenery” at my wholesale grocers’ warehouse, spotted at Door 3?


Sigh. Maybe yes, but probably not, so don’t hold your breath.
     There are all kinds and degrees of foobies out there. How bad an individual example might be, and whether you want to make it part of your modeling life or not, is obviously up to you. But in such cases, I always hark back to a remark of Tony Koester’s, which ran something like this: “Modelers will cite Rule 1, that it’s your model railroad and you can do what you want. But the moment you cite Rule 1, you run the risk of revealing that you are not really trying to model real railroads and actual railroading, but are just having fun with little models of trains.” Either of these two hobbies are perfectly fine hobbies, but they shouldn’t be confused with each other. ’Nuf said.
Tony Thompson

Friday, July 7, 2017

Freight operations: mileage, per diem and all that

One of the topics I know can be confusing to modelers trying to learn about freight car distribution and operation concerns the charges levied for use of foreign freight cars. (“Foreign” means not owned by the railroad on which the car is located.) There are two kinds of such charges, called "mileage” and “per diem.” The mileage charge is so much per mile, for all movements of the car, and is typical for privately-owned freight cars (more on the details in a moment). The per-diem charge is so much per day that the car is on a railroad’s rails, moving or stationary, and the name of course is simply Latin for “per day.”
     Back in the early 20th century, there were many varieties of charges for car usage, but the idea of mileage came into acceptance, and there were a variety of rates, often quite small (fractions of one cent) per mile. Per diem was also variable and usually well under a dollar a day in the U.S. But from the 1920s through the 1930s, per diem was famously “a buck a day.” It finally began to rise after World War II, and by the year I model, 1953, had risen to $2.00 a day. By the way, you can look up the per diem rate for any year in the Code of Per Diem Rules, which was printed in the back of every issue of the Official Railroad Equipment Register or ORER.
     In those years, the Association of American Railroads (AAR) would from time to time consider whether increases were needed, and if so, would set a new rate, which would be voluntarily accepted by the railroads. During 1953, however, that changed, because an AAR recommendation to increase the rate from $2.00 to $2.40 was not accepted by Eastern railroads, who instead continued to pay per-diem bills at the $2 rate, while everyone else paid $2.40. This naturally led to court fights and extensive hearings, etc., which led to various complications that I won’t go into. Eventually, the “per diem” became an hourly rate, thus eliminating the notorious “midnight shove,” in which you tried to get as many foreigns as possible off of your rails and onto a connecting railroad’s rails before midnight (and of course your connection was striving to do the same to you).
     Note here that while you were eager to move any per-diem foreign cars off your railroad ASAP, you really didn’t cars if any mileage-rate foreign cars sat around, as long as they weren’t moving.
     Mileage was, in some ways, complicated in that the rates varied with car type. In my 1953 era, this was also encapsulated in the Code of Per Diem Rules, and contained in Rule 18. Shown below is the entirety of Rule 18 from the January 1953 issue of the ORER. (You may wish to click on the image to enlarge it.)


The most common car types in this table are refrigerator cars, the most common varieties of which carried a charge of 3.5 cents a mile, and tank cars, most of which carried a charge of 3 cents a mile. Some cars were charged at less that one cent per mile, for example 6 mills (or 0.6 cents) a mile.
     How does this come into model railroad operation? It doesn’t, directly, but it can affect car handling. One reason refrigerator car operators like PFE and SFRD did not care at all about westbound loads, after their cars had been unloaded of their eastward produce shipments, is that the mileage was paid for all reefer movements, loaded or empty. The revenue to PFE or SFRD was identical for a westward empty as for a westward load. (The intervening railroads would have benefited from divisions of the freight rate on westward loads, but that certainly wasn’t PFE’s problem. Even SFRD, though a component of the Santa Fe, was expected to make money in its own operations and, like PFE, was primarily concerned with providing empties to produce shippers in the west. Especially in harvest season, there were often barely enough empties to go around.)
     It is certainly only a detail, but knowing how car usage was paid for, whether mileage or per diem, can readily become part of how you conduct model operations on a layout. The complicated one of the two payment arrangements is mileage, and Rule 18, shown in this post, gives all the specifics of that aspect.
Tony Thompson

Wednesday, July 5, 2017

Upgrading an Accurail reefer, Part 2

The first post on this topic (see it at: http://modelingthesp.blogspot.com/2016/07/upgrading-accurail-brex-reefer.html ) described the background of this project, which is the completion of a model started by my friend Richard Hendrickson. This post continues the story. Richard had stripped off the molded-on grabs and ladders on both sides and ends, as seen in this view of the right side of the model (the left side was shown in the prior post), and had then repainted those areas.


     After the roof and underbody work shown in the previous post, I proceeded to add wire grab irons to sides and ends. I like Westerfield brass grab irons for this kind of work and have used them for years. They are attached with a small drop of CA, and will be painted black on the sides, boxcar red on the ends.


     For side ladders, I chose to use the ladders in the InterMountain detail set for box cars. The ladders are actually too tall, but removing one bottom rung from each makes them the right height for the car side, and they then have the correct number of rungs for the Burlington reefer, and match prototype reefer photos. End ladders are one rung shorter. These can be tough to mask when on the car, so I prepainted the side ladders black before applying.
     Next came the always interesting challenge of hand-painting the door hardware black. This is not particularly hard, but inevitably a little black gets onto the area that should be yellow. No problem, just take a little yellow paint and cover up the stray black — and oops, some of the yellow gets onto the part that is supposed to be black . . . rinse and repeat until done. But the key, in any case, is to be patient, go slowly, and be careful. My personal successes I attribute to a particular paint brush I have found to be really excellent for this kind of work, a “No. 1 round” from Princeton Art & Brush Company. I also use a slightly finer “No. 0 round” for some parts. Here is the appearance of my car side at this point.


The kick plate under the door still needs to be painted (boxcar red), as do the car ends. As noted previously, some lettering on the right end of the car side has been removed for replacement with more suitable lettering for the period being depicted.
     At this point, the major remaining physical work on the car is drilling all the holes for the sill steps. I decided to do that before undertaking any more of the needed detail work, especially the B end brake detail, to minimize handling after details are installed. The same goes for completing the lettering with appropriate decals: best done late in the project. I decided to use A-Line metal sill steps, for which I drill a no. 75 hole using a pin vise. Once inserted, the steps are secured with CA. Here you see them glued in place, but in unpainted form.


The car here is resting on support blocks in place of the trucks, a convenient arrangement, as I have shown and explained in a previous post (you can see it at this link: http://modelingthesp.blogspot.com/2014/11/interim-truck-support-blocks.html ).
     Richard had removed the B-end brake platform entirely. This was a good idea, because the actual BREX brake platforms were wide (see the prototype photo in the first post in this series, link at the top of the present post). The Accurail molding has an opening to insert a tab of the platform, so I decided to retain that arrangement. A piece of 0.020 styrene was cut to fit, with a tab extending into that opening. Supports under the platform remain to be added.


Though the photo doesn’t show it, the platform has been drilled for the vertical-brake wheel staff, of 0.015-inch brass wire.
     The project continues to move forward, and I will show completion of the car, including completion of lettering, in a future post. As the year moves forward, harvest season is not far away, and I will need this car to supplement the PFE reefers on my layout, just as the prototype did.
Tony Thompson

Sunday, July 2, 2017

The St. Louis RPM meet

A week ago I attended the St. Louis meet of Railroad Prototype Modelers (RPM) for the first time, though this was the 11th meeting in a series. The meet itself actually was held in Collinsville, Illinois, about 15 highway miles east of the Mississippi, but certainly in the St. Louis area. The local convention center is modern and quite nice, and there are several hotels within a short walk, including the convention Doubletree Hotel. This meet was conceived by John Golden and he still acts as the prime mover, but he has an extensive local committee, headed by Lonnie Bathurst, Dan Kohlberg and Dave Roeder,  to do a great deal of the work. It all ran very smoothly, and with attendance topping 550, was certainly a fine success.
     The part of the convention center allocated to our meet was quite large, and contained about 210 conventional hotel-type 8-foot tables. Of these, 56 were dedicated to displays of models brought by attendees, as is traditional at RPM, and the tables were largely filled by the Saturday. There were also 48 tables allocated to dealers of various kinds, both regional hobby sellers (Ted Schnepf’s Rails Unlimited was there) and also national names such as Tangent, Athearn, Cannon, and Plano, along with about 25 tables for photo sellers, including Bob’s Photo, always worth a visit.
     Further, there were 13 historical societies with displays, a remarkable turnout and of considerable interest, as most displayed their publications, specially decorated models, and other wares likely unfamiliar to anyone outside those societies. And last but not least, there were three or four (depending on how you count) modular layouts up and running. Here’s a view of the hall, looking across some of the model displays toward the dealers and historical societies.


     I always enjoy seeing models in progress, as one can see very clearly what the modeler was in the process of doing. This example from Brian Flynn of O'Fallon, Missouri, of a Yarmouth Models kit in progress for a Santa Fe Bx-50 car, shows the nice underframe work. You can click to enlarge.


Another example, including a little humor, is from well-known modeler Clark Propst, explaining that his basement expects to receive a donation of a small part or two from each kit he builds, so he has to replace those tributes with commercial parts. The model, he says, is “naked and afraid,” explained in his caption. Model shown is the NP box car.


     Another nice display touch that I liked was the inclusion of a waybill for each freight car displayed. This was a group of cars from Rick Mink, here a DT&I automobile car used to ship an airplane, with its waybill right in front.


Some may recall that I described such a waybill for the same shipment, as yet another way to use automobile cars on the layout, a couple of years ago in a blog post (it can be found at; http://modelingthesp.blogspot.com/2015/12/delivering-loads-from-automobile-cars.html ). Thanks for noticing, Rick!
     Sometimes weathering and finishing are really well handled in these displays. This Canadian Pacific covered hopper, by Frank Jordan of Minneapolis, is an example I admired.


     Of course, there were two clinic tracks running the entire two days of the meeting. I gave one, and among the most interesting ones I attended was Jared Harper’s talk on selecting freight cars for his layout.


     Some interesting new products (or at least, new to me) were exhibited. I have already mentioned  in a previous post, the very nice new Tangent tank cars (you can see that post at http://modelingthesp.blogspot.com/2017/06/the-new-tangent-insulated-tank-car.html ). Description of others I will defer to a future post or posts. It was a really interesting and rewarding meeting, well organized and well run, and certainly well worth the visit.
Tony Thompson