Tuesday, September 28, 2021

Waybills, Part 91: model Form 704

In the preceding post, I showed the prototype Southern Pacific waybill form 704, a Conductor’s Memorandum Waybill, and included the rules for its use, from SP Circular 40-1 (that post can be found here: https://modelingthesp.blogspot.com/2021/09/waybills-part-90-sp-form-704.html ).

How can this example be reduced to a model version, in particular for my 2.5 x 3.5-inch waybill sleeves? The first step is to remove the example lettering. This is done with the clone stamp, in Photoshop or other photo editing software, to replace all the type areas with nearby empty areas. With that done, the example Form 704 is now an “empty” form, though still in original format. Note that I have also changed the date lines from “193_” to “19_” so I can use it for a later era.

Also, of course, the form is quite tall, compared to my format, so it needs to be compacted in various ways. The simplest way is to remove most of the lines for “description of articles,” since for model operations I make these quite brief. Secondly, line spacing can be reduced. Here is one attempt at doing so, though it is still an RGB image of the original color.

This still isn’t quite the right proportions — a bit too tall for its width — so I removed the line for conductor name and train number. I also removed the color and changed the image mode from a grayscale to a bitmap image (which is the format I prefer for sharpest type).

In final form, with size adjusted to 2.5 inches wide for my waybill sleeves, here is my new form. Note that it is now labeled “Part 2,” as it should be, and that the lowest line in the form above has been removed. It will be printed on yellow paper, as are my Empty Car Bills also. Both these types of forms are valid only on the issuing railroad, so the color match has meaning.

To illustrate this form in use, I decided to print one with a trial filling-out. There are basically two ways to do this. One would be entirely by hand, as would likely happen if a conductor made it out. Perhaps more likely is that an agent, not quite ready to make the full waybill, could type such a document also, so as to get the “hot car” on the road. I chose the latter approach, and included some hand-written parts.

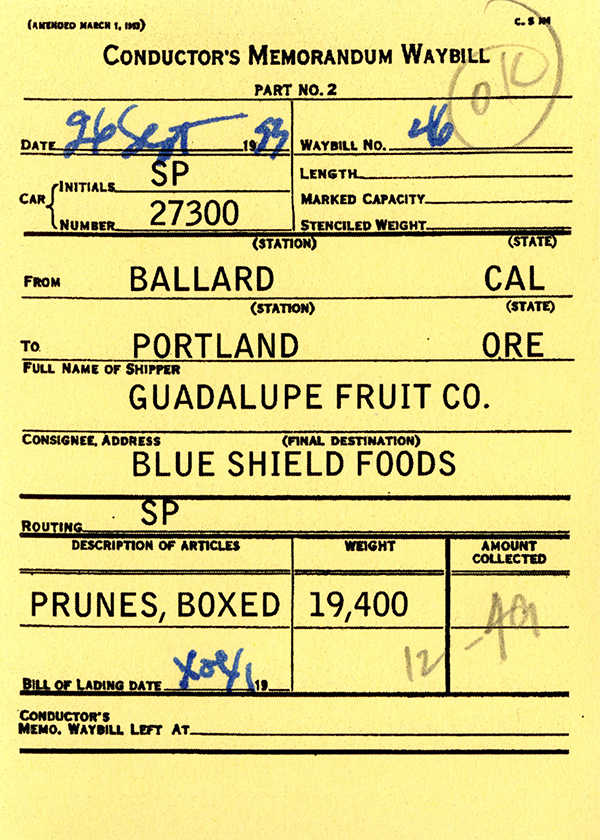
I will experiment with introducing these forms into operating sessions. I will favor the “agent filled out” mode (as shown above) in that context, since that avoids having to provide a visiting conductor with a Bill of Lading. I will report later how it works out.

Tony Thompson

Saturday, September 25, 2021

The Freight Car Guy, Part 8: weathering

 I’ve been accused of not emphasizing weathering in some of these posts about freight car modeling. And to some extent, that is deliberate. Modeling is one part of a freight car project, paint and lettering is the following part. That there is a third part, weathering, is not always central to a particular freight car project. 

But of course, cars that do go into service on my layout or on someone else’s layout do get weathered, just as do prototype cars that move around the nation on the railroads. Based on the joint clinic about weathering that was developed between Richard Hendrickson and me, a few years back, I wrote ten “Reference pages,” the links to which are at the upper right of this page. These are a pretty complete summary of my methods, with lots of examples.

Nevertheless, I have indeed shown a number of projects recently without going to the final weathering step. An example is the New York Central PS-1 box car, repainted from a scheme that did not belong on a model with a 6-foot door. I described both the background and paint and lettering, in a previous post (see it here: https://modelingthesp.blogspot.com/2021/09/the-freight-car-guy-part-6.html ).

Here’s that car, weathered and with paint patches for reweigh and repack stencils, a few chalk marks, and both a route card at the bolster, and a placard on the door’s placard board. 

Another example might be the Stewart Hobbies kit-built Western Maryland hopper that I showed earlier. It has now gotten a good weathering coat (see: https://modelingthesp.blogspot.com/2021/08/western-maryland-hopper-cars.html ), along with the usual reweigh and repack stencils.The interior has been considerably darkened.

The companion to that model is the Ulrich metal hopper car, originally lettered for the Big Four,” that I repainted and re-lettered for WM. I described that process, and showed prototype photos, in two posts about the project (the concluding one is here: https://modelingthesp.blogspot.com/2021/08/western-maryland-hoppers-part-2.html ).The model was completed with reweigh and repack stencils and some chalk marks.

And then there is the stand-in box car, lettered for the Atlantic & Danville, that I showed in freshly lettered condition (you can find this one at: https://modelingthesp.blogspot.com/2021/08/a-c-shops-box-car-part-2.html ). Now it’s not only weathered but has a reweigh paint patch, chalk marks, and both route cards and a placard on the door’s placard board.

Lastly, there is the West Shore Line resin model of a B&O covered hopper, described as a combined rescue and completion exercise ( see that one at: https://modelingthesp.blogspot.com/2021/03/b-covered-hopper-part-2.html ). Here too, the reweigh and repack stencils are evident, along with moderate cement staining.

Each of these cars is now in service on my layout, in various duties suitable for the individual identity of each. Weathering, to me, is an essential part of the appearance of very nearly every single car in my fleet, and these five cars are good illustrations.

Tony Thompson

Thursday, September 23, 2021

An actual Weight Agreement stamp

 Over a number of previous posts, I have described Weight Agreements and showed the typical kinds of rubber stamp impressions added to waybills to document the existence of these Agreements. (For example, see this one: https://modelingthesp.blogspot.com/2021/02/waybills-part-79-weight-stamps.html ). The agreements essentially allowed the shipper’s knowledge of unit weights in a shipment to calculate total shipment weights.

For additional background on this topic, I have described how these Weight Agreements worked, and discussed the various regional Weighing and Inspection Bureaus, or WIBs, at some length. Here is one discussion that is pertinent: https://modelingthesp.blogspot.com/2021/02/waybills-part-81-more-model-stamps.html .

Recently I had an amazing contact from an individual who had found an unusual rubber stamp in an “antique” store and managed to buy it. Reading the legend on the stamp led this person to try Googling the name on the stamp — and found my blog posts on this topic. What did the stamp say? Trans-Continental Freight Bureau! The bureau for the Far West!

And then, since I was the source of the information to identify what the stamp was, the finder offered to send it to me. I accepted at once! and it soon arrived. The overall appearance of the stamp is shown below. It is about 3 inches high, and the base is about 1.5 inches square.

Turning the stamp over to see the working part, it looks like this.

But of course the lettering is all reversed, so that when it’s used, the stamped lettering will read correctly. The image above is easily given a mirror image flip using any image application (I used Photoshop), and then below you can read what it says. Note that there is a blank for the agreement number, which can be written in by hand or typed.

With this in hand, of course it is irresistible to ink up the stamp and stamp some images. You can see above that parts of the stamp are worn, and of course it is at least 50 years old, maybe more. The material no longer feels like a rubber stamp, but has become quite hard. Still, I wanted to try and get an image of the lettering. Here’s one try, using a blue stamp pad:

You can see that the center part doesn’t print well, though that’s probably realistic for waybill stamps. The center of the stamp may have shrunk a little more than the perimeter. 

By pressing paper against the stamp, instead of the other (normal) way around, I can get more of the lettering to print, as you see with this purple stamp pad.

This may be a little better as an original for model bills. As I have shown in prior posts, I can adapt these images to use on my model waybills, and will do so. But that’s not the main point. What a surprise, to acquire an actual Weight Agreement stamp, and from my layout’s home territory! A huge thank-you to my benefactor.

Tony Thompson

Monday, September 20, 2021

SP steam locomotive paint details

 I receive from time to time, questions about details of how Southern Pacific steam locomotives were painted and lettered. I always begin my response by recommending the book on this topic from the SP Historical and Technical Society, Southern Pacific Painting and Lettering Guide (subtitled “Locomotives and Passenger Cars”), by Jeff Cauthen and John Signor, now in an expanded and revised Second Edition (SPH&TS, Upland, CA, 2019). It’s authoritative and complete. My advice? Buy the book.

But there are still points to be made, beyond what is contained in a necessarily very broad-brush book. For example, SP steam, especially smaller engines, often had red-trimmed cab windows. This was at the discretion of local shops, and certainly it’s known that some shops didn’t do this. It’s also known that the shade of red that was applied varied from shop to shop — and likely from time to time.

But when this was done, it can be quite dramatic. Shown below is a George McCarron photo at San Luis Obispo in 1954 (John Signor collection), which makes the point vividly. The locomotive is Class C-9 Consolidation 2581, assigned at San Luis for a number of years. It mostly worked in yard service, as can be concluded from the pilot footboards. You can click to enlarge.

Note also here that the graphite smokebox is quite evident, and that most of the paint is quite glossy and fresh. Note also something seen on some engines in later days, the very rusty stack. And don’t forget how rusty the coupler looks.

The issue also arises about painting the boiler check valve and injector red. This was, again, not universal but was a shop choice, and was most common on smaller power. Color photos, when they can be found, often show that the check valve color faded, probably due to heat, while the injectors often remained a brighter red. I will show a couple of examples, Dallas Gilbertson photos, courtesy of the late Tom Dill.

First, a nice example of the fading of the check valve, relative to the injector next to the cab. This is one of SP’s Sacramento-built 0-8-0 switchers, with boilers from dismantled Atlantic engines. Erected in 1930, they were assigned to Class SE-4. They operated with a wide variety of tenders. The locomotive is shown at Los Angeles in May, 1954, in a detail of the full slide.

At the other extreme, occasionally these paint details can be seen on larger power. Shown below is cab-forward 4274 on the Taylor roundhouse turntable in December 1953, in another Gilbertson photo.  This was the last engine of Class AC-11. Note the unlettered tender and that cab windows are not visibly red. Again, this is a detail of a larger photo.

Since these details do not show up on every SP steam locomotive, I advocate that they be applied sparingly in one’s fleet. On my own small SP steam, I have used a slightly redder color on the injector than on the check valve, as shown on the smaller locomotives above. Here are two of my 2-8-0 engines, shown in my layout town of Shumala’s engine terminal.

Note here that you don’t see red cab windows on either of these models. Brass SP Consolidations are often modeled with the sliding side windows out of sight. On models which include the windows, however, I have added red frames to a couple of engines. This is in keeping with my observations of prototype photos. Shown below is Mikado 3251, Class Mk-6, a Hallmark model re-detailed for Pacific Lines by Al Massi.

Like any topic, the only way to decide how to model something like steam locomotive painting details is to carefully examine prototype information. The challenge with a topic like that of today’s post is that color photographs are very much a minority of the available images. I’ve tried here to convey what I believe is appropriate.

Tony Thompson

Friday, September 17, 2021

My latest column in Model Railroad Hobbyist

 My continuing column in Model Railroad Hobbyist or MRH, part of a series entitled “Getting Real.” is intended to provide information and examples of prototype modeling. The latest installment by me appears in the September 2021 issue, just released (see it at: http://mrhmag.com/ ), part of the magazine portion called “Running Extra.”

This column is called “Modeling Traffic on a Layout,” and of course by “traffic” I don’t mean automobile congestion. I refer instead to the work of the railroad, the freight it carries. I divided this topic into two parts, the industries that a modeler may include on a layout, and the industries in the rest of North America that may be sending loads to, or receiving them from, a layout.

One point I tried to make forcefully in the article is that there are really excellent resources out there to understand industries, and I provided a fair list in the article. I particularly emphasized the Kalmbach Books series by Jeff Wilson, entitled “Industries Along the Tracks.” I reviewed these books in a previous post (you can see it here: https://modelingthesp.blogspot.com/2018/01/handout-for-traffic-talk.html ), but just for a reminder, below are the covers of all four of these books. Some are out of print, but all are readily available from on-line sellers.

Another point I made in the article is that understanding your layout industries allows more realistic car movement to and from each industry on the layout. For simplicity, I used several of my own layout industries to illustrate these points. For example, I showed one of my rather small businesses, a marine engine service (Martinez & Sons), that only occasionally receives an inbound load. (You can click on the image to enlarge it if you wish.)

The structure here was built from KingMill flats, and the car is a Westerfield model.

By contrast, some of my packing houses typically have three or four cars spotted at them, and two or three of these are likely to be switched in every operating session. One of these, a modified Showcase Miniatures kit, is named Phelan & Taylor for a real packing house in the area I model. I’ve moved the usual string of PFE cars so that the building can be seen.

And I always like to emphasize the immense flexibility of the “universal industries,” house tracks and team tracks. These were often near a town’s depot, and I showed an example from my layout, in the town of Ballard, where the foreground track is the team track, and right behind it is the house track, with a box car spotted. The depot and loading dock are scratchbuilt.

The crate on the flat car is also scratchbuilt, as are some of the crates on the loading dock and in the truck. These are easy details to add, and create  a sense that switching cars on the layout accomplishes something.

I personally enjoy learning things about railroad operations and activity, so for me, it is always fun to learn more about industries that are rail-served. But for any layout, I think traffic can be made more realistic with even a modicum of this kind of information. If you haven’t tried it, I recommend you consider it. And one starting point is my current column in MRH.

Tony Thompson

Tuesday, September 14, 2021

Waybills, Part 90: the SP Form 704

 In the previous two parts of this series, parts 88 and 89, I described what a “temporary waybill” was, for use of a conductor needing to move a loaded car but with the full, regular waybill not yet made out for some reason. I showed a Northern Pacific example of such a form, and mentioned that the Southern Pacific version was called “Form 704.” (To read that prototype discussion, see this post: https://modelingthesp.blogspot.com/2021/08/waybills-part-88-temporary-waybills.html ).

In the following post, I experimented with making up a model-operation version of the NP form, just to have a starting point. I recognized that since these forms were railroad-specific and not valid off the rails of the issuing company, that they were unlikely to have much commonality (the model example was shown here: https://modelingthesp.blogspot.com/2021/09/waybills-part-89-modeling-temporary.html ).

But since I had not been able to find an SP Form 704, I was afraid my model “example” drawn from the NP prototype would have to serve. Luckily a reader of this blog, Mike Yoakum, realized he could help. He has a copy of the SP Circular 40-1, entitled “Instructions to Conductors, Station Gatemen and Train Auditors,” rather obviously a companion to the Circular 39-1 of which I have a copy, with the title, “Instructions to Station Agents.” Both these kinds of employees had to deal with Form 704, but a copy was included in Circular 40-1 (though not in Circular 39-1). It’s shown below. (You can click on the image to enlarge it if you wish.)

You will note that this form is long and narrow, specifically about 4.5 x 11 inches, obviously sized to fit comfortably with a stack of regular waybills, folded the long way. This was done so that the consignee side was uppermost, the only aspect of interest during the car’s journey.

Note also in the form above that it is shown typed, intended as an illustration, but nearly all agents had billing typewriters, which had only capital letters, and of course conductors had no typewriters of any kind. So the appearance above would reflect few if any actual Form 704s in use. 

Note further, in the form itself, that the SP Form 704 has no provision for perishable cargo, unlike the NP form shown in preceding Part 88.

Mike was also kind enough to send me the associated rules for use of Form 704, from Circular 40-1. Form 704 was a four-part form, and each part naturally had a specific use. But first, let’s look at Rule 26, describing the use of the form. It’s the first rule in the section about waybilling freight.

As was mentioned previously, one important use of Form 704 was for freight picked up at a station with no agent on duty (“non-agency station”). But the rule above shows that any freight requiring immediate movement, for which no waybill was yet available for any reason, would move on Form 704. And as we saw on the similar Northern Pacific document, the document was only valid on-line. Here is Rule 50.

Now as stated, Form 704 had four parts. Here are the rules for the use of parts 1 and 2. 

You may note that it is Part 2 that accompanies the car in its onward journey, either to destination or the off-line interchange point. Parts 3 and 4 were used as follows:

Obviously Rule 55 applies to cases where the next agency station can prepare the waybill, omitting the situation where the full waybill, when completed, will be forwarded from the originating station to destination or off-line interchange point (see Rule 50).

So for model use, it seems clear that we need to produce a Part 2 version of Form 704. I have experimented with doing so, and will show some results in a following post.

Tony Thompson

Saturday, September 11, 2021

The Freight Car Guy, Part 7

 In this latest installment in our continuing series, I needed to confront yet another freight car needing revision or correction. In the one just posted, I had changed an incorrect paint scheme on a PS-1 car body, applying instead a New York Central scheme with black ends and roof. The post about that is here: https://modelingthesp.blogspot.com/2021/09/the-freight-car-guy-part-6.html

 The problem this time was, yet again, a surplus Seaboard box car, but this one at least had an 8-foot Youngstown door, as did the prototype (the model in the previous post had a 6-foot Superior door, as shown in the link cited in the previous paragraph). To repeat the prototype photo in the previous post, here is the Seaboard car shown there.


In the early to mid-1950s, a number of railroads were ordering 40-foot PS-1 box cars with 8-foot doors like the photo above, so there are a number of options to re-letter a model like this. Below I show just one example, taken from Ed Kaminski’s book, Pullman-Standard Freight Cars, 1900–1960 (Signature Press, 2007). Here again, the P-S photo is courtesy of Ed.

The C&O purchased the car shown above as part of a 1000-car order, delivered in June 1952. They were numbered 18000–18999. As it happens, K4 Decals has a set with this exact paint scheme (you can see their offerings at: https://k4decals.com/ .) I’ve used these decals before and know that they go on well.

So once again, I sprayed the model with a light-colored primer to reduce contrast of lettering and background, then gave it an overall coat of Tamiya Fine Red Primer. This covers well and has a semi-gloss finish that is very suitable for decal application. Shown below is the model, as-lettered. The decals even include a reweigh date for the major C&O car shop at Raceland, Kentucky.

Next came weathering. As I ordinarily do on all freight cars, I used acrylic washes made up with acrylic tube colors, mixing various amounts of Burnt Umber, Black, and Neutral Gray. 

The method is fairly fully described in the “Reference pages” links about weathering that you can find at the very top right of this post. Once weathering was complete and a protective coat of flat finish applied, I added patch panels for repack stencils. 

Finishing touches were the chalk marks and a route card, on the route card board on the car door, and a little streaking and highlighting with Prismacolor artist’s pencils. You can compare the overall car color, and brightness of lettering, with the photo above.

With this, the conversion of a surplus paint scheme to a C&O box car was complete. I would like to think that this is a good illustration of something a Freight Car Guy can do — and enjoy doing.

Tony Thompson

Wednesday, September 8, 2021

Waybills, Part 89: modeling temporary waybills

 I introduced the topic of “temporary waybills,” as they were sometimes called, in the previous post in this series. I explained that these documents were used to enable a “hot” loaded car to begin its journey in situations where the regular waybill hadn’t been prepared yet. It was a simple card form, and I showed a Northern Pacific example. That post can be found here: https://modelingthesp.blogspot.com/2021/08/waybills-part-88-temporary-waybills.html .

To implement this in model form, I followed my usual approach: begin with the prototype. But I don’t have an SP Form 704 (that was SP’s form of this type, called “conductor’s memorandum waybill,” as mentioned in that previous post). Someday maybe I will find a copy of the Form 704, and can adopt it to model use. But in the meantime, I began with the NP form shown in the previous post.

What I did with that form was to shorten the list of instructions to the most relevant ones, tighten up the line spacing to make the form more compact, remove the safety slogan, and replace the lettering at top with SP style. Then the form was reduced to 2.5 x 3.5 inches, like my waybills. Here is the sort of form I came up with for my interim use:

You will note there is space for weights, though any car needing to pass over a scale would not have this information at the time of pickup (with a weight agreement, this would exist). And also, the form shown above is black and white. My intent was to print this on yellow paper, as is done for Empty Car Bills on my layout. An alternative would be manila cardstock, and I may experiment with that also.

Additional features of interest in the form are that neither the cargo nor the shipper are identified, nor is the railroad to which the car will be interchanged. All that matters is that the waybill reach the designated destination point before the car does. I discussed these features of this document in the previous Part 88 post, already cited. 

Below is an example of filling out the card by hand, as a conductor or agent could be expected to do. I have written in a cargo weight, implying that there is a weight agreement in force for the shipper in question (that of course could be checked, once the actual waybill arrives at the destination point).

The form you see above, printed on yellow stock, has also been sized to fit into my usual clear plastic sleeves, as are all my waybills and Empty Car Bills, in operation of my layout. Thus a crew person switching at Ballard might have this same form in hand, as you see below. 

But note that the form is intended to be the conductor’s responsibility. Would he always fill it out? In the photo above, the conductor already has the form from the agent. This could have arisen if the agent still didn’t have everything needed for the actual waybill, but wanted the local freight to pick up the car and get it on its way. Doubtless agents and conductors worked together on such matters. I hope that if any reader has more insight into this situation, that they will send comments.

Until I use a few of these forms in actual op sessions, I won’t be sure what works best, or is most realistic. In the meantime, I can see a few ways to introduce these ideas into operating patterns.

Tony Thompson

Sunday, September 5, 2021

Yep, layout track still changes!

That’s right, I’ve made a change to the track on my layout. But wait, you say, surely all track was laid long ago? That’s almost true. But a problem had developed in connection with some staging that comes off the main line. Here I don’t mean the oft-described staging table (you can read a summary of its history and construction at: https://modelingthesp.blogspot.com/2021/07/reprise-my-staging-table.html ).

What I refer to is a thoroughly hidden pair of stub tracks underneath Santa Rosalia (see: https://modelingthesp.blogspot.com/2013/11/constructing-santa-rosalia-staging.html ).  I had modified the original mainline curving track to insert a curved switch, and then a second switch to provide two stub-end staging track. Here’s a repeat of one photo from the post just cited, with the main line curving along the photo bottom.

The view above has long been impossible to see, because the entirety of Santa Rosalia is above it. And that in turn means that working on this area is now seriously difficult. But for years, that never mattered. Trains ran on the main without issue.

I should point out that these two staging tracks were really never very useful. Mainline trains ordinarily come from the staging table, and can easily return there, giving little reason to terminate a mainline train in these stub tracks. And trains coming out from these stubs can only return by backing in. Result? I almost never used these tracks.

For years, then, the presence of this staging didn’t matter. Recently, though, I began to observe occasional derailments when passing through the curved switch that you see at left in the photo above. 

Checking with an NMRA gauge showed that the frog area of the switch had developed a narrow gauge (possibly due to gradual shrinkage of the styrene switch parts, or slow release of molding stresses, or some other cause). This is not the first track switch of mine that has developed this problem. 

I tried filing down the insides of the rails in the narrow area. But it was so hard to work in this area that I soon gave up, having made little difference in the gauge. I decided to pull the switch out entirely, and replace it with plain track. I fully realized that this was going to be more complicated in this cramped location than it would be on open benchwork!

But working slowly and carefully, I did manage to cut a new piece of track to exactly fit where the curved switch had been, and get it installed and aligned. It’s not perfect, but for the working conditions, I was satisfied. To illustrate the location issue, below is an overhead view. This track lies within the two curved backdrops for each side of the layout, where they curve from the peninsula onto the end walls of the room.

A closer-up view from the other side, below, shows the small space at right, beyond the brown top of the bookshelf, in which I had to work, coming from underneath. I couldn’t get both shoulders up into this space at the same time, so had to choose which arm needed to do which part of the work. But you can see the new track clearly. The switch machine for the former switch remains in place.

I’m not fishing for sympathy on the difficulties here — after all, it’s all my own construction — just illustrating that some parts of a layout can be a little challenging to work on, in later years, even a simple insertion of a length of track.

When the trackwork was done, I ran some trains, and found that things ran fine, with a range of lengths of cars and a variety of locomotives. Below is a view of my switcher with a cut of cars, just one of the test rains.

It is nice to have made this bit of the mainline trackage more reliable. But it wasn’t fun physically, working in that cramped space. At one point during the project, I grumbled about it to my wife, who with her usual asperity, replied, “Well, you’re not as young as you were.” Point taken.

Tony Thompson

Thursday, September 2, 2021

The Freight Car Guy, Part 6

I offered a definition, and a broad description, a couple of years ago, of what a “Freight Car Guy” is, and how I came to receive that moniker at a model railroad club (the post is at this link: https://modelingthesp.blogspot.com/2019/10/whats-freight-car-guy.html ). Since that initial post, I have added several more installments on the topic. (They are most easily found, if you wish to do that, by using “freight car guy” as the search term in the search box at right.) 

In continuing posts, I want to discuss further some of the work I have been doing for friends’ layouts, focusing, of course, on freight car problems. Today I’ll talk about a model for a 1956 New England layout.

An example is this PS-1 model, lettered as Seaboard 25250. Seaboard did in fact purchase 500 PS-1 cars in March 1952, numbered 25000–25499. But the “silver” paint scheme with red lettering that is on this model, though prototypical, was in not in fact applied until 1959, to 50 cars from this group that had been given insulated roofs, classified as AAR Class XI, and assigned to package beer service. 

So the model ought not to have a 1959 paint scheme on a 1956 layout. Moreover, it doesn’t actually represent any of the Seaboard cars, because they had 8-foot Youngstown doors, not the 6-foot Superior door that is on the  model shown above. The Pullman photo below shows this (photo courtesy Ed Kaminski).

My first step was to remove the trucks and install “interim truck support blocks,” tape the couplers, and overspray with a light primer, then finish coat with Tamiya “Red Oxide” primer. But what should I be aiming at? I immediately turned to a great reference on the PS-1, Ed Kaminski’s book, Pullman-Standard Freight Cars, 1900–1960 (Signature Press, 2007), which includes an introduction by Richard Hendrickson. I know this book well, as I edited it.

I quickly found a candidate prototype. The book doesn’t have a builder photo of it but does describe an order of PS-1 box cars with 6-foot Superior doors, 1000 cars built for the New York Central in March and April, 1948, numbered 167000–167999. Almost two years ago, Kadee produced this car group in HO scale, but it has long been sold out. Nevertheless, I could decal the model I have to reproduce those cars. Here is Kadee’s own photo of that model.

So I added black ends and roof to my model, easily done by masking the car sides, and I was ready to decal. Here is how it looked at this point, still on blocks. 

I didn’t have a decal set that really fit this car, so had to use elements from a number of stashed decals. Main feature, of course, was a car number in the 167000 range. The car still needs weathering and other details, such as fresh reweigh and repack stencils and route cards, which will happen shortly.

As always, I enjoy a challenge on a freight car matter. Restoring this particular model isn’t essential in the greater scheme of things, but it was interesting and fun to do. 

Tony Thompson