Monday, September 29, 2014

A visit to Dublin

This September my wife and I visited Ireland. Speaking from my perspective as a beer enthusiast, and someone who has enjoyed Guinness stout for a long time, a natural highlight was a visit to the “mother ship,” the Guinness brewery at St. James Gate, Dublin. It is an immense operation, and naturally today the work is carried out in fleets of huge stainless steel tanks. But they do have a very nice tour (for which admission is charged), showing both the historic brewing process and today’s process.
     Among the interesting features was a display of the former railroad within the brewery, with two-foot gauge track on account of tight clearances. Locomotives likewise had to be quite small, and were custom built in the brewery shops. Here is a historic photo of one of these in operation, in an image from the Guinness Archive, Dublin (used with permission),


    One example of this same type of locomotive is preserved and on display in the tour area. Here I am standing next to it, so you can see the relative size. Although rail operations came to an end in 1975, some of the track can still be seen within the brewery complex.


     Also displayed were various old warning signs from the railroad operation, some of which were entertaining as well as informative. Here are a few.


     Here is a photo of me standing by the brewery gate, just to prove we really were there. And by the way, we drank Guinness almost everywhere we went in Ireland! a great treat for me.


    The Irish railway network today is pretty modern and has fast service throughout the Republic. Here is an intercity train set, made up of diesel multiple units, ready to depart Dublin for Galway. The lighted destination sign on the train reads Gaillimh, the Gaelic word for Galway.


     All in all, we had a great visit, seeing much of the dramatic western Atlantic shore of Ireland, as well as four days in Dublin — in addition to visiting the Guinness brewery.
Tony Thompson

Friday, September 26, 2014

Waybills, Part 35: the people involved

As model railroaders, most of us are not very interested in the entire army of people who once did (and still do) much of the work of the railroad behind the scenes, as we perceive it, of the action along the tracks. But understanding waybills and how they are prepared and used requires at least a broad familiarity with the people who did the work. The same applies to other aspects of railroad operation, as I will briefly touch upon below.
     In almost every small town in America until the 1960s, an agent worked at the railroad’s depot. He or she handled paperwork of all kinds: accounting, billing, waybills, passenger tickets and reservations (if the station still had that service), but beyond the paper, and more importantly, the agent was the railroad to residents of the town. Not only in the economic life of local businesses and customers, but travel and other activities flowed through the agent. I have written several times previously about the various aspects of the waybill process, especially in a post devoted just to the role of the agent (you can read it at this link: http://modelingthesp.blogspot.com/2014/07/waybills-part-33-more-on-role-of-agent.html ). There is more on the same topic at: http://modelingthesp.blogspot.com/2014/04/waybills-part-32-waybill-preparation.html .
     In a depot that saw many trains, there might well be an operator also, who was the link from the dispatcher to the train crews, and transmitted orders to trains as needed. Sometimes the jobs of agent and operator were combined, though on some railroads, the two jobs were only combined occasionally.
     Many modelers will be aware of the roles of agent and operator, but most do not realize how many clerks were employed to fill out and manage paperwork. In a town of any size, there were virtual armies of railroad clerks (and almost all of them would have been men in the transition era and before). There might be clerks who only did waybilling, or only handled demurrage accounts, or only managed freight billing. Clerks might be assigned entirely to tracing shipments, making interchange reports at a junction, working directly with local industries to facilitate shipping or receiving of cargo, or a host of other duties. These clerks might work in the depot, in a yard office, or in a separate office structure in larger towns.
     The Southern Pacific photo below shows yard clerks at work, handling waybills and related paper for freight cars. It dates from 1952. You can see the sheer volume of paper that was involved.


     One duty of clerks was to check the yard. This meant checking inbound and outbound trains as they passed, to ensure that consists were as listed, and walking yard tracks to assemble a list of cars (reporting marks and numbers) in order along the track. And in an active yard, this had to be done again and again during the day.
     Other railroad tasks, such as roundhouse work, would be overseen by a foreman, supervising the boilermakers and machinists (in steam days), and the foreman would have one or several clerks to handle paperwork associated with the jobs in the shop. A stock of parts and materials was normally necessary for the machine-shop aspect of a roundhouse, and that in turn usually required a storeroom — and one or more clerks to run it.
     As modelers, we don’t want or need to model these jobs, but we need to be aware that they existed. Just to cite one example, yard offices need to be big enough for the work force of clerks that would have occupied it. Roundhouses need office space somewhere, and so on.
     In building the structures on my layout, I have tried to keep all this in mind. The roundhouse I built from a Banta Models kit (which duplicates the SP roundhouse at Port Costa, California) does include the office and storeroom space that was in the prototype. (You can see this space in the second and third photos in my final post about building this roundhouse, at: http://modelingthesp.blogspot.com/2014/02/a-roundhouse-for-shumala-part-5.html .)
     I also built a small yard office at Shumala, and this photo, from my previous layout, can be interpreted as the engineer walking down to the yard office (at left) to see if he can get a cup of coffee from the clerks, while the yard clerk, having walked the train, relaxes by the door. The conductor is no doubt inside, collecting his waybills for the day’s work.


     Being aware of all the jobs that had to be done on the railroad, even a small railroad, or at a small town, or even on a branch line, allows us to build realistic structures and to recognize the people behind the scenes who did the work which made the system run.
Tony Thompson

Wednesday, September 24, 2014

My acrylic weathering method, Part 5

In the previous four posts on this topic, I showed my materials and process, using house cars (box and refrigerator cars) in a two-part sequence, first roofs, then car sides and ends in a subsequent session. [Here is a link to the fourth post: http://modelingthesp.blogspot.com/2014/09/my-acrylic-weathering-method-part-4.html .] I mentioned in an earlier post that tank cars really cannot be done with those two steps, as there is no “separate” part you can identify to weather differently from the rest of the car, as there is in roofs vs. sides. In this post I address my weathering process for tank cars.
     The overall weathering is the same, in that the model is thoroughly wetted with wet water (be generous), then a chosen amount of pigment is applied and spread evenly over the car. The draining downward of pigment, evident on any more or less vertical surface, was described and illustrated in talking about car sides, and here it is even more prominent. Suggestion: once your weathering work on house cars seems to go all right, then try a tank car.
     I usually end up holding the car with fingertips at the bolsters, as you have to weather the walkways and trucks, along with the tank and even the center sill. As with any of these methods, you will get a fair amount of acrylic pigment onto your fingers during the procedure, but it comes off easily with water and should not be a worry. You will definitely experience this with a tank car.
     Let’s look at a prototype car to illustrate the points to be pursued. This is an SP car, whose paint scheme shows it is in company fuel service. Note the spillage around and below the dome. Notice also that the entire tank is streaked vertically, as rain has washed dirt downward. (You can click on the image to enlarge.)


Also trucks are quite dirty, in a brownish color. The photo is from the Bruce Petty collection.
     Weathering a tank car fairly heavily is quite realistic, as these cars often went many years between paint jobs. Here is a Proto2000 model of a Union Oil Company tank car, which I would call “moderately” dirty.


I try to achieve some of the same dirt streaking on the tank, and dirt over the walkways, as is seen on prototype cars, that is illustrated in the detail shot below. The weathering looks uneven in the bright light used for the photo, but under layout lighting this effect is not visible.


Note that walkway and trucks are weathered too, and that a route card has been simulated with a small square of paper on the edge of the running board. On the prototype, these were often stapled or tacked to the edge of the wood running board, which is why tank cars usually did not have route card boards as such, until the advent of metal running boards. For more about route cards, you might wish to read my discussion of the use and application of them at: http://modelingthesp.blogspot.com/2011/11/chalk-marks-and-route-cards.html .
     A detail seen in a number of prototype photos is a strip of rust alongside the tank hold-down bands. This occurs because the tank is anchored to the underframe only at the car center, and thus expands and contracts with changing temperature by sliding longitudinally on the underframe. In a prior post about modeling a tank car (that post is available at the following link: http://modelingthesp.blogspot.com/2014/04/associated-oil-tank-cars-modeling.html ), I showed this rust detail. Here is a repeat of a photo from that post; the model is a modified InterMountain kit.


     A more challenging task in many cases is lightly weathering a tank car, especially with a light-colored model. This Atlas tank car model, lettered for Warren Petroleum, would be a pretty new car on my 1953 layout and thus is only weathered a bit. Again, I tried to capture the downward streaking on the tank, as well as dirtying up the “glossy new” look of the ready-to-run model.


     This then is a general summary of my approach to the separate problems of tank cars, compared to house and other cars such as open-top cars. I will return to the latter in a future post.
Tony Thompson

Sunday, September 21, 2014

My acrylic weathering method, Part 4

In the previous three parts, I introduced materials and the method used, and showed how the wet application of the acrylic wash led gradually to a dry car side. (Third one at: http://modelingthesp.blogspot/2014/09/my-acrylic-weathering-method-part-3.html .) Here I take up a few finishing touches which can be added.
     Some highlighting or streaking can add to the effects of the overall wash in this method. As I have described the process so far, the pigment will have accumulated around rivets, corners, or protrusions of any kind, but if you have been careful as I described in previous posts, color will be pretty uniform. But photos of real cars often show more variation. Here are some ways to depict those variations.
     First, some cars show either light or dark dirt near ladder rungs, presumably from the boots of yardmen or brakemen. In this photo, I have used some pure black to dash on a little such color on the lower part of the ladder (pure Burnt Umber works well too). Note again here that truck side frames have been weathered too.


In the photo above, I am just turning to the door area. Around door latches, there are often dirty streaks or patches, and if the door rollers or door track have been greased, there can be dark brown or black stains in those areas. In the photo below, I am adding those, again with a little straight Umber or black.


     As dirty water drains from the roof in a rain shower, it is channeled along the top of the car side and drains preferentially from the ends of door tracks. This is an effect visible in some prototype photos. Dilute the straight pigment a little by adding water to the palette, or minimize the amount on the brush by just stroking it onto the newspaper under the work area, and then stroke downward at either or both ends of the top track, as you see here.


Note that my fingers atop the car have accumulated some paint. This comes off with water in seconds once you are done, so don’t worry about this development. Most fabrics, however, absorb the pigment, and thus are a different story, so I do try to keep from weathering my clothing.
     One other point. Sometimes the effect turns out too mild for what you had intended. It is easy to go back and add more pigment after everything is dry (sometimes I add a protective overcoat of Dullcote first). Below is a reefer having a little more dirt added to the roof (the yellow “color” is actually reflected light). But always remember that although it’s easy to add more color, it’s a lot harder to “add less,” that is, to remove pigment, unless you do so fairly soon after application. Better to work up to the desired level of dirt from the lighter end of the scale.


      Last, I like to allow all water to dry, even in crevices , behind ladders, or in other places water can hide, before adding the final Dullcote layer. That layer not only protects the acrylic pigments from scratching, but will also kill any shine, which sometimes can happen with this method. Where I live, sunshine is common all year round, and warming up in sunlight has proven a very effective drying technique.


Here you see the two cars for which I did roofs only in the session shown in the first post of this series, at right, and then at left, the two cars for which I did the car sides and ends in the second post (roofs had been done earlier).
     These details complete the overall process of my acrylic weathering technique. There is more to say about car weathering for specific car types, which I will take up in future posts, but this covers my basic method of acrylic weathering and some key details.
Tony Thompson

Thursday, September 18, 2014

New grade crossing, Ballard — Part 2

In the previous post about this layout project, I showed the track changes, including cutting the existing pavement on Bromela Road to accommodate the new spur track to serve a Chevron bulk oil dealer. You can read that post at: http://modelingthesp.blogspot.com/2014/08/a-new-grade-crossing-in-ballard.html . In this post I describe the work to move forward with the project by adding the repaving.
     One option in the repaving would be to match the color of the new paving to the old, but I decided it would be more interesting to show the new paving darker, to look like a paving repair.
     My previous grade crossings on Bromela Road all used ties along the outside of the rail, a common application in the prototype to ease the transition from pavement to rail. Within the rails, I paved with rail edges, as shown at: http://modelingthesp.blogspot.com/2014/02/modeling-grade-crossings.html . These represent old rail used to contain the paving material, and I use a size smaller rail for this. The spur track here is Code 70, so the old rail will be Code 55.
     So the first step is addition of ties along the outside of the rail, for which I used split Model Hobbies ties (which are pre-stained black). The vital point here is to keep the top of these ties below the rail head, to facilitate rail cleaning. I attached these with canopy glue. (If you are not familiar with this useful adhesive, you can see comments about the glue and its modeling uses at this link: http://modelingthesp.blogspot.com/2013/05/a-few-words-in-praise-of-canopy-glue.html .) Then I used the same glue to attach two lengths of Code 55 rail, cut to the length of the crossing, again to ensure that the tops of these pieces of rail are below the track rails. Here is the crossing at this point.


The rail has not yet been painted brown on the sides.
     For roadway material, I like to use styrene sheet. I have done this in several places on my layout, and been happy with the result. In fact, in an earlier post (at: http://modelingthesp.blogspot.com/2014/02/modeling-grade-crossings.html ) the Chamisal Road crossing (the second photo in that post) is partly built with styrene. This is hardly a new idea; one written description of making a road this way is by Marty McGuirk in Model Railroader, May 1997, page 92. But I also had to match the existing roadway appearance of Bromela Road. I decided to just use the fine-grained paper mache that I normally prefer, Brandt’s Paper Mache Compound, a taxidermist’s mix. (It is, or has been, available from Robert Ruozzi of Irwin, PA.) Any difference in texture from the existing plaster roadway could be a result of the new paving being simulated.
     Here is the first application of Brandt’s paper mache to the crossing area. (I think a second application probably won’t be needed.) When dry it will be sanded for greater smoothness, then the pavement color will be added. Note that rails have been painted.


     Once the paved surface is painted, I will proceed to cosmetics: ballasting of track, ground cover and vegetation, etc., as I continue to complete this added Bromela grade crossing and its new spur track.
Tony Thompson

Monday, September 15, 2014

Modeling SP passenger cars — sleepers, Part 5

This post concludes my descriptions of modifying a heavyweight sleeping car model (from Rivarossi, imported by AHM) into a specific car owned by Southern Pacific. The Rivarossi model is a 12-1 (12 sections, 1 drawing room), and the car modification I am completing converts the 12-1 into a 10-1-1 (10 sections, 1 drawing room, 1 compartment). My third post in this series contained links to the first two posts, and described the body and roof modifications (at: http://modelingthesp.blogspot.com/2014/08/modeling-sp-passenger-cars-sleepers.html ), and the fourth post described modifying the Rivarossi interior molding from its original 12-1 configuration, into a 10-1-1 (at: http://modelingthesp.blogspot.com/2014/08/modeling-sp-passenger-cars-pt-4-sleeper.html ).
     In this post I complete the car. In the third post of the series (link provided above), the body was in gray primer and the roof was unpainted. My next step was to mask the transparent sides of the roof molding and paint the roof with Tamiya “Gunship Grey” color, their no. TS-48. I also painted the interior of the car a light brownish buff color, to look somewhat like a Pullman interior. That interior color was shown in the next to last photo in my fourth post, cited above.
     The next step was to mask the windows from the inside, so no overspray of the exterior color would reach the interior walls, and to airbrush the car sides and ends with Tru-Color Paint #135, SP Dark Olive Green. This paint airbrushes well and gives a smooth and somewhat glossy surface, excellent for decals. The decal set I used was the Thin Film set HO-160-SP, which contains Dulux Gold lettering for SP heavyweight cars. This color was adopted in 1936 by SP, so was very much in use in my modeling year of 1953.
     As mentioned, my car conversion is to a 10-1-1 configuration. In the days when Pullman owned the heavyweight sleeper fleet, there were four such car assigned to Southern Pacific service. But at the breakup of Pullman in 1948, SP only purchased two of these cars, Prior Lake and Palouse Falls, and of these, Prior Lake was repainted Two-Tone Gray in 1950. [This information comes from Volume 2 of the indispensable SPH&TS series, Southern Pacific Passenger Cars (Pasadena, 2005); Volume 2 covers sleeping cars.]
     Because I wanted a Dark Olive Green car, I had no choice but to letter my model Palouse Falls, a name which is provided in the excellent Thin Film HO-160-SP set. Here is the model body with DOG paint in place and decals applied. You can click on the image to enlarge it.


     I next weathered the car roof somewhat heavily, and the car body less heavily, to reflect the fact that SP did wash passenger cars, but normally only sides were washed. My weathering method utilizes washes of acrylic paint, a process which was summarized in a clinic handout, available at this link: http://modelingthesp.blogspot.com/2011/10/weathering-clinic-handout.html .
     The revised interior (described in my fourth post in this series; link at top of this post) was installed along with the roof, completing the upper part of the car. That leaves one more point to be made. In my second post about sleeping cars (read it at: http://modelingthesp.blogspot.com/2014/07/modeling-sp-passenger-cars-sleepers.html ), I mentioned the Rivarossi trucks which come with these cars, and that I replace the original wheelsets with Kadee 33-inch wheelsets.
     The point that remains is about couplers. I have body-mounted couplers on some passenger cars, but the 80-foot ones do benefit from a partial Talgo arrangement. I cut off the horn-hook coupler molded on the end of the protruding “tongue” of the Rivarossi trucks, drill and tap the stem for a 2-56 screw, then put a regular Kadee box on top. I have standardized on Kadee #58 (scale head) couplers on my freight cars, but continue to use Kadee #5 couplers, with their greater gathering range, for my passenger cars. Below are a prepared tongue at left, and a complete arrangement at right (you can click to enlarge). These have performed well on my layouts.


     The completed Palouse Falls is shown in the photo below. You can see hints of occupants through the windows. I often marvel during visits to layouts, when passenger trains pass by and there is no indication that a single passenger is riding them. I’m trying to avoid that look.


As I have mentioned, while completing work on Palouse Falls, I also re-did the roof on my 12-1 sleeper, Tuolumne. A photo of this car was shown with its original as-delivered roof, n the first post of this series on heavyweight sleepers, at this link: http://modelingthesp.blogspot.com/2014/07/modeling-sp-passenger-cars-heavyweight.html . Here it is with the duct additions to the roof.


     That completes the work on the 10-1-1 sleeper Palouse Falls, as well as the re-roofed Tuolumne, and concludes the posts for this series on heavyweight sleeping cars. I look forward to operating this Pullman sleeper on my SP Coast Line layout.
Tony Thompson

Friday, September 12, 2014

My acrylic weathering method, Part 3

In Part 1 of this series, I described acrylic paint preparation, and the process of weathering a roof. In Part 2 I began the description of car side weathering (and ends too, of course), and paused with the pigment well distributed over the car side. That second post, and a link to the first post, can be found at: http://modelingthesp.blogspot/2014/09/my-acrylic-weathering-method-part-2.html .
     Now there are some details to recognize in this process. One point to keep in mind is that single-sheathed cars require more work, both to get wet everywhere and also to distribute pigment evenly, because every panel between posts and diagonals has to be treated as a kind of independent region. Here I am wetting such a car.


Note here the palette in the foreground, a small dish of wet water at right, and at left, a coffee cup with clean water in it.
     Another point: the low surface tension of the wet water will hold the water + pigment mixture as a continuous film or web from grab irons and ladder rungs to the car side, and that web will dry that way (not good). I simply blow gently to break that film and push the water + pigment away. This photo shows me blowing through the grab irons on that same car seen above.


Meanwhile, the same process as described in Part 2, the stroking upward of any water + pigment accumulated at the bottom of the car side, continues with a single-sheathed car as it would for any other car.


     The next thing to be watching for is the emergence of dry areas. As I mentioned in Part 1 in describing the roof weathering, dry areas require caution — if you continue the process you are using on the wet areas, into a dry area, you will immediately find different behavior of the pigment. What is happening is that suddenly you are no longer working with a wash, you are beginning to paint on the dry area, using whatever pigment happens to be on the brush. The effects can be interesting, or bad, and if bad, just use some clean water to rinse off the offending area and work as before with the “wet” technique.
     Here is the Northern Pacific box car shown in Part 2, just starting to dry at the top of the sides (there is still pigment to be dealt with at the bottom of the sides). As I said, you have to stay in the damp/wet areas for consistency,or else stroke upward to keep re-wetting the dry areas with the water + pigment.


     When the car side is very nearly dry, it will look like this next photo. You aren’t done, but it is getting close. Note I am making sure the pigment is evenly distributed on the trucks.


     At this point, I carefully check every place there may be extra water accumulated. That’s because accumulations often result in a little ring of pigment when it dries, if not corrected. This may be at door latches or hinges (on refrigerator cars), or at the attachments of grab irons. Again, the brush is an effective tool to wick up these undesirable accumulations. As you experiment, you will learn what I mean.
     In the next post I will cover what is needed to finish up the car weathering by this method.
Tony Thompson

Tuesday, September 9, 2014

My acrylic weathering method, Part 2

In Part 1 of this series on weathering, I showed my paint colors, mixing process, and the basic application of the acrylic pigments to the model, using a fair amount of “wet water” (containing a drop of dish detergent). You can read it at: http://modelingthesp.blogspot/2014/09/my-acrylic-weathering-method.html. My illustrations were about car roofs, and the final appearance, of two models which I was not intending to weather too heavily, is typically like this. The box car roof, in fact, may not even look weathered, but the roof color is now lighter, grayer and duller.


     Now we can turn to car sides, once the roofs are thoroughly dry (I would normally wait until a subsequent day). Again, the process is to apply wet water generously, now to sides and ends of the car. You can see below that I am pretty much mopping on the water. And wet the truck sideframes, too. They need to get dirty just like the car side does.


      Pigment is now applied, mixed from the gray, umber and black as desired. I usually choose a more blackish mix for cars of eastern railroads, where coal soot was more prevalent, a little browner shade for cars of western railroads. Here I am applying a fair amount of pigment, and you can see the relatively gray color mix I have made for this particular model.


The next step is the same as on roofs, namely to spread the pigment around the sides and ends. Here is a car with a fair amount of pigment, and still pretty wet in this view.


Three things to note in this view: first, the pigment is collecting at the bottom of the sides, just from gravity as the wet material flows downward; second, the trucks have a generous dose of pigment too; and third, a small dry area is already evident at the very top of the sides. Those dry areas need to have the pigment-loaded water stroked upward to cover them. So I am far from done at this point.
     The brush can be sloshed in the cup of clean water to reduce pigment load, stroked (on the newspaper you put down under the project) to remove excess water, and then can be used to “wick” water and pigment from the bottom of the car side, and, if desired, stroked upward to maintain a heavier dirt load, or else washed out in the cup to get that much pigment off the car, and reduce the dirt load. Here I am wicking up that water.


     With the car side beginning to dry a little, and with pigment loads kept fairly even over the car side. I will pause in the description. There are several more details to understand, which I will cover in the next post.
Tony Thompson

Saturday, September 6, 2014

My acrylic weathering method

A few years ago, Richard Hendrickson and I developed a joint clinic on weathering of freight cars, which we duly presented at a number of RPM and NMRA meetings, starting in 2011. Although we could not think of a way to make a very meaningful handout for this talk, we did create a summary, including a few basic facts about the materials we used. That clinic handout is still available via Google Docs, and you can retrieve it through the post at: http://modelingthesp.blogspot.com/2011/10/weathering-clinic-handout.html .
     I have been thinking about this problem off and on, and am going to try and describe in words, with a few photos, what my method is, and a few cautions and recommendations during the process.
     I begin with tube acrylic paints, available at any art store. There are premium paints and there are inexpensive ones, and for weathering I certainly advise the lower priced brands. I use a lot of Neutral Gray to tone down other colors, along with Ivory Black, and my main brown color, Burnt Umber. For rust colors such as gondola interiors, I would use Raw Sienna (the color of yellow rust) and Burnt Sienna (brick red). I almost never use any white. So that’s about it. Here are my three basic Liquitex colors, and the brush I use for most of this.


At bottom in this photo is one of my cardboard palettes. I usually just cut a square of corrugated cardboard for a palette, for example from a box flap of a cardboard carton.
     The weathering process begins by squeezing out a small amount (maybe as much as a small grape) of the black, gray and umber, onto the palette, and then mixing as seems good at the time. I’m mixing in this photo using my brush.


Here I have spread out a piece of newspaper to keep the weathering process off the kitchen table, and have a small dish containing water with just a small drop of dishwashing soap in it, to make “wet water.”
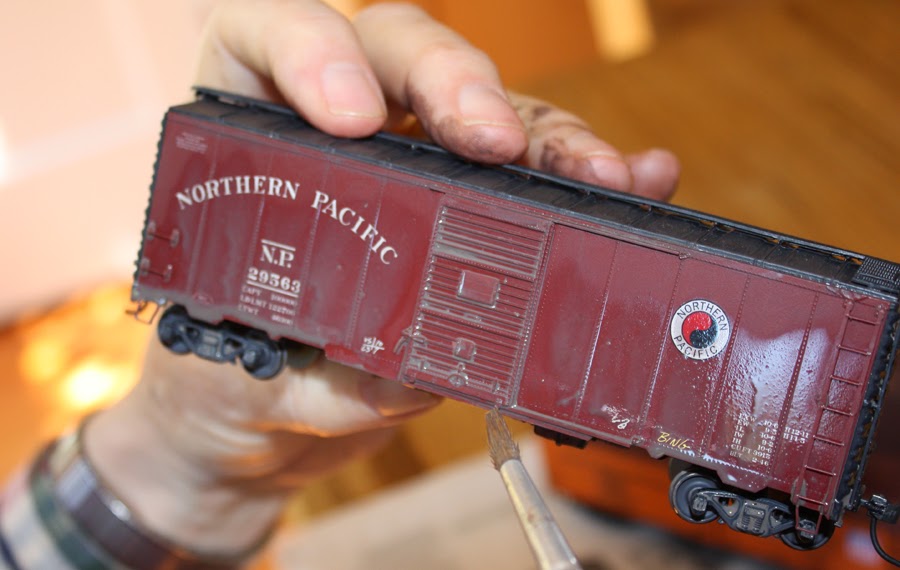
     I should mention that models to be weathered must have a flat finish with this method. Water will simply bead up and not spread, on any glossy area, which in turn would mean that the weathering will be pretty unsatisfactory (try it on something discardable as a test).
     Next I set up the models to be worked on. For house cars, I usually do the roof only, in one step, then do the sides and ends on another day. That way, you have something dry to hold onto for both steps. Likewise with open-top cars like gondolas and hoppers, I would do the outside in one session, the inside in another. Tank cars are a special challenge, as you really have to do the entire car in one go, and I will say more about that presently.
     Once I have a small amount of pigment ready, I clean the brush (a coffee cup of plain water is on hand for this), and wet the model part(s) to be weathered. I just apply the wet water liberally over the area to be done. Here I show a refrigerator car roof being wetted. You can see I am just mopping on the water, not delicately dabbing.


     Now that it’s wet, you can add pigment. Before discussing that, I should note that where I live, winters have damper and cooler air, summers warmer and drier. I mention this because  it affects the rate at which water evaporates off the model surface you are working on. That in turn sets the time scale on which you can work the wash around on the car.I would advise experimenting to learn what rate you have to work at, on a particular day. In the winter I can work slowly if I like, but in summer I have to work right along.  
     Next I splodge on some pigment, just dabs here and there on the roof. With experience you will quickly learn about how much to use, for lighter or heavier weathering. This reefer roof is not being given too much pigment so I can achieve a modest amount of dirt. Next, start evening out the pigment with your loaded brush, so that all areas of the roof have about the same amount.


You can see in this photo that the pigment tends to puddle together rather than spread uniformly. Remember, you are not painting, this is a wash. The process now is to stroke the pigment out in each roof panel, making it more uniform, and keeping the strokes in the direction in which water would run off, which on a roof means all strokes are perpendicular to the running board. Repeat until the water has begun to dry, which may be quickly in summer (for me), more gradually in winter.
     Once dry areas begin to appear, caution is needed (experiment with not being cautious and you will see what I mean). The shrinking wet areas can still receive brush strokes to even out puddles, but if you stray onto the dry areas, suddenly you are painting, not working with a wash any longer. Results can be interesting, but can also be ruinous. As I say, experiment to learn how this works.


     I don’t want this to sound like a small error means it’s all over. Far from it. Acrylics are very forgiving, in that if you don’t like how an area is working out, just scrub it with clean water, the pigment will come off readily, and you can do it over. But do this fairly promptly. Over time, an hour or two, say, the acrylic seems to take much more of a set, and becomes pretty resistant to water.
     Roofs are relatively easier than car sides. I will turn to car sides in the next post on this topic.
Tony Thompson

Wednesday, September 3, 2014

Waybills, Part 34: the one-piece waybill

By “one-piece waybill,” I mean the model waybill which has no car card or car sleeve, just a single document, like the prototype had (and, in electronic form, still has). This is the style of waybill I created for the freight cars on Otis McGee’s layout, as I described in prior posts: first, an introduction (at: http://modelingthesp.blogspot.com/2011/07/waybills-9.html ), followed by some development of the ideas behind this type of waybill system (it’s at: http://modelingthesp.blogspot.com/2011/08/waybills-11.html ), and finally I completed the basic description by presenting a few additional refinements and details (here: http://modelingthesp.blogspot.com/2011/09/waybills-12.html ).
     This idea, of course, is being used all across the country and is certainly not just mine. The recent book on layout operation by Tony Koester, Realistic Model Railroad Operation (Second Edition, Kalmbach, 2013) covers a variety of approaches, including the ones I have discussed in this blog. I described and recommended the book in a blog post when it was fairly new (you can read it at: http://modelingthesp.blogspot.com/2014/03/tony-koesters-recent-operations-book.html ).
     In the present post, I want to mention experiments I have been making with my own waybill system, trying versions of the one-piece waybill. For cars which run freely (many box cars and gondolas), this is limiting because I would like to be able to marry a wide range of cargoes suitable for such cars, with the car available at the time on the layout. But there are also cars with very limited (or no) variety in their assignments, such as tank cars traveling back and forth between a refinery and bulk oil dealers.
     To illustrate, here is a Union Oil Company tank car, UOCX 8008, which on my layout pretty much cycles to and from the Union Oil dealership at Ballard. The car is shown outward bound at Shumala, the main line junction, in an empty condition (note the Empty placard on this side of the car), and the corresponding waybill is the one on the left. Also in the car sleeve (which has no label) would be the paired waybill for when the car is loaded; here it is displayed alongside the sleeve. In this case, the cargo shown is kerosene. (You can click to enlarge the image.)


As often pointed out, the empty car returns on a regular freight waybill to help emphasize the identity of the previous cargo, for safety reasons.
     If I wanted to do so, I could add another pair of bills for this car, with a different cargo such as heating oil. The sleeves readily would accept another pair of waybills, especially if they are printed on paper instead of cardstock.
     Here is another example, paper being shipped from Canada to a printer on my layout. I received advice from a paper purchaser about how this would be handled, including the customs point, though I have not researched these details for 1953.


     The car delivery at the printer is shown below. I have been told that one use of these double-door Canadian Pacific cars was in fact for paper shipping. (The car is from a Sylvan Scale Models kit.)


     This kind of waybill is interesting in that it captures the limited options for some model freight cars on the layout. It also has the advantage that it places the reporting marks and number of the car at the top of the waybill, which is the prototype location. It has the minor disadvantage of being a different format than my other waybills which use car sleeves, but I will have to experiment and see whether that constitutes a real or an apparent problem.
Tony Thompson

Monday, September 1, 2014

The road behind the roundhouse

I described awhile back the construction of my roundhouse for Shumala, which is the Banta Models kit based on the Port Costa, California one, at: http://modelingthesp.blogspot.com/2014/02/a-roundhouse-for-shumala-part-5.html . Layout scenery around that area is still developing, and I realized I needed a way for roundhouse employees and train crews to reach the roundhouse and park their cars. This would likely be a dirt road in the 1950s, with a simple grade crossing over the main line, built from ties.
     My plan was to install the tie-built grade crossing, then for the dirt road to simply align in width and height, with the ties lining the edge of track, so obviously the ties at the grade crossing had to be put in first. I have a fairly giant box of pre-stained Model Hobbies HO ties, so set about using a razor blade to split them the long way, parallel to the broad face, so they will sit below the rail head. That may not make a good grade crossing in the prototype, but for model purposes, where track gets cleaned from time to time, it is vital for rails to be “proud” of the grade crossing. And a low Kadee trip pin, of course, is really good at finding any high points between the rails.
     There is also ballasting of the track in this area which needs to be done, but again, that awaits the grade crossings being installed first. Here is the area:


The roundhouse is at right. The whitish areas are where the painted Sculptamold has been sanded lightly to smooth it, but a final road surface has yet to be added. Piles of ties can be seen, many of them already split.
    The next step is start gluing the split ties in position, for which I use canopy glue. (If you are not familiar with this useful, general-purpose adhesive, you can read my comments about the glue and its modeling uses at this link: http://modelingthesp.blogspot.com/2013/05/a-few-words-in-praise-of-canopy-glue.html .) I also check with the steel straightedge (visible above) to make sure all added ties lie below the height of the rail head. When partly done, this is what the area looked like:


In this view you can see my bottle of canopy glue. The center crossing is complete, while the one at upper right on the main line is just partly done.
     Some ties had to be cut in half for shorter length; others have to be cut in half the long way to fit between the rails. When all three crossings were complete, it looked like this.


With some of the construction debris cleared away, you can see here the pencil lines defining the path of the road to the roundhouse (just visible at the upper right corner), though I probably won’t make a sharp angle as the pencil lines suggest, but a gentle curve.
     With these grade crossings in place, I can proceed with the road surface; with ballasting the track visible in these views; and with ground cover and other scenic materials, now that I know where everything goes.
Tony Thompson