Showing posts with label SP topics. Show all posts

Saturday, September 6, 2025

SP steam passenger power

I have not posted many comments about Southern Pacific passenger power, steam or otherwise. I did offer an introduction to the topic a few years ago (see it at: https://modelingthesp.blogspot.com/2022/06/choosing-passenger-locomotive.html ). In that post, I showed my Westside brass model of a Class P-4 Pacific, a class rebuilt in the late 1920s from elderly Class P-1 Pacifics. I also pointed out that though it is a fairly light Pacific, it would be suitable for shorter or less important trains.

I subsequently placed in service a model of much larger Pacific (the heavy Pacific was an engine type developed in part by SP, and purchased in numerous examples). The final SP class of Pacifics was Class P-10, an engine with  almost 44,000 pounds of tractive effort, compare to the 31,000 pounds of the P-4 locomotives. 

The P-10s were built by Baldwin in 1923–24; there were 14 of them, numbered 2478–2491. By the fall of 1941, all of the last 8 of the class had skyline casings. Here is an example at Oakland in March, 1953 (Grady Robarts photo, Steve Peery collection). The front ladders show that it is one of three P-10s that had been streamlined in prior years.


The locomotive number above, SP 2485, is what I chose for my model locomotive. This particular model is a Precision Scale product and happens to have Glide Drive, a feature loathed by some modelers, but loved by others, including me. It’s shown passing the depot at Shumala on my layout, trailed by baggage car SP 6337, built from a Southern Car & Foundry kit.

But as many know, Pacifics were superseded as mainline power in the mid-1920s on the SP by Mountains. In my article in Model Railroad Hobbyist in February 2019, I described a little about my model locomotive selection (for more, see: https://modelingthesp.blogspot.com/2019/02/my-column-in-february-model-railroad.html ). The goal was to duplicate the look of these handsome engines, long-lived after their introduction, because they survived in the San Francisco Peninsula commute pool to the end of steam. 

Below is a view of one of these locomotives in action on the Coast Division, just south of Paso Robles, with eastward Train 72 depicted. The power is SP 4340, a Mountain with a skyline casing, as all SP Mountains had by 1950. This particular engine has a 16,000-gallon tender, though many Mountains served out their lives with 12,000-gallon tenders. The date was not recorded, but the photographer believed it was 1951. (Wilbur C. Whittaker photo)

 Modeling the distinctive SP Mountain classes used to require brass, but in recent years Athearn Genesis has offered a superb rendition of these locomotives with a plastic body. I have simply added flat finish and some light weathering to the model as it comes from the box. For more, see: https://modelingthesp.blogspot.com/2018/12/the-sp-4-8-2-from-athearn.html . That post has a photo of my model.

The amazing scheme used on some of these engines was the “half-Daylight,” as it’s sometimes called, just the cab and tender receiving Daylight paint, applied to the Class Mt-4 engines in the helper pool for the San Joaquin Daylight over Tehachapi. First painted in May, 1946, soon after wartime restrictions on special paint schemes were lifted, it continued until 1951 or 1952. A dramatic view below shows double-headed Mt-4s on the San Joaquin Daylight in 1946 (R.G. Denechaud photo, Bob Church collection).

As need for the engines as helpers declined, they were occasionally used on other passenger trains, largely on the Coast Division.  That’s my basis for using one of the Athearn models in this paint scheme, as you see below. Eastward SP 4352 is just crossing Chamisal Road in Shumala, with 70-foot baggage SP 6448, Class 70-B-9, trailing (kitbashed from an Athearn baggage; the latter project was described in some detail for Prototype Modeler magazine, Vol. 7, No. 6, March-April 1984, pages 39–44).

Of course the queens of SP steam passenger power were the GS class 4-8-4s, and their presence is nearly obligatory on an SP layout set in the steam era. I do have one of them in all black paint, as was the fate of most surviving engines by 1953, the year I model. But that’s a topic for a future post.

Tony Thompson 

Thursday, August 28, 2025

Handling MOW equipment

I’m sure it’s no surprise to regular readers of this blog that I find maintenance of way (MOW) equipment interesting and worth modeling. In fact, I’ve written a Model Railroad Hobbyist column about modeling MOW equipment of the railroad I model, Southern Pacific. You can read about it at: https://modelingthesp.blogspot.com/2025/04/my-latest-column-in-mrh.html .

I do like to use such equipment in my layout operations, and have described how  I accomplish this for various equipment used in MOW work. That goes beyond what SP lettered as SPMW cars per se, such as ballast cars; that post can be found at: https://modelingthesp.blogspot.com/2020/02/operating-mow-equipment.html .

On my layout, most activity of MW cars (SP lettered them as SPMW) centers around the outfit track, which was the SP term, in my layout town of Ballard. For background, I’ve written previously about the role of an outfit track; the post is here: https://modelingthesp.blogspot.com/2022/02/the-role-of-outfit-track.html .

Though sometimes it’s empty, I usually arrange that my outfit track contains a boarding bunk car and a kitchen-commissary or dining car, to both house and feed MW forces. Sometimes there is also a domestic water car there, for crew use. Here’s an example, with the boarding bunk car in the center and the kitchen-diner, converted from an open-platform head-end car, at left. Water car at right.

The specific cars vary from time to time, for example with a different kitchen-commissary car and a more modern water car. 

But other times, some additional car type may be spotted on the outfit track, for the use of track maintenance forces, such as a  car of ballast, as you see below.

In the two photos above, the bunk cars are both converted from box cars. But as I described in a couple of earlier posts (concluding with this one: https://modelingthesp.blogspot.com/2023/11/small-project-sp-boarding-bunk-car-pt-2.html ), after 1950 SP began converting old 12-1 Pullman sleepers to boarding bunk cars, and such bunk cars are sometimes found on my outfit track. 

It may sound like the SPMW cars I am showing are just passive scenery. But in fact cars do move to and from the outfit track in many sessions. When these are cars like ballast cars, it’s fairly obvious how they may move. In fact I wrote an entire post about the waybills associated with these kinds of movements: https://modelingthesp.blogspot.com/2025/03/waybills-part-119-operating-mow.html

When a boarding car is moved, however, SP had rules associated with how that might be done. So something like a bunk car being delivered at the junction of the Santa Rosalia Branch, to move to the Ballard outfit track, might look like this, on the Coast Division main line approaching Shumala:

The SP company rule for this was Rule 831 in 1953. Here is how it reads (this rule is included in the Special Instructions section of the timetable that my layout operators use): 

Operations including MW cars can be interesting, and are usually a contrast to conventional commercial shipments to or from industries on the layout. I find them a valuable enlargement of operating possibilities.

Tony Thompson 

Monday, August 4, 2025

Adding an MW car for the layout

I have long enjoyed learning about maintenance of way equipment, particularly for the railroad I model, the Southern Pacific, and making models of some of them. In fact, I recently published an article on the subject in Model Railroad Hobbyist, part of the continuing “Getting Real” rotating monthly column, in the issue for April 2025 (you can see it at: www.mrhmag.com ). 

One of the points emphasized in that article is that SP designated its work equipment, other than specialized equipment like cranes, spreaders, pile drivers, and so on, as either “roadway” cars, meaning cars that carried tools, equipment and supplies, and “boarding” cars, cars used by personnel to sleep, eat, or work in. Very much more about such cars can be found in Ken Harrison’s superb book (Southern Pacific Maintenance of Way Equipment, SPH&TS, 2022).

I already have a couple of interesting boarding bunk cars, but wanted to add another one. In a recent purchase of a group of freight cars, included was an old Train Miniature (TM) bunk car (these have been sold in more recent years by Walthers) . Though not a match to any SP photos of bunk cars that I have seen, it is certainly a similar kind of converted box car.

Shown below is the TM body molding. It is the window pattern that resembles but doesn’t duplicate any SPMW cars that I know of. 

I decided to prepare this car as a stand-in. I first sprayed the assembled car a boxcar red color, which is what SP used for MW cars in my era. Some details remain to be upgraded. 

I removed the molded-on sill steps you see above, and replaced them with A-Line Style A steps, and on the lateral running boards, added some corner grabs from a plastic kit. Also, surplus kit parts were used to add running board end supports. Canopy glue was used for all of them.

My next step was to letter the car, using the excellent MW decals from Owl Mountain Models, their set 1225S. You can see their home page at: https://owlmtmodels.com/ . The decal offerings are not currently on the site, which awaits refreshing, but you can purchase them by making direct contact.  

How were cars like this lettered? There was only an SPMW number, essentially arbitrary since newly-converted cars simply received a vacant number. Often a weight, sometimes light weight, was shown beneath that. This was usually over the right journal of the left-hand truck. Ordinarily to the right of car center, sometimes to the left, were the usual warning signs in English and Spanish. 

Below is an example ( photo from the Arnold Menke collection), taken at West Oakland of boarding bunk car SPMW 1109. It’s a former Class B-50-2 box car, number 84984, converted to bunk car in 1936. The car has arch-bar trucks, though SPMW cars rode on a very wide variety of trucks.

With decal lettering completed and protected by a coat of clear flat finish, I set about weathering the car. Since these cars were rarely if ever repainted, I decided I should apply a moderate amount of weathering. I followed my typical method of washes of acrylic tube paints (explained and illustrated in the “Reference pages” linked at the top right of this post). 

This boarding bunk car is now ready for service on my layout, visiting the outfit track in my town of Ballard (information about outfit tracks can be found here: https://modelingthesp.blogspot.com/2022/02/the-role-of-outfit-track.html ) from time to time.

Tony Thompson 

Friday, July 11, 2025

Another 3D-printed freight car

More and more, we are seeing distinctive freight cars, unlikely to be produced in resin, let alone in styrene, created by 3D printing. I’ve just received yet another one, this on from Robert Bowdidge (who once sold kits of such models under the name Dry Creek Models; see my post at: https://modelingthesp.blogspot.com/2015/10/the-new-dry-creek-sp-work-cars.html ).  

Robert’s latest effort models the famous dump cars built by Southern Pacific in 1902, nicknamed “the battleships” and notably used not only for the Harriman-era fill for the trackage across Great Salt Lake, but in closing the Salton Sea breach in 1905, and in clean-up after the 1906 San Francisco earthquake (each of which is illustrated in Volume 1, “Gondolas and Stock Cars,” in my series, Southern Pacific Freight Cars, Signature Press, 2002).  

These cars were 30 feet long and had a 50-ton capacity, dumping through a single, large side door on each side, over an A-frame interior supported by a gigantic 36-inch-high I-beam. Below is the SP drawing for this car type. The car numbers shown are from a later time; the original 300 cars were numbered 11665–11964.

The cars were arranged for air-powered movement of the side doors, and the end dumping gear is well shown in this view (SP photo) from the Great Salt Lake project (showing “sinking of track” — before enough fill had been placed). Note also that side grab irons are attached to the dump door.

As the years wore on, the cars took the usual beating of all ballast cars, and by 1950 all had been scrapped — except for a few that had been converted to MOW use as “roadway ballast” cars. There are four that we know of, converted in 1935 from cars SP 11811, 11697, 11798, and 11899, which became, respectively, SPMW 309, 313, 315, and 317. By my modeling year of 1953, only SPMW 315 had been scrapped.

But the cars were significantly changed as MW cars, with the air-dumping mechanism removed. Below is a photo of SPMW 309 at Bakersfield on December 3, 1955 (Chet McCoid photo, Bob’s Photo collection); the plain end is evident. Side dump doors were also shortened to permit a fixed side section for attachment of side grab irons, and divided into two doors.

Another known car, SPMW 317 was photographed in 1961 at an unknown location (Ken Harrison collection),  and like the car above, its lettering is simplicity itself.

Here is the 3D-printed HO version, with details obtained from the American Steel Foundry Co. drawing copies at the California State Railroad Museum. This is the original car body, including that 36-inch I-beam, and with full-length dump doors. The spaces under the A-frame could readily accept lead weight to permit the car to be operated empty. 

I will turn to the challenges of modifying this car body for my 1953 modeling era in a future post. For example, the end detail of the air-activated door levers is very nice, though unfortunately  I will have to remove it. And there are other changes that I will address.

Tony Thompson 

Saturday, July 5, 2025

Correcting my mistake: speeder paint scheme

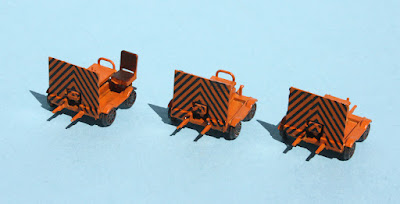
The other day I posted a description of the new HO scale Fairmont M-19 speeders (or motor cars) produced by Ken Harstine. I knew they were Daylight Orange and so painted them. Ken included a decal sheet for diagonal black stripes on the front or wind screen, but as I had not seen photos from my era (early 1950s) of speeders with stripes, I omitted them. The post is here: https://modelingthesp.blogspot.com/2025/07/speeders-or-are-they-motor-cars.html .

Promptly upon posting, I heard from former SP employee Mike Yoakum, who didn’t criticize, just sent me the Common Standard drawing CS 1942, which is shown below. This was adopted in 1946, and I don’t think it could be more clear. Incidentally, note two points of terminology: SP called them “motor cars” in this drawing, though SP paperwork like special instructions and train orders often refer to them as “track cars;” and the front wind barrier is called a “windshield,” though not transparent like the ones we are familiar with on automobiles. It certainly serves to shield occupants from the wind.

This pretty conclusively shows that stripes were adopted in April of 1946, so obviously I had to go back and correct my speeder models! Now I was really grateful for Ken’s nice decals. Here are the three speeders with properly striped “windshields,” as I now know to call them in SP parlance.

They are now a little more eye-catching on the layout too, as long as they are posed on the track turnouts as headed toward the viewer. I’ve been told that when pulling speeders off the track, crews preferred to swing them so they were facing back toward the track, not away from the track — but not a hard and fast rule.  

Thanks again to Mike Yoakum for correcting my misunderstanding and backing it up with the ultimate authority, a CS drawing.

 Tony Thompson 

Thursday, July 3, 2025

Speeders — or are they motor cars?

 Railroad employees often called them speeders or motor cars; the railroad I model, Southern Pacific, called them “track cars” in official documents. I posted about a beautiful 3D-printed Fairmont speeder in HO scale awhile back (see it at: https://modelingthesp.blogspot.com/2022/07/a-beautiful-ho-scale-speeder.html ) and showed it in place on my layout. It was produced by Yelton Models, located in Niagara Falls, Ontario. 

More recently, a Fairmont M-19 speeder in HO scale was 3D-print produced by Ken Harstine (I believe doing business as Voltscooter), in three versions: with a windscreen and a seat, with windscreen only, and with neither seat nor screen. Below is a photo from Tim O'Connor showing such cars. This view was taken at Beaumont, Texas in 1976. 

The one in the rear in this view is enclosed, like the Yelton one I showed in the post linked in the top paragraph, above. The foreground car, without seat or screen, is the type sometimes called a “gang car,” as it might be used by track gangs. The middle speeder has a windscreen (of a later design including clear windshield in the upper part) but no seat. Note that these cars have fenders on the wheels, an optional feature on Fairmont speeders.

Here is the simplest speeder, much like the “gang car” shown above, with neither windscreen nor operator seat, seen at the speeder shed in my layout town of Ballard. Beyond the shed is an SP concrete phone booth. Like all my speeder models, it’s painted Daylight Orange. Wheels are grimy black.

Addition of a windscreen makes a speeder like the center car in the prototype photo above, but with the early style of a screen only, no windshield. It’s at the speeder pull-out  or turnout near the mainline tunnel on the approach to Shumala on my layout. Note that it does have the handles that a crew can use to manhandle it on and off the track. (I described building SP-style turnouts like this in a post awhile back; see it at: : https://modelingthesp.blogspot.com/2019/01/track-car-turnouts-part-4-installation.html ).

These speeder models are provided with decals for diagonal black stripes on the front. From what I know, these stripes were used in later years, but I have not found a photo showing such stripes on speeders in the early 1950s. Thus my models don’t have them.

Here’s a close-up view from the rear of the type shown above. It’s impressive what has been modeled here; this is a really small model. The width of the windscreen shown below is just 9/16 of an inch.

The third type is like the one above, but with an operator seat. Note the motor controls in the center housing, included on all these speeder models. It’s shown on the pull-out near the depot in my layout town of Santa Rosalia. In the background is the trailer containing the Harbormaster’s office for the port.

These are all nice models for period “atmosphere,” and I can change them from pull-out to pull-out so they don’t become scenery fixtures.

Tony Thompson 

Tuesday, June 24, 2025

SP piggyback, Part 7: finishing the flat cars

I am continuing with the project to complete the very nice 3D-printed Southern Pacific piggyback cars made by AJ Chier. In my last post about the flat cars, I showed completion of the body details (grab irons, sill steps, brake wheels), shown at: https://modelingthesp.blogspot.com/2025/02/sp-piggyback-part-5-3d-printed-flat-cars.html . I should repeat that because I model 1953, the first year of this service on the SP, my models reflect the very earliest practices of SP piggyback. 

First I needed to prepare the models for trucks and couplers. I used a bottoming tap to tap the bolster and coupler pocket holes 2-56. 

For lettering, I used the Protocraft set for SP Class F-70-6 and -7 flat cars (Rick Leach artwork). Each set is intended for lettering a single car. I used the set, but was a little disappointed in the low opacity of the white lettering in the smaller sizes. Here is the model as I lettered it with the Protocraft set.

Below is the central part of a builder photo (AC&F) of the last car in Class F-70-7 (they were numbered 140500–142549). You can readily see, in comparison to the above model photo, what I mean about the appearance of the smaller lettering (you can click to enlarge). But in layout operation, no doubt this will go unnoticed.  I did omit the AC&F builder emblem, as these are not visible on any of SP’s piggyback cars.

Next I turned to installation of trucks and couplers. This involved making a styrene sheet cover plate for the coupler pocket, what’s sometimes called a “one-minute job.” Then Kadee No. 158 couplers were added. 

Trucks are an interesting problem. These 70-ton flat cars of course had 70-ton trucks, and most modelers aren’t sensitive to the differences between 50-ton and 70-ton trucks: 5' 8" wheelbase instead of 5' 6", and slightly beefier sideframes; both aspects essentially invisible in HO scale. But several HO scale truck makers do offer 70-ton trucks, and I chose to use those.

The SP prototype cars had Barber S-2 trucks, of the early A0 (A zero) variety. Most commercial Barber S-2 trucks are S-2-B (so marked by the rare truck maker who actually designates such details, such as Kadee). Can we tell? Actually, yes. Below is a view (AC&F photo) of an SP Barber S-2-A0 truck.


 Here you can see the distinctive Barber bolster end, with its friction-wedge corners, and a pair of truck springs outermost (there were five such springs in the spring package). For more on this, for those interested, I would direct you to Bob Karig’s superb truck chapter (Chapter 6) in Coal Cars, University of Scranton Press, 2007.

(For background, on model trucks, I recommend Richard Hendrickson’s HO scale truck document, available on Google Docs at this link: https://docs.google.com/file/d/0Bz_ctrHrDz4wcjJWcENpaDJYbUU/edit?usp=sharing .)

Commercial HO scale trucks, such as the very nice Kadee 70-ton Barber S-2-B, are visibly different, having three outermost springs visible in the spring package, a very noticeable aspect of a truck. I show the Kadee S-2-B below.

I chose the Rapido 70-ton truck (no. 102059), which does have the Barber bolster end and a pair of outermost springs, thus looking like the SP Barber trucks. You could also use the ExactRail 50-ton Barber, which is close to the SP prototype.

The completed flat car is shown below, loaded with a pair of the Pacific Motor Trucking trailers, which I described in the previous post (available at this link: https://modelingthesp.blogspot.com/2025/05/sp-piggyback-part-6-trailers.html ).

I look forward to seeing this car in a mainline train during a layout operating session, a single car being appropriate in the earliest days of SP piggyback. And thanks, one more time, to AJ Chier for making these very nice 3D printed models.

Tony Thompson 

Sunday, June 15, 2025

WOOPS 2025

As perhaps only Westerner model railroaders know, “WOOPS” stands for “Western Oregon Ops,” an event held in alternate years. This year it took place during June 6–8. Though literally only in the northwestern corner of Oregon, there are a number of fine layouts, and a fair crowd shows up every time. Below is their emblem, including iconic Mt. Hood, a visual presence throughout the region. 

I reported on a WOOPS event once before, in a blog post, and if interested you can view it at this link: https://modelingthesp.blogspot.com/2019/06/woops-2019.html .

I was only able to attend for two days this year, but enjoyed two really nice, large, and interesting layouts. The first was Charlie Comstock’s Bear Creek and South Jackson, with a challenging operating scheme. I worked at Bear Creek Yard, and was kept moderately busy all day. 

I was especially intrigued to see the ground throws that Charlie uses: they are the Caboose Industries N-scale throws, though the layout is HO scale. This works because his hand-laid switches have a near-prototype spacing of point and stock rails, so the smaller throw distance of the N-scale device is sufficient. It’s quite visible here at an unpainted switch.

The layout is scenicked nicely in a number of areas, while not yet done in other areas. The completed ones were quite well handled, such as this scene at Junction City, Oregon. It’s very sharp depot model, and some good industrial buildings (the one at right is a computer-printed paper). Notice at left he is experimenting with photographs for the streets that head straight into the wall. And every station has a schematic map on the fascia to help orient crews.  

The other layout was Bill Decker’s Cascade Division of the SP, set in the early 1970s at the moment (he plans to backdate in the near future). The layout is HO scale, and models from Eugene, Oregon and environs, then up the long climb to cross the Cascades at Cascade Summit. Again, I managed to snag a yard job in the big and rather busy Eugene Yard, and had a lot of fun doing it, busy most of the day.  This photo looks railroad west along the yard. 

In addition to mainline trains climbing or descending the grade, there are several busy locals. Below you see Steve Menker (left) and Jim Radkey (right) working the Springfield Local. 

As has happened every time I’ve attended, it was a fun weekend with really enjoyable layouts. If you get a chance to attend a future WOOPS, don’t miss it!

Tony Thompson 

Thursday, June 12, 2025

Southern Pacific’s railroad in Mexico

Recently I received an email question that I thought was interesting enough to merit discussion here. The question was, what were the freight cars of the SP railroad in Mexico, did cars go back and forth over the border with the U.S., and when did that all stop?

The background is covered in a number of books, perhaps best in the one authored by John Signor and John Kirchner, The Southern Pacific of Mexico (Golden West Books, San Marino, CA, 1987). The story began in 1882 with the completion of the Ferrocarril de Sonora  in the Mexican state of Sonora, from the U.S. border at Nogales, Arizona to the port of Guaymas on the Gulf of California. This was built under the auspices of the Santa Fe, which operated it until 1898.

In 1898, the SP’s little-used line from Mojave to Needles, California was traded to the Santa Fe (to forestall further Santa Fe construction westward) in return for the Sonora Railway. SP soon acquired also the railroad properties of the Cananea, Rio Yaqui and Pacific, and in 1905 began to build southward past Mazatlan, eventually to reach Guadalajara in the state of Jalisco. The name given to the combined railroads (FdeS, CRYyP, and the new construction) was the Sud Pacifico de Mexico or SPdeM. 

Much of the new railroad’s rolling stock was handed down from the SP in U.S. or leased. In the 1930s, to cite an example, SPdeM owned only 29 of its 112 locomotives and 657 of its 1251 freight cars. The SPdeM, as emphasized in the Signor and Kirchner book, was remarkably like the parent SP, not only with its hand-me-down rolling stock and locomotives, but in use of the SP rule book, timetable and train order operation (with telegraph communication only),  and many familiar features of SP practice. 

Photographs of yards and trains in the 1940s and up to the sale of SPdeM to the Mexican government in 1951 show that most freight cars, certainly all the modern ones, had SP initials, interchanged into Mexico. In principle, SP cars made empty in Mexico were not permitted to be reloaded to further destinations in Mexico, only back to the U.S., but this regulation was not stringently enforced. The same applied to PFE cars. Moreover, significant numbers of empty SP and PFE cars were interchanged into Mexico for SPdeM use.

One consequence of these cross-border movements of cars has to do with waybills and how they were handled. I have described earlier the basics of the situation (see this post: https://modelingthesp.blogspot.com/2020/10/waybills-part-75-non-us-freight-cars.html ), and followed that discussion with several further examples of both Canadian- and Mexican-origin shipments (in this post: https://modelingthesp.blogspot.com/2020/10/waybills-part-76-more-on-cross-border.html ).  

Let’s look at some rolling stock. Below is a photo (Library of Congress) taken during the Mexican Revolution of 1911, showing insurrectionists atop a train. The caboose is an SP design, Class CA, and the box car (number not readable) is one of the early Harriman-standard double-sheathed box cars, likely Class B-50-5 or -6.


 To show one of the few cars built new for the SPdeM, below is a builder photo (AC&F, Al Westerfield collection) of a member of Class B-50-6. 

Another example of these cars in service is this view (Southern Pacific) of the Redo Sugar Co. mill at El Dorado, Sinaloa, with several box cars in sight. These too appear to be Harriman Class B-50-6 cars. 

After the sale of the SPdeM to the Mexican government in 1951, the railroad was renamed Ferrocarril del Pacifico (Pacific Railroad), initially with reporting marks FdelP, but soon changed to FCP. I have described the changes of the former SP rolling stock to the FCP ownership in an earlier post (see it at: https://modelingthesp.blogspot.com/2016/08/ferrocarril-del-pacifico.html ). Since I model 1953, I need to focus on the FdelP, not the SPdeM.

On the modeling front, I have shown my creation of one of the re-lettered former SP cars in a post a few years ago (here’s a link: https://modelingthesp.blogspot.com/2020/09/resin-box-car-build-part-3.html ). A photo of my completed model, a former SP Class B-50-14 from a Sunshine kit, is below, including the “patched” change of reporting marks. 

So that’s an overview of “SP’s railroad in Mexico,” and a few of the aspects that can be part of model railroading.

Tony Thompson 

Monday, June 9, 2025

Some additional SP advertising

I’ve recently posted a number of examples of the “institutional advertising” that Southern Pacific published in the 1950s, bright, eye-catching graphics from their advertising agency of the time, Foote, Cone & Belding. This is defined as advertising not to those who were necessarily actual customers or potential customers of the railroad, but the public at large, and was placed in general circulation magazines such as Time.

I began with a number of these “institutional” ads that to me are interesting because they promoted the image the railroad wished the public to have, a progressive and modern railroad. That first set of ads was contained in this post: https://modelingthesp.blogspot.com/2025/05/sps-public-advertising.html

In a following post, I showed more of the same kind of ads, but also included a few of the advertising efforts SP made toward their actual customers. that post is at this link: https://modelingthesp.blogspot.com/2025/05/other-sp-advertising.html . Lastly, I returned to more of the public ads, along with an interesting example of SP advertising to companies who might be considering a new plant location in SP territory, Here’s a link to that post: https://modelingthesp.blogspot.com/2025/05/more-sp-advertising.html .

Now let me show a few more of the vivid Foote, Cone  & Belding examples, with one simply intended to draw attention to the “Golden Empire” as a possible plant location. As mentioned previously, this is from the latter part of the 1950s, because it has the later-era addition of the Cotton Belt to the Golden Empire logo. You can click on the image to enlarge if if you wish to read the text.

Next is another example of SP emphasizing how much of certain agricultural and mineral products were produced in the Golden Empire:

In this period, SP also liked to publicize various modernizations that the railroad was achieving. This one is a good example. President Donald J. Russell was eager to promote SP to the financial community as progressive and modern.

Next  is an ad that actually may have reached out to railroad customers, once again including publicity for SP’s trucking subsidiary, Pacific Motor Trucking, and the related piggyback service. Note also the inclusion of one of SP’s largest and most profitable freight categories of the time, lumber. That was the main reason the the SP freight car fleet contained 10 percent flat cars, while the national average was just 3 percent.

Beginning in 1956, SP experimented with “dual-fuel” arrangements for diesel locomotives, promoted here using the traditional engineer’s glove. The two fuels were conventional diesel fuel, and cheaper “residual” fuel oil, so thick it had to be heated to flow. Dual fuel would be abandoned in the early 1960s.

Lastly, they decided to publicize the enormous project of replacing the Harriman-era Great Salt Lake trestle with a fill, with a dramatic comparison of the volume of material used. The project was carried out from 1955 to 1959.

All these ads have, naturally, a similar style that the agency created, and as this series of posts demonstrates, they covered a wide range of aspects of the railroad that could be promoted to the general public. 

Tony Thompson

Wednesday, May 28, 2025

SP piggyback, Part 6: trailers

This is part of an ongoing series about the beginnings of Southern Pacific piggyback service. That service on the SP began in 1953, the year I model, so I am interested in the characteristics of the operation at its outset. In previous posts, I have discussed both the highway equipment, owned by SP subsidiary Pacific Motor Trucking, and the SP flat cars that carried the trailers. The most recent of these posts, Part 5, can be found here: https://modelingthesp.blogspot.com/2025/02/sp-piggyback-part-5-3d-printed-flat-cars.html

In a previous post, I showed the model trailers that had received a coat of white primer (Tamiya “Fine Surface Primer”). That post is at this link: https://modelingthesp.blogspot.com/2024/10/sp-piggyback-part-4-progress-on-3d.html . My next step was to airbrush them with Daylight Orange, using the excellent Star Brand version of this color, STR-27 (I have discussed this color: https://modelingthesp.blogspot.com/2022/06/pfe-orange-one-more-time.html ). 

Since in the final paint scheme this color is only on the upper parts of the trailer, most care was taken with coverage in those areas, but each entire model truck body was painted. Otherwise there could be risk of uneven color in the coat of Daylight Red to follow, on the lower parts.  

The next step was to mask off the upper part of the trailer, using the excellent 18-mm Tamiya tape. This tape performs beautifully on the glossy surface of the orange coat, above. Then I could paint the lower body, and the underbody, Daylight Red, using Star Brand STR-34. Here the masking line will be in the upper part, above the “belt rail” on the trailer, because it will be hidden by the black stripe, as is visible seen in the prototype photo, below.

This image is repeated from a PMT history post, which can be found at: https://modelingthesp.blogspot.com/2024/09/sp-piggyback-part-1-pacific-motor.html . Background: this is a 1940s publicity photo, posed to emphasize the truck–rail connection, shown here as a box car at a freight platform (SP photo, courtesy Steve Peery). The tractor here is a GMC, typical of SP’s long closeness with Chevrolet and GMC motor vehicles, pulling a 22-foot trailer.

The lower trailer bodies, and underbodies, were airbrushed red, and of course the tires will subsequently be painted black by hand as a final painting step. Here are the trailers at this point:

I might mention that there has been some disagreement over the years as to whether the underbodies were black or red. It is a minor point, since one can’t really see the underbody of a trailer on a flat car or on the highway. But SP photos of the trailer tie-down process, several of them reproduced in Chapter 13 of my book, “Automobile Cars and  Flat Cars,” Volume 3 in the series, Southern Pacific Freight Cars (Signature Press, 2004), seem to me to show a color like the bottom section of the trailer sides. 

Lettering follows the prototype photo shown above. Luckily, a Microscale Decals set of some years ago remains in production and in stock, set MC-4027. I used those sets (each of which can do one trailer) for these models. By the way, I should mention that examination of about a dozen photos of these trailers shows all PMT 22-ft. trailer numbers in the 3100 and 3200 number series.

My decaling approach has been to first stand the trailer on its flat end, and drape over the front a piece of stripe, containing the PMT initials at center front. Once that’s well dried, I start adding all the other lettering, along with a second length of stripe around the back, and the back end lettering. Here is a prototype rear view to illustrate (SP photo). And I should mention that locations of some of the lettering varied over time and for slightly different trailer bodies.

With the entire lettering applied, one can see what an attractive paint scheme this is.

I can hardly wait to finish the flat cars and start putting these trailers onto them! Thanks one more time to A.J. Chier for creating these fine 3D-printed models.

Tony Thompson