Showing posts with label MOW. Show all posts

Thursday, August 28, 2025

Handling MOW equipment

I’m sure it’s no surprise to regular readers of this blog that I find maintenance of way (MOW) equipment interesting and worth modeling. In fact, I’ve written a Model Railroad Hobbyist column about modeling MOW equipment of the railroad I model, Southern Pacific. You can read about it at: https://modelingthesp.blogspot.com/2025/04/my-latest-column-in-mrh.html .

I do like to use such equipment in my layout operations, and have described how  I accomplish this for various equipment used in MOW work. That goes beyond what SP lettered as SPMW cars per se, such as ballast cars; that post can be found at: https://modelingthesp.blogspot.com/2020/02/operating-mow-equipment.html .

On my layout, most activity of MW cars (SP lettered them as SPMW) centers around the outfit track, which was the SP term, in my layout town of Ballard. For background, I’ve written previously about the role of an outfit track; the post is here: https://modelingthesp.blogspot.com/2022/02/the-role-of-outfit-track.html .

Though sometimes it’s empty, I usually arrange that my outfit track contains a boarding bunk car and a kitchen-commissary or dining car, to both house and feed MW forces. Sometimes there is also a domestic water car there, for crew use. Here’s an example, with the boarding bunk car in the center and the kitchen-diner, converted from an open-platform head-end car, at left. Water car at right.

The specific cars vary from time to time, for example with a different kitchen-commissary car and a more modern water car. 

But other times, some additional car type may be spotted on the outfit track, for the use of track maintenance forces, such as a  car of ballast, as you see below.

In the two photos above, the bunk cars are both converted from box cars. But as I described in a couple of earlier posts (concluding with this one: https://modelingthesp.blogspot.com/2023/11/small-project-sp-boarding-bunk-car-pt-2.html ), after 1950 SP began converting old 12-1 Pullman sleepers to boarding bunk cars, and such bunk cars are sometimes found on my outfit track. 

It may sound like the SPMW cars I am showing are just passive scenery. But in fact cars do move to and from the outfit track in many sessions. When these are cars like ballast cars, it’s fairly obvious how they may move. In fact I wrote an entire post about the waybills associated with these kinds of movements: https://modelingthesp.blogspot.com/2025/03/waybills-part-119-operating-mow.html

When a boarding car is moved, however, SP had rules associated with how that might be done. So something like a bunk car being delivered at the junction of the Santa Rosalia Branch, to move to the Ballard outfit track, might look like this, on the Coast Division main line approaching Shumala:

The SP company rule for this was Rule 831 in 1953. Here is how it reads (this rule is included in the Special Instructions section of the timetable that my layout operators use): 

Operations including MW cars can be interesting, and are usually a contrast to conventional commercial shipments to or from industries on the layout. I find them a valuable enlargement of operating possibilities.

Tony Thompson 

Monday, August 4, 2025

Adding an MW car for the layout

I have long enjoyed learning about maintenance of way equipment, particularly for the railroad I model, the Southern Pacific, and making models of some of them. In fact, I recently published an article on the subject in Model Railroad Hobbyist, part of the continuing “Getting Real” rotating monthly column, in the issue for April 2025 (you can see it at: www.mrhmag.com ). 

One of the points emphasized in that article is that SP designated its work equipment, other than specialized equipment like cranes, spreaders, pile drivers, and so on, as either “roadway” cars, meaning cars that carried tools, equipment and supplies, and “boarding” cars, cars used by personnel to sleep, eat, or work in. Very much more about such cars can be found in Ken Harrison’s superb book (Southern Pacific Maintenance of Way Equipment, SPH&TS, 2022).

I already have a couple of interesting boarding bunk cars, but wanted to add another one. In a recent purchase of a group of freight cars, included was an old Train Miniature (TM) bunk car (these have been sold in more recent years by Walthers) . Though not a match to any SP photos of bunk cars that I have seen, it is certainly a similar kind of converted box car.

Shown below is the TM body molding. It is the window pattern that resembles but doesn’t duplicate any SPMW cars that I know of. 

I decided to prepare this car as a stand-in. I first sprayed the assembled car a boxcar red color, which is what SP used for MW cars in my era. Some details remain to be upgraded. 

I removed the molded-on sill steps you see above, and replaced them with A-Line Style A steps, and on the lateral running boards, added some corner grabs from a plastic kit. Also, surplus kit parts were used to add running board end supports. Canopy glue was used for all of them.

My next step was to letter the car, using the excellent MW decals from Owl Mountain Models, their set 1225S. You can see their home page at: https://owlmtmodels.com/ . The decal offerings are not currently on the site, which awaits refreshing, but you can purchase them by making direct contact.  

How were cars like this lettered? There was only an SPMW number, essentially arbitrary since newly-converted cars simply received a vacant number. Often a weight, sometimes light weight, was shown beneath that. This was usually over the right journal of the left-hand truck. Ordinarily to the right of car center, sometimes to the left, were the usual warning signs in English and Spanish. 

Below is an example ( photo from the Arnold Menke collection), taken at West Oakland of boarding bunk car SPMW 1109. It’s a former Class B-50-2 box car, number 84984, converted to bunk car in 1936. The car has arch-bar trucks, though SPMW cars rode on a very wide variety of trucks.

With decal lettering completed and protected by a coat of clear flat finish, I set about weathering the car. Since these cars were rarely if ever repainted, I decided I should apply a moderate amount of weathering. I followed my typical method of washes of acrylic tube paints (explained and illustrated in the “Reference pages” linked at the top right of this post). 

This boarding bunk car is now ready for service on my layout, visiting the outfit track in my town of Ballard (information about outfit tracks can be found here: https://modelingthesp.blogspot.com/2022/02/the-role-of-outfit-track.html ) from time to time.

Tony Thompson 

Tuesday, April 22, 2025

My latest column in MRH

Again in the issue for April, Model Railroad Hobbyist’s “Running Extra” segment contains one of the multi-author “Getting Real” columns by me. This one is about Southern Pacific maintenance-of-way equipment, or as SP designated it, “MW.”

One reason for my having a particular interest in MW equipment is that I provided a spur track for it on my layout. At various places around the railroad, SP designated certain tracks as “outfit” tracks, meaning that the equipment of an MW gang could be located there during a work period, whether a track gang, signals gang, or bridge and building gang. 

This offers an interesting facet of layout appearance and operation: various models of MW equipment may be found on such a track from time to time, and not only may this equipment move to and from the outfit track, but also carloads of tools and materials (termed “T&M” by SP) can be set out and picked up there. 

The photo below shows the outfit track in my layout town of Ballard, and it contains, at left,  two boarding bunk cars, as they were called (one obviously converted from a Pullman car), as well as an empty ballast car being picked up at right.

Modeling of the cars in the photo above has been described in previous blog posts: for the conversion of the Rivarossi Pullman model, see: https://modelingthesp.blogspot.com/2023/11/small-project-sp-boarding-bunk-car-pt-2.html ; and for the Class W-50-3 ballast car at right, you might wish to see: https://modelingthesp.blogspot.com/2020/09/building-dry-creek-ballast-cars.html . The middle bunk car is described in the MRH article.

The cars in the photo represent two of the three types classified by SP. Those were “boarding” cars, meaning cars that employees (and in some case their families) would live, eat sleep or ride in; “roadway” cars, meaning cars carrying T&M for the gang’s work; and certain types of cars in revenue-service number series, mostly ballast cars, that could also carry revenue loads.

Below I illustrate an MW roadway car, which were usually revenue-service cars that had completed their lives in that service and handed down to the maintenance forces. Usually these were give modest repairs and repainted into an MW scheme, but sometimes they were simply “patch painted” with their new reporting marks, even leaving intact the railroad emblem from the previous paint scheme.

 Another topic of the MRH article was to describe modeling a few of the revenue-number-series ballast cars. I recently showed in a blog post my completion of paint and lettering for one of the “Bruce’s Train Shop” resin hoppers, sold assembled, as a representative of SP’s more modern steel ballast hoppers. Shown below is one described in a blog post (see it at: https://modelingthesp.blogspot.com/2024/05/another-sp-ballast-hopper.html ). 

Finally, I have enjoyed building the two Class W-50-3 ballast cars from Dry Creek Models, as I’ve described in blog posts. The most recent one was chosen largely so that I could build a load of rail for the car, as I’ve presented fully (see the post at: https://modelingthesp.blogspot.com/2025/04/a-rail-load-for-my-dry-creek-ballast-car.html ). 

I concluded my article by mentioning that these various MW cars can be included in the work of an operating session by using appropriate waybills to direct their movement, in many cases to and from the outfit track. My experience on many layouts I’ve visited is that MW equipment is simply a static display, maybe on a back track of a yard, and isn’t moved as part of operation. But it’s something I’ve enjoyed doing on my own layout.

Tony Thompson

Tuesday, April 1, 2025

A rail load for my Dry Creek ballast car

 I recently described completing a Dry Creek Models Southern Pacific Class W-50-3 Hart convertible ballast car, a fairly straightforward completion of a 3D-printed car body. In that post, I showed an example of such cars being used to carry rail, and mentioned that I planned to make such a load for the model (see the post at: https://modelingthesp.blogspot.com/2025/03/another-dry-creek-ballast-car.html ). 

In addition to the photo I showed in that previous post, a second photo exists. (Both photos are in Chapter 3 of my book, Southern Pacific Freight Cars, Volume 1, Gondolas and Stock Cars, Signature Press, 2003.) This photo shows the men getting ready to move rail. At left are two men holding rail tongs, which each pair of men will use in moving the rail. This is 90-pound rail, a 39-foot length of which weighs 1170 pounds, and 12 men, in six pairs, will be needed to move it.

Enlarging the photo above to look just at the rail ends, and assuming that rail not visible with something over it will be at the same spacing as the other rail, leads to the conclusion that there were at least 78 rails still in the car, and four more out of the car, as the full photo shows. For a 50-ton nominal car capacity, the max load would be 85 rail lengths, though in fact overloading company cars was not unusual, so that more than 85 lengths would be quite possible. But if one isn’t compulsive about this, a lesser load of rail is perfectly reasonable too.

An important point is what size rail to use for the load. This will of course depend on your prototype and era. In the 1950s, SP’s Coast Division, which I model, was undergoing replacement of the last older rail, to bring the entire division up to 113-pound rail. Since HO scale Code 83 rail represents approximately 126-pound rail, that’s what I chose.

Part of the motivation to make this load is that the Dry Creek model is very light, and has few places that weight can be hidden on an empty car. So the combination of lengths of nickel-silver rail, and a slab of lead sheet under the load, can bring the car up to a weight that can be operated with confidence. 

I cut a lead slab to fit inside the car, and less than the 39-foot rail length. It’s 0.062 inches thick, handily less than 0.083-inch rail. Next I cut a piece of styrene sheet, 0.005-inches thick, slightly narrower than the car interior, and 37 scale feet long, to underlay the weight and allow the rail ends abutting the lead weight to be glued to something. Now I needed a way to get the rail ends exactly even. I decided to make a gluing fixture. I just used some scrap styrene, and glued barrier strips 39 scale feet apart.

I then taped the 0.005-inch styrene in the middle of this fixture, and with pencil marked the location of the ends of the lead weight. That defined the place where I would attach short rail ends to represent the bottom layer of rail in the load. Here are a bunch of rail ends attached with canopy glue, with the pencil boundary visible. It is very simple to align these rail pieces, simply butting the ends to the fixture.

Once all the short ends of the first rail layer were in place, I added the lead sheet weight in the middle, also with canopy glue. Then the next layer of 39-foot rail was added, again with canopy glue. I decided to add a couple extra rail lengths on top. Total weight is 3.5 ounces, very helpful in a “weightless” model. Here it is in unpainted condition.

New rail could vary considerably in color, from the medium gray of mill scale on freshly hot-rolled rail shipped from its place of production, to lightly rusted when outdoors for awhile, to a deeply rusted brown color if stored outdoor for some time. I chose a medium brown, Tamiya’s “Red Brown” (TS-1) and used artist’s color pencils to add rust patches.

This load not only makes this car without end bulkheads logically sensible, and creates an additional load that can be directed to MOW use, but adds weight to a very light model. I look forward to seeing it in a operating session.

Tony Thompson

Saturday, March 15, 2025

Waybills, Part 119: Operating MOW equipment

A few years ago I went beyond the modeling of maintenance-of-way (or MOW) equipment, equipment many of us enjoy modeling, and touched on some operating possibilities with such equipment. (If you’re interested in a few of the modeling projects, you can find them using the search box at the right, with the search term, “modeling MOW cars”). The previous post on today’s topic is here: https://modelingthesp.blogspot.com/2020/02/operating-mow-equipment.html .

 In some ways, that previous post was a little simplified, as I did not try to really enter into use of much of the equipment movement that might occur in connection with an outfit track (for commentary on a track of that kind, see: https://modelingthesp.blogspot.com/2022/02/the-role-of-outfit-track.html ).  Below is a view of my outfit track, in the layout town of Ballard, with Nipomo Street at left.

This view shows a pair of what Southern Pacific called “Boarding cars,” cars that track gangs or other forces might live, sleep, eat or ride in, both formerly box cars. To the right of those two is a water car. SP commonly provided wash as well as potable water by delivery with such cars, and of course I can duplicate such deliveries with a suitable waybill, such as the one below. The old saying is that the railroads were just like the military: nothing moves without paperwork.

Another perhaps more interesting case is the use of company refrigerator cars to deliver ice to on-line employee residences, depots, and work gangs on the road. (My car like this is described in an earlier post: https://modelingthesp.blogspot.com/2013/04/modeling-some-sp-mow-cars-part-2.html .) Here is an example of arranging such movements:

Of course work materials might arrive in company equipment other than MOW cars, for example including ballast when a track gang is working in the vicinity of an outfit track:

And finally, as I have shown in a previous post, one can readily arrange a full load or half-load of ties, to be delivered to track forces. (That post is here: https://modelingthesp.blogspot.com/2019/02/open-car-loads-ties-in-gondolas.html .) Here is what such a waybill might look like, in this case partially unloading the carload of ties before arriving on my layout:

These are all interesting variations on conventional railroad freight movements, and I enjoy including them in some of my operating sessions on the layout.

Tony Thompson

Monday, May 6, 2024

A Jordan spreader for the layout

I have been intrigued by Jordan spreaders since I was a boy, and saw a spreader being worked on by a mechanic. Not sure where this happened, maybe near the Southern Pacific’s Burbank, California depot, and I had no idea what this complex machine was. But others who knew railroading explained it to me, and I find them interesting to this day.

Today we have a phenomenal amount of information about SP spreaders, because of Ken Harrison’s magnificent opus on a wider topic, Southern Pacific Maintenance of Way Equipment, published by the SP Historical & Technical Society in 2022. (You can read my review of the book at: https://modelingthesp.blogspot.com/2023/02/ken-harrisons-marvelous-addition-to-sp.html .) Ken devotes the entirety of his Chapter 2 to spreaders, and my knowledge of SP’s machines largely stems from this chapter.

Photos of spreaders at work aren’t common (aside from snow removal, which doesn’t occur on my layout), so I was delighted to find the photo below in Ken’s book. It was taken at Seacliff, California (on the Santa Cruz Branch) on March 19, 1978 by Gary G. Allen, from the John Shaw collection. One side of the spreader is re-contouring the trackside area.

Manufactured for many years by the O.F. Jordan Company (thus their name) in East Chicago, Indiana, spreaders came in quite a few variations and several sizes. SP owned many of the variations. I have long thought that my layout needed to host a Jordan spreader somewhere, and in fact the layout does include what SP called an “outfit track,” used to host or merely to store work outfits, comprising all kinds of work cars.

But this idea of including a spreader has remained dormant for years. I have occasionally been tempted by brass models of Jordan spreaders, though the cost is substantial, and the Walthers plastic HO model seemed too modern. But aha! Looking into Ken’s book, I understand better what I am looking at. The most important point to recognize is that Jordan’s product didn’t change that much over the years, the most visible aspect being where the cab was located, and how big it was. Let’s have another look at the Walthers model, in its recent assembled incarnation (there was a kit in the 1990s).

A side view shows the vivid orange color (SP was just beginning to use this color for spreaders, in place of the traditional boxcar red, in the 1950s) and the probably arbitrary number, SP MW 4000. In a 1956 SP MW roster, car 4000 was a boarding bunk car. There were a number of spreaders with higher 4000-series numbers, so this is at least in the ballpark. I’ll change it.

What is immediately striking about the model is the very high plow in front. I cannot find that SP ever bought a Jordan spreader like this, certainly not in the 1950s, which I model. Instead, the SP ones with a sort of centered cab location like the model, had a far smaller size of front plow or faceplate. 

I’ll illustrate with a photo from the book, a Jordan builder photo of SP MW 4066 from 1953 (John Shaw collection). This spreader is a lot like the Walthers model, except for the front shape, at left. Note also that the paint is boxcar red. Trucks have solid bearings, not roller bearings like the Walthers model.

Could I just cut down the Walthers front plow? Luckily, the detail inside the plow is included, including the front steps descending from the cab, and the pneumatic cylinder that is prominent in the photo above. Here’s how it looks:

I soon realized that the low front configuration of SP spreader 4066, shown in the prototype photo above, is in fact molded on the Walthers model along the bottom of the front end, but with a great deal of higher material added at sides and front. My first step in seeing if it could be modified, was to remove the front structure entirely. By removing the front coupler, this can be wiggled free. Here’s the front view at this point.

I would need to re-install the lower part of the front structure, and I could also remove the overly heavy “railings” which were used to support the tall front plow. In addition, the pneumatic cylinder should be vertical. But the important point is that I think this project can be done, and I’ll return to how I did it, plus painting and lettering, in a future post. 

Tony Thompson

Tuesday, February 13, 2024

Another Maintenance of Way model

I find most Maintenance of Way (MOW) cars interesting, and they offer some distinctive modeling opportunities and challenges. The Southern Pacific was certainly no exception to this. One way I incorporate them into my layout is that I have provided what SP called an “outfit track,” a spur set aside for MOW use in certain locations. This is a natural place both to place static displays of MOW models, and also to switch, in that equipment may come and go from such a track. 

Recently I was reviewing some of the MOW photos I received from Arnold Menke. and below is an image taken by L..L. Bonney at West Oakland on November 22, 1938, of a boarding bunk car, SPMW 4622. It’s evidently based on an old box car, with light-duty trucks. Note that window screens are outside of the sliding windows, and that there is no end door (though such doors were common on boarding box cars).

Why did I focus on this image? Because it suddenly registered with me that I have a model of this exact car, built I believe by Al Massi (or from his collection), a scratch-built car which is hand-lettered in white ink.

What’s the background to this car? One naturally turns (if so equipped) to Ken Harrison’s magnificent book, Southern Pacific Maintenance of Way Equipment (SPH&TS, 2022), which I reviewed when it came out (see: https://modelingthesp.blogspot.com/2023/02/ken-harrisons-marvelous-addition-to-sp.html ). The book pages are amazing enough, but still more amazing is the enormous collection of roster data, supplied on a disk inside the back cover of the book. 

This information reveals that SPMW 4622 was converted from a 30-ton box car owned by El Paso & Southwestern, one of a group of American Car & Foundry-built EP&SW box cars from 1902. The EP&SW had already converted the car to MOW use, numbered 1163, by the time of the SP takeover in late 1924 (it is listed in EP&SW entries in Official Railway Equipment Registers prior to that date), though the official date of SP’s MOW conversion at El Paso was in October of 1925. Of course. the El Paso shops may well have modified the car to suit SP needs at that time.

The car design seen in SPMW 4622, with “over-and-under” windows, was widely used by SP for boarding bunk cars. Here is another example, from the John Signor collection (date and location unknown), a Class B-50-6 box car converted to MOW in 1942. It was the third SPMW car to carry the number 80. Again, there is no end door; but note the shadow of a tank car on the end, probably a domestic water car for the outfit. Stoves in this era on the SP burned coal.

Another interesting example, with slightly different window pattern, is SPMW 1728. It’s another L.L. Bonney photo, taken at Truckee in 1960 (Arnold Menke collection). It was originally Class B-50-2 box car 86529, and was converted to MW in 1939. The tall chimney is noteworthy.

I have long thought about making up styrene sides for such cars, not too difficult a job but fiddly work with all the window framing to place. But the cars I already have may well meet my MOW needs. The scratchbuilding possibility is going to stay on my “long-range” project list.

Tony Thompson

Sunday, December 3, 2023

Modeling SP MOW, Part 6: a commissary-kitchen car

I haven’t attempted to get very far into maintenance-of-way (MOW) cars for the Southern Pacific, because there is little scope for them on my layout. But I do find them interesting. By far the most common MOW car type in the transition era, which I model, was the boarding bunk car (and see this post: https://modelingthesp.blogspot.com/2023/11/small-project-sp-boarding-bunk-car-pt-2.html ). There were dozens and dozens and dozens of bunk cars, and scattered among them, for obvious reasons, were cars for feeding the men: dining cars, and commissary-kitchen cars. This post is about modeling a car like that.

Among model starting points, both Train Miniature and Tyco made plastic MOW cars back in the day, and Mantua and Walthers (inheritor of the Train Miniature line) have offered them also. Of course, for SP as for most railroads, there was considerable variety in the appearance of MOW cars in any category; these were cobbled into shape in the shops in whatever way worked. 

So although good prototype photos are available, particularly in Ken Harrison’s superb book (Southern Pacific Maintenance of Way Equipment, SPH&TS, 2022), the sheer variety of prototypes means that even a commercial model isn’t too far from realism. It would challenge the memory of most of us to be certain that a pasrticular model wasn’t close to a prototype car.

Some years ago at a swap meet, I came across a Tyco MOW car, nicely modified with wire grab irons and so forth, but evidently mistreated over its life, and rather derelict. I bought it for a couple of dollars and began to study what I could do with it. It had had its vertical-wheel brake gear removed (a good idea) and some windows had been blocked, true of some prototype cars. My first step was to add a brass horizontal brake wheel on a brass wire staff, as you see below.

I also painted the broom and shovel (probably for the coal stove) with contrasting colors, to help them stand out, and I placed screen in the open window. There were no couplers on the car as I received it. I have also patched the car side (the white patch in this photo). Note also that the car should have a sill step below the side door.

You may note that this model represents a car that was converted from a double-sheathed box car. Cars of that type were not numerous on the SP, but large classes B-50-6 and B-50-9 did fit that description, and many kitchen-diner and commissary-kitchen cars were in fact converted from box cars of those classes. This is evident in the vital publication, the 1956 SPMW car roster published by the SPH&TS.

Next came lettering.Over the years, SP varied the lettering on its MOW cars, but after World War II became fairly settled. The bunk car photo below illustrates it (John Lawson photo, 1951, Wilbur C. Whittaker collection). The two “Danger” warnings, in English and Spanish, were located various places on the cars, often near the car door, and frequently arranged over-and-under, as here. The car number was always accompanied by a light weight value. Note at far end of the car there is a repack stencil, something rarely seen. The low car number has no significance, as SP repeatedly re-used MW car numbers over the years.

(This car is a former Class B-50-6 box car, converted to MW service in December 1942, and is a Boarding Bunk car, obviously different from the model I’m describing, but illustrating lettering.) 

The car shown above is riding on Vulcan trucks, widely used by SP at one time. But MOW cars exhibited a very wide variety of trucks in the 1950s, from ancient arch-bar trucks, through T-section, Vulcan and Andrews trucks, to more modern cast-steel AAR trucks. I chose to use a pair of arch-bars that were in my “surplus trucks” parts drawer. They might be Train Miniature; not sure.

 I used the new Owl Mountain decal set for MOW box cars, #1225W (W = white). The set contains very nice, clear “Danger” warnings. (For completeness, I will supply the text of these warnings: “As these cars are liable to be moved at any moment, all parties are warned against lounging or sleeping under or near them.”) The side door’s sill step has been added.

With lettering done, I needed to add couplers. The original Tyco trucks had a “Talgo” coupler attached to the truck bolster. In addition to preferring body-mounted couplers, I was discarding the trucks. So Kadee couplers in their own boxes were added.

The remaining task was to weather the car. I did this with my usual acrylic washes (for background and process description, see the “Reference pages” linked at the upper right corner of this post). These cars did get fairly dirty in service and were rarely repainted, so one can go to whatever length one wishes. We know from the SPH&TS-published MOW roster that this car, SPMW 2381, was converted to MOW service in 1942, so one could about weather as much as desired. 

Here’s the other side of the car, from that shown above.It has an open door, all right if the car is spotted somewhere, though not okay when being moved. Hanging on the car side are what appears to be a mop and a washboard. Here too, screen has been placed in two of the windows.

This has been an interesting exercise, starting with someone else’s model work (adding of wire grab irons) and completely redoing the finish, along with adding steps, lettering, and weathering. I am happy to have this car as a change for the equipment usually spotted on my layout’s outfit track.

Tony Thompson

Friday, November 24, 2023

Small project, SP Boarding Bunk car, Pt. 2

In Part 1, I showed both the model that inspired me to this project (made by Todd Osterberg) and also a prototype photo of a Pullman 12-1 sleeper re-purposed by SP as a bunk car for maintenance-of-way (MOW) crews. This primarily was a task of repainting and lettering. To see that part of the project, you may visit this post: https://modelingthesp.blogspot.com/2023/11/small-project-sp-boarding-bunk-car.html .

I might add a definitional point: SP divided many of its MOW cars into Roadway cars, meaning cars that carried materials, equipment and supplies, and Boarding cars, meaning cars that were used by personnel, such as bunk, dining, foreman, engineering, and similar cars. There’s much more on this and related topics in the superb book by Ken Harrison (Southern Pacific Maintenance of Way Equipment, SPH&TS, 2022).

As I mentioned at the conclusion of Part 1, there still remained some modeling tasks. First among these was to add internal view blocks where the interior partitions were in the Pullman car, since one ought not to be able to see through the car in those areas. 

I built them my usual way, with 0.020-inch styrene about 1 inch tall inside the car, and 1/8-inch square styrene strip glued into the corners. I then painted the inside of these a dark gray, and the outside a pale gray, and glued them to the floor with canopy glue. The floor still needs to be painted black. Note also that I added four 1/2-inch steel nuts, painted black, for weight (about half an ounce each). Otherwise these cars are quite light.

Second, these cars often had the window shades pulled down by crews using the car, and left down — there was no porter to restore them. I used a pale tan paper for the shades, setting them at different heights in the various windows, and gluing them in place with canopy glue. This looks odd when you look at the window glazing alone. (The shades are, of course, on the inside of the glazing.)

But of course the roof + glazing part, when inserted into the car body, brings these shade representations into a correct-looking location in the car side

Next I weathered the car, including the roof. I used a brownish acrylic wash, primarily Raw Umber, with a little Neutral Gray to lighten it and give a faded look, and a deeper Burnt Umber in places.

I decided to body-mount the couplers on this car, though that can be limiting in some switching moves with an 80-foot car. The car will mostly reside on the “outfit track,” as SP would have called it, in my layout town of Ballard, along with other maintenance equipment. I also made sure that the trucks, painted boxcar red with the rest of the car at the repaint, were suitably grimy.

That completes the car. Thanks again to Todd Osterberg, for the inspiration for this small project, and to Jason Hill, for the excellent MOW decals. As an SP modeler, I have to say we’ve needed those decals for years, and I look forward to using them on other projects!

Tony Thompson

Thursday, November 9, 2023

Small project: an SP Boarding Bunk car

Among the interesting and, frankly, inspiring models I saw at the Southern Pacific Historical & Technical Society meet in Bakersfield at the end of October was a pair of ex-Pullman passenger cars, painted and lettered for service as maintenance-of-way bunk cars. (For more on that meeting, see my post at: https://modelingthesp.blogspot.com/2023/10/the-2023-sph-annual-meeting.html .) And for a connected series of posts on MOW modeling, see: https://modelingthesp.blogspot.com/2015/08/modeling-sp-mow-cars-part-4.html .

A little background. As the traveling public gravitated increasingly to room accommodations in sleeping cars, in place of open sections, the very numerous Pullman 12-1 cars (12 sections, 1 drawing room) began to be less needed. Many were converted to other floor plans having rooms (taking advantage of the highly modular design of Pullman heavyweights).

Many others, however, were converted to “tourist sleepers,” as they were known, cars intended for economy travel. The drawing-room toilet compartment was sealed off, and the rest of that room converted to a 13th section. Pullman then gave these cars numbers in place of their previous names.

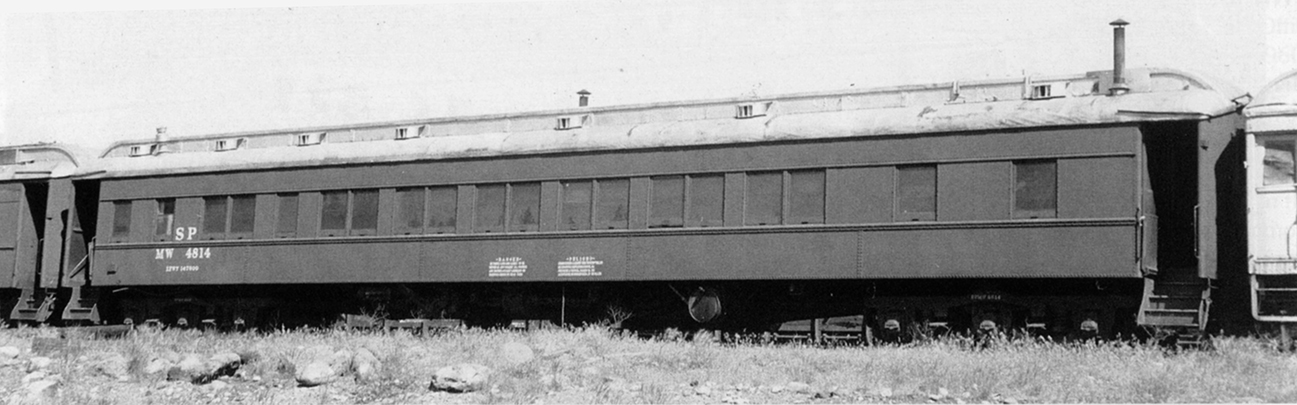
In 1948, a number of railroads, including SP, purchased a lot of these cars for use as maintenance-of-way bunk cars, in SP’s case, 78 cars. (As MOW cars, these were numbered SPMW 4800–4877.) The majority of these 13-section cars had never been air-conditioned, and most SP cars remained that way. Over time, many were modified and cut up in a variety of ways, making them look less and less like the original Pullmans, but in 1953, my modeling year, most cars like this would still have looked quite original.

Below is an example, SPMW 4814, an L..L. Bonney photo (Arnold Menke collection) taken at Truckee in July 1963. It’s from the superb book by Ken Harrison (Southern Pacific Maintenance of Way Equipment, SPH&TS, 2022). Ken refers to these Pullmans as the “third generation” of SP equipment like this, as all the ancient passenger cars and modified box cars previously used were wearing out and had to be replaced. That helps explain the SP purchase of 78 cars like this. On this car, the car number is not centered, but on many cars it was located at car center.

As mentioned at the top of this post, a model in the display at Bakersfield inspired me to pursue this project; it was by Todd Osterberg. It’s simply a Rivarossi 12-1 Pullman model, repainted with the body entirely in boxcar red, and the roof aluminum (though rather dirty, as no doubt happened rapidly). Here is Todd’s model. Having lots of window shades pulled down disguises the lack of interior.

My own project began with a Rivarossi (AHM) Pullman from my stash, bought years ago when these were on sale. It happened to be a model decorated for C&O, as you see here.

I removed the roof (which was black), masked the window glazing, and gave it a coat of gray primer. I then did the same to the car body. This avoids having to strip the paint, and adequately conceals the original paint and lettering.

With that paint well dried, I painted the roof with Tamiya “Gloss Aluminum” (TS-17), and the body and trucks with Tamiya “Fine Surface Primer (Oxide Red).” This latter color is a little more red than conventional boxcar red, but SPMW cars often looked a little that way, so in my view it’s a good choice. Note below that I’ve removed the “Talgo” couplers from the trucks. I will body-mount the couplers on this car.

Next comes lettering. As is evident in the Bonney photo at the top of the post, lettering was extremely simple. We SP modelers of the transition era have long used (and often cursed) Microscale set 87-155, as it has little of the correct size or style that we can use for MW cars. But now Owl Mountain Models has several very useful and accurate sets of MW decals (see them at: https://owlmtmodels.square.site/shop/1200-series-ho-decal-sets/5?page=1&limit=60&sort_by=category_order&sort_order=asc ). 

The new Owl Mountain set include very nice, clear versions of the iconic SPMW “Danger” warnings, which were in English and Spanish by the time I model. (For completeness, I will supply the English text of these warnings: “As these cars are liable to be moved at any moment, all parties are warned against lounging or sleeping under or near them.”) You can see these warnings to the right of center on the model below, and in the prototype photo at the top of this post.

One nice modeling challenge that isn’t necessary is diaphragms, as these were removed for MOW service. But still to come, the interior needs to be dealt with, and  I need to weather the car, hopefully as nicely as Jason Hill’s model shown above. Those issues will be presented in a future post.

Tony Thompson