Wednesday, June 29, 2022

More on layout origins

 I have written a number of blog posts over the last decade that included mention of my previous layout (built when I lived in Pittsburgh, PA, prior to 1994) and its free-lanced short line, the Lompoc & Cuyama, that connected to the Southern Pacific main line. One such post, showing what had carried over to the present layout, is here: https://modelingthesp.blogspot.com/2012/03/survival-from-my-old-layout.html

In the early days of layout construction in Pittsburgh, I tended to take black & white photos, so most of my “record” images are that way. I thought it might be interesting to show a few of these, both to show  progression over tie, and as a comparison to today.

The earliest dated images that I have are from the summer of 1984. The photo below shows Ballard as it then was. The layer below is staging, You can see the backdrop has a faint mountain outline sketched. The winery building is at left, about in its present location. The other structure, that would become Union Brass Foundry, is not placed at any trackside but is simply resting in the area. Obviously only a little track has been laid,.

Two years later, in August 1986, things had progressed. The backdrop painting is partly completed. Though three structures are placed, only the winery is in the location it has today (there’s even a six-compartment wine car spotted there!). Some scenery treatments and fascia have been started.

But the view above, showing the left side of Ballard is a little misleading; looking to the right of the photo, you can see that there is little there. Here is a closer view of that area.

Clearly little has been done at this end. The depot roof hasn’t been created, and only a kit box stands in place of the eventual Guadalupe Fruit. Work has begun on a wye at the back of this area, but the connection toward the right of the photo, intended as the final town on the branch, hasn’t been begun. But note the bill box on the layout edge. Switching by the local freight train crews did take pace in this era, though the industry structures weren’t yet built.

In the spring of 1990, I did extensive layout photography for an article that was to appear in Railroad Model Craftsman (eventually in the June 1990 issue: you can see the cover shot here: https://modelingthesp.blogspot.com/2018/03/how-old-is-my-layout.html ). Below is an example. This looks pretty finished, and there are now two more industries, Peerless Foods and Nocturnal Aviation, along the backdrop. But note there are no foreground industries. At this time, what is now an SP branch was an imaginary short line, the Lompoc & Cuyama.

As one more demonstration that looks can be deceiving, here is a look in the other direction, toward the right-hand end of Ballard. To the right of the depot is a mock-up for  Guadalupe Fruit. Mock-ups of building flats line the backdrop. The stack of styrene blocks at the back, photo center, was part of a plan to disguise the wye tracks, but clearly little else has been done at this end of town.

It is always interesting to look back and see where we’ve come from. These photos certainly demonstrate that. But not too long after the photo above was taken, the layout was dismantled, and the parts that could be re-used were moved to our new home in Berkeley, California. I will return to the development of Ballard in a future post.

Tony Thompson

Sunday, June 26, 2022

PFE orange, one more time

 As a Southern Pacific modeler, and one interested in produce shipping generally and PFE in particular, I have a lot of PFE refrigerator car models in my fleet. And having written the car chapters of the PFE book, as well as acting as overall editor of the entire volume (Pacific Fruit Express, Thompson Church and Jones), I’m familiar with many prototype as well as modeling issues for PFE.

One issue that often surfaces is the orange color of PFE cars. Until 1929, PFE car sides were yellow, but in that year, a color PFE called “Light Orange” was introduced, and from painting records, we know that by 1934, essentially all of the PFE fleet had become that orange. The color was adopted seven years later by SP for the new Daylight trains, but as many paint chips attest, “Daylight Orange” is identical to the PFE color.

Because modelers are properly concerned with reproducing prototype colors, one thing the authors of the PFE book wanted to include was a reproduction of the PFE color drift panels. On page 414 of the first edition (1992), and on page 418 of the second edition (2000), are reproduced four color panels: Standard Refrigerator Orange, Standard Refrigerator Yellow (the pre-1929 color), Standard Freight Car Red (roofs and ends), and Standard Exterior Gray (for structures).

A scan of the 2nd edition page is shown below. Note that all four panels “bleed” off the page edge (the printer’s term for an image that extends beyond the page edge). This was done so that the page can be laid right onto whatever colored object one wants to check. And when the book was printed, Bob Church and I were at the printing plant. When this color page was on press, we consulted with the pressman in a "true-color" light booth, to make sure we all agreed that the pages coming off the press did match the drift panels. You can trust them in the book, though of course what you see here on your electronic screen is not necessarily the same.

Just for background, shown below is one of the Bowles color drift envelopes, heavy black paper, in which panels were to be stored to avoid fading. SP used the same system; I have commented on the SP structure colors in this same context (see the discussion at: https://modelingthesp.blogspot.com/2012/10/modeling-sp-structure-colors.html ).

I should also mention the superb resource created by Dick Harley, as part of the book, Southern Pacific Freight Car Painting and Lettering Guide (SPH&TS, Upland, CA, 2016), reviewed in a prior blog post (see it at: https://modelingthesp.blogspot.com/2016/09/new-book-sp-and-pfe-lettering-guide.html ). There was no effort to reproduce color drift panels, but extraordinary detail on lettering is presented. A sample page is below. The orange you see here is certainly close to the PFE drift panel, though not intended as a reference.

This brings me to model paint colors. Back in the day, when model paints comprised Floquil and Scalecoat, many modelers were devotees of one or the other. I tended to be a Floquil guy. Floquil, at least in its later years, produced variable versions of some colors, including Daylight Orange. I remember throwing away some new bottles of that orange that were quite wrong. But today we have a new range of model colors to choose from.        

I have stated before, and still maintain, that the best match in model paints that I know of, to Daylight or PFE orange, is Star Brand Paint’s STR-27, “S.P./P.F.E. Daylight Orange.” It can be sprayed or brushed with equally good results. Nearly as good a match is the Tru-Color paint, TCP-107, “Daylight Orange.” 

Many modelers are trying to find acrylic paint equivalents, and recently there has been praise for a Vallejo color, “Bright Orange,” no. 70.851. I bought a bottle of this color, along with a bottle of “Light Orange,” no. 70.911. The two are shown below, resting on the PFE orange color drift panel, photographed in midday sunlight.

Perhaps a better view shows the bottle ends, as this usually shows paint colors well.

My perception is that the “Bright” color is too red, and the “Light” color not red enough. I have tried mixing, with one drop of the light orange with 4 drops of the bright orange, and it’s pretty close to the color drift. But I haven’t painted a model yet with these colors.  I plan to continue with the Star no. 27 for the time being.

Tony Thompson


Thursday, June 23, 2022

BAPM 2022, Part 2

 The long-running Bay Area Prototype Modelers meet (BAPM), naturally on hiatus during the pandemic,  finally returned this year, and took place on June 18. In my previous post, I  showed a number of models I had enjoyed examining, and in the present post, will show some more. (See the previous post at: https://modelingthesp.blogspot.com/2022/06/bay-area-prototype-modelers-2022.html ).

I will begin with Scott Kelley-Clement, who brought some spectacular renditions of freight car graffiti. His approach is to work from prototype photographs, and hand-paint the graffiti, while at the same time using decal tags and various weathering methods. Though tempted to show a whole bunch of his fine models, I will just show one to convey what I mean. Here’s the prototype (photo source, date, or location not given):

And here is the model. Speaking as one who has tried to accomplish some of what Scott showed, I am quite impressed.

Another model I like was an N scale model shown by Doug Nelson (needless to say, seeing his presentation, a Pennsy modeler). This is the same Mesta Machine Co. crosshead I have modeled myself in HO scale, a product of Multiscale Digital LLC (see my post at: https://modelingthesp.blogspot.com/2020/05/impressive-flat-car-loads.html ), but Doug, realizing he didn’t have a 200-ton flat car that could carry this monster casting, instead used the Z-scale version of the casting! Clever, realistic, and it looks good!

Another interesting group of models was brought by Tom Bacarella. I especially like this one, BREX 76058, a nicely finished plug-door reefer.

Finally, for this report, I will show Charlie Joslin’s Southern Pacific fire (water) car —  actually with NWP reporting marks — and very well rusted. This looks like an Albrae Models car, but the work done to create the heavy rust is very nice.

In conclusion, I’ll repeat my comment: it was really great to see over 100 participants, many of them old friends, and I can only say, welcome back, BAPM.

Tony Thompson


Monday, June 20, 2022

Bay Area Prototype Modelers 2022

The annual Railroad Prototype Modelers (RPM) meeting held in the San Francisco Bay Area has naturally been on hiatus through the pandemic, but on June 18, it returned at last. I have always enjoyed attending this event, the Bay Area Prototype Modelers (BAPM) meeting, and this was no exception. What a pleasure to see the familiar sign on arrival at our usual site in Richmond!

As usual, there were many excellent models on display, and I photographed a few that especially struck me for quality or distinctive treatments. For example, there was a group of box cars by Jesus Peña, who said he had never had the courage to try weathering, until he saw a Michael Gross video (and here’s a link to one of Michael’s articles: http://mrhpub.com/2017-01-jan/online/html5/index.html?page=154&noflash ) using artist’s pencils, and decided to try it. His results looked really nice to me. Here is one of his cars, a Class BX-37 box car, ATSF 141923.

One example of a modern freight car treatment that I liked was by Robert Forsstrom, a grain hopper that’s not only gotten dirty, but has been patched and given new reporting marks, along with some graffiti. Very nice looking combination of treatments.

Another display I really liked was Richard Mitchell’s locomotives. In particular, he has used the Mantua/Tyco Pacific (essentially the B&O Class P-7e) as the basis for a number of railroads’ heavy Pacifics. Most receive new cabs, to get a prototypical shape and thin walls. Below is a striking example, the T&NO “Sunbeam” power, but in addition, he displayed a C&NW “400” engine, the streamlined B&O P-7d, a GM&O Class P-167, and the prototype, B&O P-7e.

Lastly, I want to show one of a very nice series of models “in progress,” always a most informative way to see the work that is done. These were by Rick Selby, and the particular example I show below is based on the SP 60-foot box cars of Class B-100-44, 100 cars built by Pacific Car & Foundry in 1978. 

Rick began with the Athearn Genesis 60-foot FMC box car kit. Roof and ends were removed on a milling machine, and Cannon & Co. Plate C ends were added, then extended to Plate F height with styrene. The new roof was built with styrene to match the PC&F prototype. A nice looking model and as I mentioned, always interesting to see work in progress.

I will stop here, and will have more to show in a future post, additional models that I really enjoyed seeing at this year’s BAPM.

Tony Thompson


Saturday, June 18, 2022

Choosing a passenger locomotive, Part 3

 In the two previous posts I described why I want to add an additional locomotive to my layout fleet, for passenger moves; the criteria I chose; and (particularly in the second post) also discussed at some length the Southern Pacific prototype I wanted, the Class P-10 Pacifics. That second post is here: https://modelingthesp.blogspot.com/2022/06/choosing-passenger-locomotive-part-2.html .

My Precision Scale HO model of a Class P-10 is factory painted as no. 2485 (of which I showed a prototype photo in the previous post, link above). That sounds like the basic finishing is complete, but there are some rather obvious issues with the model as it comes from the box, even though the overall impression is nice. I show a side view below.

In the photo above, the skyline casing is evident, along with the big 6-wheel Class 120-C-8 tender, and the model is correctly lettered. But the wheels of the lead truck are almost obscenely shiny, and likewise driver “tires” and wheel centers are shiny silver (and even the screws holding the brake shoes), along with all rods and crosshead. Here’s a close-up:

Needless to say, this is not how the prototype looked. Of course it’s true that many passenger locomotives, when freshly shopped, might have driver tires painted white, but those were narrower than the model — and the model tires aren’t white. More importantly, road grime very soon concealed any white paint of that kind.

My first step (after giving the entire locomotive and tender a coat of flat finish) was to brush-paint the lead truck wheels, and the offending driver parts, Tamiya “German Grey” (XF-63). I also dry-brushed the same color onto parts of the rods and other running gear. This is a first step in a more realistic appearance for this part of the locomotive. Wheel flanges remain shiny, but it’s a start.

My next step was to do a light weathering job on the entire locomotive and tender. By 1953, this locomotive was almost certainly based in the Peninsula commute pool, so would not have been allowed to get too grimy. There are photos as late as 1955 of quite clean commute locomotives. 

I used a light wash made with acrylic tube paints, mostly Neutral Gray (for more on my acrylic wash weathering, see the “Reference pages” linked at the top right of this post). For the running gear, I’ve noticed a warm, yellow-brown color on prototype rods and crossheads, perhaps from the color of greases used. For that, I mixed some Raw Sienna and Burnt Umber. On the tender, a few streaks from occasional overfilling of the tender were included. 

I’m happy with the look of the model at this point, and I only need to add couplers and cab crew for this locomotive to enter service on my layout. I’m looking forward to it!

Tony Thompson

Wednesday, June 15, 2022

Choosing a passenger locomotive, Part 2

 I introduced this topic with a description of how I conduct passenger operations on the Coast Division main line of my Southern Pacific layout, particularly choice of motive power. I concluded by stating that a model of a Class P-10 Pacific would be very suitable for my layout purposes (see it at: https://modelingthesp.blogspot.com/2022/06/choosing-passenger-locomotive.html ).

Historically, the SP purchased a lot of Pacific-type locomotives, over 140 system-wide. By the end of the Harriman era in 1913, there were 59 of them, in classes P-1 through P-6 (classes P-2 and P-4 were vacant at that time), numbered 2400–2458. None of them were particularly big or powerful, as Pacifics go.

But in 1921, SP resumed purchase of this wheel arrangement with Class P-8. These were much bigger and more powerful engines, weighing almost 300,000 pounds compared, for example, to the 220,000 pounds of Class P-5. They also had far more tractive effort, 43,500 pounds compared to, again, Class P-5 at 30,000 pounds (not counting boosters in both cases).

The new Pacifics were initially assigned to the principal passenger trains on the Overland Route, from Sparks, Nevada to Ogden, Utah, and soon proved their effectiveness, not only handling heavier trains but running through the entire 536-mile distance without change and without helpers. This was a record for long-distance passenger operations at the time.

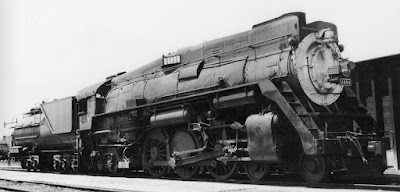
They were soon followed by the Class P-10 engines, also built by Baldwin, in 1923-24. These 14 engines, numbered 2478–2491, would be the culmination of SP’s Pacifics. They were followed in late 1923 by the first 4-8-2 Mountain types. But the two classes of big Pacifics would continue to perform admirably to the end of steam on the SP.

As it happened, three of the Class P-10 engines were selected to be semi-streamlined for the new San Joaquin Daylight in 1941, engines 2484, 2485, and 2486. Shown below is SP 2485 in this service (Francis C. Smith photo, courtesy Steve Peery), photographed at Bakersfield in August, 1941. Also in 1940-41, most of the P-10 class received skyline casings, like you see below.

But with the outbreak of World War II, the skirts on these three engines were painted black, and then all  skirts were removed by 1950. For an example of the appearance in later years, below is shown SP 2484 at Oakland in 1952 (Doug Richter photo).

Note the “stairs” from running board to pilot, installed with the skirting and left behind when skirts were removed, along with a narrow strip of sheet metal on the side of the stairs. This contrasted with the formed metal steps in this location on most SP steam.

The above photo shows two other noteworthy points. First, the engine has a Class 120-C-3 tender (12,000 gallons, C = cylindrical), like the one it was delivered with, though we know from SP records that tenders were usually changed at major shoppings (Class 1 or 2), so this is unlikely to actually be the original car. And note that running gear is dark in color from grime and dirt, though ordinarily not painted. 

I’ll start with tenders. Here is a photo of a widely used tender class on the heavy Pacifics of the SP, Class 120-C-8. Delivered in 1926 with 4-10-2 engines, they migrated to smaller power in later years, as the big engines got 16,000-gallon tenders (Frank Gillenwaters photo at Oakland, courtesy Bob Church). The six-wheel trucks are heavy-duty designs; these tenders weighed over 130 tons when loaded.

I show the above tender because that is the tender class offered on the Precision Scale brass version of a Class P-10 Pacific that I have.

Finally, I mentioned the appearance of the running gear because brass models of steam power almost always have bright “silver” rods and crossheads. When engines emerged from shopping, they had somewhat this appearance, but a few months on the road, and they looked more like the photo of SP 2484 that you see above.

I’ll turn to the model and what was needed to put it into service, in a following post. 

Tony Thompson

Sunday, June 12, 2022

PFE Class R-30-24, Part 2

This post continues my description of this resin car project, assembling a complete model refrigerator car from a stash of resin parts given me years ago by Frank Hodina, as a reward for some help I provided to him when he was making masters for the Sunshine Pacific Fruit Express kits. The first post about this project, primarily giving PFE prototype background, is at: https://modelingthesp.blogspot.com/2020/04/building-pfe-class-r-40-24-car.html

For me, and hopefully for readers, this is an interesting project in that it isn’t actually a kit, simply a group of excellent major parts. I needed to collect suitable detail parts, and devise an assembly process.

I showed all those major components in the previous post. I now began the process of collecting detail parts, but did not attach them yet, since it is easier to assemble a resin house car without ladders and other fragile details on the sides. I began by airbrushing the car sides using Star Brand Paint’s STR-27, “S.P./P.F.E. Daylight Orange.” This paint dries glossy enough to accept decals with no other preparation. 

 Likewise the car roof and ends and their various detail parts; these were painted separately and would be attached after the house car body is assembled.  Here I used Star’s STR-30, “SP/UP Freight Car Red,” As I mentioned above, this paint gives a semi-gloss surface that accepts decals well. Here are all these parts laid out.

If you compare this photo to the one included in the first post (cited in the opening paragraph, above), obviously the sides are now orange, and roof and ends are matching Freight Car Red. Also in that color are the following: a sprue of InterMountain reefer ladders, adjoining the ends; above that, an etched metal running board (Plano), and above that, a sprue of ice hatch parts. Not shown is a sprue of hand brake parts that I forgot to include. The floor and frame part is at right, not yet painted.

I decide to begin by making the “box” for the body. One of the attractions of this project for me was to learn to use the Coffman “Corner Clamps” I inherited from my late friend Richard Hendrickson. There are of course a great many corner clamp products out there, but I wanted a task where I could learn to use these. They are designed for just such a project as this.

The key for assembling the sides and ends of the present project was to determine how the roof set up over the sides and ends. I simply clamped a side and an end, and experimented to get the roof right. I could then proceed to attach the two parts.

In the photo above, it may appear that the bottom of the side and end pieces don’t match. But they do; you may click on the image to enlarge it, if you can’t readily see what I mean. Also well shown here is the opening inside the corner of the clamp, permitting application of adhesive. I chose 1/8-inch square styrene strip to use inside the corner to reinforce it, and added the strips with canopy glue.

When the canopy glue was well set, I removed the clamps and added CA glue in the corner inside. As you see below, one advantage of pre-painting before assembly is that no masking is needed. I was well pleased with how neatly the clamps worked, and will consider them part of my toolbox for future projects. By the way, the holes you see in the sides will accept fan shafts in the completed model.

I will continue with this project in a following post.

Tony Thompson

Thursday, June 9, 2022

Choosing a passenger locomotive

 Although the staging tracks I have on my layout can’t accommodate realistic-length passenger trains, I do operate some trains of passenger equipment. One possibility, which I’ve discussed several times before (as one example, see: https://modelingthesp.blogspot.com/2012/11/modeling-sp-passenger-cars-coast-mail.html ) is the mail train on the Coast Route. 

Another possible train choice is one of the occasional deadhead moves that Southern Pacific necessarily conducted to get passenger equipment from where it was surplus (or not assigned), to where it was normally assigned or needed. This would be mostly passenger cars like sleepers, but could of course be almost any car.

Part of any such operation, of course, is motive power, and in my 1953 modeling year, SP still powered its Coast passenger strains with steam, one of the last holdouts of the whole system. And the Coast Division included the Peninsula commute trains in the Bay Area, meaning that a number of the steam locomotives retained in that service were also used on other movements on the division. This permits some latitude in choices of steam passenger power.

A locomotive I have used on a number of my short passenger trains is an old Westside model, modified with improved detail, representing a Class P-4 Pacific. The P-4 class comprised 10 engines, nine of them from Class P-1 and one from Class P-3, rebuilt to more modern standards with Delta trailing trucks (the most obvious change), superheaters, feedwater heaters, new one-piece cast-steel cylinder blocks, boosters, and modified cabs. Most of these upgrades took place during 1927–1929.

These P-4 Pacifics had an old-fashioned look with their straight boilers, but the modernization of the 1928 rebuilding made them much more capable, particularly the installation of the booster, which added about 10,000 pounds tractive effort for better train starting. My model, SP 2402, represents an engine that was rebuilt to Class P-4 in August 1928. Here’s my model at Shumala:

If anything, this is a bit of a small locomotive, since the prototype had only about 31,000 pounds tractive effort (without booster). Far more capable were the dominant passenger engines on the Coast by the 1950s, 4-8-2 and 4-8-4 power. These were quite a bit more powerful than the Pacific shown above; the Class Mt-4 engines, for example, had 57,500 pounds tractive effort, along with a 10,000-pound booster. This would describe my Athearn 4-8-2 model, no. 4349,  shown here just crossing Chamisal Road at Shumala.

Both the above photos, incidentally, are repeated from my article in Model Railroad Hobbyist in the issue for February 2019, entitled “Choosing a model locomotive fleet,” based on what I have researched and modeled for my own layout. It’s available in the magazine’s “Running Extra” section at www.mrhmag.com .

Something in between the elderly P-4, and the much larger Mt-4, would be better for many of my passenger moves. Probably ideal would be one of SP’s big Pacifics, such as Class P-10, built in 1923-24 and providing  over 43,500 pounds tractive effort (plis a 10,000-pound booster). There is an added attraction with the P-10s, namely that 10 of the 14 engines in the class received SP’s distinctive skyline casing, most during 1940-41.

As it happens, I do have an HO scale brass model of a P-10 Pacific stored away for possible use, a very nice Precision Scale version, and I think this would be an ideal piece of power for my occasional Coast Route passenger moves. It’s a model of SP 2485, and before going further on the modeling front, I need to look into the individual history of that locomotive. But I will reserve that exercise for a future post.

Tony Thompson

Monday, June 6, 2022

Operating with more steam

 In my usual operating sessions, I offer a mixture of steam and diesel motive power, as is entirely appropriate for my 1953-era layout. But I really enjoy steam engines, and accordingly sometimes reduce the number of diesels a bit. And this is not inappropriate: one reason for my choice of 1953 as a modeling year is that it was the last year in which steam was the dominant motive power on Southern Pacific’s Coast Division, which I model.

The weekend just past saw two operating sessions hosted on my layout, and the “extra” steam was mostly evident on the second day. On the first day, it showed up in mainline trains, passing across the layout on the Coast Division main.

The first of the two sessions on the weekend included former dispatcher Steve Gust (naturally nicknamed “Breezy”), and he was paired with John Sutkus. They are shown below working at Shumala, with John at left, looking perhaps a little startled.

One member of the other crew was Jeff Aley, long-time clinic chair at the Cocoa Beach RPM meeting, and he was partnered with Seth Neumann. Below you see them switching at Ballard. Jeff, at right, seems to be making a point, but I don’t remember what it was.

The following day Mark Schutzer brought a couple of steam engines, including an 0-6-0 to work Shumala in place of the usual diesel switcher. That’s part of the extra steam. Below, Mark is shown at left, partnered with Pat LaTorres, working at Shumala. They are studying the timetable to make sure of the time of the next mainline train.

In the photo above, you can just make out the 0-6-0 on their cut of cars; below is a better shot of it, spotting the caboose for the Santa Rosalia Local. The locomotive ran beautifully and had no trouble doing all the work.

The second crew this day was Dave Falkenburg (below at left) and Jim Radkey. You see them here at Shumala, but like all crews in these sessions, they worked both sides of the layout in succession.

Mark also brought a steam engine to power the Santa Rosalia Local, an interesting choice of one of SP’s home-made 0-8-0 switchers, created by removing the lead truck from a Consolidation — exactly how Mark created his model. Below you see it backing across Nipomo Street in the town of Ballard.

This was a pair of good sessions, with relatively few problems arising. It is always fun to get together with experienced operators who understand their jobs in sessions like these, and enjoy doing them. And of course sessions like these bring the layout to life, doing the work I designed it to do. I look forward to more in the future.

Tony Thompson

Friday, June 3, 2022

Mechanical reefers in 1953?

 I had this question arise in an operating session awhile back, and thought the background might be interesting. Before World War II, experiments in mechanical refrigeration were tried by a number of car owners, but none were very successful, either mechanically or economically.

After the war, however, small diesel engines had been proven in many wartime environments, and refrigeration development work resumed with a dependable power plant. There was also a considerable growth in frozen food consumption, all but necessitating mechanical refrigeration for shipment.

I’m not sure that all the chronology is known. But certainly Fruit Growers and Santa Fe were working in this direction, as was Pacific Fruit Express (PFE). There is detailed background on this topic in the PFE book (Pacific Fruit Express, 2nd edition, Thompson, Church and Jones, Signature Press, Wilton, 2000). 

To summarize briefly, Santa Fe was first out of the box, with a single car, SFRD 12000, shown below (Santa Fe photo). It had a Sheppard 3-cycle diesel engine, and entered service in December 1949.

This car, rebuilt from a standard ice car of Class RR-46, was not too successful as a prototype. After three years, it was rebuilt back into a conventional ice-bunker reefer. But a great deal was learned from it, in a four-year testing program. 

Meanwhile, Fruit Growers Express had been not only testing, but creating a sizeable fleet of mechanical cars. Already in January 1952, they had 175 cars, with a variety of mechanical equipment. Several refrigerator car-owning companies, including PFE, assigned engineering people to be stationed at the FGE shops (with FGE permission, of course), to observe developments and learn. Santa Fe, however, did not participate, and in later years, often chose mechanical features that no other reefer company used.

In March 1953, the first SFRD mechanical reefer class, Class RR-54, began to be built, in the amount of 30 cars. These introduced the familiar blue door paint, with the initials MTC, for “mechanical temperature control.” (For more about all this, I recommend John Moore’s excellent book, Mechanical Refrigerator Cars of the Santa Fe Railway, 1949–1988, Santa Fe Railway Historical & Modeling Society, 2007.)

A few months earlier, PFE had begun to build its first mechanical class, Class R-70-7, a batch of 25 cars. Though the class was entirely designed by PFE, it shared a number of mechanical approaches with the FGE cars. Below is shown (PFE builder photo) the first of these cars, also introducing a new number series in the 300,000  range.

In January 1953, with construction of Class R-70-7 barely underway, PFE began work on a follow-up 100-car class, Class R-70-8. They began car construction during 1953, but design modifications and slow delivery of refrigeration equipment pushed back completion of the first cars to March 1954. Below is a photo (PFE) of the first car of Class R-70-8.

So what about modeling? As a modeler of 1953, I ought to model Class R-70-7. But a number of differences in detail from later cars, particularly the louver pattern on the engine compartment, would make that a challenging project. 

As I described in an article in Railroad Model Craftsman (“PFE’s mechanical reefers,” January 1988, p. 78), I chose instead to model the following class, R-70-8, using an old Lima model produced in Italy and imported by AHM and others (the Athearn 50-foot mechanical reefer could also be used).  Below is a photo of my model, which does occasionally appear in an operating session.

Note the paint scheme, introduced with Class R-70-8: silver roof and black ends, even though ice cars would continue to have boxcar red roofs and ends until 1960.

So the answer to the question posed in the title of this post is “yes,” though not easily achieved with a correct model. I compromise with the Class R-70-8 model you see above.

Tony Thompson