Thursday, August 29, 2013

Electrical wars, Part 6

Having completed my electrical panel work, as described in the Part 5 post in this series (at: http://modelingthesp.blogspot.com/2013/08/electrical-wars-part-5.html ), I connected the panel to the layout. As described previously, this connection was simply a DB-25 connector pair, convenient and dependable hardware I had used previously in layout work.
     Next came the smoke test. I connected up everything, turned on the power, and then there was both good news and bad news. The good news was, no smoke emerged. The bad news was, neither did any electricity at the track. This is where a multi-meter comes in handy, and I certainly cannot understand how anyone can install, let alone troubleshoot, layout wiring without one. I soon found an open solder joint, and a panel switch oriented backwards (just needed to be rotated 180˚ so the function agreed with the panel lettering).
     The correctness of wiring was easy to re-check, because I not only give all feeders a name, and indicate them on a track map, but also identified all wire connections to the DB-25 connectors, by pin number and wire color. This way, any mistake in connecting wires is easily found. Using my digital image of the new panel (and reversing the contrast), it was easy to make this schematic map of feeder names.

The identification of the DB-25 connector wiring was also crucial, with so many connections involved. Like the map above, this is easy to compile as you go, but would not be much fun to construct after everything was connected.


     With some more fiddling and meter checking, I found both the DC and DCC functions working throughout Shumala, and grabbed the camera to document the first switching move with the new panel. I’ve discussed my fascia treatment, shown here, in previous posts (for example, at this link: http://modelingthesp.blogspot.com/2013/02/layout-fascia-my-approach.html ), along with the bill box visible at far right. This box serves an important function, derived from the prototype. I have discussed prototype bill boxes ( http://modelingthesp.blogspot.com/2012/03/bill-box.html ), and have also indicated how my model approach works (you can read my description at: http://modelingthesp.blogspot.com/2011/10/operations-role-of-agent.html ).


     Having gotten this far, and occasionally shaking my head over all the complexities of wiring, I was reminded of the cartoon below. Drawn by Hal Kattau, it appeared in Model Railroader, December 1996, page 173, and is reproduced here with permission from Kalmbach Publishing.


     What more can I say? Wiring for those of us not yet in Heaven remains necessary, and for some of us is not especially fun.
Tony Thompson

Monday, August 26, 2013

My experience with steam in India, 1984

There has been a substantial interest expressed in my account of seeing steam locomotives in action when I visited China in 1981, as part of a metallurgical delegation. The high point was walking through the Datong Locomotive plant, as described at: http://modelingthesp.blogspot.com/2013/08/steam-in-china-part-3.html .
     On another trip connected with a professional conference, I also had the pleasure of seeing working steam, this time in India. I was scheduled to present two talks at the quadrennial International Conference on Fracture, or ICF, the sixth convening of which took place in New Delhi in December 1984. (The series continues; the 13th ICF is this year in Beijing.) Since I lived in Pittsburgh, Pennsylvania at the time, this was a long journey. In fact, a quick glance at the globe shows that New Delhi is pretty much the other side of the world from Pittsburgh.
     This gave my wife Mary and me an idea. Why not fly around the world, halfway to get to India, the other half returning home? We arranged to take Pan American’s eastward Flight 2 from New York, which reached New Delhi via Heathrow, and after the conference got back onto Flight 2, continuing via Bangkok, Hong Kong, Tokyo and Honolulu to San Francisco. The domestic U.S. legs were on U.S. Air, as Pan Am did not cover those routes. Flight 2 turned out to be a bad choice, as both Mary and I are “night people,” and going eastward means you are always out of sync with the time zone at bedtime. For us, the westward companion flight, Pan Am Flight 1, would have been better.
     The conference organizers had arranged travel itineraries in cooperation with the Indian Ministry of Tourism, to facilitate addtional tourist travel before or after the conference, so we signed up for that, visiting Kathmandu (Nepal), Varnasi, and Khajarao, along with tours during the conference itself. A highlight was a bus trip to Agra to see the Taj Mahal, definitely one of those sights that is much more impressive in person than in photographs, and in fact I believe photographs simply do not do it justice.
     Anyway, I had not expected there would be any opportunity to see railroads in steam, though I was aware that steam locomotives were still running in some parts of India. But as our plane was on final approach to Varanasi, we flew diagonally across a rail line, and there was a train just passing under us, with steam power on the head end! I knew I was going to have to find time to track it down during our day and a half in Varanasi.
     As soon as we had checked into our hotel. I asked the people at the desk about where the depot, or else the railroad yard, might be. They seemed blank, but helped me examine a map, and the depot was immediately evident, and not too far from the hotel. My wife was a little weary and wanted to take a nap before dinner, so I grabbed a taxi and went to the depot. It was the right choice.


Like most of the passenger and freight power I saw, this is a Mikado, or 2-8-2. Passenger power typically sported red smoke lifters like these, along with a red tender (below), nicely decorated.


This part of India is the North East railway zone, with three divisions, one of which is Varanasi. The large characters on the tender identify the NE zone. The cab had  an obvious English flavor, but the decoration was distinctly Indian.


     Before long, a lad came up to me, partly to practice his English, which was pretty good already, but also because he was a train spotter, with a notebook in which he was writing locomotive numbers. I was delighted: here was a local expert on these engines. His name was Sanjay (I don’t recall his last name). I was soon disappointed to find he had no idea of locomotive classes, where and when built, etc., just collecting numbers. But he was friendly and enthusiastic.


Behind Sanjay is a typical heavy Mikado, just arriving, which Sanjay said was usually in freight service. It has a plain black tender and no smoke lifters.
     It is difficult to convey the sheer press of people in the depot area. I usually had to wait for numerous people to pass before taking photos. And they were everywhere, not just on the platform, but crossing the tracks (apparently oblivious to trains and moving locomotives), and going in every direction. You can see a few examples in some of my photos. One objective these people had was water. The water column plumbing leaked a stream of water and frequently people came to collect a bucketful and depart. This young woman was bathing in it, without disrobing, just washing the garment and herself at the same time.


     These are only some of the scenes at this very active depot, where in the space of two hours I saw dozens of trains, nearly all steam-powered, along with additional light engines moving to and from the fueling facilities and what appeared to be a shop. It was difficult to tear myself away, and return to the hotel for dinner with my wife. She was, of course, less than impressed with my excitement about my afternoon’s activities; but then, she hadn’t seen it like I had. I had to say, “Just wait till you see the photos!”
Tony Thompson

Friday, August 23, 2013

A new SP bridge for Shumala, Part 2

In my first post about constructing this bridge (you can view it at: http://modelingthesp.blogspot.com/2013/05/a-new-sp-bridge-for-shumala.html ), I described why I was replacing the original bridge on this site, my design considerations in dimensioning the new bridge, and the creation of new bridge girders with Archer rivets. In this post, I describe completing the bridge girders.
     Before continuing, I should mention a nice magazine article about a bridge of approximately the length of the one I am building. It was by Harold Russell, in Model Railroader for November 1979, pages 116 and 117. It is worth consulting if you want to simply follow a published drawing and photos.
     When I left off in the previous post, the outside flanges and stiffening-member uprights had been attached to the faces of the girders. Next I added cover plates to the top flange, of about 11 scale feet length, using the same scale 1 x 10-inch styrene strip. Cover plates resist buckling of the top flange, when the bridge is under load, and the upper flange of the girder is in compression.
     Now I was ready to place the outer surface rivets, again using Archer set 88025, in double rows. These of course represent the attachment of the outer flanges to angles which are also riveted to the plate underneath, so there are two rows of these rivets on the outer flanges. In fact, neither the 88025 set nor other Archer sets have rivet spacings which really match bridge photos, so it may be time to dig out the prototype dimensions and hand off the information to Archer, in hopes they may add more rivet sets for us to use.
     But along the right side of set 88025 (held so you can read the lettering at the bottom) are conveniently closely-spaced rows of rivets, and these make a nice double row that you can apply all at once. That’s what I did. The black rivets show up nicely on the white styrene.


The second girder is identical to this one, as both are the visible sides of the bridge (the girder backs are plain, since they can’t be seen on the layout).
     At this point, it is a good idea to paint any part with rivets newly attached, as the paint layer protects them from handling damage. I have sometimes used clear flat, but for these girders, decided to use the final color, a faded black. I have mixed this from mostly black, with some gray and brown, and keep a bottle of it at my spray booth. (You can click on the image to enlarge it.)


The girder looks dark here, and the rivets aren’t obvious, but under layout lighting they are quite visible.
     The girders were then weathered. I did this with my usual acrylic washes, using a mixture of Ivory Black, Neutral Gray, and Burnt Umber. (If you like, you can download the handout from the joint clinic on weathering techniques, written by Richard Hendrickson and me, at this link: http://modelingthesp.blogspot.com/2011/10/weathering-clinic-handout.html .) As the wash of that mixture got close to dry, I added another wash of Raw Sienna (yellow rust), and allowed it to accumulate along the bottom of the girders. Here is a photo to illustrate what I was aiming for on the girders themselves. It is the west end of the trestle at Gaviota, California, and was taken in January 1987.


Although this is a deck girder bridge, not a through girder design like I am building, it does illustrate the yellowish tinge I wanted.
     My next step was to provide for the ballasting of the bridge deck, once it is installed. To do this, I wanted to glue a wide strip of styrene underneath the track. The problem here is that the ties are an engineering plastic (maybe Delrin or maybe something else), and most adhesives adhere poorly or not at all to such plastics. I had a bit of a “wrestle” with this problem, and will defer a description of it to a future post, along with final bridge installation.
Tony Thompson

Tuesday, August 20, 2013

Electrical wars, Part 5

In the previous post, I showed the changes I was making in my Shumala control panel, along with brief remarks about rewiring that part of the layout. You can view it at: http://modelingthesp.blogspot.com/2013/06/electrical-wars-part-4.html . In this post, I continue the project.
     As wiring work underneath the layout progressed from new feeders to local terminal strips near the feeders, to terminal strips adjoining the panel, I also started work on revising the panel itself. I showed in the previous post how I used a digital image of the old panel to experiment with new possibilities. Adobe Photoshop makes these kinds of changes easy, and in fact the “new” panel design shown in that previous post was soon superseded. But that’s all digital. Now for physical revision.
     I removed all the existing switches from the panel and removed the panel front from the case. Then I covered the back of all the holes which were no longer going to be needed with masking tape, and filled them with Sculptamold. The Sculptamold was confined to the hole itself by the tape. Using Sculptamold is quick and easy, and although it has a bit of a rough surface when dry, I simply sanded it approximately flat and then refined the surface with Squadron Green modeler’s putty. This is the old panel, as repaired.


Holes along the bottom are for the bolts which attach the panel to hinges on the case.
     Next I set up to paint the yellow parts, both repainting of old areas with repairs, and new paint for new track being added. Given that the panel surface is black, and that yellow is not the best-covering of all paints, I opted for a quick coat of gray primer first, applied only in the areas where new track had to be added. As soon as this was reasonably dry, I sprayed it with a rattle can of Testor’s Reefer Yellow. For many purposes, I distrust spray cans, but for this kind of painting, it worked fine.
     Once yellow was in place over all the green “corrections” shown above, I considered just taping the entire track diagram and overspraying with black. But the complexity of that masking job was a little daunting, so I handpainted the remaining minor spots (edges of the green bits shown above) with black. Then I could proceed to mask only the new track lines, along with all other areas not to be repainted, and overspray flat black. So at this point the “new” panel looked like this, so far without labels. Holes are for switches, with some new holes yet to be drilled.


The differences from the old panel, shown at top, are evident.
     My next step was to drill 1/4-inch holes for the new switch locations, then to add lettering. I laid out lettering in various colors on a black background, then printed it out on glossy stock at my local copy shop, using a high-resolution color printer. I cut out the various lettering elements, used a felt-tip pen to blacken the white edges of the paper lettering pieces, and glued them to the panel with canopy glue. You can click on this if you want to enlarge it.


Finally, the panel was protected with an overspray of clear flat.
     Meanwhile, I had been fitting out my DB-25 connectors with a full set of wiring for all the connections to be made. Leads from one connector were attached to the full terminal strips near the panel, where many track leads come together. The leads in the other DB-25 were soldered to some panel switches, or attached to a terminal strip inside the panel’s case.
     Once the interior soldering was completed, about 40 individual wire-to-lug joints, the DPDT switches could be re-installed in the panel front. Here is the completed panel and case.


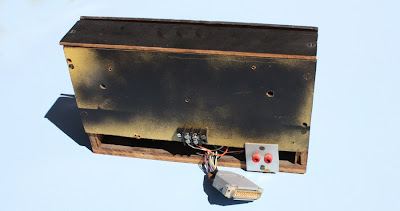
The back of the case has never been given a finish coat, and has a back face mainly for structural reasons. The DB-25 connector at bottom is the entire connection to the layout, except for the two banana-plug sockets for interchangeable power packs, whenever I choose to use a conventional DC pack for DC locomotives.


 This case bolts to the shelf under my town of Shumala on the layout.
    Now I was ready for a “smoke test,” connecting the panel to the layout and adding power. My electrical engineer friends have always told me how important it is to keep the smoke inside the wires and components, so I approached the next step with trepidation.
Tony Thompson

Saturday, August 17, 2013

Steam in China, Part 3

In my first post about experiencing steam locomotives in action in China during a professional trip in 1981 (the post is accessible at this link: http://modelingthesp.blogspot.com/2013/08/my-experience-with-steam-in-china.html ), I talked about watching steam-locomotive yard switching in Beijing. I followed that up with a second post about our lucky break in arranging to visit the locomotive manufacturing plant at Datong (the post is at this link: http://modelingthesp.blogspot.com/2013/08/experiencing-steam-in-china-part-2.html ). In both posts, I mentioned my metallurgical colleague and fellow modeler and railfan, Gordon Geiger. In the present post, I show some more of the images Gordon was able to acquire in China on that trip.
     In the first post I wrote, cited above, I showed several shots of Mikado 2303, working in the yard at Beijing. Gordon also got a good shot of that engine, near the coaling facility.


     Before retirement, Gordon was what is called an extractive metallurgist, meaning someone who works with converting ore to metal, and his career was in the steel business. As a result, he was able to visit Chinese steel plants, a rare privilege in 1981. He got some great photos in the process. For example, this wonderful shot of ingot molds being teemed from a ladle (which means filling the waiting molds with molten steel poured from a ladle, in this case bottom-poured). The foreground molds have already been filled.


He also got a quick shot of ladle cars being switched by a steam locomotive, a sight not seen in North America for many years even in 1981.


      And of course Gordon and I were together during the tour at the Datong locomotive plant. I tried to take photographs inside the plant and was mostly unsuccessful (the light level was really low), but Gordon got some good images. Here is one, with an array of both drivers and truck wheels.


Then as I described in my second post, we went out into the yard behind the plant to see brand-new QJ-class 2-10-2 no. 6186. Gordon got a better shot of the whole locomotive than I did. In this shot, some of our group of metallurgists can be seen clustered in the distance at far left.


      The plant switcher was this 2-6-2, an elderly engine, but I don’t know how old (our plant guide either did not understand our question, or had no idea of how old it was). Another of our group got a shot of Gordon and me in front of this engine, Gordon facing toward the camera.


     My thanks to Gordon for loaning me his slides (of which these are only a small segment), and for being part of the “persuasion” needed for our group to skip the Buddhist caves near Datong, and visit the locomotive plant instead. It’s still a great memory for me.
Tony Thompson

Wednesday, August 14, 2013

Modeling storage tanks, Part 2

My previous post on this topic was about building storage tanks from scratch, of which I only gave two examples. That post is available at this link: http://modelingthesp.blogspot.com/2013/06/modeling-storage-tanks.html . In the present post, I will say a little about kits for storage tanks.
    In the realm of kit tanks, there have been quite a variety over the years, many of them fairly clunky. On the other hand, one of the nicest pieces of storage tank modeling was the Grandt Line bulk oil dealer kit, which is now deleted from their product line, reportedly because the dies were damaged. I have monitored eBay and other sources, hoping to find one of these, but to date have not succeeded. I hope someday to find one.
     There are some usable kits out there. One is the Walthers oil dealer, which has surfaced in a couple of variations (Interstate Oil, McGraw Oil) but is intermittently available. (Such kits are produced in “runs” from time to time, so if not currently on the market, wait awhile.) I feel sure the kits will be available in the future, as this kind of industry is a staple of model railroad layouts, and rightly so.
     Here is the Walthers photo of the McGraw dealer (from the kit box), which has small brick buildings for its office and pump house, not a very likely kind of small building in the Far West. But that’s not a problem, as these brick structures can be used for other things, and the storage tanks adapted as needed. I have additional comments about the McGraw kit components below.


In HO scale, using the standard formula for a cylinder and the fact that there are 231 cubic inches per gallon, one can determine that each of the McGraw tanks is 28,300 gallons in size, if built as intended with four sections in the height. This could readily accommodate deliveries in 8000-gallon or 10,000-gallon tank cars.
     The Interstate Oil kit from Walthers has three horizontal and two vertical storage tanks and some unloading and other piping, all of which is useful, but it has an odd curved-roof structure serving as warehouse and office. Again, that building can be repurposed or modified (for example, with a simple peaked roof) to a more realistic regional look. Changing it also removes the obvious visual cue that you just used the Walthers product instead of matching to any prototype. The photo is from Walthers’ web site.


     There have long been the Williams tank kits, and these too are sometimes not available, other times on the market. The tanks are pretty nice, their drawback being the vertical seam created by molding the tanks in two vertical halves. The kit I refer to here is Williams no. 501.


The three Williams tanks are each about 4.75 inches high and 2 inches diameter. This corresponds to each unit being a 42,500-gallon tank. That represents multiple tank-car loads and would thus not have to be refilled too often.
     The contrast in tank size between the Walthers McGraw Oil tanks, and the Williams tanks, is considerable. A modeler may wish to choose an appropriate tank size (and of course can easily scratchbuild whatever size is desired, as described at the link cited at the top of this post), or mix sizes.
     There have long been nicely done storage tanks in the Campbell Scale Models line, in their “Quincy” series. There is a kit for a pair of vertical tanks, and for a pair of horizontal tanks. You can see their current catalog at: http://www.campbellscalemodels.com . This long-time kit manufacturer has been located in Central Point, Oregon since 2004. The kits are no longer bargain prices, in my opinion, but these tanks do remain an alternative to plastic.
     For a time, Chooch offered a bulk oil dealer, which I have built. I will not discuss it in this post, but will offer comments on how I modified it, in some future comments on oil dealer modeling.
     Let me return to the McGraw tanks, of which I have a set. These are molded to indicate weld seams on each tank segment, though these seams are immense, over two scale inches high, from which most welders would recoil in horror. I simply carved them off with an Exacto chisel blade and sanded smooth. Then I used Archer rivets, set 88025, to place rivet rows where the seams would be. One could also scribe a line to suggest a plate edge for an overlapping seam, but as these tanks will be some distance from the front of the layout, I didn’t think it would be needed.
     As seen in this view, I just used two segments of the McGraw tank pieces to make this shorter tank. This is an interim view; the tank will be painted later. (You can click on the image to enlarge it.)


     Another option from Archer is a resin weld bead (set 88018), a little ragged and perhaps a little oversize for HO scale, but nothing like the size of the original Walthers ridges. I tried these on alternate sections of one of my tanks. Here is the unpainted view, and you can probably see that although the Archer weld beads (black) are comparable in width to those molded on the Walthers part, they are considerably (and realistically) more shallow in height.


     The obvious use for many storage tanks would be to model bulk oil dealers, but they can also be used for other storage applications, such as company fuel or chemicals. I will have some of that type on my layout also.
Tony Thompson

Saturday, August 10, 2013

Improving the Atlas model of a USRA rebuild

Recently Atlas Model Railroad Co. came out with a new freight car, intended to represent the USRA double-sheathed box cars which were given steel sides in later years. These usually kept their original corrugated ends, and sometimes their outside metal roofs. But the steel sides enclosed a space wider than the original underframe, which was under a superstructure with framing, and thus more narrow. This is a signature feature of these rebuilds.
     For some reason, probably associated with injection molding technology, Atlas did not faithfully represent this signature feature, but made it far more shallow than it should be. I show below a prototype photo of such a rebuild to indicate how the car ought to look, with the superstructure overhanging the frame. The shadow along the bottom of the car side is the distinctive give-away. (This is a George Sisk photo from the Charles Winters collection, provided to me by Rob Evans.)


     The side sill of the Atlas box car does not come close to this appearance. But the thought occurred to me, that what we really need here is the shadow, not necessarily the actual frame depth. I decide to try an experiment. I bought one of the Atlas cars, decorated for Atlantic Coast Line, and used a black “Sharpie” permanent felt-tip marker to carefully draw in a shadow at the bottom of the side sheets.


When completed, with weathering and a route card, and photographed with overhead light, the car looked like the photo below.


In all candor, this isn’t a great solution, but in a passing train does look somewhat convincing. When a string of freight cars rolls past, few observers want to (or can) examine details like this. I will continue to operate this car as a stand-in.
     Incidentally, on the ACL these box cars were Class O-14A. The model does have the correct roof, and the correct 5-5-5 corrugated ends which were originally on these USRA box cars, making this model closer to prototype than some of the other paint schemes marketed by Atlas. So the primary shortcoming is in the side sills, which I admit is only weakly remedied by the Sharpie technique.
     I believe the better option for these side sills is the Chad Boas resin castings. I used these in my construction of the “Shake ’n’ Take” project (from a Cocoa Beach meeting) of a Kansas City Southern box car—see prototype photo above. You can see the application of them in my post about the modeling, which is at: http://modelingthesp.blogspot.com/2012/07/shake-n-take-kcs-rebuilt-box-car-part-2.html . The car body is different, but the side sill issue is almost the same.
     The side sills can be obtained directly from Chad. He doesn’t really stock these parts, but has the masters and tells me that he will continue to sell the parts. Accordingly, it should be possible to order them at any time. His address is 30 N. 30th St., Lafayette, IN 47904, and his e-mail is <chadboas@yahoo.com>. He charged $6 for a pair of the side sills, plus $2 shipping and handling, when I bought mine. They are really nice parts, and would be a great deal of work to duplicate from scratch.
     One point of warning, however. Chad’s side sills are for a ten-panel car, that is, five side sheets on each side of the door. As you can see above, the ACL model is an eight-panel car, with only four sheets each side of the door. It may be more trouble than it’s worth to kitbash the resin sills into the four-sheet configuration. Incidentally, don’t be misled by the Atlas web catalog, which describes their model as a ten-panel model. As far as I can tell, it is not. All cars I have seen, painted or not, have eight-panel bodies.
     Anyway, to illustrate how nice the Boas sills can look if you have a ten-panel prototype like the KCS car shown above, here is my completed KCS model. You can read about in the concluding post to my three-part series (it is at: http://modelingthesp.blogspot.com/2012/07/shake-n-take-kcs-rebuilt-box-car.html ).


     I bought another of these Atlas rebuild cars (undecorated) when I bought the ACL car, and am going to experiment with replacing the side sills. If it works out all right, I will report in a future post. Drawing in the shadow with a Sharpie just seems a little too much like getting off lightly, in the way I think about it.
Tony Thompson

Thursday, August 8, 2013

The Santa Fe convention in Flagstaff

Over the last week (July 31 through August 4), I attended the Santa Fe Railway Historical & Modeling Society, SFRH&MS, annual convention in Flagstaff, Arizona. Flagstaff is a great place, and though I know some may shudder to think of Arizona in August, in fact Flagstaff is at 7000 feet above sea level, and is surrounded by pine forests. Temperatures were in the 70s for most of our time there. I say “our” time because I drove to the convention with my wife, and Richard Hendrickson and his wife. We all had a great time.
     This was the 33rd annual meeting of the Society, and a suitable patch was given to attendees, using the term “Second Section,” as the previous convention at Flagstaff in 1998 (which I also had attended) was also named for the Grand Canyon train. I am by no means a patch collector, but I thought this one was attractive.


     Richard and I were there to present the latest revision of our joint clinic on freight car weathering. We still use the same handout (you can access it at: http://modelingthesp.blogspot.com/2011/10/weathering-clinic-handout.html ) but have made numerous small adjustments to the content. In this case, we both added some photos of Santa Fe freight cars to cater for the attendees at this particular meeting.
     Now some may say, “what was I doing at a Santa Fe convention?” since, after all, I model Southern Pacific, and SP and the Santa Fe were in dogged competition in California, which is the setting for my layout. But photos of SP trains in California show plentiful numbers of Santa Fe cars, especially box cars, and the reverse is true, too. Photos of Santa Fe trains in California show plenty of SP cars. So the modeling isn’t just an option, it’s necessary. And I have long found Santa Fe freight equipment interesting, and have belonged to the SFRH&MS and its predecessor organization for over 20 years.
     The meeting was held, as in the past at Flagstaff, at the Little America Hotel, a terrific venue and very pleasant for a convention site. As you can see, it’s surrounded by Ponderosa and other pines at this elevation.


     Among the highlights of this convention for me was the steam-powered excursion to the Grand Canyon, a round trip from Williams, on the Grand Canyon Railway. The train was powered on this trip by former CB&Q Mikado 4960, a handsome engine, and the period flavor was enhanced by the cars, three vintage SP commute coaches. Here is a view of the train, during one of the photo run-bys:


The locomotive was photographed a great many times by all the passengers, at run-bys and at both ends of the trip. Here Richard and I pose in front of it at Willaha siding.


Of course we did get to see the Canyon too <grin>, which for some was the actual point of the trip.


     The convention also featured a quite good vendor room, with a wide assortment of model and prototype materials for browsing and sale. This is just an overview to give a sense of the size of the thing.


     All in all, it was a terrific convention, and the location had all the virtues I associate with Flagstaff. I only go to some of the Santa Fe Society meetings, but when it is in places like Flagstaff, it’s a “don’t miss” for me.
Tony Thompson

Monday, August 5, 2013

Experiencing steam in China, Part 2

In my previous post on this topic, I described experiences on a trip to China in 1981, particularly visiting a yard in Beijing and watching yard switchers and mainline freight and passenger power, almost all steam. A great experience, and I wish I had been equipped to take video. That post is at this link: http://modelingthesp.blogspot.com/2013/08/my-experience-with-steam-in-china.html .
     In this second post, I will describe an event from later in our delegation’s visit to China. After the technical conference in Beijing was concluded, our hosts had arranged some tourism for us. We went to visit the Great Wall, of course, and the other thing they had arranged was to take a train overnight to a site where there were some historic Buddhist cave retreats, as well as a local art museum. This destination, in Inner Mongolia, was a small city called Datong. Now right away, my colleague (and fellow modeler) Gordon Geiger and I recognized that this was where the primary manufacturing plant for steam locomotives in China was located, but we had a pretty full schedule and did not expect to be able to visit the plant.
     We departed Beijing on an express train with diesel power, common on the highest-class trains at the time, and went to bed in the sleeping cars. When we awoke, arriving in Datong as the sun was about to come up, we realized that all around was steam. Our train’s power had changed in the night, and we had arrived behind steam (Gordon’s photo at the depot is below), and even more stunning, there was a huge yard, filled with loaded coal hoppers, and all through it were steam switchers working. Gordon and I naturally were grabbing our cameras, but we quickly discovered that Inner Mongolia was regarded as “frontier territory” and militarily sensitive. Uniformed men told us in no uncertain terms, “no photographs.” That was a disappointment, and off we went to our cultural tour.
     Here is the shot Gordon got before we were told not to take photos.


     We saw the art museum, and after lunch were to take a bus to the Buddhist caves outside of town. Gordon and I got together and decided to ask if we could beg off the cave tour, and maybe hire a taxi or something, so we could go to the locomotive plant. We asked our guide if he could phone the plant and try to arrange a visit. It seemed that we might be allowed to do this. Meanwhile, others in the delegation overheard us and began to say, “ . . . manufacturing plant?” These were engineers, after all, and this sounded a lot better than the caves. Soon we had a full taxi load, and then it looked like maybe two taxis, and then everyone wanted to go. So to the guide’s credit, he managed to delete the cave tour and take everyone to the Datong Locomotive Works.
     It was amazing. As I said to Gordon at the time, seeing all the locomotive components everywhere, it was like a full-size Cal-Scale catalog. There were feedwater heaters, cross-compound air pumps, cast steel pilots, and many other parts stacked everywhere in the assembly space. Gordon and I, of course, knew what all those parts were, so we became the tour leaders and explained to everyone what we were looking at. Here is one example:


There were also several frames being assembled, with one-piece cylinder castings.


Next we went out into the factory yard, to see a brand-new 2-10-2, a member of the very large QJ or Qian Jin class, QJ 6186.


The engine was being put through some tests, and they told us it had only left the factory floor the day before. Of all things I might have expected to see in 1981, a day-old steam locomotive was certainly not on the list. And not only were we allowed up in the cab, but they even let us open the throttle a bit and move the locomotive a short ways on the factory track. What an experience! A photo of me in the cab was taken by a fellow tourist, but was very badly blurred. That was too bad! But the Chinese test engineer was happy to pose for us too. Just imagine that the person in this photo is me.


I suppose in cultural terms, our hosts were sorry that they did not show us the Buddhist caves, but our whole delegation, especially Gordon and me, thought the locomotive plant was one of the highlights of the entire visit.
     In 1999, my wife Mary and I traveled to China again. She had heard me talk about it so much, she wanted to see for herself. And I wanted to see some other parts of China, like Shanghai, Xian, and Guilin. We did all that, a very nice trip, but one event fits with the story above. By 1999, most of China had been dieselized, and steam was only to be found in a few remote areas—so we had heard. But on the train from Shanghai to Beijing, we saw a Mikado with a local freight, switching a siding. I wasn’t ready with the camera, and by the time I got it out, I only could only take a grab shot out the window (the red characters were on the glass), but I did get to see steam in China one more time.


     These were great experiences for me, because these were not tourist railroads or special excursions of locomotives which only are operated occasionally. They were working locomotives, doing the job they were built to do. It was a treat to see them.
Tony Thompson

Friday, August 2, 2013

My experience with steam in China

In 1981, I had the good fortune to be chosen as a member of a U.S. delegation of metallurgists that traveled to China to meet with an equal number of Chinese engineers and scientists in the materials field. We were there late in the fall, at a time when westerners were still unusual, and people on the street would turn and look at you. But one of the fascinating aspects to me was that in 1981, there was still a lot of steam power operating in China. I did not realize what this would mean until I got there.
     The hotel in which we stayed in Beijing was not too far from a major yard, and as soon as we arrived, I could hear steam whistles. My friend and colleague (and fellow modeler) Gordon Geiger was in the delegation too, and it wasn’t long until he and I were putting our heads together. Whenever one of us had a break in the conference proceedings, he would grab his camera and walk the six or so blocks to the tracks. Now we had been warned that the Chinese at the time were sensitive to any observation by foreigners of anything regarded as strategically important, and rail traffic could well fall into that category. So both Gordon and I were careful, carrying our cameras under raincoats or jackets, and only taking them out right when making a shot.
     We were mostly wasting our time with these precautions, at least on railroad property. We of course stood out right away as non-Chinese observers, and train crews would wave wildly to us, or else pose in locomotive windows or on footboards. Obviously they had seen railfans before. Luckily, no security personnel ever came upon us doing our “subversive” photography in the yards.
     What did we see? It was like a time machine, with few diesels and almost all locomotives being steam, even yard work. Here is an atmospheric shot which probably conveys a lot of the feeling (and the air pollution too!).


A mainline train is departing at right (note the rider atop the box car), and yard switcher 2303 is backing toward me on the left. As he approached, I got another shot.


There is a switchman on the nearest corner of the tender. Mikado 2303 was hard at work at my end of the yard, and the crew waved every time they passed. Here is a better view of the engine and crew, as they came back past me on a different track. The sun was beginning to break through the overcast. There are two switchmen on the front end, and the man at the rear is still there.


     Next I walked over to the engine terminal. Hardly had I gotten there but 2303 came past again, now with both fireman and engineer leaning out to wave.


The white trim and bright red drivers and pilots were pretty universal on the engines I saw.
     In the engine terminal getting a load of coal was engine 5545, one of the passenger Mikados used on every sort of train except the major expresses. Here you can see the equipment which carried a small car up over the tender and dumped it in. There is also a water tank here.


Just to show an example of one of these passenger Mikes, here is one which passed me on the main while I was there. With the smoke deflectors high on the smokebox, they had an ungainly look. This is engine 5245.


     To see several steam switchers at work at one time in a yard was almost too much to take. Gordon said he was so intrigued watching the action he almost forgot to take photos.  I knew what he meant. Even the ribbed-side cabooses had a distinctly Milwaukee Road look. This is a departing freight.


     I finally had to walk back to the conference site to hear a couple of relevant talks, and as I was just leaving the main line, I heard a rapid exhaust and was lucky enough  to catch no. 985, one of the compact 4-8-4 engines used on expresses. He was already on a pretty good roll out of town.


     What a morning! I had not really experienced this kind of working steam as a boy, and to see it in 1981 was quite a revelation. But this was only part of what we saw. I will defer the second half of the story to a future post.
Tony Thompson