Wednesday, October 31, 2018

Blue flag awareness

I have previously posted several comments about blue flags in model railroading. I began with some discussion of the prototype use of blue flags for various kinds of safety notification (that post can be found at this link: https://modelingthesp.blogspot.com/2017/04/blue-flags.html ). I followed up that post with a description of how I produced a set of blue flags to use on my layout, along with illustration of the insertion points I created (between pairs of ties) so that the flags could be placed for operations (see that post at: https://modelingthesp.blogspot.com/2017/04/blue-flags-part-2-modeling.html ).
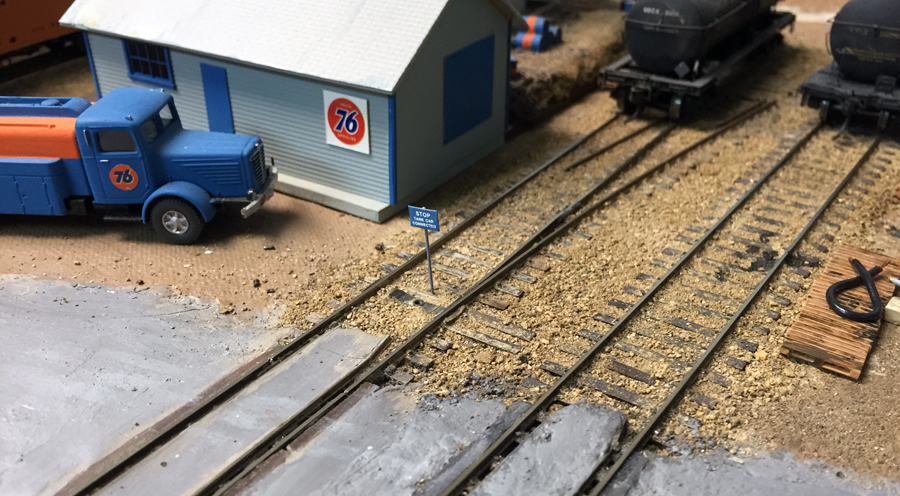
     But I quickly discovered two things about using these flags in an operating session. First, they are scale size and a medium-hue color, and are accordingly all but invisible under ordinary layout operating conditions. Crews have in fact run cars or locomotives right over the flags. The brass wire stanchions of the flags can be straightened and repainted, but the point is that the flags aren’t serving their warning purpose very well. I realize they are pretty small. The photo below, in my layout town of Ballard, illustrates the visibility problem (check the left-hand track).


     Some of the problem may be location. On Seth Neumann’s layout, blue flags are important for switching his NUMMI auto plant, and his taller flags, with plainer scenery around them, do seem more visible. Not sure how I can do that part better, since I would prefer not to make oversize flags. (Photo below supplied by Seth.)


     The second point I recognized is that there is not a good way for crews to know either that flags are in place, or a time when the flags might be removed. One possibility here is to use the method that Seth uses on his layout, simply to tell crews that if they encountered a blue flag in the way of a movement that they needed to make, they should consult the Superintendent (Seth) as to when the blue flag might be removed. I could do the same, but was searching for a more “paperwork” way to accomplish something similar.
     A couple of weeks ago, during my visit at the 25th Anniversary RPM meeting in the Chicago area (I posted some comments about that trip at: https://modelingthesp.blogspot.com/2018/10/the-25th-naperville-rpm-conference.html ), I operated one evening at Bob Hanmer’s layout. The job I drew this time was one I had done before, the switching at Grand Rapids, Minnesota, including the large paper plant. No blue flags were in use, but there was a system of “lockouts” for most tracks. Each track had a form like this (you can click to enlarge):


Though not based on an actual Great Northern form (it was created by Bob Hanmer), it has a realistic look to me. The entire header may be hard to read; here it is in close-up:


     I thought that this might be a way to inform crews about blue flags. Bob’s form shows a fixed length of lockout, four hours in the case of the particular form shown above, but I don’t see why there would be a fixed time for most shipper situations. Instead, I would think the agent, appropriately notified by the shipper, would give a starting and (estimated) ending time for the lockout, thus notifying the crew when the blue flag should be lifted.
     Of course, on arrival, they might find that the shipper or consignee wasn’t quite finished with the car, and would need to wait. I have heard former employee stories like that, of having to wait for the loading dock foreman to give them the “okay” to move a car. I will have to mull over ways to do that in an operating session. But a form like the one Bob Hanmer created will be a welcome step in the right direction. I will have to put some thought into the precise format I want.
Tony Thompson

Sunday, October 28, 2018

Upgrading an old model, Part 2

In Part 1 of this series, I showed the assembled Ulrich gondola model I purchased from Chuck Hitchcock, along with photos of the Santa Fe prototype, to indicate a few things I wanted to upgrade so I would feel  comfortable operating the model in my fleet. (You can read that post at this link: https://modelingthesp.blogspot.com/2018/10/upgrading-another-old-model.html .)
     As I mentioned in Part 1, the most glaring deficiency (to me) about the Ulrich model was the hand brake location on the drop end. It needed to be mounted to the corner post, with the brake wheel parallel to the car side. I dug into my parts stash, and found the Cal Scale brake set that has an Ajax brake mechanism, with attached chain, very handy. I simply mounted that mechanism to a small piece of 0.010-inch styrene sheet.  I chose the Kadee Ajax brake wheel as by far the best available today. Here are those parts at this point.


Note in the photo that I left a small edge margin to the left of the brake mechanism. This was to provide a gluing surface for CA adhesive to locate on the inside of the corner post of the car. I have also angled the chain toward the car’s end sill.
     Next I went back to the Cal Scale brake set and selected a retainer valve to add to the car side, then also added a 0.012-inch brass wire for the retainer line. With that done, I could glue the hand brake assembly to the inside of the corner post. At this point, it looked like this:


     Now, of course, I needed to paint the new parts, as well as touching up the car end where the old Ulrich handbrake parts had been. My late friend, Richard Hendrickson, as dedicated and serious a Santa Fe freight car modeler as you could find, always used Floquil “ATSF Mineral Brown” paint for his Santa Fe models. The problem here, however, is that the original Ulrich paint is quite brown, more so than the Santa Fe color. I had to fiddle with paint mixes to get close to a match. My starting point was Tamiya XF-64, “Red Brown,” but I had to darken it a bit for this model.
     With the addition of a few chalk marks, reweigh and repack stencils, and a route card, the car was almost ready to enter service.


     But there is one more correction needed. Because this model is numbered for the cars that were part of Class GA-63, and that class was delivered with National B-1 trucks, I need to replace the trucks shown above. With that change made, and a (removable) load of pipe included, here is the car as completed. (You can click on these images to enlarge them if you wish.)


     I continue to enjoy owning and operating some of the pioneer freight car kits of the hobby, as is the case for the Ulrich heritage of this particular car. Moreover, its connection to Chuck Hitchcock makes it especially welcome in my layout’s freight car fleet.
Tony Thompson

Thursday, October 25, 2018

The 25th “Naperville” RPM Conference

Last week was the 25th renewal of the Railroad Prototype Modelers (RPM) meet, initiated by Martin Lofton of Sunshine Models back in 1994. Held for many years in Naperville, Illinois, it is now held a few hundred yards away, over the line into the town of Lisle, and is becoming known as the “Chicagoland” meeting, perhaps a better name for attendees from outside the area. This has for most of its existence been known to many as the “Freight Car National,” and deservedly so, as the emphasis continues to be on freight car modeling. Shown below is the cover from this year’s program.


After Martin Lofton passed away, this meeting languished for awhile, but under the direction of Mike Skibbe it is now thriving.
     As always, there was an excellent clinic program, an extensive vendor presence in the hotel ballroom (accompanied by the fine HO and N scale Mod-U-Trak layouts), and a considerable model display. We also had the now-traditional Friends of the Freight Car dinner, part of which was a recognition for Tricia Lofton, Martin’s widow, and long the organizing and registration presence at the meeting when Martin was in charge. It was great to have her at the meeting, renew acquaintance, and have a chance to chat.
     The vendor tables were always busy if no clinic was in progress. Ted Schepf’s massive inventory was welcome, as always, with so much to browse through, and a number of manufacturers were drawing crowds, notably Pierre Oliver’s Yarmouth Model Works, with several new kits. At times one had to wait a turn to get up to a popular table.


     As is often the case at this event, Tony Koester gave one of his fine presentations, this one on “Realistic Operation,” a subject that never gets old. And though many of us have read enough of Tony’s writings to be familiar with most of the ideas, he always presents a talk in a way that holds your attention. In the photo below, he is talking about having places for the dispatcher and operators to do their work. Obviously Tony’s complexion is colored by the slide being projected, so don’t become concerned about his health on the basis of this view.


There were some other talks of interest, and I intend to return to at least one of them in a future post.
     Among the models I especially liked this year was an ART car by Jonathan Pansius, modified from a Westerfield kit with a new roof and ice hatches, and lettered for a 1930 appearance. (During the 1928–1931 period, ART cars had no initials above the car number, as Jon’s model shows; this is amply explained in the new book, American Refrigerator Transit, by Maher, Michels and Semon, Signature Press, and yes, my opinion on this is far from neutral, as I’m a partner in Signature Press.)


     Another car I liked was the one shown below, by Chris Vanko. Chris gave an excellent talk about weathering using oil paints and Pan Pastels, and this car is a product of that. The car is an InterMountain “Emergency” box car, with modifications to match the Wabash prototype.


     I have attended nearly every one of the 25 renewals of this event (missing the first one because I was in the process of moving to California), and have always found them to be outstanding meetings, among the best there is for freight car enthusiasts. I look forward to more of them in the future.
Tony Thompson

Monday, October 22, 2018

Small project: repurposing a covered hopper

I have purchased a number of the superb covered hoppers in HO scale produced by InterMountain Railway Company, or IM, and really enjoy the level of detail and the distinctive look of these square-hatch cars. They are essential parts of not only my Southern Pacific car fleet, but other western railroads as well, including Santa Fe and Union Pacific. Even the leased cars are interesting, and IM has produced a number of paint schemes for those cars too.
     But one of my purchases, admittedly probably an impulse event, was the leased SHPX car for the Sherwin-Williams Company. This particular leased car is a fine notion, but not one I can readily see a use for, beyond my mainline trains. Still, it’s one of the terrific IM models, and as a black car, I thought that likely I would figure out some other use for the car, either relettering it, or a full repaint.
     Deciding that if possible, I would like to keep all the dimensional and capacity data already on the car, I painted out the reporting marks (SHPX 25195) and the information about the Sherwin-Williams lease. That gave the appearance below.


     Next I had to choose a prototype. There are a number of railroads that painted their covered hoppers black, but most are eastern, and in my era, covered hoppers like this were mostly used for cement, and accordingly did not travel far. (Cement is cheap to produce, and heavy, thus costly to ship, so most travels only short distances.) But a leased car might be in almost any service. In particular, certain industrial lessees shipped dry chemicals in these cars. Since I have destinations on my layout which can receive chemicals, I decided to look for possibilities.
     Most leased cars of this type, like most covered hoppers generally, were painted light gray. But I did find a few General American leased covered hoppers that were black. Shown below is one example, from a group of five cars (GACX 40218–40222).


Photo is from General American, and appeared in Vol. 28 of Railway Prototype Cyclopedia in an article by Ed Hawkins.
     I quickly found that none of the alphabet decal sets I have were really the right size and style to match what is in the photo above. But an old Walthers alphabet set came close enough. I decided to go ahead and live with somewhat oversize lettering. In the photo below, you can see the AC&F builder stencil (visible in the photo at the top of this post, toward the right of the car side) has now been painted out.


     Next the car needed to be weathered, and acquire some reweigh and repack stencils. As is my usual procedure, I weathered first. Then rectangles of black decal were applied where the new stencils were located, and appropriate decals added. Here is a photo of the car in service, spotted over the unloading auger at Pacific Chemical on my layout (for more on the modeling of the unloading auger, you might wish to read my post at: https://modelingthesp.blogspot.com/2018/08/unloading-covered-hoppers-part-2.html ).


     This has been an enjoyable small project, turning a black covered hopper model that was kind of surplus, into something that can operate regularly on my layout.
Tony Thompson

Friday, October 19, 2018

Electrical wars, Part 16

In the previous post, number 15 in the series, I described adding feeders to a stretch of track which was exhibiting a really difficult defect: intermittent lack of power. An engine operating on this track would be fine for multiple moves in both directions, then the track would be dead for a  move or two, then the track would be live again. Though not certain of the reason for the problem, I attacked it with a solution that was shown in a previous post (you can see it at: https://modelingthesp.blogspot.com/2018/10/electrical-wars-part-15.html ).
     There is another problem, possibly related to my intermittent power issue, which has arisen a few times on my layout, and I have become vigilant in searching out places where it could happen in the future. This has to do with electrical gaps. I always cut them very narrow, both for appearance and smooth operation over them. But this raises the possibility that thermal expansion and contraction of rail, as well as the thermal and humidity expansion and contraction of the layout structure from season to season, can close one of these gaps. It may,of course, not be visually obvious at all.
     I showed in a previous post in the Electrical Wars series how gaps can be secured with a small piece of styrene glued into them. This is a technique demonstrated on my layout by Jim Providenza, as shown in that post (it can be found here: https://modelingthesp.blogspot.com/2016/09/trackwork-wars.html ).
     My previous work adding feeders to my intermittent-power track section should fix the problem, but I could not rule out problems arising with the gaps which define the track. Accordingly, I went back to each of the gaps, verified that it was open at the moment, and began by gluing some styrene into the gap, using CA adhesive. I usually use Evergreen scale 1 x 4-inch strip, or sometimes scale 2 x 4-inch strip if gaps are wider, as in the photo below.


     I allow plenty of time for the CA to cure, then use a fresh razor or hobby knife blade to slice off the styrene right at the rail head. Sometimes I add a little CA to fill any gaps that may remain.


Any styrene showing on the gauge side of the rail is carved off, and the sides of the insert painted medium or dark brown. The white styrene at the rail head is not very noticeable compared to the silver appearance of the surrounding rail. Shown below is an example of these kinds of filled gaps, right about at photo center, demonstrating that they are close to invisible.


     I don’t know that there were any gap-closure problems contributing to my intermittent power issues on the track in question. But at least now I know that gap problems cannot be a factor in that area in future.
Tony Thompson

Tuesday, October 16, 2018

Another Kalmbach “industry” book

Way back in 2004, Kalmbach Books initiated a series of volumes entitled The Model Railroader’s Guide to Industries Along the Tracks, usually just referred by the last four words of the title, or by IATT.  These books were authored by Jeff Wilson, who did a really excellent job of providing brief but well-directed summaries of rail-served industries. I mentioned them in a prior blog post, which actually served as a handout link for a talk I was giving over the lat year, about railroad traffic (you can visit that post at this link: https://modelingthesp.blogspot.com/2018/01/handout-for-traffic-talk.html ).
     Eventually there were four of these books, each one covering six industries in 88 pages total. Given the need for front and back matter in a book, it’s evident that each industry could only receive a dozen or so pages of coverage, and given that the books were profusely (and appropriately) illustrated, text was necessarily brief. I show below the covers of these four books. 


All but the first of these is still in print at Kalmbach Publishing, or was when I checked recently.
     In that previous post (link given in the first paragraph, above), there is a list of the six industries in each volume, along with a fairly extensive bibliography of sources of information about traffic topics.
     Now the topics of industries are being revisited b Kalmbach, very appropriately, I think, in expanding upon what was in the earlier books. The new series has the title, Guide to Industries Series. The books continue to be well authored by Jeff Wilson. The one I’m commenting on today covers a subject I know well, from extensive research when writing the PFE book (Pacific Fruit Express, 2nd Edition, Signature Press, 2000). This book is about the produce business.


This is not only a comprehensive and accurate book, but contains many excellent photos. One of Jeff Wilson’s strengths is his photo choice (aided, of course, by the extensive Kalmbach photo collection), and it is a major contributor to the quality of these books.
     One thing I especially like in this treatment is that it contains a full chapter on harvesting and packing of produce. This topic is something often omitted in presenting the railroad side of this business, but it is covered well here. In fact, one of my favorite photos in the book is in this chapter (it’s from the Library of Congress) .


The photo depicts field boxes arriving on a flatbed truck at a packing house in Redlands, California. These are the boxes filled by field hands who picked the fruit, and are not the final shipping boxes that will go into refrigerator cars. The field boxes, of course, will go right back into the orchards for the next load. As with so much on this topic, modelers are often unaware of the role of field boxes.
     The book also has a fine chapter on the various owners of the major refrigerator car fleets, covers the operation of perishable trains nicely, and concludes with a very appropriate chapter on produce terminals and the destinations of the cargoes. All told, another fine effort from Jeff Wilson, and as I have said before, kudoes to Kalmbach for continuing this very useful series of books.
Tony Thompson

Saturday, October 13, 2018

Upgrading another old model

I have written a number of previous posts about restoring and upgrading older HO scale models, to an extent that I can operate them on my layout alongside newer (and usually significantly better) models. These have ranged from Athearn metal box cars, through Thomas Trains metal tank cars, and several other models of various kinds. You can readily find them by using “upgrade old model” as a search term in the search box at the right of this paragraph.
     The one I am writing about today is a model I always had wanted to acquire as a young modeler, but never did: the Ulrich white-metal model of the “War Emergency” 52-foot gondola. Though lacking some details that would be expected today, it does have all the main dimensions and features of the prototype. Moreover, though it has cast-on sill steps and grab irons, it also has nice stamped sheet metal ends, permitting both sides of the end to have a proper appearance. Of course I know that Tichy now offers a kit for this car, a kit which results in a far better model. But I wanted to have one of the Ulrich versions also.
     My opportunity arose when Chuck Hitchcock was selling his rolling stock, in connection with tearing down his layout. There was one of the Ulrich gondolas in the list, and I signed up to buy it immediately. This acquisition doubles my interest: not only is it the Ulrich model I had long wanted, but I have immense respect for Chuck and his accomplishments in, and contribution to, the hobby. I looked forward to this car becoming part of my car fleet.
     Here is a photo of the model as it arrived from Chuck. Ii is intact in every respect, and an immediate candidate for service, so I looked to to see what changes I might want to make.


I realized right away that there is a problem with this model as built. It has the hand brake on the car end, but nearly all these “Emergency” cars had drop ends. That, of course, precludes mounting the hand brake on the moveable end. It is also has a pretty clunky white metal hand brake mechanism and wheel. I thought I could do better.


     What did the prototype look like? The Santa Fe bought two classes of these cars, classed as GA-61 and GA-63. Here is how the hand brake was arranged on the car side. As Santa Fe  nearly always chose in those days, the manufacturer of the hand brake was Ajax. Note also the retainer valve on the car side.


Note also that the Dreadnaught end is reversed, that is, that the major ribs or bulges face into the car. This was common on gondolas, as it was believed to be a stiffer end this way. Finally, there is a brake step, positioned level with the floor so it will not interfere with loads when the drop end is down.
     You can see in the photo above that the brake wheel lies in a plane parallel to the car side. A view from the other side of the car shows that the mechanism was mounted to a flat plate. (You can click on the image to enlarge it if you like.) This flat plate is visible in the photo above, too, as a dark shadow below the brake mechanism.

(Both photos are from the Santa Fe, courtesy of the Richard Hendrickson collection.)
     For those interested, there is considerable information available about both the “Emergency” gondolas as a whole, and about the Santa Fe cars of that type. For the former, an excellent article by Ed Hawkins, in Volume 28 of Railway Prototype Cyclopedia, both illustrates and tabulates all the “Emergency” gondola designs of World War II. For the latter, Richard Hendrickson provided detailed coverage in Santa Fe Open-Top Cars: Flat, Gondola and Hopper Cars 1902–1959, part of the Santa Fe Rolling Stock Reference Series, Volume 7, published by the Santa Fe Railway Historical and Modeling Society, 2009.
     My modeling choices to upgrade this model began with a decision to replace the original Ulrich hand brake parts with a better Ajax mechanism, and a good wheel (note how lacy is the prototype wheel!). I will return to that modeling process, and other detail work, in a future post.
Tony Thompson

Wednesday, October 10, 2018

Electrical wars, Part 15

It occurs to me, in writing the title for this post, that it must say something about me and model railroad layouts, that I am up to the 15th episode in describing my efforts to conquer electrical problems of all kinds. But that is just how it has gone. For anyone interested in previous posts in this series, the easiest way to find them is to use “electrical wars” as a search term in the search box over at the right of this top paragraph.
     There were two electrical faults which showed up in my last operating session, one from some recent trackwork, but the other from track first laid (and powered) over 20 years ago.The event in more recent track occurred in a single rail within a three-way turnout, which had operated properly for several years, but suddenly became intermittently dead. This problem was easy to fix: I simply soldered a short wire to connect the offending intermittent actor, and the appropriate stock rail. In the center of the photo below, you can see the two ends of the wire because of its orange insulation. This will all be painted dark brown, of course, but I wanted to photograph it so it was evident what I did. (You can click on the image to enlarge it if you wish.)


In the background is the Common Standard No. 22 depot at Santa Rosalia on my layout, familiar to SP modelers as an American Model Builders kit (and a delight to build, as I described in a series of posts awhile back; the conclusion is at this link: http://modelingthesp.blogspot.com/2015/05/sp-depot-santa-rosalia-part-4.html ).
     The first of these problems, the straight track that has been in place over 20 years (actually closer to 30 years) was a slightly different problem. Try as I might, I cannot find a loose wire or cracked solder joint or any other explanation for intermittent power to this track. But whether or not there may be a  problem, the simplest procedure is to simply place new feeders to the track in the offending area. The arrangement of gaps and feeders are the same as in the second of two diagrams on a prior post (you can find that post at: http://modelingthesp.blogspot.com/2012/09/electrical-wars-part-2.html ). I will repeat that description here.
     Here is how the layout was originally wired, with power routing through turnouts at the end of sidings. A full gap was cut at the center of sidings like this (using conventional symbols for gaps and feeders).


Especially if it is a long siding, it can become tedious to have to run down to the other end of the siding all the time, so that a turnout can be powered for movement in the middle of the siding. One also depends on the turnout effectively routing power every time. The simple answer, of course, is to replace the arrangement above with this:


     The first step is to cut the gaps, which I did with a cut-off disc in a  hobby tool. Then holes need to be drilled for the feeders that will be added.


Lastly, the wire feeds are soldered to the rails at each location.


     These additions should correct this track power problem, though since it has been intermittent during operating sessions, I can’t be certain yet. Next step will be to operate over the area as much as I can, and see if I can still obtain a failure. Of course, given the perversity of layouts (you know, of course, that they can smell fear), the next failure may simply wait for another operating session.
Tony Thompson

Sunday, October 7, 2018

Riding a tourist train

I am not generally a huge fan of tourist train rides, partly because railroad museums often provide train rides that are pretty darn short. I realize that the 99.5 percent of the general public that is neither railfan nor modeling oriented wants it that way, and I accept that the museums have to cater to the bulk of their audience. But in any event, though I do enjoy them from time to time, it would be fair to say that I would usually just as soon pass on tourist trains.
     That said, there are occasions when it is fun and even interesting to take a tourist train. I recently did such a ride, on the California Western Railroad, westward out of Willits, California. The Cal Western or CWR was for many years a serious lumber operation, originally carrying redwood logs from the mountains to the large Union Lumber mill at Fort Bragg on the Pacific coast, and also bringing finished lumber from Fort Bragg over the coast range to Willits for interchange with the Northwestern Pacific of the SP. The CWR in those days was actually a division of Union Lumber.
     But closure of the Fort Bragg mill left the Cal Western with little to do beyond its existing tourist operations. These have been in place for decades, originally using an ancient Mack railbus. Because the railbus had smelly fumes, the nickname became the “Skunk Train,” and eventually that name became embedded in the Cal Western’s publicity, as it remains today. The logo, as included on the Wikipedia entry for the California Western, is shown below. As the logo suggests, a variety of motive power, steam and diesel, has been used to pull passenger cars, though one old bus, CWR’s M100, still runs.


     The occasion for my taking a ride was a fund-raiser for the Mendocino Land Trust. The trip was to include quite a nice lunch in the middle of the trip. Shown before departure at the former NWP depot in Willits is the train, two conventional coaches and a roofed open-side car.


We rode from Willits up to a new picnic site west of the summit of the range, a place named Crowley. Formerly a maintenance location, a meadow was created by cutting brush and trees and mowing the weeds. In this photo, the musicians for the lunchtime entertainment are detraining. The information tent for Mendocino Land Trust can be seen at left.


The hot lunch (along with extensive hors d’oeuvres) was a gigantic paella, prepared in the shallow pan you see in the photo below. The smaller dish in the foreground is a vegetarian paella.


     Our train remained on the main line during lunch. Here you see the power, a modified GP9, reportedly former SP GP9E no. 3411, now CWR 64.


     The trip was a fairly brief train ride (not a lot over an hour each way), and an excellent lunch selection which included complimentary wine or beer (the latter donated by North Coast Brewing Company of Fort Bragg). Moreover, our ticket prices included a nice donation to the Mendocino Land Trust, which has been instrumental in preserving old-growth redwoods in the Coast Range, including a tract surrounding some of the California Western trackage. We were more than happy to make that donation. So there are times that tourist trains can be a worthwhile experience, and this was certainly one of them.
Tony Thompson

Thursday, October 4, 2018

Setting up an operating session, Part 4

As my title indicates, I have written several posts previously about how I set up an operating session. What is needed begins with basic ideas about how your layout can or should operate (relevance of mainline trains, amounts of switching, etc.), some things I discussed in the first of these posts on setting up (see it at this link: http://modelingthesp.blogspot.com/2013/09/setting-up-operating-session.html ). I amplified those comments with more specifics, especially about timetable construction and use, in a second post (it can be found at: http://modelingthesp.blogspot.com/2013/10/setting-up-operating-session-creating.html ). Then in a third post, I went into my methods of evaluating what switching is needed to follow a particular session (that one is at: http://modelingthesp.blogspot.com/2015/06/how-i-set-up-operating-session.html ). As I described, I begin by walking around the layout and taking some notes.
     The present post is to provide more details to follow that third post. My “walking around” assessment process involves, basically, three kinds of industries on the layout. First would be the really busy industries, the two vegetable packing houses and the wholesale grocer, which work year-round and often have multiple cars switched per session. I can just continue these car cycles in any future session.
     Second, there are the industries that are not as busy, and typically are switched in every other session. So for these, I know to plan for replacing or removing cars that were static in the session just ended, or to recognize cars that were just spotted in the recent session, and will not move in the next session.
     Finally, there are the places that only occasionally are switched. These are usually empty (per diem charges mean that cars would simply not sit on sidings for extended times), and I have a rough rotation scheme for these places, which I can consult to see if the following session will involve these sidings.
     All the foregoing assessments are identifying cars that will be switched in the following session, and places that will need new cars in the next session. But there are also cars departing the layout, either that have already gone to staging in the Guadalupe Local, or have been spotted for pickup by trains on the main line. Most of these will be departing by “0-5-0” from the layout, and returned to car storage.
     Then how do I go about selecting new cars? One of my principles is to try and include cars from the biggest U.S. railroad fleets in every session, not slavishly but as a guideline or goal. Shown below is a graph of the size of U.S. railroad fleets in 1950, with hopper, ore and ballast cars removed (since they moved far less freely in interchange than other car types). I showed this graph, and described its background, in one of my columns in Model Railroad Hobbyist, for the issue of December 2011 (you can read or download this issue for free at their website www.mrhmag.com ).


     The implication of using a graph like this is acceptance of the Gilbert-Nelson hypothesis, an idea described in that MRH column, if you’re not familiar with it. Note in this graph that PFE has been separated from SP and UP, mainly because of its size. I do try to include cars from the largest five roads (other than SP, since of course it’s the home road for my layout) in every session, and also look for chances to include cars from the remainder of those shown in the graph, whenever I can.
     I have explored the quantitative aspects of car fleets and car selection in prior posts, and will just provide links to a few of them here. One of them addressed the problem of how many home-road cars a layout ought to have (see that post at: http://modelingthesp.blogspot.com/2012/12/choosing-model-car-fleet-some-numbers.html ). Then I went further afield and tried to figure out, for my layout modeling the SP Coast Route in 1953, how many and what kind of foreign cars would be expected to be present (that post can be found at: http://modelingthesp.blogspot.com/2012/12/choosing-model-car-fleet-numbers-part-2.html ). All this analysis is only to provide guideposts in operating my layout, certainly not to offer any kind of rules or requirements.
     Another resource I draw upon in choosing new cars for upcoming operating sessions is my compilation of a “Master Roster.” I described this in moderate detail in a previous post, so won’t go further into it here (you can read that post at: http://modelingthesp.blogspot.com/2017/07/waybills-part-59-more-on-op-session-set.html ). But the key information available in that Roster is previous use of each car. That enables me to avoid repeating familiar cars, and making sure less-used cars are employed too. In effect, I want the whole car fleet to be exercised over a span of operating sessions.
     This may all sound rather formal and even quantitative, and perhaps all that background analysis can be described that way. But the analysis is definitely background, and is by no means “up front” in setting up sessions. So as I use this approach, I have found it quite flexible, within the guidelines I have set for myself. My experience is that I am rarely if ever constrained in car choices for operating sessions, though of course receiving guidance from the principles. At the same time, I like having the confidence that there is a prototype background to my car selections. And of course, that’s the way I designed it.
Tony Thompson

Monday, October 1, 2018

Sunshine tank car project, Part 2

I began this topic by showing a kit-built resin Sunshine tank car, almost completed except for its expansion dome. The dome supplied in the kit was the wrong diameter, and my first post about completing this kit showed how I came up with a dome to fit the opening in the car body (see that post at: http://modelingthesp.blogspot.com/2018/06/completing-sunshine-tank-car.html ). In the present post, I continue this project.
     My first step, after the work in the previous post, was to bend grab irons for the dome sides, fitted to the spacing of the Tichy dome bolt heads. I used 0.010-inch brass wire for the grabs. Attaching these grabs with CA, I added the Tichy tank car detail parts (from their set No. 3007) for the safety valves and manway cover on the dome top. The new dome was now ready to paint.


     There was no need to mask for painting, other than the general dome area, since everything else was black too. I sprayed the dome flat black, then added a coat of gloss for decaling.
     Having painted the dome, I could proceed with the Sunshine kit decals for Rohm & Haas. Though no lettering drawing accompanied the decals in this kit, what was furnished was a color print of one of the prototype cars. I don’t know the photographer, nor the place and date of the photo,  but will include the image here as part of this Sunshine project.


     It was an interesting exercise to go from the decal sheet, to find each of the items of lettering on the photo, and of course vice versa: to go from a visible item on the prototype photo, to locate same on the decal sheet. Eventually I did find and apply all those various bits of lettering. Shown below is a photo of the model at this point, essentially ready for weathering.


Partly because of the somewhat flamboyant lettering, I decided not to weather this car too heavily, but just add some moderate dirt. Here it is at the unloading rack for Pacific Chemical Repackaging in the town of Ballard on my layout.


     Though at first disturbing to realize a kit had a wrong-size part, it turned out to be a fun exercise to find a suitable new dome. Then it was straightforward to complete the work. And my general enthusiasm for tank cars is certainly being fed by this very nice General American car.
Tony Thompson