Showing posts with label Car fleet. Show all posts

Wednesday, September 3, 2025

Mundane models

 In a recent conversation with an acqaintance, the topic of my blog came up, and during the discussion he asked, essentially, “Are all your model projects complicated ones, like the Hendrickson one?’ (He was remembering the Santa Fe automobile car of Richard’s that I had completed; the concluding post is here: https://modelingthesp.blogspot.com/2018/11/hendrickson-auto-car-part-6.html ). 

Like most modelers, my answer was “no.” I do lots of projects that can only be called “mundane,” thus the title of this blog. But reflecting on this point, I thought I would show some examples of such projects, always remembering, of course, that I am definitely a “freight car guy.” (For background on that term, see: https://modelingthesp.blogspot.com/2019/10/whats-freight-car-guy.html .) 

The topic of mundane models returns me to something I’ve often mentioned, usually just in passing. It’s my idea to separate mentally, what I call “mainline models,” by which I mean cars that will look all right in a passing train, but might not look so good up close during switching, from better models. I talked about the philosophy of all that in a previous post, too (it can be found here: https://modelingthesp.blogspot.com/2020/08/layout-models-and-all-that.html ).

But today’s post is to illustrate a few models, and perhaps clarify what a mundane model is. It need not be a “mainline model,” but may be quite a nice freight car, just not anywhere approaching contest quality or even worthy of a detailed description of its construction in this blog. I have felt from the beginning that following kit directions needn’t be posted here, but some models so built can turn out quite well.

I’ll begin with a automobile car finished recently. This was kind of a silk purse affair, in that I started with a C&BT Shops kit, kits known for their poor detail sprues. But replacing most of them, and in particular adding wire corner grab irons on the roof, and an etched metal running board, can make a pretty decent final result. There was a distant view of this car in a post last year (see it at: https://modelingthesp.blogspot.com/2024/09/forty-foot-automobile-cars.html ).


 A second box car in work is more mundane than the car above; it is simply a Branchline kit for a postwar 40-foot box car. I happen to have won it as a door prize at a Prairie Rail operating weekend, and so far it has its internal steel nuts for weight added, underframe complete, and starting to add body details. Roof not yet attached; it will receive an etched metal running board. Shouldn’t be long till it’s done.

Awhile back, as part of purchasing several of the very nice Broadway Limited 6000-gallon high-pressure tank cars, I received one lettered for the Ethyl Corporation. The car came with a dome platform and railings, but a prototype photo I have shows an EBAX  car with only short dome walkways, no platform. I removed the platform and ladders (used them on another project), and am preparing to add the walkways and new ladders. A small project, to be sure.

This car will likely only operate in mainline trains, because I have no industries on my layout that would either ship or receive Ethyl Corp. cargoes, but such a restriction won’t be on account of model shortcomings.  

Finally, I’ve just completed an Accurail box car, chosen in honor of Paul Weiss’s Central Vermont layout (and could be used to receive cargoes from industries on his layout). This is of course an extremely simple kit, with minimal number of parts, though I added A-Line sill steps and a Cal-Scale brass brake wheel soldered to the brake staff. It hasn’t yet been weathered.

All these cars are mundane in construction, but all have roles to play, and in fact none of them would be relegated to the “mainline” category because of quality shortcomings. Cars like this can be the majority of any freight car fleet, as they are in mine. 

Tony Thompson 

Saturday, August 16, 2025

More about Speedwitch Media kits

I received a question via email a few months back, and it’s been bumping around in my head every since. It touched on the fine freight car kits from Ted Culotta’s Speedwitch Media. I have in fact posted a couple of times about these kits, once about a kit I built (concluding with this post: https://modelingthesp.blogspot.com/2015/01/building-resin-box-car-part-3.html ), and once about a kit that was built for me by Pierre Oliver (described here: https://modelingthesp.blogspot.com/2012/09/class-50-4-auto-cars-new-update.html ). But that’s all I’ve posted.

I decided I could describe a little about other Speedwitch kits that are in my fleet.  I’ll write today about Speedwitch kit no. 105, for an MKT (Missouri-Kansas-Texas, nicknamed “Katy”) single-sheathed box car. The prototype cars were built in 1923 and early 1924, 1500 cars in the 76001–77500 series, and in 1925, 1000 cars from Mt. Vernon Car Co. (95000–95999 series). As Ted pointed out, these cars were the backbone of the Katy boxcar fleet until the late 1940s, when the railroad began to purchase 40-foot steel box cars to supplant them.

The cars were originally painted conventional boxcar red with white lettering, but in 1937, the Katy introduced what became a famous paint scheme, chrome yellow with black lettering. Box cars continued to be so painted until about the end of 1947, when the railroad returned to boxcar red, but cars remaining in the yellow scheme were only slowly repainted, and were photographed into the late 1950s. I naturally could not resist having one of the cars in yellow.

Here is a photo (from Speedwitch’s book, Volume 1 of Focus on Freight Cars, by Richard Hendrickson), showing one of these single-sheathed cars in its original boxcar red paint (the reweigh date on the car is January 1936). Note, incidentally, the railroad’s initials on the door. 

The kit instructions include a poorly reproduced but informative undated photo of one of these cars in yellow, credited to Big Four Graphics. The paint scheme reflects that shown above, just in reverse contrast.

As usual, the Speedwitch kit includes very complete and helpful instructions. I don’t always need all the detailed guidance, but it’s reassuring to have it in front of me. And the one-piece body casting is a big help. 

As with most kit building projects, the first step is the underframe. Here is what the instructions direct us to do: 

My model’s underframe is quite similar, an easy process following the directions. You will notice a little overspray of yellow onto the underbody; I decided this might well be prototypical, and left it in place. It’s not noticeable in normal operation, in any case.

After lettering was complete, I weathered the car fairly well, being a car obviously not repainted for several years at least. The completed model is shown below. 

This was a kit that produced a very nice result, as one expects from Speedwitch Media. The final result is a box car that I enjoy owning and operating, not least because of its nearly unique color scheme for box cars in my modeling year of 1953. The car is an active participant in many of my layout operating sessions.

Tony Thompson 

Saturday, September 24, 2022

Stand-ins? Well, yes

 I was asked awhile back if any of my model freight cars were “stand-in” versions, meaning, I suppose, models that were not really correct but at least “in the ballpark.” I replied, “Absolutely.” There are just too many desirable objectives and too few convenient routes to model them. And I should emphasize “convenient” here, because sometimes a stand-in is just a labor-saving approach, on a prototype you aren’t terribly serious about.

I am, I like to think, a reasonably serious modeler for several prototypes, notably most Southern Pacific equipment (but an exception is included below), Pacific Fruit Express, and a few other railroads that have caught my fancy over the years. But filling out a freight car fleet now numbering in the several hundreds, I cannot be and have not been meticulous about everything. Some projects are stand-ins.

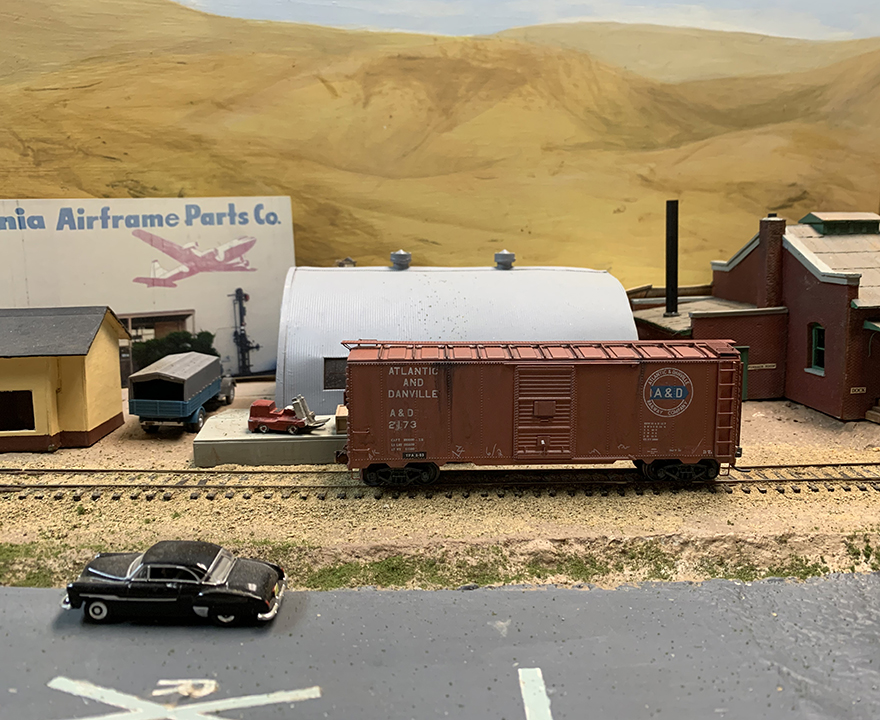
Last year, I wrote a blog post about such a project, beginning with an old C&BT Shops box car kit that I wanted to re-detail and use for something “interesting.” As I described at some length in that post, I chose the Atlantic & Danville (see that post here: https://modelingthesp.blogspot.com/2021/08/a-c-shops-box-car-part-2.html ). And here’s a prototype photo (Jim Seagrave collection) from the 2100-series of these box cars.

And here’s how that model turned out, using a nice set of K4 decals to letter it as A&D 2173. The model is spotted at an industry in my layout town of Ballard. Superficially similar to the prototype, entirely different in lots of details, and that’s a classic example of a stand-in.

Another example is a Rock Island stock car, a stand-in for which I assembled from an Accurail stock car. Turns out the prototype Rock Island cars were a lot different from the Accurail model; they had four-panel Pratt truss sides, not the six-panel Howe truss sides of the Accurail version. But I intended to use the car in passing trains, where ordinarily spectators are not counting side panels, so I decided to go ahead. Here is the prototype (photo provide by Steve Hile, but I can’t find the source from which he got the photo):

My version, decal lettered as RI 75119, is shown below in a lightly-weathered state that will likely get more intense next time I do a batch of car weathering, shown being switched at my layout town of Shumala. (You can click on the image to enlarge it if you wish.)

In the photo above, note also the SP gondola. It’s lettered as SP 161035, a member of SP Class G-50-25. The model was built following an article by the late Bruce Petty, using a Mantua high-side gondola as a starting point. Problem is, the Mantua model is a ten-rib car, while the prototype, as you see below (Paul Dunn photo), was an eleven-rib car, and a number of other details are different also. (Ignore the post-1956 car number and lettering on the car below.) But now I do have one of these moderately distinctive SP gondolas among a lot of commercial models of other classes.

Bottom line? Sure, my fleet contains stand-ins, most of them deliberately built as such, along with a few that I found out later weren’t accurate after all, and just turned out to be stand-ins. Now sometimes a model turns out to be totally bogus (most manufacturers have no shame, as is well documented), and those baddies do tend to be re-sold or given away.

But if the model looked good, wasn’t grossly inaccurate, and filled a hole in my fleet, yes, I kept it, and will operate it from time to time. And it’s likely I will build more of them from time to time.

Tony Thompson

Friday, September 9, 2022

Operating stock cars

 Years ago, I gave a brief summary of what I expected when operating stock cars on my layout, as part of a post describing the choices I had made for my stock car fleet (see that post at: https://modelingthesp.blogspot.com/2011/02/choosing-model-car-fleet-3.html ). But with the passage of time, additional considerations have arisen, thus this post.

As a Southern Pacific modeler, naturally I mostly need stock cars of that railroad, and awhile back I wrote a post just about SP stock car modeling (it’s here: https://modelingthesp.blogspot.com/2015/07/modeling-sp-stock-cars.html ). Many readers will also know that I wrote a full account of the prototype cars, Volume 1 in the series, Southern Pacific Freight Cars (Signature Press, 2002).

One interesting example among my “home road” cars are Texas & New Orleans cars, especially the post-WW II conversions done by T&NO to use old Class B-50-13 and -14 box cars for conversion into stock cars. The example below, T&NO 15259, is an example, having steel ends that survived from the predecessor box car. The model was built from a Sunshine kit.

As the photo above shows, on my layout I do have a small stock pen, used of course for loading or unloading stock cars. A post about the background of that facility is here: https://modelingthesp.blogspot.com/2015/03/a-stock-pen-for-east-shumala.html . The construction of that pen was also described in a post: http://modelingthesp.blogspot.com/2015/06/the-east-shumala-stock-pen-part-2.html .

An important source for understanding stock car operation is the recent excellent book, Live Stock Operations, by Stephen Sandifer (Santa Fe Society), which I reviewed when it came out (see the review at this link: https://modelingthesp.blogspot.com/2020/11/new-book-on-live-stock-by-stephen.html ). Very many important features and details of operations are included, though many are specific to the Santa Fe.

An important point has to do with resting animals. Federal law prescribed that animals could not be confined in stock car for more than 28 hours (which a shipper could request to extend to 36 hours). When that time expired, animals had to be let out of the cars and allowed to rest for 5 hours before reloading (in practice, rest periods were often longer, at railroad convenience). In addition animals would be fed, and after a suitable interval of time, also allowed to have water.

These regulations meant that stock traffic was handled as expeditiously as possible, usually in the fastest manifest trains or in dedicated stock trains. But when animals were unloaded for rest, it was common to send any empty foreign cars homeward and reload into the home road’s cars (provided, of course, that home road cars were available). But for just that reason, it is not unusual to see foreign-road stock cars in prototype photos.

I show one such photo below, taken at Kino, Arizona in 1953 by Bob Knoll. The lead stock car, behind the cab-forward, is an SP Class S-40-11 car (rebuilt from a “Harriman” Class B-50-5 box car), and behind it are two Texas & Pacific stock cars. One has a yellow door to identify it as a double-deck car, something many roads did. I took this as inspiration to add a T&P stock car to my fleet.

My model, built from a Sunshine kit, does show up from time to time in operating sessions. You see it below being switched by SP Ten-Wheeler 2344 in my layout town of Shumala.

After a rest period, it was permissible to reload animals into the same cars, but bedding had to be inspected, and additional bedding added if needed. Any fresh cars had to have fresh bedding, as did the cars spotted for initial loading. Cars were normally cleaned between runs, some railroads using steam cleaning, and shippers had the right to reject for loading any car which in their judgement was not clean.

A bedding example is this one, a Santa Fe photo from the Kansas State Historical Society collection, taken from Sandifer’s book. The men are shoveling sand into the stock car to serve as bedding; the recommended depth was two inches throughout the car.

Last, I want to show a favorite model, even though it turns out to be a stand-in only. Many years ago, before the availability of the Internet resources we enjoy today, I had only a poor photo of the rebuilt stock cars the Denver & Rio Grande Western had created. It looked like the steel ends were Dreadnaught ends, and the cars had a steel panel roof. Since the Athearn “Blue Box” box car of the day had those features, I cut the sides out of such a model, and spliced in the sides of the Athearn stock car. The result is shown below. 

Unfortunately, as I now know, the actual D&RGW cars had corrugated ends, not Dreadnaught, and were not as tall as this model. But it was an interesting project (including the broken board that you can see above), and I do still operate the car. Nostalgia definitely has its place in my world of model railroading.

Tony Thompson

Wednesday, August 10, 2022

Grumbling again about brass freight cars

 As anyone knows who operates a sizeable fleet of model freight cars, from time to time something goes wrong and a car is pulled off the layout for upgrade or repair. It may, of course, merely be a task of replacing a lost sill step or re-installing a coupler, but sometimes it is a more demanding task — and gets put off. Recently I noted that my shelf of “ailing” freight cars had grown, and set out to find what was needed to get them back in service.

It turned out that a bunch of them were brass freight cars of various origins. One of the ongoing problems with such cars can be (isn’t always) coupler box attachment provisions. Brass models often come with a set of metric screws that can secure a Kadee coupler box. That’s a simple attachment.

But not always. I recently repainted an old Precision Scale tank car, and found that the single screw hole in the coupler box pad was a very small (and missing) metric screw. I could simply have added such a screw from my own stash, but its head was too small for the hole in the Kadee box. I could have made a washer, but decided instead to simply drill out the small hole and tap it for a 2-56 screw.

I then discovered that the frame was bent, and had to gently straighten it so that coupler boxes at both ends rode at the correct height. When all that was completed, here is the underbody (I left the coupler box screws unpainted for the photo so they would be visible). Note also that I had to add washers atop the trucks, as the car sat too low otherwise.

Here is the complete car, in its new SHPX paint scheme, depicting a lease to the Western Chemical Corp. of Los Angeles. It’s a nominally 8000-gallon car. Route card and placard also visible.

Another of the issues frequently encountered with brass freight cars is the annoying method of truck attachment. I’ve mentioned this in previous posts (see, for example: https://modelingthesp.blogspot.com/2012/12/small-modeling-project-brass-tank-car.html ), and also showed the solution(s) I have used, particularly replacing the truck screw that came with the model, with a metric screw of the same size (you can find that description at: https://modelingthesp.blogspot.com/2020/09/those-pesky-truck-screws-for-brass.html ).

I’ve never understood the attraction (to manufacturers) of this kind of “sprung truck screw,” unless it’s to hold trucks aligned for easy placement in display cases. It certainly does no favors for these cars in operation. At one time, I tried to find softer springs, reasoning that less force pressing the truck bolster against the car bolster should make truck swing easier. I never really got a good result, and now just snip the original springs in half (or entirely replace the shouldered original truck screws, as I described in the post that is cited in the preceding paragraph). 

But even these measures will not solve all performance issues, especially for models from what’s called the “middle age” of brass models. That usually means between the first age of durable, somewhat clunkily detailed models that operated well, ending around 1975, and today’s third age of beautifully detailed models with good quality operation — and steep prices. 

In the “middle age,” brass production seemed to be oriented exclusively to collectors, and not only collectors, but collectors who rarely if ever took the models out of boxes or display cases, and certainly never operated them. The common side effect was appalling trucks, which did look like trucks but rolled like sleds. 

Trucks like that simply have to be replaced if the models are to be operated on actual layouts. I have a few in my fleet, models of prototypes that I like to include but simply could not possibly operate with their original trucks. I put those trucks back into the original box, so that whoever acquires them someday when I’m gone and wants the original trucks, will have them with the model. 

For replacements I use a variety of trucks. If I know what trucks the prototype car had, I prefer to use a Tahoe Model Works truck of the same design, since they are accurate representations of specific trucks, roll well, and (unlike some trucks out there) have the correct height. I also have a stash of plastic truck sideframes which, with decent wheelsets, can represent a more generic “AAR truck” if needed. There are examples of both in my fleet.

As a single example, below is a W.A. Drake model of a Southern Pacific 8000-gallon tank car (dome walkway only on one side, typical SP practice). Nice, accurate model, but unlike other Drake brass tank cars I have, this one’s trucks simply could not keep the wheels all in the horizontal plane. That might be stickiness in the bolster ends, or something. But whatever it was, I just couldn’t get it to stop. Easy fix, replace those trucks. 

As should be evident from the foregoing, I expect and demand that my model freight cars operate properly. I am not collecting a display case of beautiful models; I am exercising a fleet of working freight cars in layout operations. That’s part of achieving one of my layout goals: to reproduce the SP railroading of my layout’s locale and era.

Tony Thompson

Sunday, May 22, 2022

Updating the car fleet plan: flat cars

 One of the least common freight cars in the national fleet in 1953, the year I model, was flat cars. However, it’s important to realize that this varied greatly by region, and Southern Pacific handled huge quantities of lumber shipments in that period, which explains the large SP flat car fleet.  

To illustrate, here are bar-graph representations of the national car fleet (left) and the SP car fleet (right) in 1950. Both graphs show the car types in same order, in order of descending size for the national fleet, then in the same order for the SP fleet to dramatize its differences. Note that flat cars made up 9 percent of the SP fleet, while nationally, flat cars were just 3 percent. (You can click on the image to enlarge it, if you wish.)

As part of a multi-post effort back in 2011 to present all of my car fleet plans, separated by car type, my fleet plan for flat cars is at the following link: https://modelingthesp.blogspot.com/2011/02/choosing-model-car-fleet-5-flat-cars.html .

It’s interesting to look back at that 2011 plan and note that I only had two special-use flat cars, a depressed-center car (AAR FD) and a 4-truck car. The balance were 20 “general service” cars, AAR Class FM, though 5 of those 20 were unbuilt kits and five more were stand-ins, due for replacement. 

Today the number of unbuilt kits has risen slightly (though not the same ones!), most of the stand-ins are gone, and there are a number of new cars. And today my overall fleet of flat cars is about 7 percent of the total fleet, probably about right for SP in 1953.

In that 2011 post, I noted that lumber was a major category of flat car loads for SP in the 1950s, and I’ve posted several descriptions of such loads I’ve built for these cars (see for example: https://modelingthesp.blogspot.com/2014/08/open-car-loads-completing-owl-mountains.html ), or one of my posts about the lumber loads that Richard Hendrickson built, and which I inherited (available at: https://modelingthesp.blogspot.com/2015/06/richard-hendricksons-lumber-loads.html ).

I also described, in a later post, the variety that ought to be present in lumber loads, as to both height of lumber stacks, and size of lumber in the stacks. These aspects of course varied from carload to carload (that post can be found at: https://modelingthesp.blogspot.com/2019/07/more-about-lumber-loads.html ).

Thke latter topic is only one part of the broad subject of open-top car loads, about which I have written frequently; to locate any of those posts, I would recommend using “open-top car loads” as the search term in the search box at the upper right corner of this post.

I continue to enjoy open-top cars, of course including flat cars, because of the variety of loads they can carry. An example is below, a car and load currently operating on the layout, an ancient Athearn 4-truck car (not really quite correct, but . . .) with a large casting load (for more on the load, see https://modelingthesp.blogspot.com/2020/06/blocking-for-big-loads.html ). 

Most of my loads, including the one shown above, are removable, permitting their use on a variety of flat cars (or, in some cases, also in gondolas). For another example, this short girder, braced according to the AAR loading rules, is shown on the Pennsylvania F30A flat car I recently discussed  (https://modelingthesp.blogspot.com/2022/05/the-new-rapido-pennsy-flat-car.html ). Background on the girder load can be found at this link: https://modelingthesp.blogspot.com/2012/03/open-car-loads-poles-and-girders-in.html .

Flat cars remain, as they should, a minor part of my overall freight car fleet, but I think my earlier 2011 goals for sizes, types, and railroad name variety are being met.

Tony Thompson

Tuesday, April 19, 2022

Updating the car fleet plan: covered hoppers

I have often written in this blog about fleets of freight cars: what kinds of cars were historically present, how one might identify the needs for a particular railroad, or for a particular area on a particular railroad; and how to proportion a model car fleet in a realistic way. Among the posts addressing those issues, and also containing links to all my 2011 posts about my own car fleet, is here: https://modelingthesp.blogspot.com/2013/02/keeping-model-car-fleet-under-control.html

 One of the fleet components I have been re-assessing is my covered hoppers. Let me begin by emphasizing that cars of this type were not common at all in 1953, the year I model. They are ubiquitous today, but not in 1953, comprising only a few percent of the national fleet in those days. 

Back in 2011, as I mentioned in the first paragraph, above, I included a covered hopper plan in my fleet summaries (here’s a link to that specific post: http://modelingthesp.blogspot.com/2011/02/choosing-model-car-fleet-6-covered.html ). The dominant cargo carried in covered hoppers in 1953 was cement, by a large margin. Grain carriage was years in the future, and dry chemical shipments were just getting established.

 Accordingly, nearly all my covered hoppers are weathered and waybilled for cement service. An example is below, from Union Pacific’s first class of these hoppers, painted boxcar red. As is obvious, this wasn’t a great choice of color, and all subsequent UP covered hoppers were light gray, along with most of the rest of railroading. The car is being switched at Shumala on my layout, and like all the cars shown in this post, originated as an InterMountain model. (You can click on the image to enlarge.)

But there are a few exceptions. I have rostered several such exceptions, but these are operated sparingly, in light of their relative rarity. Nevertheless, Ed Hawkins and Pat Wider documented a great many different leased covered hoppers, to a wide range of industries, in the Railway Prototype Cyclopedia (RP Cyc), especially Volume 30 (2015). In the photo below, a car leased by North American Car Co. (marks NAHX) to American Potash & Chemical, being blocked for pickup at Shumala, is just crossing Chamisal Road.

Many industrial companies, of course bought their own cars, as also documented in RP Cyc issues 27, 28 and 30. For example, here is a car owned by General Electric used to move glass sand, closely following prototype photos. We see it here in a passing mainline train on my layout.

Finally, the leasing companies kept some cars simply under their own reporting marks for flexibility in assignments. All of the “Big Three” lessors did this (General American, in their covered hopper division, marks GACX; Shippers Car line, under SHPX; and North American, under NAHX). An example is this car from the GACX fleet, seen bringing up the rear of the Santa Rosalia Local in my layout town of Ballard.

This car was one of my “small projects” awhile back (a description is at: https://modelingthesp.blogspot.com/2018/10/small-project-repurposing-covered-hopper.html ).

All these examples offer a change from the far more numerous railroad-owned covered hoppers in the early 1950s, and though all of these are authentic schemes, as I mentioned, I do operate them sparingly.

Tony Thompson


Friday, April 8, 2022

Getting the car you want, Part 2

 I began this series of posts with a description of a particular goal I had, to add a car representing a portion of a number series of PFE Class R-40-10 steel reefers to my fleet. There are both research and modeling dimensions to this task, and I outlined both in my first post (you can read that post at: https://modelingthesp.blogspot.com/2022/03/getting-car-you-want.html ). 

As I always do with house cars, I chose to add weight to the car with 5/8-inch steel nuts, attached inside the body with canopy glue. But before doing that, I drilled and tapped both the bolster holes (for truck screws), and the coupler box holes, for 2-56 screws. The reason to do that first is so I can avoid covering either hole with the steel nut. In the photo below, you can see at the right of the photo, that both holes are visible, thus not covered.

I am sure modelers will immediately also notice something else in the photo above: the body is warped, with sides bulged outward.  I corrected this when the roof was applied. I made sure the roof fitted correctly, then applied heavy rubber bands to hold it in place, and allowed styrene cement to “wick” into the roof-body joint all around the car. This is not the order of application of parts called out in the instructions, but in this case, I wanted to get the body corrected.

Next, I want to show the information available for this class of PFE cars, from pages 434-35 in the PFE book (Pacific Fruit Express, 2nd edition, Thompson, Church and Jones, Signature Press, 2000). The table below is just the Class R-40-10 portion. The heading is a hand-lettered heading from the original PFE document that was the source of the information (now at the California State Railroad Museum, or CSRM), added here to the table. You can click to enlarge the image to help in reading it.

The group of cars I want to model are in the last three lines of this table. Two additional notes: “SRE Co.” refers to the Standard Railway Equipment Co., and the numbers with the truck listings are the PFE drawing numbers. The handbrakes listed for all the 44,000-series car numbers are either Equipco or Miner, and Kadee makes excellent versions of both, so I will choose the one that goes with my car number.

As I stated in the previous post (link in the first paragraph of the present post), these cars were all built with wood running boards, but in 1939, PFE conducted an experiment with the then-new steel running boards from Apex, and quickly concluded that these were superior to wooden ones. (This was long before the AAR would order in 1944 that henceforth, new cars would have running boards “other than wood.”)

Below is a 1939 photo of one of the Class R-40-10 car in this experiment, shown at the Roseville shops of PFE (PFE photo, author’s collection). One of the five cars chosen for this experiment was PFE 44214, a car number I could choose for my project.

Note also in this photo, the clear view of the separate hatch plugs, hinged at a lower point than the hatch covers, and thus at a different angle. Note also that these hatches are latched as far open as possible (the top of the latch bar), yet they are not at a very big angle.

Repairs and upgrades to PFE cars were all recorded on individual “car cards,” 5 x 7-inch pre-printed cards filled out and stored by the shop. Many of these cards survive at CSRM. I showed examples of these in the PFE book, pages 435 and 436. For Class R-40-10, such replacements of the original wood running boards with steel boards are recorded as early as 1944, and continued for modest numbers of cars until 1950, at which time most of the class was reconditioned.

Since my InterMountain kit for the R-40-10 car I am building has the two-herald paint scheme, in use from 1946 to 1948, I would be modeling a car that might or might not have received a steel running board. It also might or might not have received retrofitted fans. More on that, and other kit completion details, in a future post.

Tony Thompson

Tuesday, April 5, 2022

Adding a UP automobile car

 In the previous post, I described an update to my freight car fleet planning for automobile cars on my layout. As I mentioned in that post, this updates a descriptive analysis I posted back in 2011. In particular, I noted that my present car fleet lacks a 50-foot Union Pacific auto car. To read that post, see: https://modelingthesp.blogspot.com/2022/04/evaluating-car-fleet-part-2-automobile.html .

As it happens, I have a kit for such a car in my stash, a Proto2000 kit with end doors, modeling UP Class A-50-17. The class was built by UP at Omaha in 1941-42, and had end doors.  Other prototype specialties included W-corner-post Dreadnaught ends, Equipco hand brakes, and wood running boards. Clearly it was time to build this kit. 

(For UP prototype information like this, see Terry Metcalfe’s excellent book, Union Pacific Freight Cars, 1936–1951, Metcalfe Publications, Englewood, CO, 1989.) The dates in the book title refer to built dates.

Below is a photo which, though not a great image, is enough to illustrate the main feature of Class A-50-17. It’s taken from from the Protocraft Decals website ( https://www.protocraft.com/category.cfm?ItemID=10295&Categoryid=39 ). In particular, note the “tabbed” side sills. These 250 cars were numbered UP 161200–161449.

For many modelers, the first issue to be addressed with UP freight cars is lettering, and this is well covered in Terry’s book. Until 1936, UP cars had white Roman lettering, without slogans. In that year, they introduced the familiar slogans, “Road of the Streamliners,” and “Serves All the West,” slogans possibly initially in white, but very soon changed to yellow. In June 1939, the Roman lettering was replaced with sans-serif or “Gothic,” still white or yellow. That is the scheme you see in the photo above. In mid-1947, all lettering was changed to yellow.

The Proto2000 kit is in the 1939 paint scheme, correct for a 1941-built car, which means that I will weather it a fair amount for my 1953 modeling year. The car body, as it comes in the kit, happens to have straight side sills, but is cleverly designed with recessed areas on the inside of the body, indicating where to cut to remove material, if a tabbed sill is needed, as with this car (see prototype photo). I did this with a hobby knife to score the cuts, then small files to clean up.

Next, let me address an additional issue with this or any freight car kit. I mentioned above that the prototype cars had Equipco hand brakes. To my surprise, if not astonishment, the kit brake wheel is in fact a late 1930s model Equipco brake wheel. I show the kit part below, in the sprue.

How do I know what this brake wheel is? I consulted Patrick Wider’s superb article in Railway Prototype Cyclopedia (“Freight Car Hand Brakes – 1920s to 1950s”), in issue no. 10 (2004). In it, he showed the photo below, which I concede does not match the Proto2000 wheel exactly, but it’s certainly similar, and the kit part does have six spokes and six holes in the interior dish. (The photo is from Equipco, division of Union Asbestos & Rubber Co.)

Many transition-era modelers understandably think of nothing beyond Ajax brake wheels when building a model, and understandably so, as it was the most widely sold handbrake product in the immediate years after World War II. However, I show that wheel below (also from Wider’s article), just to illustrate that the two prototypes are considerably different. Note also that the gearboxes of the two makes (behind the wheels) are different in shape.

I will of course use the kit wheel on my model, with some pleasure in being able to use the correct part.

There are additional issues to be solved in this kit (beyond of course the mere following of kit directions), and I will come back to those in a future post.

Tony Thompson


Saturday, April 2, 2022

Evaluating the car fleet, Part 2: automobile cars

As I mentioned in the preceding post, back in 2011 I updated all my car fleet plans by car type. Some of them have changed little, despite adding more cars (I think mostly in accord with plans).  I gave the example of gondolas (see that post at: https://modelingthesp.blogspot.com/2022/03/evaluating-car-fleet-anew-gondolas.html ). But there are exceptions. This post is about one car type that is an exception: automobile cars.

For many years after the 1920s, the ARA and then the AAR classified all box cars with double doors as “automobile cars,” regardless of actual assignment, intended use, or the presence of special equipment such as auto loaders. It just meant a double-door box car, nothing more.

This is well illustrated by Southern Pacific, which classified all its double-door box cars in Class A (automobile), even though only a minority of the fleet was equipped for or assigned to automobile traffic. That includes auto parts as well as assembled automobiles. This was just as AAR intended.

My post in 2011 about automobile cars described the balance I believed needed at that time. Here is a link to that post: http://modelingthesp.blogspot.com/2011/02/choosing-model-car-fleet-4-automobile.html ). I did discuss auto parts and assembled automobile routing in some detail.

To summarize, one indication of the cars that would be needed in any automobile car fleet is the route(s) cars would follow, from the upper Midwest, particularly Michigan, where so many auto parts, as well as assembled automobiles, were manufactured, to the railroad you model.  For Southern Pacific modelers, that means primarily the Overland and Golden State Routes. 

For the Overland Route, there exists a very helpful magazine article by Mark Amfahr, “Bay Area Auto Shipments in the Postwar Years,”which appeared in the Spring 2016 issue of the The Streamliner magazine (UP Historical Society), pages 6–13. It contains fascinating data, as shown below.

The reason for these various railroads’ cars, of course, is that most railroads joined into pooling arrangements, usually on the basis that each railroad contributed  the same proportion of the needed number of cars, as their proportion of the total miles distance in the route. 

To illustrate one aspect of this traffic, the 1950s photo below (UP Museum, courtesy Mark Amfahr) shows yard clerks at Council Bluffs attaching a route card to an Erie 40-foot double-door box car containing assembled automobiles. Note that the route card reads “1B,” a UP blocking code indicating priority transfer to SP at Ogden. 

Returning to the graph above, it shows that I certainly need DT&I, Wabash, New York Central, PRR, GTW, and SP cars, all of which are in my auto car fleet. In the previous post on automobile car planning (link shown in the fourth paragraph of the present post), I showed a number of my SP auto car models. I’d like also to show models for some of the other railroads shown in the above chart. Below is the tail end of a Los Angeles-bound auto-parts train, about to arrive at Shumala on my layout.

The models shown above are DT&I 13167, an ancient Athearn metal model, obviously similar to the familiar Pennsylvania X32 cars, and Wabash  45218, an Overland brass model. Note the caboose, incidentally, with its vermilion ends: all of of SP’s pre-1960 bay-window cabooses were built that way (for some background, see: https://modelingthesp.blogspot.com/2022/02/modeling-sp-cabooses-part-4.html ). 

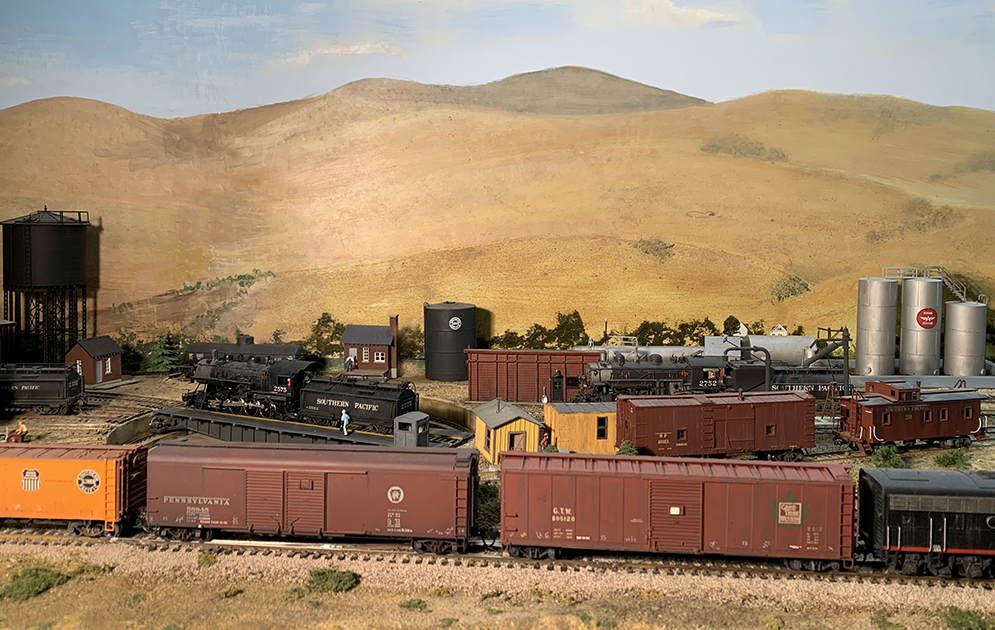
Some additional cars are shown below. Here we see two cars right behind the power on today’s Golden Gate Manifest (GGM), passing the engine terminal at Shumala. The cars are Grand Trunk 595128 (a Proto2000 model) and PRR 58845, Class X32A (a Railworks brass model). Both are in auto parts service, and are returning empty westward from Southern California auto plants, heading for the Overland Route.


I mentioned the specific mainline trains in the foregoing photo descriptions to emphasize that I try to maintain a connection to SP’s Coast Route traffic, even though I can only do so with passing trains, moving from staging onto the layout, and back to staging. For me, this is part of the interest in including the SP main line in my layout.

I have not mentioned Union Pacific automobile cars in the foregoing, but the graph above clearly shows that I need UP cars as part of the auto car traffic to and from the Overland Route. As it happens, my fleet currently only contains a 40-foot auto car.  Obviously a 50-foot car should be added, since the graph shows approximately equal numbers of 40-foot and 50-foot cars in the traffic.

I will return to the creation of a UP 50-foot automobile car model to be part of this traffic in a future post.

Tony Thompson


Thursday, March 24, 2022

Evaluating the car fleet anew: Gondolas

 Perhaps as many as 30 years ago, I began to try to rationally plan my fleet of freight cars for the layout. I did this by analyzing the cars of each type that I had (say, stock cars), and then determining what traffic they might be needed to carry, to and from what points, and how often. The latter aspects provided an idea of how many cars of that particular type I might need, and which ones.

There was a hiatus in layout activity following my move from Pittsburgh, PA to California, because I didn’t have suitable home layout space. But in 2005 we moved to a house with a fine space, though not overly large, and layout work resumed. I have written a bunch of blog posts about the rebuilding (“rebuilding layout” should be a good search term in the search box at right, if you’re interested), but one post that captures the transition activities is this one: https://modelingthesp.blogspot.com/2018/03/how-old-is-my-layout.html .

Once rebuilding was well underway, and I was beginning to actually do some switching on the layout, I re-opened the idea of analyzing the car fleet composition. The new layout would have different features and somewhat different goals, so the fleet would necessarily differ. In addition, many new (and much better) HO scale freight cars were coming on the market, so older cars could be replaced.

I found the old computer files of my fleet planning lists, and set about revising them. Several of the revisions led to blog posts in 2011 and 2012. One of the car fleet areas I summarized was gondolas (see the post about it here: https://modelingthesp.blogspot.com/2011/04/choosing-model-car-fleet-8-gondolas.html ). I recently realized that I needed to re-visit this car type.

The traffic analysis in the blog post just cited is fine, and I wouldn’t alter the thrust of it at all. But my emphasis today is a little different. I have begun to use more General Service (GS) gondolas in ballast service, taking advantage of building some more Red Caboose kits and acquiring some Challenger brass models. Now I can run divisional ballast trains like the one below (this was also discussed in my recent Model Railroad Hobbyist or MRH article, see https://modelingthesp.blogspot.com/2022/03/my-column-in-new-model-railroad.html ), seen here passing Shumala.

Of course these cars are not limited to ballast loads. One load needed regularly at Shumala on my layout is sand for the new sand house (construction described in an MRH article in the January 2021 issue ). Below you see one of my venerable Ulrich cast white-metal gondolas (produced in the 1950s), being switched to the sand house. They are a little oversize, but are prototypically correct in their details.

Turning away from GS gondolas, tight-bottom or GB gondola are also important, and nearly all the foreign-road gondolas in my fleet are GB types, along with representative Southern Pacific GB types. One of the great things about model gondolas, of course, is the interesting loads that can be carried in them. I show below just one of my own examples, a steel beam long enough that both drop ends needed to be lowered. It’s seen here at the end of a passing train on the Coast Division main line.

The model shown here, PRR 439197, Class G26, is a 65-foot car modified from an E&B Valley kit to match the Pennsylvania Railroad prototype. The large girder is made from Atlas bridge parts.

Another important aspect of car choice is to recognize the railroads that had substantial rosters of GB cars and thus would have some likelihood of showing up on my California layout (referencing, of course, the Gilbert-Nelson hypothesis — for more info, use that term in the search box at top right). 

A major example, in addition to the PRR and the Pennsy car shown above, would be New York Central and its subsidiaries, such as Pittsburgh and Lake Erie. Below I show a load of steel beams, on the way to a team track on my branch line, spotted here at Shumala en route to its destination.

Here the model, P&LE 40205, is from a Proto2000 kit, and the load is simply Evergreen beams. One of the nice things about these kits is the interior detail, rare on commercial gondola models until recent years.

I continue to refine my gondola fleet, occasionally selling off or adding a car, but for the most part, my fleet matches my updated goals for this car type, so this part of the fleet management job is substantially complete.

Tony Thompson


Friday, November 12, 2021

Why add a freight car to a fleet?

 Reading this title, many would say, “Oh, yeah. And why not? . . .” But I have around 750 freight cars in my active roster, so there are obviously no particular shortages. Or are there? 

At this point, my freight fleet being what it is, I do tend to add cars only for quite specific reasons. Maybe a model becomes available for a prototype I haven’t modeled, or one of my older cars really deserves replacement. But there is one other reason, too. 

From time to time, I scan through my “pairs list,” to see if there are any visible needs. (The “Pairs List” has been described in prior posts, such as: https://modelingthesp.blogspot.com/2012/02/waybills-17-pairs-list.html , and was developed somewhat further in a later post, which is at this link: https://modelingthesp.blogspot.com/2017/03/waybills-part-58-more-on-managing-bills.html .)

Recently, such a browse through the pairs list drew my attention to my fish cannery, in the layout town of Santa Rosalia. I would like additional inbound loads of vegetable oil, used for canning sardines. Much of the traffic from the cannery is outbound loads of canned food, as you see below with a divider-equipped box car spotted for loading. That’s the depot roof in the foreground.
But more variety of inbound tank cars of appropriate ownership would be welcome. One of the oils widely used for packing canned fish is soybean oil. Upon this thought, a faint bell rang in my memory, that I had a tank car kit for a car that would fit that load. I have for years maintained a written kit inventory (originally created to be carried on hobby shop visits, minimizing duplicate purchases), and sure enough, there it was, a Proto2000 tank car kit lettered for A.E. Staley.

This is a long-lived company, founded by the A.E. Staley of the name, in Decatur, Illinois. (Incidentally, Mr. Staley also founded a professional football team in 1919, called the “Decatur Staleys.” Not long afterward, they moved to Chicago under the direction of their coach, George Halas, and became the Chicago Bears.) This company originally specialized in corn starch, but broadened into a variety of corn and soybean products.

I built the kit per directions, so no description of that process is needed, except I substituted brass wire for the plastic handbrake shaft provided in the kit. Prior to weathering, the 8000-gallon car is shown below. It’s reassuring to know that this is a paint scheme documented for Proto2000 production by Richard Hendrickson.

With the car approaching operational status, it was time to make up a waybill. One of the ones that I created is shown below, with typical added marks characteristic of many prototype waybills, as I have shown in a number of prior posts.

Next I applied my usual acrylic wash weathering to this model (for a fairly detailed discussion and description of my methods, please see either of the two “Reference pages” linked at the top right of this post). Here’s the car, satisfactorily weathered, and with the waybill shown above as authority, being spotted at the cannery by Ten-wheeler 2344.


This car makes a nice addition to my tank car fleet, and of course likewise shrinks my kit stash by one. That’s how it’s done: one car at a time. And the original goal is met too: switching at the cannery gains some variety.

Tony Thompson