Saturday, December 30, 2023

Building a Sunshine Mini-kit

Back in the day, Sunshine Models used to offer “mini-kits” at the annual Naperville meets. These usually contained resin and/or styrene parts so that a commercial kit could be modified to model a specific prototype. This post is about building one of them.

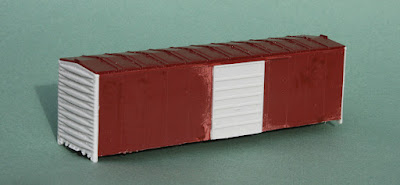
This particular kit is one that I recently discovered in my stash. It was in an unlabeled box, and in tidying up its area, opened it to see what it was. It was a kit to modify a Branchline box car into a model of an EJ&E 1941 AAR boxcar with 10'6" inside height and 8-foot Superior doors.

These 500 interesting cars were built in 1941, when such a wide door was unusual in North America. The first 300 were built by American Car & Foundry, the remaining 200 by Mount Vernon. They were numbered 60400–60899. Below are builder views of one of the AC&F cars. (AC&F photos courtesy Ed Hawkins). Note the 5/5 “W-corner post” Dreadnaught end. Resin ends and doors were supplied in the Sunshine kit.

The kit instruction recommends an undecorated Branchline 40-ft. Postwar AAR Boxcar kit. After trolling the internet for awhile but not finding such a kit, I settled for a decorated one, and used paint stripper to clean up the body. After attaching the new resin doors with canopy glue, I removed the “tabbed” side sill of the original model; the mini-kit supplies the kind of straight side sill visible on the prototype side view above.

The next step is adding weight. As I often do with house cars, I use 5/8-11 steel nuts, attached inside with canopy glue. This has proven to be a strong and durable attachment. In the photo, you can observe that I didn’t locate the nuts at the locations provided by the car body. I want the weights well away from all screws that will come up through the floor.

Next is the attachment of the roof. Assembly is done in this order so that the ends can be fitted right up against the underside of the roof on each end, once it’s attached. Since the roof and body are both styrene, I used styrene cement to join them. After carefully cleaning up and checking fit of the resin ends, they were attached with canopy glue.

Withe basic box completed,  I was ready to install the new side sill. But I’ll take up that step and completion of the model, in a following post.

Tony Thompson

Wednesday, December 27, 2023

Route cards, Part 30: modeling

As the post title tells you, I have written a substantial series of posts about route cards. These were initially posts about the prototype size and shape (for example, see this post: http://modelingthesp.blogspot.com/2012/01/route-cards-7.html ). A more recent series of posts has shown a wide variety of prototype route cards (an example can be found at this link: https://modelingthesp.blogspot.com/2023/11/route-cards-part-29-more-on-grading.html ). 

At the risk of repeating earlier material (admittedly, material from several years ago), I often add route card boards to models that don’t already have them, by simply gluing a short length of HO-scale 2 x 6-inch styrene to the car in the appropriate location. This is usually near or above the left-hand truck on each side of the car, or on boxcar doors.

But prototype photos should be always consulted, because sometimes the boards are located in other places on the car side. Here’s an example (SP photo, my collection),  one of the thousands of Enterprise General Service gondolas purchased by Southern Pacific. Obviously the route card is in the far right panel, with a route card on it.

SP modelers for decades have had a serviceable model of this car, in the form of the Ulrich white-metal model. But it was manufactured with no route card board. Most of my Ulrich cars have received one, but I spotted one still needing a board. Here I applied my usual method, small piece of styrene 2 x 6, attached with canopy glue:

Then of course the new board is painted body color. Now we need to put a card on the board.

The modeling approach for route cards has for many modelers, including me, primarily meant adding small squares or rectangles of paper to the route card boards. That looks fine in most situations. But some prototype route cards do have lettering on them big enough to read. Here’s an SP example, from a previous post (this card, and its meaning, were at: https://modelingthesp.blogspot.com/2023/08/route-cards-part-22-additional-examples.html ).

It would sure be nice to be able to have some of our route cards look like the one above. And now, an  alternative has actually emerged.  Owl Mountain Models now offers a small decal sheet, only 2 inches square, but it has plenty of card images: 124, by my count.

You can purchase these on the Owl Mountain website, and as you see above, this is set #1220. Scroll down the page at this address: https://owlmtmodels.square.site/shop/1200-series-ho-decal-sets/5?page=1&limit=60&sort_by=category_order&sort_order=asc . This sheet, that would do 62 cars, is only $2.00! I’d say these are way underpriced.

Applying these is, of course, like any decal. In fact, I like that you don’t have to trim them exactly to size; the clear film around them allows you to simply cut close to the printed image. I’ve been putting these on a variety of cars, and totally enjoying the look that is achieved. First, one end of the Ulrich gondola that I showed above:

I also chose one of my freight cars that had no route card on it, which happens to be a car I inherited from Richard Hendrickson. We know that the Santa Fe, like SP, used route cards with large, bold numbers (coded, of course, for a range of destinations). I showed examples in an earlier post (see it at: https://modelingthesp.blogspot.com/2018/11/route-cards-part-17.html ).

Finally, I used one of the route cards on a wood-sheathed car. These of course could be tacked anywhere on the car side by a clerk, but the most common location was above the left-hand truck, at a convenient height for the clerk.

I really like these new Owl Mountain decals for route cards. It’s true that you can’t really read them when they are on a model. But they beautifully fulfill one of Richard Hendrickson’s lettering principles: that “there should be something there” that looks like lettering. Mission accomplished.

Tony Thompson

Sunday, December 24, 2023

Trackwork wars, Part 8

Over the years, my maintenance issues with my layout have involved many things, but the two most frustrating have been electrical (spawning the name “electrical wars” for posts about them), and to a much lesser extent, trackwork (thus the obvious counterpart, “trackwork wars”). This is another of the latter topics, interestingly in about the same area as the previous such post (see it at: https://modelingthesp.blogspot.com/2023/10/trackwork-wars-part-7.html ) but a different issue.

Below you see the obvious dip in the track in the area of the entrance switch into my layout area of East Shumala. This was discovered by the usual method, derailments during an operating session (for a description of the session, not the problem, see: https://modelingthesp.blogspot.com/2023/12/december-operating-session.html ). I amused some of the visiting operators, when this dip was discovered, by exclaiming “It’s a new dip!” But I was correct; this wasn’t evident six months ago.

But in fact the problem is not only at this location. Moving to the right of the above photo, it was evident that though the main line through Shumala is level, the switch diverging toward East Shumala from the main line is downhill over a longer area that suggested in the photo above. So a wider area needed to be corrected.

I have a way of correcting dips, as I showed in the previous post (link in the first paragraph at the top of this post). I force a putty knife into the track support (installed too long ago to be sure, but I suspect Homasote) under the area that needs to be raised. This is near but not the same place as the area I corrected in that previous post (top of post).

With an opening created, I slide in some pieces of Evergreen styrene strip, 0.040 x 0.125 inches (HO scale 4 x 12), about an inch long, into the opening where the putty knife was.

As you see above, these were a little too long, and the protruding ends were cut off. Then a check with my steel ruler showed that there was no longer a dip in the track. In the photo below, the rail joint is at the 10-3/4-inch mark on the ruler, and there is no discernible dip any longer. And the mainline track is also raised to be level, correcting what is shown in the second photo from the top of this post.

The very ends of the styrene strips are evident above, but these will be covered with ballast in my upcoming tour of the layout to correct innumerable areas where scenic ground cover needs to be added or renewed.

With this track corrections, repeated switching moves revealed no derailments (of course, as every layout owner knows, bringing in guests may reveal a different result). I realize that this and other track subsidence problems probably indicate that my sub-roadbed or track boards may have shrunk, warped or shifted in some way, but rather than tear up the layout down to the framing to fix things from the bottom up, I will continue to make these kinds of “corrections” to the track.

Tony Thompson

Thursday, December 21, 2023

The Shortest Day

One of my vivid memories from childhood is my father relishing this day, which seemed odd to me then, what with the days shortening and the nights closing in, and of course colder and rainier weather, so why would you celebrate? But he always said, “Now the days will be getting longer,” and of course, so they will.

What hadn’t occurred to me in those days was that humans for many, many centuries have had the same feelings about this day that my dad did, and in more primitive times, for better reasons (Jessicaphoto).

 (I have posted something quite similar to today’s post on several previous December 21st. starting back in 2012.)

From the time my wife and I discovered the performances known as Christmas Revels, we attended a number of times here in the Bay Area. Revels was created by John Langstaff in 1957, and the tradition gradually grew and extended over the years. Today Christmas Revels is performed in nine cities around the country (for the location of those cities, you can visit their map at this link: https://revels.org/about/#revels-nationwide , and from there go to their home page to learn more about their history and what Revels is.)

A favorite part of the performance of every Christmas Revels is the reading, toward the end, of a poem by Susan Cooper, written for Revels in 1977 and for me a delight. I reproduce it below, with permission from Cooper, to whom I wrote an email and requested the use. (The poem is all over the Internet, in both written and spoken form, though often mis-punctuated and sometimes with words changed — imagine the nerve!) She sent me a copy of it as she wrote it, so that it could be presented correctly. (If you’d like to know more about her and her career as a writer, you can go to her web site at: http://www.thelostland.com/ .) She also mentioned that she was happy to give permission for use in this blog, as she is descended from three generations of English railwaymen!

THE SHORTEST DAY

By Susan Cooper

So the shortest day came, and the year died,
And everywhere down the centuries of the snow-white world
Came people singing, dancing,
To drive the dark away.
They lighted candles in the winter trees;
They hung their homes with evergreen,
They burned beseeching fires all night long
To keep the year alive.
And when the new year’s sunshine blazed awake
They shouted, revelling.
Through all the frosty ages you can hear them
Echoing, behind us — listen!
All the long echoes sing the same delight
This shortest day
As promise wakens in the sleeping land.
They carol, feast, give thanks,
And dearly love their friends, and hope for peace.
And so do we, here, now,
This year, and every year.
Welcome Yule!

A far more eloquent presentation of our traditions than I could ever have written. I hope you enjoy it as much as I do.

 Tony Thompson

Monday, December 18, 2023

Modeling a Celanese tank car, Part 3

In the previous post, I showed the first steps in converting an Athearn insulated tank car model to resemble one of Celanese Corporation’s many tank cars that were ICC type 103 or 104 insulated cars. In that post, I showed a prototype photo of such a car, GATX 77414. If you wish to look at that post, it can be found at this link: https://modelingthesp.blogspot.com/2020/09/modeling-celanese-tank-car-part-2.html .

In that previous post, I had replaced the Athearn valve bonnet with a Detail Associates dome molding, and was ready to deal with the details of the new dome, and prepare for addition of a new dome platform. Here’s a repeat of the final photo in the previous post.

At this point I considered painting the central area of the car, including the dome, with the cream or ivory color used on many Celanese cars. I’ll repeat one of the prototype photos shown earlier (specifically, in my introductory post on this topic, which is here: http://modelingthesp.blogspot.com/2017/08/modeling-celanese-tank-car.html ). The photo is from the Richard Hendrickson collection, and was taken at Southern Pacific’s Taylor Yard in Los Angeles. The center color area around the dome is evident, as is the fact that handrail and ladder are black.

(Incidentally, note the very dirty top surface of the lumber load in the foreground, presumably the result of some kind  of pollution that landed on the load; but how many modelers have reproduced this look?)

My original painting plan was to build and attach the new dome platform, then mask the body that you see in the photo at the top of this post, and paint that entire area. But it occurred to me that it might not be so easy to get a good paint coverage underneath a dome platform. The idea that then occurred is that I could paint the body area, then later paint the platform separately before installing it. 

Here’s a photo of that step. The handrail and ladder also got painted ivory, but that won’t remain. The ladder will be replaced by one that reaches from the running board to the dome platform, and the handrails will be brush-painted black (compare the prototype photo). The perspective make it look like the ivory band is not equal on both sides of the dome, but in fact it is.

My next step in continuing modeling this car was to add features to the dome top. The Detail Associates dome I used has the two safety valves and manway cover, but needs an air inlet valve and an eduction valve cover. I made the former from a piece of rod on my workbench, and turned the valve cover from 1/8-inch styrene rod. I have described these kinds of parts in my article in Railroad Model Craftsman, Vol. 80, issue for January 2012, page 61.

These features, and the dome grab irons, will be painted when I paint the dome platform.

Work on the underframe is also in progress. As I usually do, I added brake rods to the Athearn underframe, because on a tank car, they are visible from above. I sometimes also add piping to the reservoir and valve, but that piping is far less obvious from above than the brake rods, so I usually omit that.

Most Celanese cars like this had dome platforms, some did not, but I wanted to use the Yarmouth Model Works dome platform kit on this model, which is a full platform, to resemble the prototype photo above. (See my post about how I addressed building this kit at: https://modelingthesp.blogspot.com/2023/04/better-model-dome-platforms-part-2.html .) I will be able to follow the same procedure on the present project as I did in that post.

I’ll return to the building and placement of the dome platform, underframe completion, and other issues of finishing, in a future post.

Tony Thompson

Friday, December 15, 2023

The PFE reconditioned wood cars

In 1935, Pacific Fruit Express, lacking funds to entirely rebuild its many older cars, began a program that they called “reconditioning.” (There is considerable information available beyond the brief summary presented in this post; see Chapter 7 in Pacific Fruit Express, 2nd edition, Signature Press, 2000). This meant replacing damaged or worn parts in kind, particularly wood superstructure framing, but not modernizing, other than ladders in place of grab iron rows, and modern hand brakes.

The first car of this program, PFE 91022, was built as a test car and completed in June 1936. It would be the first of more than 7500 cars that went through this program, nearly all classed as R-30-9. It’s shown below at Roseville (PFE photo, CSRM). Note in particular the wood ice hatch covers, wood ice hatch platforms, and hatch plugs below the the covers.

For a better view of this ice hatch arrangement, the photo below (PFE photo, CSRM) shows a hatch platform and a hatch cover open as far as it can go (at the top of the latch bar). The separately-hinged hatch plug is beneath the cover. Note the hatch rest in the center of the hatch cover, and the small metal striker plate at right on the hatch platform, where the hatch rest strikes if covers are entirely open for icing.

But before long, based on experience with roofs of steel cars, PFE decided to dispense with ice hatch platforms, relying instead on slate granules in the roof paint to provide adequate footing for workmen doing icing. But a wood bar was retained on the roof to put the hatch rest striking plate at the correct height. This photo shows the roof of Class R-30-9 car 92508. This is a car reconditioned in 1937 from a 1923-built car of Class R-30-12, 25756. The photo was taken at Gering, Nebraska in 1957 (Virl W. Davis photo). Note also that the hatch covers clearly sit higher than the roof.

A side view may be more clear. Below is a detail of a PFE photo during icing (my collection), and on both cars you can see the raised hatch coaming and the hatch striker bars. Note also the open hatch plugs atop each hatch cover. The plywood-sheathed car at right is PFE 94242, one of a small number of Class R-30-9 cars to get such sheathing.

These details apply only to the earlier cars in Class R-30-9, because in 1938 PFE decided to replace wood ice hatch covers and plugs with one-piece steel ice hatches, as were applied to steel PFE cars. In Class R-30-9, this meant that PFE 95737 and higher numbers had these integral steel hatches.

The impact of these details on modeling PFE’s Class R-30-9 is that the very nice Red Caboose HO scale kit for Class R-30-9 offers the chance to model either the wood hatch covers with an ice hatch platform, or a steel hatch without platform. You can even model the wood covers without a platform, but that leads to a difficulty, visible in the prototype photos above. The wood ice hatch cover sits above the roof, as it should, but there is no support for its hinges, nor is there any ice hatch striker bar; those would be part of the platform.

Of course, these are easily added with styrene.  Below is the roof of a kit I am working on, with the additions of striker bars and hinge supports fairly obvious. It will, of course, be the roof of a car numbered below PFE 95737, and will end up looking like the above photo of the roof of PFE 92508.

I will say more about this kit in a future post.

Tony Thompson

Tuesday, December 12, 2023

Waybills, Part 112: stamps and all that

From time to time in this series of posts about waybills in model form, I have alluded to rubber stamps used for convenience, especially by car distributors moving cars to agents that requested them. Having to type or even hand-write the same originating yard name many times a day, would quickly lead to use of a rubber stamp for that name. (I introduced this topic in a recent post in the series: https://modelingthesp.blogspot.com/2023/02/waybills-part-104-yard-stamps.html ). 

Below is an example, a C&O Empty Car Bill with the originating yard, E. Buffalo, NY, identified with a rubber stamp. I wanted to capture this practice and appearance. The image of the card was provided to me by Ted Pamperin, and I discussed it in the earlier post cited in the paragraph above.

As I showed in Post 104 in this series (see link in first paragraph, above), I had a couple of stamps made for my waybills. I ordered them from TheStampMaker (you can see the wide range of their offerings at: https://www.thestampmaker.com/custom-rubber-stamps.aspx ), and selected two yard names, Los Angeles and West Oakland. Since then, I have added three: Santa Clara, San Luis Obispo, and Watsonville Junction.

At the Southern Pacific Historical & Technical Society meeting this fall, held at Bakersfield in early October (you can see my write-up about it at: https://modelingthesp.blogspot.com/2023/10/the-2023-sph-annual-meeting.html ), a vendor was selling rubber stamps used by passenger agents to stamp ticket destinations. These are actual SP stamps and were terrific looking! I bought them immediately. 

Some are for smaller places that would be unlikely to forward cars to my layout area (you can click on the image to enlarge it, if you wish), such as Paso Robles or Oxnard, but not impossible. I will use them sparingly if at all. Others like  Sacramento and Salinas are quite reasonable.

These stamps are about the right size for my model Empty Car Bills. I also like to use different stamp ink colors to add variety to the images. Most of the ones below are purple, but I also use red, green, blue and even occasionally black.

For completeness, I should mention that I have worked in Photoshop to create rubber-stamp-like images that I can include on my waybills, from Weight Agreement Stamps to Dangerous stamps, to customs stamps (see for example this post: https://modelingthesp.blogspot.com/2020/10/waybills-part-74-more-stamps.html ). These continue in use, and I have gone back into my older waybills to make sure all the ones needing, for example, DANGEROUS stamps have received them. 

Bet beyond those considerations, I’m enjoying using all my rubber stamps for car origins. I like the look and what I know about the realism of their use.

Tony Thompson

Saturday, December 9, 2023

Blog 13th anniversary

The first post of this blog was posted on December 8, 2010, so that makes yesterday the 13th anniversary. Around every subsequent Dec. 8, I have posted a reflection on the year just past, along with statistics associated with blog viewership. And once again this year, I still remember comments that my blog wouldn’t last out the first year. I guess that prediction was wrong.  

My posting pace of a couple of posts a week continues to be about right for me. This leads to around ten posts a month, which I find comfortable. I have also had comments from people that they like finding new posts fairly often, so for at least some readers, the pace is good also.

The viewership has amazed me every time I’ve looked at it, with numbers of page views that always seemed fantastical to me — and they still do. In the first years of the blog, it received about 100,000 page views a year. Since then, it increased to the current value of about 250,000 a year, still gently increasing from year to year. Total page views for the life of the blog now exceeds 2.6 million views.

Monthly views since 2017 have averaged about 20,000, with occasional excursions higher. This may represent some “views” by Internet crawlers seeking links, but as it comes from a wide variety of the usual Western countries, at least some of it must represent actual human viewers.

I also want to mention that some time back, I added “Reference pages” (as the Blogger application calls them) about my weathering process. The process is one I developed myself, but I did get additional ideas from my late friend Richard Hendrickson. Links to these pages can be found at the upper right of the screen, at the top of each blog post. As I hoped, these continue to receive numerous page views. My experience in teaching weathering to others is that the main requirement is just to try it.

In this calendar year, I hosted four operating weekends on my layout, two days each, one weekend of which was the BayRails semi-annual event. These sessions are a real pleasure for me, because I get to see the layout operating as I intended in designing and building it (well, people mostly operate it as I envisioned). To choose just one example, below are Jeff Aley (left) and John Sutkus switching at Ballard on February 18 (for a write-up about that session, see: https://modelingthesp.blogspot.com/2023/02/operating-sessions-no-80-and-81.html ). 

This was a kind of milestone year for me, as this was the year I turned the same age as Richard Hendrickson was when he passed away in 2014 (for my memorial post, see: https://modelingthesp.blogspot.com/2014/07/in-memoriam-richard-hendrickson.html ). Here’s a photo taken by Ray deBlieck in 2012 of Richard (left) and me, crewing a train at the La Mesa Club’s superb Tehachapi layout. Hard to believe that this photo was taken over a decade ago.

As the photo above suggests, this annual anniversary post allows me to look back and consider what I’m doing, how well I think I’m doing it, and whether any of it needs to change. I have received the comment on occasion that a post describing a project, such as building a freight car, seems to assume that some steps in the project don’t need to be explained. It’s true that this is not a beginner-oriented blog. I am usually writing for those who do have some background and some experience. I plan to continue that way.

An interesting comment received by email a few months ago is that my layout seems to be largely complete and that I don’t write too much about it. That is certainly true in part. Maintenance problems have been more frequently described than new structures or newly-laid track. 

But I always emphasize that my layout was built mostly to operate, not as a great collection of prize-winning structures or stunning scenery. As a result, photos of it can be a little mundane. Still, I continue to enjoy views like this one, showing activity on the freight platform at the Ballard depot.

Another year! I’m still surprised that it keeps going, and that I enjoy doing it. But as long as that’s true, I will continue.

Tony Thompson

Wednesday, December 6, 2023

December operating session

This past weekend, I hosted two operating sessions on my layout. As always, the modeling represented the current dates (December 2 and 3) but in 1953. Those days were Wednesday and Thursday in 1953, so the session modeled a regular weekday operation. I always mention these points in my pre-operation briefing.

As had been suggested, my briefing included a “crop report,” identifying the crops being harvested locally in December: broccoli and celery on the vegetable side, prunes from Guadalupe Fruit Company, and of course lemons, which are harvested nearly year-round on the California coast (for background, see my post on this topic: https://modelingthesp.blogspot.com/2015/09/seasonality-of-crops-and-traffic.html ).

And in 1953, there was a good grape harvest, so both my layout’s shippers of wine would be loading “young wine” for blending (if that isn’t understandable, please see my article in Model Railroad Hobbyist, “Tank Cars and the Wine Business,” in the May 2023 issue).

Here’s a view of a PFE car being loaded at the Coastal Citrus Association shipping building at Santa Rosalia. There are even a few spilled lemons on the ground outside the door.

The first day of these sessions, Saturday Dec. 2, the crews comprised Jim Providenza, Tom Swearingen, Ed Slintak, and Richard Brennan. As we almost always do, the two-person  crews traded off between the Shumala side of the layout, and the Ballard/Santa Rosalia side, working each side once. Below are Ed (at left) and Richard, starting out on the Ballard side. It looks like Ed is the conductor here.

About the time the Shumala crew has completed the first round of work, the Guadalupe Local passes by on the main line, and both collects all outbound cars, and sets out inbound cars for the branch. As the mainline trains would be an interruptions for the switch crews to operate, I normally run them. With the Guadalupe Local having completed its work at Shumala, here is a view of me starting off its departure on the main (Jim Providenza photo).

Then the crew that started off on the branch takes over at Shumala, and the former Shumala crew departs with the branchline train. Below, Tom (at left) and Jim are at work on the Ballard side of the layout.

The second day a new set of crews arrived. Unfortunately, this session was marred by some trackwork issues, issues that had been less severe the previous day, and somehow had gotten worse. Likely in a future post I will deal with the remedies for these problems, but at the time, I tried to remember Paul Weiss’s advice about Host Flaw Hysteria (see my post at: https://modelingthesp.blogspot.com/2023/07/pressure-what-pressure.html ) and remain calm.

The crews who suffered through the problems on what was my 87th session on the layout in its present form were Jon Schmidt, Seth Neumann, Mark Schutzer, and Jim Radkey. Starting out on the Ballard side were Jon (at left) and Seth. I think Seth was the conductor here.

Meanwhile, Mark (at left) and Jim were working at Ballard, with Mark conducting. As he often does, Mark was kind enough to bring a couple of SP steam locomotives, which we all enjoyed seeing work on the layout.

And as before, once the two crews have finished their initial work, the Santa Rosalia Local returns to Shumala, and the two crews have to organize how to switch the train, including putting the branchline power and caboose onto the new train before departure. Here are all four of them discussing how best to do this. From left, they are Jon, Jim, Mark and Seth.

Not fun for the owner to have a session with problems (Host Flaw hysteria notwithstanding), but I think fun was nevertheless had for most of both sessions. And as always, for the layout owner, it’s great fun to see the layout come to life and switching take place just as you imagined it when designing and building the layout. Now to dig in and fix the track.

Tony Thompson

Sunday, December 3, 2023

Modeling SP MOW, Part 6: a commissary-kitchen car

I haven’t attempted to get very far into maintenance-of-way (MOW) cars for the Southern Pacific, because there is little scope for them on my layout. But I do find them interesting. By far the most common MOW car type in the transition era, which I model, was the boarding bunk car (and see this post: https://modelingthesp.blogspot.com/2023/11/small-project-sp-boarding-bunk-car-pt-2.html ). There were dozens and dozens and dozens of bunk cars, and scattered among them, for obvious reasons, were cars for feeding the men: dining cars, and commissary-kitchen cars. This post is about modeling a car like that.

Among model starting points, both Train Miniature and Tyco made plastic MOW cars back in the day, and Mantua and Walthers (inheritor of the Train Miniature line) have offered them also. Of course, for SP as for most railroads, there was considerable variety in the appearance of MOW cars in any category; these were cobbled into shape in the shops in whatever way worked. 

So although good prototype photos are available, particularly in Ken Harrison’s superb book (Southern Pacific Maintenance of Way Equipment, SPH&TS, 2022), the sheer variety of prototypes means that even a commercial model isn’t too far from realism. It would challenge the memory of most of us to be certain that a pasrticular model wasn’t close to a prototype car.

Some years ago at a swap meet, I came across a Tyco MOW car, nicely modified with wire grab irons and so forth, but evidently mistreated over its life, and rather derelict. I bought it for a couple of dollars and began to study what I could do with it. It had had its vertical-wheel brake gear removed (a good idea) and some windows had been blocked, true of some prototype cars. My first step was to add a brass horizontal brake wheel on a brass wire staff, as you see below.

I also painted the broom and shovel (probably for the coal stove) with contrasting colors, to help them stand out, and I placed screen in the open window. There were no couplers on the car as I received it. I have also patched the car side (the white patch in this photo). Note also that the car should have a sill step below the side door.

You may note that this model represents a car that was converted from a double-sheathed box car. Cars of that type were not numerous on the SP, but large classes B-50-6 and B-50-9 did fit that description, and many kitchen-diner and commissary-kitchen cars were in fact converted from box cars of those classes. This is evident in the vital publication, the 1956 SPMW car roster published by the SPH&TS.

Next came lettering.Over the years, SP varied the lettering on its MOW cars, but after World War II became fairly settled. The bunk car photo below illustrates it (John Lawson photo, 1951, Wilbur C. Whittaker collection). The two “Danger” warnings, in English and Spanish, were located various places on the cars, often near the car door, and frequently arranged over-and-under, as here. The car number was always accompanied by a light weight value. Note at far end of the car there is a repack stencil, something rarely seen. The low car number has no significance, as SP repeatedly re-used MW car numbers over the years.

(This car is a former Class B-50-6 box car, converted to MW service in December 1942, and is a Boarding Bunk car, obviously different from the model I’m describing, but illustrating lettering.) 

The car shown above is riding on Vulcan trucks, widely used by SP at one time. But MOW cars exhibited a very wide variety of trucks in the 1950s, from ancient arch-bar trucks, through T-section, Vulcan and Andrews trucks, to more modern cast-steel AAR trucks. I chose to use a pair of arch-bars that were in my “surplus trucks” parts drawer. They might be Train Miniature; not sure.

 I used the new Owl Mountain decal set for MOW box cars, #1225W (W = white). The set contains very nice, clear “Danger” warnings. (For completeness, I will supply the text of these warnings: “As these cars are liable to be moved at any moment, all parties are warned against lounging or sleeping under or near them.”) The side door’s sill step has been added.

With lettering done, I needed to add couplers. The original Tyco trucks had a “Talgo” coupler attached to the truck bolster. In addition to preferring body-mounted couplers, I was discarding the trucks. So Kadee couplers in their own boxes were added.

The remaining task was to weather the car. I did this with my usual acrylic washes (for background and process description, see the “Reference pages” linked at the upper right corner of this post). These cars did get fairly dirty in service and were rarely repainted, so one can go to whatever length one wishes. We know from the SPH&TS-published MOW roster that this car, SPMW 2381, was converted to MOW service in 1942, so one could about weather as much as desired. 

Here’s the other side of the car, from that shown above.It has an open door, all right if the car is spotted somewhere, though not okay when being moved. Hanging on the car side are what appears to be a mop and a washboard. Here too, screen has been placed in two of the windows.

This has been an interesting exercise, starting with someone else’s model work (adding of wire grab irons) and completely redoing the finish, along with adding steps, lettering, and weathering. I am happy to have this car as a change for the equipment usually spotted on my layout’s outfit track.

Tony Thompson

Thursday, November 30, 2023

Stand-in head-end cars

In my layout operating sessions, I usually operate either a section of the Coast Division mail train, or a deadhead move of passenger equipment, as one of several through trains on the Southern Pacific main line. I like to vary the equipment in these consists, but not particularly being a passenger modeler, I sometimes find myself without many options. Accordingly, I have gradually accumulated some stand-in cars which look all right among their “betters.” 

One of these is a converted wartime military Pullman, modified to a baggage-express configuration, as was done by a number of railroads. It’s a model I inherited from my good friend, the late Richard Hendrickson (see my remembrance at: https://modelingthesp.blogspot.com/2014/07/in-memoriam-richard-hendrickson.html ), lettered for the Burlington. 

He modeled October of 1947, and at that time, the model’s Allied Full-Cushion trucks would still have been in service. But by my modeling year of 1953, these would have been gone. I nevertheless operate the car occasionally, just as Richard modeled it. It isn’t a stand-in for model accuracy (except for trucks), but is perhaps unlikely on the SP Coast Route, presumably representing a through load of mail or express.

An RPO car is a natural in a mail train. I have a brass RPO, correct for SP, though its trucks roll so poorly that I dislike operating it. I could of course replace the trucks. But I have an alternative. Years ago, I bought one of the Rivarossi heavyweight RPO models (described by the importer, AHM, as a “1920 Baggage P.O.”), which was lettered for Santa Fe. 

Now it was unusual for RPO cars other than than the home railroad to be seen in trains, so I simply relettered it for Southern Pacific. Its clerestory roof would make it an unusual car  in the SP fleet, but there were a few, so I chose a number near the car numbers of similar SP cars. I relied on the information in the excellent reference source, the book “Head-End Equipment,” Volume 3 in the series Southern Pacific Passenger Cars (SPH&TS, 2007). But it’s definitely a stand-in, not accurately representing any SP car.

Still another car in the stand-in category is Rapido’s recent Dark Olive Green car, representing one of the Class B-50-15 box cars converted to head-end express box car service (AAR type BX). It was shown in my post about paint schemes as SP 9008, a 1936 conversion which returned to freight service in 1943 (here’s a link: https://modelingthesp.blogspot.com/2023/08/the-rapido-sp-box-cars-models.html ).

All 472 of the SP 9000-series cars, both BX cars and “Overnight” cars, were renumbered in the early days of World War II when special freight services were cancelled nationwide. Among those were 99 head-end cars renumbered to the 5800 or 5900 series, as shown in detail in Chapter 18 of Volume 3 in the SPH&TS passenger series, mentioned two paragraphs above.

As passenger traffic declined after the war, SP decided around the end of 1948 that these B-50-15 and -16 BX cars were no longer needed in head-end service, and all were either retired or returned to freight service by the spring of 1949,  in boxcar-red paint and with their original numbers. (I know this from the SP Car Ledgers, now at CSRM.) Since I model 1953, strictly this would rule out using one of these cars on my layout.

But since I have the model, I decided to treat it as an unexpected hold-over and give it one of the 5800-series numbers. From the SPH&TS book, I chose one of the numbers in the group of BX cars assigned to the Northwestern Pacific, and knew I could use Dulux Gold car numbers from the very nice Thin Film decal set, HO 160. First, I painted out the original car number, 9008, using Star Brand Dark Olive Green (STR-29), as you see below; then I painted out most of the other small lettering on the side. 

But the car remains an anomaly historically, so the car will definitely be a stand-in. I have weathered it to get a faded look consistent with its over-long survival, and hiding paint scheme problems. Here is the car, as I occasionally operate it:

These cars, though stand-ins in various senses of the term, do add variety to my various mail and extra passenger trains. As such, they essentially expand my fleet. That was the reason to explore them in the first place.

Tony Thompson