As wiring work underneath the layout progressed from new feeders to local terminal strips near the feeders, to terminal strips adjoining the panel, I also started work on revising the panel itself. I showed in the previous post how I used a digital image of the old panel to experiment with new possibilities. Adobe Photoshop makes these kinds of changes easy, and in fact the “new” panel design shown in that previous post was soon superseded. But that’s all digital. Now for physical revision.
I removed all the existing switches from the panel and removed the panel front from the case. Then I covered the back of all the holes which were no longer going to be needed with masking tape, and filled them with Sculptamold. The Sculptamold was confined to the hole itself by the tape. Using Sculptamold is quick and easy, and although it has a bit of a rough surface when dry, I simply sanded it approximately flat and then refined the surface with Squadron Green modeler’s putty. This is the old panel, as repaired.
Holes along the bottom are for the bolts which attach the panel to hinges on the case.
Next I set up to paint the yellow parts, both repainting of old areas with repairs, and new paint for new track being added. Given that the panel surface is black, and that yellow is not the best-covering of all paints, I opted for a quick coat of gray primer first, applied only in the areas where new track had to be added. As soon as this was reasonably dry, I sprayed it with a rattle can of Testor’s Reefer Yellow. For many purposes, I distrust spray cans, but for this kind of painting, it worked fine.
Once yellow was in place over all the green “corrections” shown above, I considered just taping the entire track diagram and overspraying with black. But the complexity of that masking job was a little daunting, so I handpainted the remaining minor spots (edges of the green bits shown above) with black. Then I could proceed to mask only the new track lines, along with all other areas not to be repainted, and overspray flat black. So at this point the “new” panel looked like this, so far without labels. Holes are for switches, with some new holes yet to be drilled.
The differences from the old panel, shown at top, are evident.
My next step was to drill 1/4-inch holes for the new switch locations, then to add lettering. I laid out lettering in various colors on a black background, then printed it out on glossy stock at my local copy shop, using a high-resolution color printer. I cut out the various lettering elements, used a felt-tip pen to blacken the white edges of the paper lettering pieces, and glued them to the panel with canopy glue. You can click on this if you want to enlarge it.
Finally, the panel was protected with an overspray of clear flat.
Meanwhile, I had been fitting out my DB-25 connectors with a full set of wiring for all the connections to be made. Leads from one connector were attached to the full terminal strips near the panel, where many track leads come together. The leads in the other DB-25 were soldered to some panel switches, or attached to a terminal strip inside the panel’s case.
Once the interior soldering was completed, about 40 individual wire-to-lug joints, the DPDT switches could be re-installed in the panel front. Here is the completed panel and case.
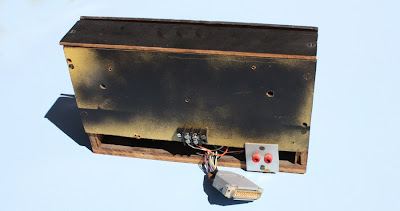
The back of the case has never been given a finish coat, and has a back face mainly for structural reasons. The DB-25 connector at bottom is the entire connection to the layout, except for the two banana-plug sockets for interchangeable power packs, whenever I choose to use a conventional DC pack for DC locomotives.
This case bolts to the shelf under my town of Shumala on the layout.
Now I was ready for a “smoke test,” connecting the panel to the layout and adding power. My electrical engineer friends have always told me how important it is to keep the smoke inside the wires and components, so I approached the next step with trepidation.
Tony Thompson


No comments:
Post a Comment