One example of how ties might be shipped is shown in an ARA diagram, from the Loading Rules book of 1926 (most diagrams remained in force for decades), page 62. It’s shown below.

Note the stack of cross-wise ties at the left end, with all other ties leaned against that pile. This arrangement would be fairly straightforward to load and unload by hand. (Of course, the 200-pound weight of a prototype tie is not easy to handle.) It is also fairly stable in the car, and won’t be seriously perturbed by draft and buff loads in transit.
I began to build a load like the one shown above by making up the pile of ties that go in the end of the car. This is of course a simple stack. I used the same Model Hobbies ties previously mentioned (see my earlier post at: https://modelingthesp.blogspot.com/2018/12/tie-piles-and-rail-racks-modeling.html ) and canopy glue. This is quick and easy.

When this pile is placed in an example gondola (here one of SP’s composite GS cars, a Red Caboose model), it fits as expected. This is how I chose the height of my pile, 6 ties high.

Then layers of ties need to be laid over the end pile. These of course hide the pile in the end, as you see in the photo below. (It could be argued that you don’t need to use ties for the end pile, since it will be hidden.) The single layer you see here is laid in loose, not glued. I intend to make both a full load and partial loads, so that I can ship both kinds (the latter would represent a load delivered in two parts to two locations).
It is an option to simply lay all the ties into the car by hand, leaving them loose, and I know a modeler who does tie loads that way. (Then, of course, it’s easy to model a partial load by just removing part of the load.) I prefer to make at least some glued layers to simplify loading the car. My method is to make up “layers” of ties by gluing 9 ties side by side for each layer. The photo below includes few loose ties for scale.

One can of course make up a few of these layers, and intersperse loose ties for flexibility. Here is a partially loaded car:

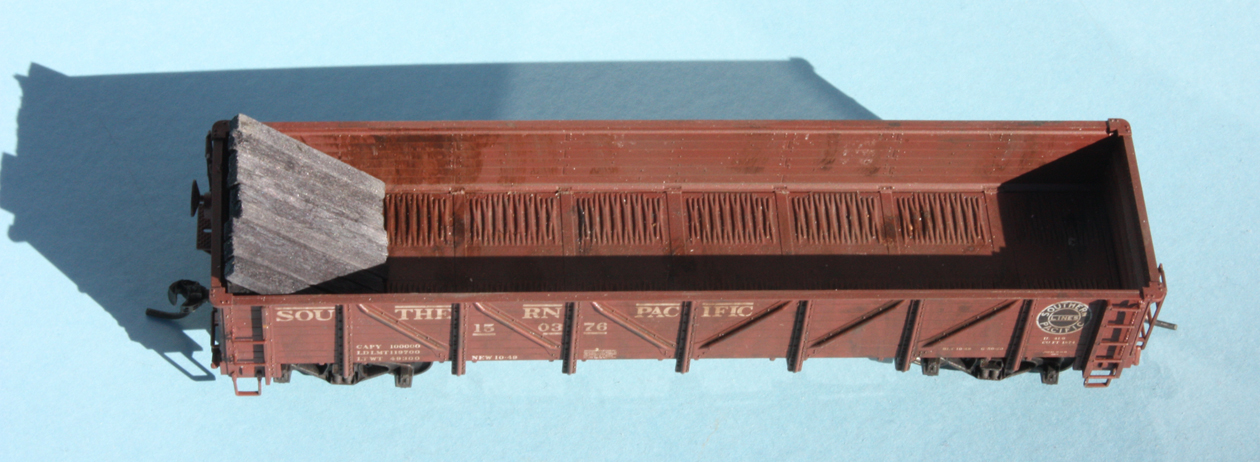
What may not be very evident above is the restraint of the tie pile. I recall seeing a photo somewhere, that showed a partial load of ties like this. The pile in one end of the car was restrained by a single tie crosswise in the car, with wooden wedges driven at each end to hold it in place. I guess a workman could just use an axe to whack a couple of wedges from a piece of scrap wood. But this indicates a way that such a load can be modeled. Looking down into the car, you can see that I just added small pieces of stripwood at each end of the crosswise tie. (You can click on the image to enlarge if you want.)

I can now make waybills to deliver loads of ties, whether partial or full loads, to my “outfit track” on the layout, where various work cars are usually spotted, and where I envision that track crews would be headquartered. This adds a little variation to the many revenue loads that get switched in an operating session.
Tony Thompson
No comments:
Post a Comment