Tuesday, September 19, 2023

A Santa Rosalia fishing boat, Part 2

In the previous post on this topic, I showed some of the prototype photos and information I had found about California coastal fishing boats as well as the fishery itself in the area of the California coast that I’m modeling, and the beginning of the assembly of a Frenchman River Models fishing boat (you can read that post at: http://modelingthesp.blogspot.com/2015/06/a-fishing-boat-for-my-santa-rosalia.html ). To see some background about the locale of my layout, you may consult a post on that subject from a number of years ago (see it at: http://modelingthesp.blogspot.com/2011/01/layout-design-locale.html ).

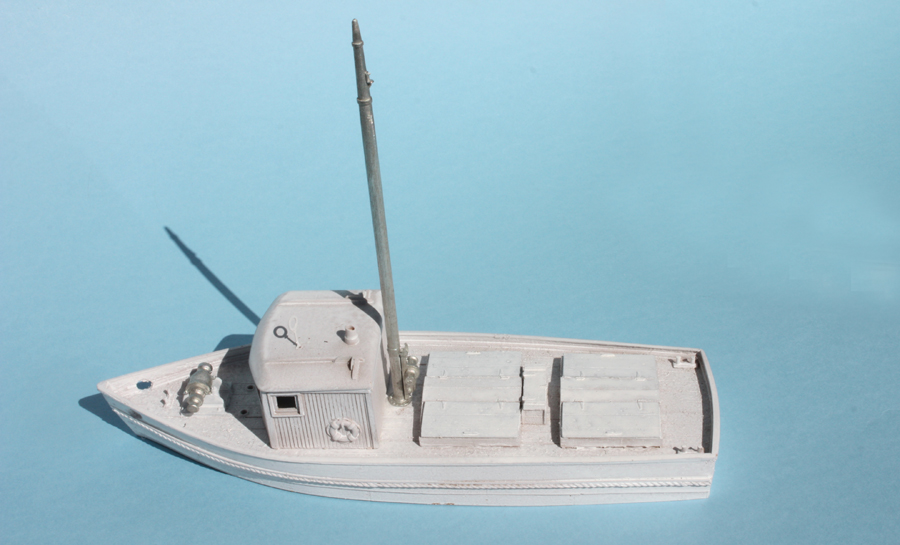
In the previous post about my fishing boat model, the basic boat was almost ready for painting. I added a few more details which ought to be the same color as the hull of the model, and spray-painted the assembly white. This will permit a lot of weathering to make the boat look well used, while preserving a very common color for boats of this kind. Here it is at this stage.  


The next assembly step was to install the mast. This was an area of concern to me in building the model, in the way the boom that attaches to the mast. I’m not an experienced ship modeler, but to me this attachment seemed to rely on a fairly small glued area. To counter any fragility there, I drilled through the mast and boom end so I could insert a brass wire of 0.028-inch diameter, which should considerably strengthen this joint. That said, I was impressed with the excellent way in which the mast inserts into the hull, very securely attached with CA.
Note that the anchor winch on the foredeck and the mast winch at the base of the mast have been set in place also, though not permanently installed. 

At this point, detailing begins to be added to the hull, so a decision needs to be made about trim colors. The Frenchman River kit illustrations show model boats with a trim color in addition to a basic gray or white body color, and most prototype California fishing boats show the same. I decided to use a medium gray, which could readily be brush painted, namely Tamiya  “Imperial Japanese Navy Gray (Kure Arsenal)”, no. XF-75, for trim.  

I began with the wheelhouse part (not yet attached to the hull), just to see how it looked. The result is below. I felt that this was about the right amount of trim color, and also felt that gray was a good background sort of color. Note that I have also started to dirty up the white color, to some extent. This will need to go further in the completed boat.

Next came the hull. Here I relied on the common appearance of boats like this, with essentially a single stripe along the hull sides. I simply masked either side of the chosen area and sprayed, using the same gray color. The result was what I had been aiming at, and the assembly now looked like this.

I haven’t decided how much rigging I want to do, for the boom and its winch. My present intent is to  minimize rigging, since the boat will be depicted moored at the dock in Santa Rosalia harbor. More on detailing in a future post.

Tony Thompson

Saturday, September 16, 2023

Route cards, Part 24: examples of route cards

 In my recent posts that are part of a series about route cards, I have been including grading cards also, as Michael Litant’s collection includes both (both can be found on route card boards and on placard boards). To see any of those previous posts, the easiest way is to use “Route cards” as the search term in the search box at right. In the present post, I continue with route cards only. 

My first example is from the Akron, Canton & Youngstown. It identifies the car as SSW 46322, a 40-foot double-door automobile car, as apparently containing plywood, and is destined to Erie, PA. The card is 4 inches square.

A second one is a card identifying a car as either just cleaned, or needing to be cleaned, at Sanford, Florida. The card isn’t identified as to issuer, and though it may be an Atlantic Coast Line card, it could also be a Fruit Growers card for servicing refrigerator cars. The card is 3 x 7.5 inches, it’s dated May 13, 1967, and the car is FGEX 38970, a 40-foot ice refrigerator car.

Third, an interesting card is this Santa Fe example, labeled as a Switch Order Card, something I haven’t seen so identified before, though many route cards are exactly that. The car is ATSF 151490 , a 50-foot single-sheathed, single-door box car (abbreviated “AT” as was common on the Santa Fe), carried sugar, and it is stamped with what appears to be a destination — it looks like “933-R,” though I don’t know what that refers to. The card is 4 inches square.

I have shown some Burlington cards before. This one evidently is an urgent card, as I would interpret the word “TIME,” and it was made out at St. Joe (presumably Missouri) for RBBX 79106. That was a 50-foot insulated box car owned by Burlington Refrigerator Express. The card’s designation  may involve a switching group (“Group Number 115”) and is headed for a junction at Sioux City. It’s 3 x 4 inches.

This larger card (3.5 x 8.5 inches) would just barely fit on a route card board, and is a transfer slip for the Central of Georgia. The car was IC 118743, a 40-foot, 50-ton box car. Much of the writing is rather faded and hard to read, but it’s intriguing that it contains considerable waybill-like information about the destination and contents of the car.

Last, I will show a small Cotton Belt card, with the railroad emblem included. It’s 3.5 inches square, and isn’t filled out, except for the number 27107 at upper right, which could be a car number. It might be logical to assume that with no reporting mark listed, it was a Cotton Belt car, but as late as 1970, there was no such car number in Official Railway Equipment Register (ORER) listings for the Cotton Belt.

Like all the prior examples of prototype route cards, I find the variety of these to be interesting and instructive about the different ways individual railroads went about routing and directing car movements. I hope to include more route cards in a future post.

Tony Thompson

Wednesday, September 13, 2023

A detail you can add to the Rapido box cars

I’ve written several pieces about the recent Southern Pacific box cars from Rapido Trains in HO scale. And while pointing out a few relatively minor issues with the cars, I have praised them in several contexts. There ended up being a series of four such posts, the fourth of which contains links to the previous three (see that post at: https://modelingthesp.blogspot.com/2023/09/the-rapido-sp-box-cars-finishing.html ).

But what I wanted to keep separate while dealing with much of the entire run from Rapido is a single detail that was omitted from some of the cars, and it’s one I always make use of. It’s the route card board. Now let me hasten to observe that when the SP Class B-50-15 and -16 cars were built, they had wood sheathing, thus route cards could be tacked anywhere on sides or doors.

But in the mid-1930s, SP began to steel-sheath some of the cars, by simply welding steel sheet inside the superstructure framing, and adding steel-sheathed doors. That naturally raised the issue of route card boards, and of course the prompt result was that route card boards were added to the steel doors. Here’s a photo to show that (photo by Robert McFarland, from Arnold Menke’s collection, taken at Bayshore in 1940).

In the photo above, there is a route card on the door’s board, but it may be hard to see. Here’s a detail of the photo above. in order to show just the door. The board is located at the end of a reinforcement strap on the surface of the door, with the card very typically tacked at an angle. And an incidental observation, for those who think it isn’t visible on models, the chain slack on the K brake cylinder linkage beneath the car.

Rapido chose to put route card boards on none of these models. They did have to produce both a wood door and a steel door, so I’m not sure why it was omitted from the steel door, but it was.

Incidentally, neither the size nor the shape of this route card board look like the “recommended standard” 5.5 x 9-inch design that was introduced in 1937. But as late as 1952, this was still not mandatory, and many prototype photos in the intervening years show that plenty of railroads used their own design of route card board. For more on this history, see my earlier post: https://modelingthesp.blogspot.com/2011/12/route-cards-6.html .

As is visible in the photos above, the SP board on these cars is a little more square than the recommended dimensions. Of course it is extremely easy to represent any size or shape of board with a small piece of styrene strip. That is what I chose to do with my Rapido box cars that had steel doors. I simply attached the strips with canopy glue, as you see below.

The new boards can then be painted and, if need be, weathered to match the rest of the car. That was my procedure, mixing paint to get close to the weathered color of cars that had already been weathered. Then I added the usual small rectangles of paper, white or a color. Here’s an example on an Overnight-assigned car from Class B-50-16:

Many modelers will overlook or not even notice the omission of the route card boards on these models of cars with steel doors, but since I put route cards on most of my freight cars, it did jump out to me as something I needed to remedy. As shown above, it’s a very easy fix.

Tony Thompson

Sunday, September 10, 2023

Small project: completing a layout structure

From time to time I like to mention modeling projects that, though quite small in scope, may be interesting to some readers for what is involved. This is another of them, this time on the layout.

I have had a packing house in my town of Ballard for some years, named Guadalupe Fruit. But I never got around to adding a roof or canopy above the door onto the loading platform. You can see that below. It just seemed to me that such protection would be wanted, both in summer sun and winter rain.

I had in mind a simple kind of canopy, and I had in the stash some very nice ribbed-seam roofing material (Builders In Scale, no. 501, looks like aluminum) which I could use for this. I chose an angle for the canopy roof to assume (by eyeball) and cut side pieces from 0.020-inch styrene sheet to shape. These were glued to the underside of the roofing material with canopy glue, with 1/8-inch square styrene blocks in the inside corners. I also added a front edge with scale 4 x 6-inch styrene strip, and a trim strip along the upper edge with scale 1 x 6-inch styrene.

[I will avoid any jokes about the fact that “canopy glue,” named for model aircraft canopies, is here being used to assemble a canopy over a building doorway. The names are the names. I hope there is no confusion.]

Although this kind of metal roofing is often galvanized and can be left unpainted, I decided it would likely have been painted the same color as the building. I used the original color of the building, Testor’s “Flat Aircraft Light Gray” (no. 1233). 

I decided that the canopy roof should show dirt and weather, so used Pan Pastel weathering materials, which is a quick and convenient process. I included a little rust staining. (For some reason, the weathering looks exaggerated in the photo below.)

With that done, it was easy to attach the new canopy to the building. Like nearly all the buildings on my layout, the structure for Guadalupe Fruit is not attached permanently, but is only set in place. So I could turn the building up on end and allow gravity to hold the canopy in position while the canopy glue was setting, as you see below, right on the layout.

Finally, of course, with the glue fully set, the building could be returned to its normal position on the layout, and the small project was complete. 

The need for some sort of canopy on this building has been a kind of low-level annoyance for me in the layout room for years. I finally got focused on actually scratching that itch.

Tony Thompson

Thursday, September 7, 2023

The new Tangent SP box cars: using undecs

A short while ago, I posted a review of the new Southern Pacific postwar 40-foot box cars produced by Tangent Scale Models, SP classes B-50-28 through B-50-33, except for the 50-foot cars of Class B-50-30. Several interesting combinations of car specialties (doors, running boards, hand brakes) are offered in ready-to-run form, fully lettered. (Here’s a link to my post: https://modelingthesp.blogspot.com/2023/08/the-new-tangent-sp-box-cars.html .) But there are also undecorated cars offered, one in each of the three door styles, but otherwise complete. I chose to buy two of them. 

One motivation for deciding to do some lettering of  my choice is an excellent set of decals for these cars, specially produced exactly for these car classes. They are produced by Daniel Kohlberg, whose line can be seen at: http://www.icgdecals.com ; and Dan can be reached, if need be, via dan@icgdecals.com . This enables you to either add to the choices of road numbers for a particular class, or choose to letter for a class not offered by Tangent.

Here is one of the undecorated models, the Youngstown door version. It has an Apex running board and Miner brake gear. As such, it matches some of the SP Class B-50-29 and -31 cars. My plan was to choose combinations of door and running board that are suitable for particular classes, and replace brake gear if necessary.

The car has a fairly glossy finish, perfect for me to just go ahead and add the nice decals. And they really are nice, obviously laid out by a modeler who knows what’s involved in decal lettering placement. Essentially everything needed is correctly arranged.

For my first car, I chose the car number SP 103984, which is on the decal sheet. This matches with SP Class B-50-29, and as is readily discovered in my book about SP box cars, Volume 4 in the series, Southern Pacific Freight Cars (Signature Press, revised edition, 2014), specifically Table 12-3 on page 312, we know all the specialties. 

This car, SP 103984, was one of 500 cars assembled from commercial parts by the SP Equipment Company at Sacramento General Shops, had Ajax handbrakes, Apex steel running boards, ASF A-3 trucks, and Youngstown corrugated doors. The model matches, except for having a Miner brake wheel. I replaced it with one of the fine Kadee Ajax brake wheels. Here it is, lettered with the fine Kohlberg decals.

The second car reflects my desire to include one of the cars with a panel door. SP did build some cars in this 9500-car group with Superior panel doors, both 7-panel doors for Pacific Lines and 5-panel doors for T&NO. Tangent has modeled both of these panel doors. My choice, of course, was a 7-panel door to letter as a Pacific Lines car.

Here the choices were to do a different car class from the B-50-28 and -29 cars I already had, including a resin B-50-29 from Sunshine Models, or to make sure I had a different number series from what was already in my fleet. I chose the latter approach, and decided to letter one of the B-50-29 cars built by Pullman-Standard with a 105000-series number. 

Here’s the result. Note that I included the Pullman-Standard builder emblem, as this car was built there. The car also carries the wide-spaced car number applied by Pullman-Standard, not SP practice but not replaced until cars were repainted. The Kohlberg decals provide this. Lastly, I’ll mention the repacking stencil, taken from the Sunshine “Western Reweigh and Repack Data” decal sheet.

Next came weathering. Since these are cars that were built in the few years prior to my modeling year of 1953, I really only wanted a “haze” of dirt, and only added a few chalk marks (and dirtied up the rather red truck frames). Route cards, of course, would have been applied throughout the life of the car, so would certainly be present.

I am glad to have these fine Tangent models, reproducing the most recent boxcars on the SP at the time I model, and am delighted with the ease of lettering the Tangent undecorated cars with the decals from Dan Kohlberg. The cars are on the layout already.

Tony Thompson

Monday, September 4, 2023

Route cards, Part 23: varieties of grading cards

 In the present post, I return to the subject of small cards tacked or stapled to freight car notice boards, whether placard boards or route card boards, but in this case clearly intended to reflect a car’s interior inspection and grading. You can see my previous post about grading cards at this link: https://modelingthesp.blogspot.com/2023/08/route-cards-part-20-more-grading-cards.html . 

I’ll begin with a straightforward two-sided card, from the Seaboard. It’s 4 x 5.5 inches, and interestingly only provides for grades A or B. The car mentioned is SAL 16094, a 50-foot, single-door box car.

But many grading cards, as visible in previous posts of mine on this topic, can be quite a bit more complex. Here is an interesting card from the Maine Central, one-sided but with a full range of possible grading levels expressed. It is octagonal, just under 5 inches square over parallel sides. I show it upright, but note that the chosen grade, for roll paper, in car MEC 9248 (a 50-foot, single-door box car), is at an angle (that side could be attached as the upright side). Date is June 3, 1965.

A much more complex example of the same sort of card is this one from the Santa Fe. It appears to have been intended to be octagonal, like the card above, but was trimmed a little wrong. One side, at left below, shows color coding for what were presumable common cargoes. On the reverse are actual grading letters, but these seem not to exactly correspond with the colored side. This one too is about 5 inches over parallel sides, just fitting on a route card board.

But the octagon is not the limit of card designs with other than four sides. Here is a really distinctive one, not only triangular but pink in color. This design of course accommodates six grades, evidently sub-grades of A on one side, and of G on the other side. Neither railroad nor location is printed on the form, but the rubber stamp, below left, reads “A.G.S.,” possibly Alabama Great Southern, a long-time component of the Southern Railway. Date is Dec. 20, 1972. It is 5 inches high.


And an interesting variation on the multiple grades in use is this card from the  Missouri Pacific, with one side showing seven grades (and a blank space if none of those grades would apply, as was done here). More striking is the other side, with a huge letter “U” to designate “unfit for loading.” It is 5.5 inches square. It is filled out for car T&P 257991, “OK for lead loading at Glover.”

Finally,  another of the cards showing definitions in some detail of what each grade comprised, an Atlantic Coast Line card, 5 inches square. The car noted, given grade D, was NYC 75789, a 50-foot, double-door box car, on September 27, 1965, at South Rocky Mount, N.C. Note that it had been folded so that the side with grade D was outermost.

The variety of card designs and amounts of information on each are certainly interesting, and a fascinating window into 1960s management of freight car grading and movement.

Tony Thompson

Friday, September 1, 2023

The Rapido SP box cars: finishing

As most readers know, Rapido Trains recently released a number of paint schemes on a new HO scale model of Southern Pacific Class B-50-15 box cars, and a quite good stand-in for Class B-50-16. I have posted the historical background of these two classes to help understand the model choices (see that post at: https://modelingthesp.blogspot.com/2023/07/the-new-rapido-sp-box-cars.html ), and have also shown most of the paint schemes offered (that post is here: https://modelingthesp.blogspot.com/2023/08/the-rapido-sp-box-cars-models.html ). 

[By the way, I also wrote a response to some of the criticism of these models, in a previous post. It is at this link: https://modelingthesp.blogspot.com/2023/08/standards-for-commercial-freight-cars.html .]

The present post takes its title, “Finishing,” from a remark of Richard Hendrickson’s from some years ago, speaking about “ready-to-run” models: he felt these should really be called “ready to finish.” They may need details replaced or upgraded, trucks may need to be changed, and of course the models almost always need weathering and other finishing, such as reweigh and repack stencils, chalk marks, and route cards.

One example of a “finishing” step is to correct the brake gear, if your particular modeling period is such that the K brakes on some of the Rapido models should have been replaced with AB brakes by the time you model. I wrote about this fairly simple process, using the AB brake parts helpfully provided by Rapido in many of the model boxes (a post that is located at: https://modelingthesp.blogspot.com/2023/08/the-rapido-sp-box-cars-brake-gear.html ).

Now let’s turn to weathering and its accompanying steps. These are procedures I have already described in some detail in my “Reference pages,” linked at the upper right corner of every post, and I won’t directly repeat that material; but I thought I would take space to at least outline my process with the Rapido models under discussion.

My first step (after any detail replacement or truck changes) is to weather the roof with washes made from acrylic tube paints. You see this below on a maintenance-scheme Rapido car. I do it this way because it is easy to work on the roof with the sides available for holding the model. You can see that the roof is duller in color, with gray tones.

The next step is to hold the car by roof and center sill (or trucks) and weather sides and ends. After a few hours (if it’s warm) to get fully dry, I give the car an overspray of Dullcote or equivalent. Actually I nowadays usually prefer Tamiya’s “Flat Clear,” number TS-80.

When that’s dry, protecting the acrylic pigment on the car, I add small patches of Glosscote from a bottle, only as big as the paint patches would be, for new repack and reweigh stencils. Then patches of black or boxcar red decal are placed. These are visible below in the usual locations (you can click on the image to enlarge it, if you like). I chose black for the repacking stencil location because some rather minor yards did repack journals if needed, and often had only one color of paint to patch with: black.

[Note also in the above view that the plain metal wheel faces have been painted, in this case Tamiya “German Gray,” XF-63. Wheels in this era were liberally coated with journal oil soon after entering service, and this color, or a darker gray, gives a realistic look.]

Once the paint patches are placed, the stencils can be added. For repacking, I use the Sunshine Models “Western Reweigh and Repack Data” decal sheet. For SP reweigh dates and symbols, I use the Tichy decal set, HO 10053, which is for SP tank cars (using artwork I prepared), but it also includes many SP reweigh locations and dates from 1950 to 1953. Those locations range from the most familiar (SAC, LA, OAK, ELP) to the less familiar (FRN, Fresno; BS, Bayshore; EGN, Eugene) and even to the rare and unfamiliar (KF, Klamath Falls; AVD, Avondale; CKT, Crockett). For this car, it’s BAK (Bakersfield).

You may note that I added a couple of route cards to this side of the car, something fairly often observed in prototype photos. One of them is light green, inspired by an SP route card shown in one of my recent posts about route cards (you can peruse it at: https://modelingthesp.blogspot.com/2023/08/route-cards-part-21-more-examples.html ). 

On a wood-sheathed car like this, a route card could be attached wherever the clerk wanted to put it, but two common locations were above the truck  bolster (as you see above), or just to the left of the door. I have applied route cards in both locations on my various wood-sheathed cars. 

For an additional example, here is a Class B-50-15 Rapido car, weathered and prepared exactly like the foregoing model, and carrying a reweigh location of Bayshore, to supersede the unlikely factory reweigh date of 1936 on a post-1946 paint scheme.

The chalk marks seen on both cars above were made with Prismacolor artist’s pencils, both white and French gray 30%. I used to make mostly readable numbers (implying train numbers, etc.) but so many prototype photos show smaller writing, that now I just make a small scribble for most of the marks. I’ve learned that the pencils need frequent sharpening to write truly small scribbles.

This brief summary is, as stated at the top of this post, just a small part of all the detail about weathering presented in my “Reference pages,” linked at the top right corner of every post. If you are interested in more info, please look there. For now, I am pleased with how these new Rapido box cars are turning out.

Tony Thompson