Wednesday, January 30, 2013

The Shumala extension -- Part 2

In the previous post with this title, I briefly described construction of an extension of my layout to enlarge the town of Shumala (see: http://modelingthesp.blogspot.com/2012/11/the-shumala-extension.html ). In the present post, I address tracklaying and electrics.
     In the previous post, it could be seen that the track into the extension area has to curve to the left. I also wanted to have two industrial tracks. The obvious way to accomplish this efficiently is with a curved turnout. I chose a Peco “Setrack” turnout for this location, because it has a true curve through both legs of the switch, as well as having sufficient curvature. Peco trackwork also has a good reputation for being well-built and dependable. I used their model ST-245, an “Insulfrog” turnout, which means that it is an “all-live” arrangement, rather than power-routing, and the frog does not have to be gapped, as in a power-routing turnout. Your hobby shop probably carries Peco, but if not, they can be obtained direct from Walthers or other on-line hobby merchants. For more on the fine Peco line of turnouts, you can visit their site at http://www.peco-uk.com/ , or you can get a convenient summary of data on the entire range of Peco turnouts (all scales and gauges) at this Australian site: http://www.rmcq.mixedpk.com/worksheets/peco_turnout_dimensions.pdf .
     In the table just cited, you will see, among other things, that the Setrack ST-245 double-curved turnout has an 11.25-degree frog angle, which is equivalent to a Number 5 turnout, which I have tried to maintain as a minimum on my layout.
     When installed, it looked like this.


     As I always do in preparing a new area to be scenicked, before laying track, I painted the baseboard area a medium brown. There have been recommendations in some published articles by modelers to use a beige or tan color, but my experience has been that any chip or scratch in the scenic material revealing such a color really stands out, much more so than use of a medium to dark brown. I like a Rust-Oleum color called “Nutmeg,” which is water-based and available in small cans. Here’s a view of the extension area after painting. At upper right will be the rise of a hill, so I didn’t need to color that area.


     Next I carried on with tracklaying. This is all flex track, with rails prepainted Floquil “Rail Brown,” which later will receive additional color variation.


     The “all-live” Peco turnout leading into the area meant that all rails are powered from the turnout, but I added feeders partway along these long industrial tracks, to ensure good electrical supply.
     This concludes what I want to summarize in this post about work on the Shumala extension. I already have structures underway to use here, one of which will be the packing shed kit which was described earlier (at: http://modelingthesp.blogspot.com/2013/01/a-packing-shed-for-shumala.html ), and I will probably post more about them as work progresses.
Tony Thompson

Monday, January 28, 2013

Prototype Rails at Cocoa Beach, 2013 -- Part 2

In my initial post about the Cocoa Beach meeting this year (view it at: http://modelingthesp.blogspot.com/2013/01/prototype-rails-at-cocoa-beach-2013.html ) I commented about clinic presentations and some of the social aspects. In this post and in another post to follow, I want to say something about the outstanding model display, held in the hotel ballroom. These have been a feature of this meeting from its beginning over ten years ago, and hundreds of outstanding models of various eras continue to be shown, year after year. But I should also mention that a number of manufacturers, large and small, also display in the same room. That makes the ballroom quite a center for social activity as people circulate among all the fascinating tables. Here is a general view, with meeting stalwart Marty Megregian at lower right.


     Among the faithful manufacturers who come to this meeting is InterMountain, and they always show forthcoming models along with a selection of recent products. Seated at left with his laptop is Frank Angstead, IM’s president. At right front of the display is the forthcoming offset hopper car in HO scale.


     Smaller manufacturers are especially interesting, since many of them are not well known to a lot of modelers. These usually include Southern Car & Foundry, Rail Shop, Rapido, Archer Transfers (makers of the famous decal rivets), ExactRail, and Funaro & Camerlengo. Here is part of the F&C display, with Sharon Camerlengo in the right background.


     I will just include a few model displays in this post. I was intrigued by the outstanding model car graffiti by Thoroughbred Railroad Models, accurately duplicating prototype cars, as was evident since each model was accompanied by a prototype photo. I have commented previously that I believe modern modelers who omit graffiti from their freight cars are distorting reality (the post is at this link: http://modelingthesp.blogspot.com/2013/01/graffiti-for-modern-freight-cars.html ). Here is an overview of the Thoroughbred display (you may click to enlarge):


One example of a nicely duplicated, complex prototype is this one; the same model is visible in the upper right corner of the photo above.


     This concludes what I wanted to say in this post about one of my favorite meetings of any year.
Tony Thompson

Thursday, January 24, 2013

Rust, Part 3 -- open car interiors

My original post on this topic described how prototype rust looks, including its typical colors, and how I believe it can be modeled effectively; here is a link: http://modelingthesp.blogspot.com/2012/12/rust.html . The second post concentrated on car roofs and paint failure, and was really more about rust being prevented by galvanized roofing than about rust. It is available at: http://modelingthesp.blogspot.com/2013/01/rust-part-2-car-roofs.html .
     One important freight car location where rust is sure to appear is inside steel gondolas. Gondolas can take a lot of abuse in loading and unloading, and often side sheets, ends, top chords and floors all show dents and scrapes. These naturally damage the paint layer and allow access of moisture in the environment to reach the steel material of the car body, and pretty soon you have rust.
     Here again, as explained in the first post on this topic (link provided above), the sequence as time passes is yellow rust, red-orange rust, and last, brown rust. Portrayal of rust on freight cars thus requires the modeler to decide whether it is old or new rust, or a combination. For these colors, I use artist’s acrylics. For dark brown, I use Burnt Umber; the reddish color is Burnt Sienna, and the yellow is Raw Sienna. These can be applied as either a wash or in blotchy patches. Since they are water-based, you can simply rinse off any effects that don’t go the way you want (I’ve done that many times), and try again. Just remember to do the rinse fairly promptly, since once the paint sets up, it is no longer very sensitive to water. And acrylics do dry quickly.
     For a first example, here is the EJ&E gondola I mentioned in a previous post about route card boards. If you wish, you can see that prior post at: http://modelingthesp.blogspot.com/2011/12/route-cards-5.html . It is a modifed Athearn gondola, with a wood floor (scribed styrene) and rivet-impressed styrene liners to provide the interior rivets on the side walls. I have applied general rust colors, along with linear rust marks to indicate scrapes or scratches of the interior. This photo is from the left side of the car. Note that some rust staining has extended onto the floor.


From the right side of the car, the other interior side can be seen. In this view, some scraps of wood dunnage can be seen, which were left from the previous load.


     Another technique, especially appropriate for cars that often carry bulk cargoes, such as drop-bottom or GS gondolas, and open-top hoppers, is the yellowish rust that forms on relatively clean steel. Every time a load of coal, sand, ballast or other such cargo is loaded, then unloaded, much of the interior, especially floors or slope sheets, is scoured clean of dirt and old rust. In the presence of moisture, that steel surface will again start to rust with a yellow film. Here is a GS gondola model which attempts to depict this situation. This SP Class G-50-15 car is from a Detail Associates kit.


     Heavier rust, as old paint damage areas continue to darken with time, is shown by dark brown colors only. Here is another SP gondola, Class G-50-13, built from a Speedwitch resin kit, showing that appearance.


     These are some of my efforts to show heavier rust areas, and I am always trying anew to do this better. As with so many modeling topics, a big benefit is to look at the prototype, get photos if possible, and try and duplicate what you see.
Tony Thompson

Saturday, January 19, 2013

A packing shed for Shumala

I have long intended to add a packing shed to Shumala, inspired by the existing shed of Phelan and Taylor at Oceano (you can see its present state at: http://modelingthesp.blogspot.com/2012/11/visiting-area-you-model-part-2.html ). When my layout was in Pittsburgh, PA, I used a simple, undecorated cardboard box to stand in for this shed, at what was then the town of Jalama. But with work underway on the addition of my “Shumala extension,” as I described in a prior post (http://modelingthesp.blogspot.com/2012/11/the-shumala-extension.html ), it was time to consider a proper shed model.
     I have admired the Showcase Miniatures model of the San Fernando Lemon Association packing shed at San Fernando, California, for some time, kit 2009X. You can see information and a photo of the model at their web site: http://www.showcaseminiatures.com/smph.html . I went ahead and purchased this kit, which is the by-now-familiar laser-cut wood design, with parts engineered to fit together neatly.  Here are a couple of the sections with parts pre-cut. The windows are at lower right.


     One can begin such a kit by painting the exterior side of all parts the desired body color, in my case white. But because I was also going to paint the trim boards at building corners the same color as the body of the structure, it made more sense to assemble the body part-way before painting. The same point can be made for this particular kit because of the way the freight doors are set back into the wall thickness—best to paint the whole thing at one time.
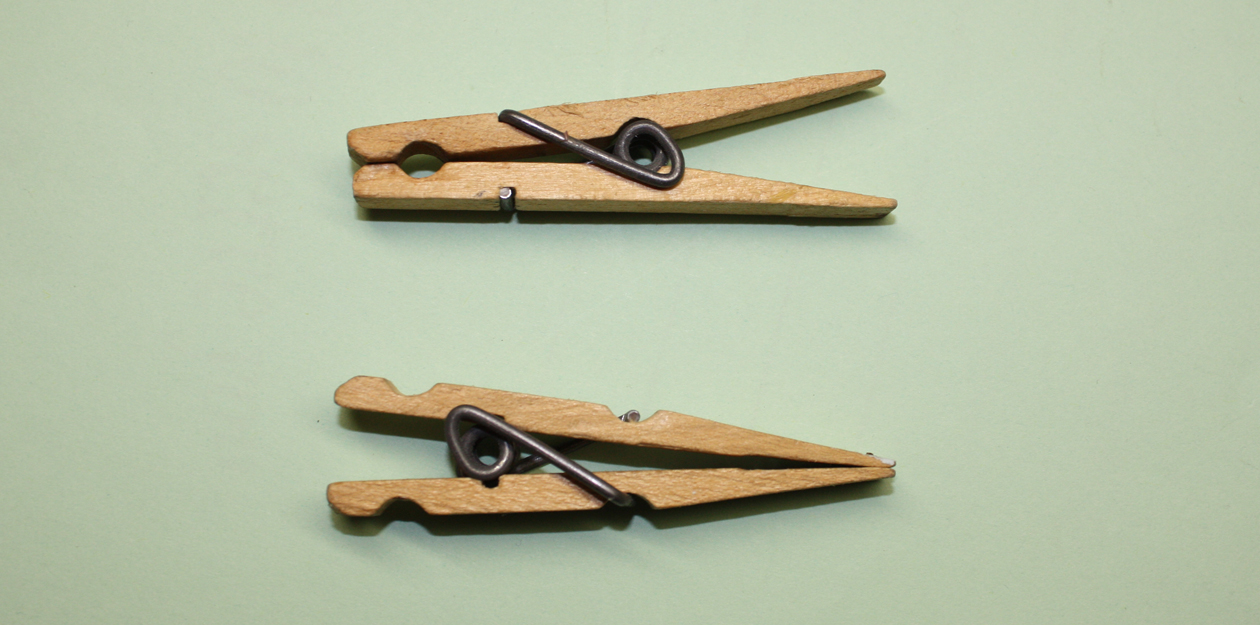
     I like to use yellow carpenter’s glue for the main structural parts of a wood building like this, and use heavier pieces inside the corners to strengthen them and keep them square. My favorite clamps for this kind of assembly are old wooden clothes pins, with the sides reversed to make a kind of parallel clamp.


I used these kinds of clamps to attach corner strips on the inside of each corner, looking something like this, using scale 8 x 14-inch stripwood.


The structure assembly is continuing, and I will report further on it as I reach milestones in the process.
Tony Thompson

Wednesday, January 16, 2013

Prototype Rails at Cocoa Beach, 2013

This meeting, which began about ten years ago under the leadership of Mike Brock, and continues to be a strong gathering each January, was once again held at the Hilton Hotel in Cocoa Beach, Florida. Mike is the leader and main organizer, but he has major help from his committee, particularly Marty Megregian and Jeff Aley. To read more, you can visit the convention’s web site at: http://prototyperails.com/ .
     A core part of the meeting is the clinic program, spread over two days, Friday and Saturday, with a few clinics on the preceding Thursday night. This year’s program was varied and strong, as it usually is. One cannot, of course, give any idea of these talks with photos, but I will show a couple. First, a typical clinic room, with Frank Peacock just getting set up to present his talk on freight car consists, drawn from conductor time books for the Oregon Short Line. That’s Frank on the left, with Richard Hendrickson on the right.


     A second talk involved a very challenging problem in reaching the audience. Ken Tendick offered a two-part clinic on building a resin kit, which he did on a table in front of the room. Of course only those in the front row seats would really get a decent view of what he was doing, so a video camera was used to feed the room projector, and a substantially enlarged view of Ken’s hands and the model work was readily visible. This arrangement is not easy to photograph, but this image gives some idea of how it looked from my seat, ten or so rows back.


I believe the audience really did get to see what was going on, and hopefully at least a few realized that resin kits are not an impossible challenge, as Ken worked steadily along and clearly showed that each step is pretty straightforward.
     A tradition of eight or so years at Prototype Rails is the “Shake ’n’ Take” session, with a pre-selected kitbash model chosen each year, and with the generosity of some manufacturers, especially Accurail, and the inspired leadership of Greg Martin, this has been an ongoing success. This year it is a 37-foot National Car Company meat reefer, which will be made by cutting down an Accurail wood reefer. Likely I will be reporting on my own progress with this project. Here is a photo of Greg kicking off the session (facing the audience, near the screen), with the back of Roger Hinman’s head nearest the camera, just left of center.


For one example of a “Shake ’n’ Take” car project, you can read my post about one of the cars, at: http://modelingthesp.blogspot.com/2012/07/shake-n-take-kcs-rebuilt-box-car.html .
     Naturally everything is not entirely serious, and a now-established tradition is a visit to Roberto’s “Little Havana” Cuban restaurant, just a couple of miles away.


Several of us made a point of heading off to Roberto’s for dinner on two nights, and there are those in the crowd who actually eat three meals a day there, to enjoy even more of Roberto’s outstanding presentation of a distinctive cuisine. Here are some of us on one of the nights. From near left, they are Larry Kline, me, Richard Hendrickson, Dave Hussey, Lindsay Raley, and Bruce Smith. Several of us, naturally, are wearing our Friends of the Freight Car red shirts. If you don’t already know about these, I’ve written a brief history, available at: http://modelingthesp.blogspot.com/2011/10/friends-of-freight-car.html .


Well, that’s one part of the story of the Cocoa Beach meeting. I will say something more extensive about the model displays in a following post.
Tony Thompson

Monday, January 14, 2013

Traveling with or shipping models


I have been asked how one can manage to take models to meetings that require air travel, or how one would safely ship a model. Brass models of course have good protective foam and sturdy boxes, at least when new, and are usually wrapped in a sheet of plastic, and sometimes also a sheet of tissue paper. But what about other models? I have indeed taken models from California to such locations as Naperville, Illinois and Cocoa Beach, Florida, with total safety and with no security hassles, and I will describe what I do.
     The plastic sheet that wraps a brass model serves an important function. It exerts very low friction on its contents, so having the first layer in any protective shipping be plastic is a good idea. For freight cars, i just use sandwich bags (we usually use the Baggie brand), one per car unless it's a 50-foot or longer car, which may then need two bags, one on each end. I cannot overemphasize that this is very effective. It prevents snagging any projecting parts on foam or paper cushioning, and as I said, is low friction, so that outermost parts like grab irons don’t get the paint worn off by vibration in travel. 
     Here is a photo. A 40-foot car fits diagonally into one of these bags. This is the KCS box car (see my model description at: http://modelingthesp.blogspot.com/2012/07/shake-n-take-kcs-rebuilt-box-car.html ), which I took to Cocoa Beach last week. 


     Then I use a suitable size box, often an old kit box. I line it with a crumpled paper towel and experiment with how the bagged car fits. I may then just fill any open areas with facial tissue (Kleenex or equivalent), and sometimes add a tissue wrap to the bagged car also. The wheel side doesn’t need the same padded protection.


     Add a single sheet of tissue atop the car, and the box can be closed. I always am careful to keep track of how the car sits in the box, and put on the lid so it is “right side up,” by which I mean the “top” of the box front corresponds to the top of the car, as shown by this alignment. This is not important for shipping, but can be important for air travel, as explained in a moment.
     I then place the box in my carry-on luggage so that the car will lie on its side when going through the airport X-ray machine. That does two things: makes the model wheels visible and puts the car in side view, which helps the X-ray examiner to realize it is a model train. You want them to recognize it correctly. I have not had any trouble with the security folks when traveling with models in this fashion.


Note that the handle end of this wheeled suitcase is at the left, which corresponds to the top of the boxes, so that the bottom or wheel side of the model will be at the bottom when the suitcase is being moved with its handle. And the cars lie flat for the X-ray, since the view shown above is what the X-ray sees.
     For shipping, for example by U.S. mail or a package service such as UPS, I like to surround the completed kit-box assembly with more packing which absorbs energy and motion, such as lightly crumpled newspaper. This means that any shocks to the package, such as dropping it, moves each successive inner part a smaller and smaller amount because energy is absorbed in the surrounding packing. I have sent a number of completed cars considerable distances by U.S. mail with no damage by this method.
Tony Thompson

Saturday, January 12, 2013

Graffiti for modern freight cars

There are times I wish I modeled modern freight cars. Many of them, to be sure, are bland and boring, compared to the transition era, but others are quite interesting, such as cars which have changed ownership (sometimes more than once) and thus carry patched and revised lettering. And deterioration due to rust is often more vivid nowadays, offering additional opportunities for creative weathering.
     One aspect I happen to like—in some cases—is the presence of artistic graffiti. Note I said “artistic,” since tags and scrawls don’t interest me, but creative and colorful artists’ work does. And freight car graffiti are simply a fact of modern life, which if ignored simply makes models look less realistic. A modern freight car free of graffiti is kind of like a transition-era freight car without weathering. Of course I know that many modelers (and railroaders, for that matter) hate graffiti and view it as vandalism. But as I say, it happens to be reality.
     It may come as a surprise to those who dislike this topic, but there are actually books about railroad car graffiti. One I own, and have found to be fascinating reading, is the book Freight Train Graffiti, by Roger Gastman, Darin Rowland, and Ian Sattler (Abrams, New York, 2006). I took a university class in typography a few years ago, and my assigned term project was exploration of lettering and character styles in graffiti, so I chose railroad car graffiti. It turned out to be an interesting and revealing experience.
     For those who wish they could have more realistic graffiti on modern freight cars, Microscale has just released a new decal set, 1364, for both HO and N scales (as usual, 87-1364 for HO, 60-1364 for N). It has a great assortment of styles, even including tags if you want to add them:


Here’s the Microscale web site link: http://www.microscale.com/Merchant2/merchant.mvc?Screen=PROD&Product_Code=87-1364&Category_Code=NEWRLS&Product_Count=0
     One thing I learned from the Freight Train Graffiti book is that graffiti styles are regional, so a particular style for one area might be uncommon in an area far from there. But since many freight cars still go everywhere, there probably are no “wrong” graffiti.
     I always itch to model a modern car or two, and add some of these spectacular graffiti to them, for the sheer realism if nothing else, but certainly for the art and drama. I think some of these graffiti are actually pretty neat. For some, it may even be fun to display such a model, if for no other reason than to annoy the modelers who want to revise reality in their own modeling.
Tony Thompson